
Djangoでチャットアプリを開発するレシピ(Part1)

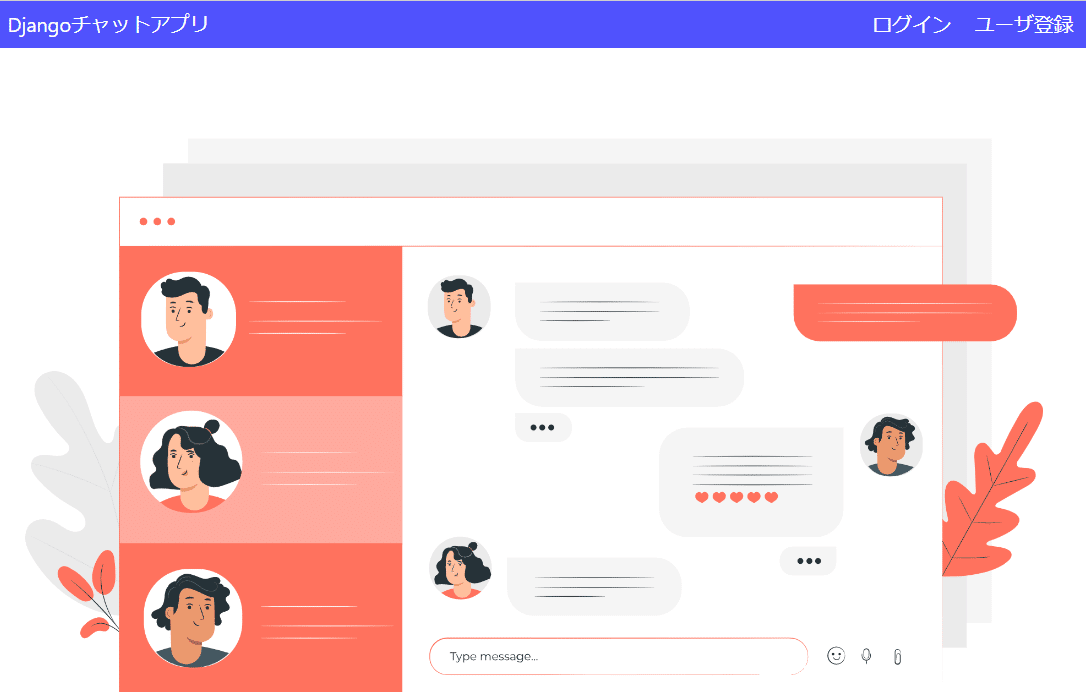
このレシピではDjangoで以下のようなチャットアプリを構築する方法を学ぶことができます。
※Django、DRF(Django REST framework)、JavaScriptの構成で開発を行います。

このレシピは全体で3つのパート(記事)で構成されています。
Part1:認証機能の実装
Part2:ユーザ検索と追加機能の実装
Part3:チャット機能の実装
この記事(Part1)では、Djangoプロジェクト、アプリケーションの作成とユーザ認証機能の実装まで行います。
具体的なチャット機能の開発はPart2以降で行っていきます。
対象者
このノートは以下のような方にお勧めです。
Djangoチュートリアルを終えて基礎がある程度理解できている方
JavaScriptの基礎構文が理解できてる方
Djangoでチャットアプリの作り方を知りたい方
Djangoで非同期処理の実装方法を学びたい方
ソースコードについて
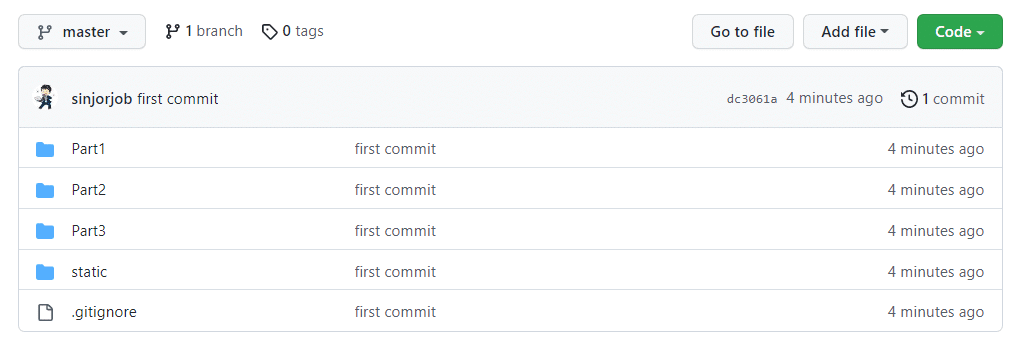
この教材で開発するソースコードは以下のGithubリポジトリに登録されています。
以下の通り各パート(Part1~3)が完了した時点の完成形のソースコードをフォルダ分けして格納してあります。
必要に応じてご利用ください。
1.事前準備
まず、開発に必要な事前準備を行います。
以下のような構成で仮想環境の作成、Djangoプロジェクトの作成、アプリケーションの作成まで行いましょう。
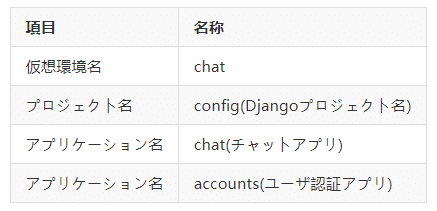
任意のディレクトリ上で以下のコマンドを実行して、アプリケーション作成まで完了させてください。
仮想環境の作成とアクティベート
python -m venv chat
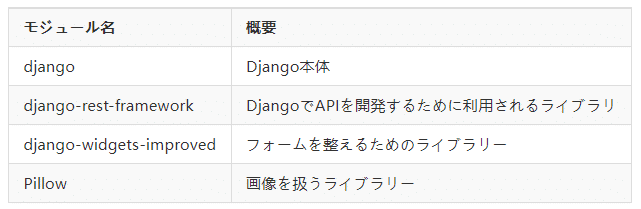
chat\scripts\activate次に、今回利用するモジュール群をインストールします。
pip install django django-rest-framework django-widgets-improved Pillow以下のモジュールをインストールします。
Djangoプロジェクトの作成
以下のコマンドを実行してプロジェクトを作成します。
django-admin startproject config .アプリケーションの作成
次に、以下のコマンドを実行して2つのアプリケーションを作成します。
python manage.py startapp chat
python manage.py startapp accountschatはチャット用のアプリケーション、accountsはユーザ認証用のアプリケーションです。
作成したアプリケーションを認識させるためにconfig/settings.pyのINSTALLED_APPSにエントリーを追加します。
'widget_tweaks'はフォームを整えるためのライブラリーです。
INSTALLED_APPS = [
    'django.contrib.admin',
    'django.contrib.auth',
    'django.contrib.contenttypes',
    'django.contrib.sessions',
    'django.contrib.messages',
    'django.contrib.staticfiles',
    'chat.apps.ChatConfig',    #追加
    'accounts.apps.AccountsConfig',   #追加
    'widget_tweaks',    #追加
]また日本語にするためconfig\settings.pyの言語とタイムゾーンを以下の通り変更しておきます。
LANGUAGE_CODE = 'ja'

TIME_ZONE = 'Asia/Tokyo'
以上で、基本設定は完了です。
2.ユーザ認証機能の実装
まず最初にユーザ認証機能を実装します。
Djangoの標準では「ユーザ名+パスワード」認証がデフォルトです。
ここでは、「メールアドレス+パスワード」形式の認証を実装することにします。
カスタムユーザモデルを定義する必要がありますが、今回はDjangoのAbstractUserを承継してカスタムユーザを定義することとします。
ちなみに、DjangoでCustom User Modelを実装する方法はAbstractUserを利用する方法とAbstractBaseUserを利用する方法の2つがあります。
2つの違いを簡単にまとめると以下の通りです。

どちらのケースでも、標準でユーザ名+パスワード認証になってるので、メールアドレス+パスワードにしたい場合はカスタマイズが必要です。
それでは、カスタムユーザモデルの実装に移りましょう。
accounts\models.pyに以下の通りCustomUserクラスを定義します。
from django.db import models
from django.contrib.auth.models import AbstractUser, UserManager


class CustomUser(AbstractUser, UserManager):

    email = models.EmailField(verbose_name="メールアドレス", unique=True, blank=False, null=False)  #emailを必須&ユニークに設定
    thumbnail = models.ImageField(upload_to="images/thumbnail/", verbose_name="サムネイル", blank=True, null=True)
    USERNAME_FIELD = 'email'   #ログオンIDをユーザ名→Emailへ変更
    REQUIRED_FIELDS = ['username']       #ユーザーを作成するために必要なキーを指定

    def __str__(self):
return self.emailAbstractUserとUserManagerを承継して「メールアドレス+パスワード」形式でログオンするCustomUserクラスを定義します。
UserManagerは通常のユーザ作成や管理者ユーザ作成等のメソッドを提供するクラスです。
AbstractUserにはユーザ名(username)やメールアドレス(email)等のユーザ項目が定義されています。
今回は、email項目をオーバーライドして以下の通りemailをユニーク&必須に設定します。
email = models.EmailField(verbose_name="メールアドレス", unique=True, blank=False, null=False)また、ユーザのサムネイル画像も追加したいので以下でサムネイル列を追加しています。
thumbnail = models.ImageField(upload_to="images/thumbnail/", verbose_name="サムネイル", blank=True, null=True)最後にログオンをデフォルトのユーザ名からEmailに変更するため以下の設定を追加しています。
USERNAME_FIELD = 'email'   #ログオンIDをユーザ名→Emailへ変更
REQUIRED_FIELDS = ['username'] #デフォルトのemailからusernameへ変更REQUIRED_FIELDSはユーザ作成時に必要な項目を定義します。
今回はユーザ作成時にユーザ名も設定させるためにusernameを指定しています。
なお、上記設定はAbstractUser内でデフォルトで以下の様に設定されています。
USERNAME_FIELD = 'username'
REQUIRED_FIELDS = ['email']上記で定義したカスタムユーザモデルを利用するようにsettings.pyの末尾に以下の設定を追加します。
# カスタムユーザモデル
AUTH_USER_MODEL = 'accounts.CustomUser'AUTH_USER_MODELに設定したユーザモデルがDjangoアプリで利用されるようになります。
以上でカスタムユーザモデルの定義は完了です。
一旦マイグレーションを行いカスタムユーザモデルをデータベースへ反映します。
(chat)> python manage.py makemigrations accounts

Migrations for 'accounts':
  accounts\migrations\0001_initial.py
- Create model CustomUser(chat) > python manage.py migrate
Operations to perform:
Apply all migrations: accounts, admin, auth, contenttypes, sessions
Running migrations:
Applying contenttypes.0001_initial... OK
Applying contenttypes.0002_remove_content_type_name... OK
Applying auth.0001_initial... OK
Applying auth.0002_alter_permission_name_max_length... OK
Applying auth.0003_alter_user_email_max_length... OK
Applying auth.0004_alter_user_username_opts... OK
Applying auth.0005_alter_user_last_login_null... OK
Applying auth.0006_require_contenttypes_0002... OK
Applying auth.0007_alter_validators_add_error_messages... OK
Applying auth.0008_alter_user_username_max_length... OK
Applying auth.0009_alter_user_last_name_max_length... OK
Applying auth.0010_alter_group_name_max_length... OK
Applying auth.0011_update_proxy_permissions... OK
Applying auth.0012_alter_user_first_name_max_length... OK
Applying accounts.0001_initial... OK
Applying admin.0001_initial... OK
Applying admin.0002_logentry_remove_auto_add... OK
Applying admin.0003_logentry_add_action_flag_choices... OK
Applying sessions.0001_initial... OK次にcreatesuperuserコマンドを使って管理者ユーザを作成しておきます。
以下の例では、アドレスをadmin@gmail.com、ユーザ名をadminとして登録しています。
CustomUserを使っているのでメールアドレスとユーザ名の入力が必須になります。
python manage.py createsuperuser

メールアドレス: admin@gmail.com
ユーザー名: admin
Password:
Password (again):
Superuser created successfully.
adminサイトのカスタマイズ
次に、作成したカスタムユーザモデル(CustomUser)をadminサイトに表示して、ユーザデータを表示、変更できるように設定を行います。
まず、カスタムユーザの作成、変更用のフォームを定義します。accounts\forms.pyを作成し、以下のコードを定義します。
from django.contrib.auth.forms import UserCreationForm, UserChangeForm
from .models import CustomUser
from django import forms


class CustomUserCreationForm(UserCreationForm):

    class Meta(UserCreationForm):
        model = CustomUser
        fields = ('username', 'email')

    email = forms.EmailField()


class CustomUserChangeForm(UserChangeForm):

    class Meta:
        model = CustomUser
        fields = ('username', 'email')

email = forms.EmailField()UserCreationForm, UserChangeFormはDjangoが標準で提供しているユーザ作成と変更用のフォームクラスです。
これらのクラスを継承して CustomUserCreationForm、CustomUserChangeFormを定義します。
また、継承元のUserCreationForm, UserChangeFormクラスにはemailフィールドが存在しないため、それぞれemail = forms.EmailField()でemailフィールドを追加しています。
fieldsには設定したい項目(username, email)を定義しておきます。
次にaccounts\admin.pyに以下の定義を追加してadminサイトにCustomUserを表示させます。
from django.contrib import admin
from django.contrib.auth.admin import UserAdmin
from .forms import CustomUserCreationForm, CustomUserChangeForm
from .models import CustomUser
from django.utils.translation import gettext, gettext_lazy as _


class CustomUserAdmin(UserAdmin):

    add_form = CustomUserCreationForm
    form = CustomUserChangeForm
    model = CustomUser
    list_display=('pk', 'username', 'email')
    #fieldsetsをオーバライドしてthumbnailを加えることで変更画面に項目として表示されるようになる。
    fieldsets = (
        (None, {'fields': ('username', 'password', 'thumbnail')}),
        (_('Personal info'), {'fields': ('first_name', 'last_name', 'email')}),
        (_('Permissions'), {
            'fields': ('is_active', 'is_staff', 'is_superuser', 'groups', 'user_permissions'),
        }),
        (_('Important dates'), {'fields': ('last_login', 'date_joined')}),
    )

    #add_fieldsetsのfieldsにthumbnailを加えると新規登録時の項目に追加される。
    add_fieldsets = (
        (None, {
            'classes': ('wide',),
            'fields': ('username', 'email', 'password1', 'password2','thumbnail'),
        }),
    )

admin.site.register(CustomUser, CustomUserAdmin)Djangoが標準で提供しているユーザモデルをadminサイトに登録するUserAdminクラスを承継してCustomUserAdminを定義します。
fieldsetsと add_fieldsetsのfieldsにそれぞれthumbnailを追加しています。
こうすることで、ユーザ情報の新規登録時と変更時にthumbnail項目が表示されるようになります。
なお、継承元のUserAdminクラスにfieldsetsと add_fieldsetsは以下の様に定義されおり、これを元にthumbnail項目を追加しています。
    fieldsets = (
        (None, {'fields': ('username', 'password')}),
        (_('Personal info'), {'fields': ('first_name', 'last_name', 'email')}),
        (_('Permissions'), {
            'fields': ('is_active', 'is_staff', 'is_superuser', 'groups', 'user_permissions'),
        }),
        (_('Important dates'), {'fields': ('last_login', 'date_joined')}),
    )
    add_fieldsets = (
        (None, {
            'classes': ('wide',),
            'fields': ('username', 'password1', 'password2'),
        }),
)add_formに指定したフォームクラスは新しくCustomUserを作成するときに使用され、formに指定定したフォームクラスは既存のCustomerUserのデータを変更する際に利用されます。
以上で、adminサイトの設定は完了です。
開発サーバを起動して、http://127.0.0.1:8000/adminにアクセスするとカスタムユーザモデルのテーブル(ユーザ)が表示されます。
python manage.py runserverログイン画面は、以下の通りアドレス+パスワードになります。

また、登録されているユーザの変更画面は以下の様になります。

ユーザ登録機能の実装
次に、ユーザ登録機能を実装します。
まず、前提としてユーザ認証系の機能実装についてはDjangoが標準で提供する機能(django.contrib.auth)を利用します。
django.contrib.authには、以下のようなURLパターンが定義されています。
#Lib\site-packages\django\contrib\auth\urls.py

urlpatterns = [
    path('login/', views.LoginView.as_view(), name='login'),
    path('logout/', views.LogoutView.as_view(), name='logout'),

    path('password_change/', views.PasswordChangeView.as_view(), name='password_change'),
    path('password_change/done/', views.PasswordChangeDoneView.as_view(), name='password_change_done'),

    path('password_reset/', views.PasswordResetView.as_view(), name='password_reset'),
    path('password_reset/done/', views.PasswordResetDoneView.as_view(), name='password_reset_done'),
    path('reset/<uidb64>/<token>/', views.PasswordResetConfirmView.as_view(), name='password_reset_confirm'),
    path('reset/done/', views.PasswordResetCompleteView.as_view(), name='password_reset_complete'),
]
上記を見ると分かりますが、「ログオン、ログアウト、パスワード変更」のURLパターンが用意されています。
しかし、ユーザ登録の機能は提供されていないため個別に作り込む必要があります。
それでは、ユーザ登録機能の実装に移りましょう。
accounts\urls.pyを新規に作成して、ユーザ登録用のURLパターンを以下の通り定義します。
# accounts/urls.py
from django.urls import path
from . import views

urlpatterns = [
    path('signup/', views.SignUp.as_view(), name='signup'),
]SignUpクラスベースビューはこの後定義します。
また、config\urls.pyでaccounts\urls.pyをインクルードする設定を追加しておきます。
from django.contrib import admin
from django.urls import path, include

urlpatterns = [
    path('admin/', admin.site.urls),
    path('accounts/', include('accounts.urls')),   #追加
]
続いてaccounts\views.pyにユーザ登録用のSignUpビューを以下の通り定義します。
from django.urls import reverse_lazy
from django.views import generic
from .forms import CustomUserCreationForm
from django.contrib.auth import login


class SignUp(generic.CreateView):

    form_class = CustomUserCreationForm
    success_url = reverse_lazy('chat:chat_room')
    template_name = 'registration/signup.html'

    def form_valid(self, form):
        """
        ユーザ登録直後に自動的にログオンさせる。
        self.objectにsave()されたユーザオブジェクトが格納されている。
        """
        valid = super().form_valid(form)
        login(self.request, self.object)   #login処理
return validDjangoのクラスベースビューであるCreateViewを承継してサインアップ用クラスSignUpを定義しています。
form_classにはaccounts\forms.pyで既に定義しているユーザ登録用のフォームクラス(CustomUserCreationForm)を指定します。
success_urlは処理が成功した場合のリダイレクト先をreverse_lazyで指定します。
今回は、ログオン後にチャットルーム画面('chat:chat_room')に遷移させることとします。
URLパターン('chat:chat_room')は後程設定します。
また、ユーザ登録用のテンプレートとしてregistration/signup.htmlを指定しておきます。
更に、form_validメソッドをオーバーライドしてユーザ登録が完了した際にloginメソッドを使って自動的にログオンさせる処理を追加しています。
loginメソッドは、Djangoが標準で提供するメソッドで以下の通りインポートしておきます。
from django.contrib.auth import loginloginメソッドの第1引数にはリクエストオブジェクト(request)、第2引数にユーザオブジェクトを渡すと、指定したユーザのログオン処理を行ってくれます。
静的ファイルの設定
画面デザインを整えるための静的ファイルを事前に用意してありますので、
この静的ファイルをDjangoプロジェクトに適用します。
まず、静的ファイルの配置場所をプロジェクト直下のstaticフォルダに統一化するための設定を行います。
config\settings.pyに静的ファイルの場所を以下の通り定義します。
from pathlib import Path
import os  #追加

#~~~省略~~~


STATIC_URL = '/static/'
STATIC_ROOT = os.path.join(BASE_DIR, 'static')  #追加
次にgithubリポジトリをダウンロードして、リポジトリ内のルートにあるstaticフォルダをchatフォルダ直下に丸ごとコピーします。
accounts
chat
  └── static  →ここにコピーする
config
templates
manage.py
その後、以下のコマンドを実行して静的ファイルを集約します。
python manage.py collectstatic以下の通り静的ファイルがプロジェクト直下のstaticフォルダに集約さればOKです。
accounts
chat
config
static →このフォルダ直下に静的ファイルが集約されます
  └── admin
  └── assets
  └── css
  └── images
  └── vendor
templates
manage.py
テンプレートファイルの設定
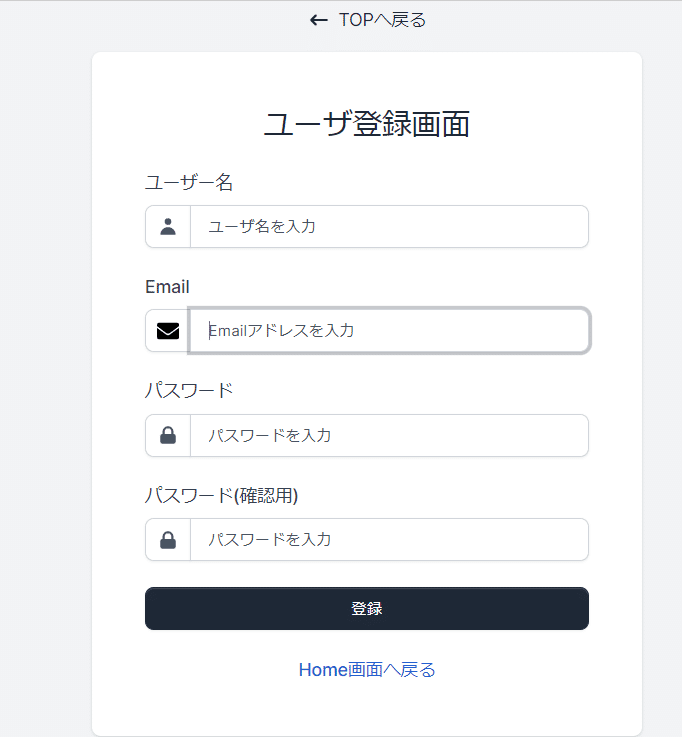
次にユーザ登録用テンプレート(signup.html)を作成します。
まず、config\settings.pyでテンプレートの配置場所をプロジェクト直下のtemplatesに設定します。
import os  #追加
TEMPLATES = [
    {
        'BACKEND': 'django.template.backends.django.DjangoTemplates',
        'DIRS': [os.path.join(BASE_DIR, 'templates')],  #修正
        'APP_DIRS': True,
        'OPTIONS': {
            'context_processors': [
                'django.template.context_processors.debug',
                'django.template.context_processors.request',
                'django.contrib.auth.context_processors.auth',
                'django.contrib.messages.context_processors.messages',
            ],
        },
    },
]
プロジェクト直下にtemplates\registrationフォルダを作成し、signup.htmlを以下の通り定義します。
なお、テンプレートデザインはvoltというテンプレートを流用しています。
<!--
=========================================================
* Volt Pro - Premium Bootstrap 5 Dashboard
=========================================================
* Product Page: https://themesberg.com/product/admin-dashboard/volt-bootstrap-5-dashboard
* Copyright 2021 Themesberg (https://www.themesberg.com)
* License (https://themes.getbootstrap.com/licenses/)
* Designed and coded by https://themesberg.com
=========================================================
* The above copyright notice and this permission notice shall be included in all copies or substantial portions of the Software. Please contact us to request a removal.
-->
{% load static %}
{% load widget_tweaks %}
<!DOCTYPE html>
<html lang="ja">
<head>
    <meta http-equiv="Content-Type" content="text/html; charset=utf-8" />
<!-- Primary Meta Tags -->
<title>Volt Premium Bootstrap Dashboard - Sign in page</title>
<meta name="viewport" content="width=device-width, initial-scale=1, shrink-to-fit=no">
<meta name="title" content="Volt Premium Bootstrap Dashboard - Sign in page">
<meta name="author" content="Themesberg">
<meta name="description" content="Volt Pro is a Premium Bootstrap 5 Admin Dashboard featuring over 800 components, 10+ plugins and 20 example pages using Vanilla JS.">
<meta name="keywords" content="bootstrap 5, bootstrap, bootstrap 5 admin dashboard, bootstrap 5 dashboard, bootstrap 5 charts, bootstrap 5 calendar, bootstrap 5 datepicker, bootstrap 5 tables, bootstrap 5 datatable, vanilla js datatable, themesberg, themesberg dashboard, themesberg admin dashboard" />
<link rel="canonical" href="https://themesberg.com/product/admin-dashboard/volt-premium-bootstrap-5-dashboard">
<!-- Open Graph / Facebook -->
<meta property="og:type" content="website">
<meta property="og:url" content="https://demo.themesberg.com/volt-pro">
<meta property="og:title" content="Volt Premium Bootstrap Dashboard - Sign in page">
<meta property="og:description" content="Volt Pro is a Premium Bootstrap 5 Admin Dashboard featuring over 800 components, 10+ plugins and 20 example pages using Vanilla JS.">
<meta property="og:image" content="https://themesberg.s3.us-east-2.amazonaws.com/public/products/volt-pro-bootstrap-5-dashboard/volt-pro-preview.jpg">
<!-- Twitter -->
<meta property="twitter:card" content="summary_large_image">
<meta property="twitter:url" content="https://demo.themesberg.com/volt-pro">
<meta property="twitter:title" content="Volt Premium Bootstrap Dashboard - Sign in page">
<meta property="twitter:description" content="Volt Pro is a Premium Bootstrap 5 Admin Dashboard featuring over 800 components, 10+ plugins and 20 example pages using Vanilla JS.">
<meta property="twitter:image" content="https://themesberg.s3.us-east-2.amazonaws.com/public/products/volt-pro-bootstrap-5-dashboard/volt-pro-preview.jpg">
<!-- Favicon -->
<link rel="apple-touch-icon" sizes="120x120" href="{% static 'assets/img/favicon/apple-touch-icon.png' %}">
<link rel="icon" type="image/png" sizes="32x32" href="{% static 'assets/img/favicon/favicon-32x32.png' %}">
<link rel="icon" type="image/png" sizes="16x16" href="{% static 'assets/img/favicon/favicon-16x16.png' %}">
<link rel="manifest" href="{% static 'assets/img/favicon/site.webmanifest' %}">
<link rel="mask-icon" href="{% static 'assets/img/favicon/safari-pinned-tab.svg' %}" color="#ffffff">
<meta name="msapplication-TileColor" content="#ffffff">
<meta name="theme-color" content="#ffffff">
<!-- Sweet Alert -->
<link type="text/css" href="{% static 'vendor/sweetalert2/dist/sweetalert2.min.css" rel="stylesheet">
<!-- Notyf -->
<link type="text/css" href="{% static 'vendor/notyf/notyf.min.css" rel="stylesheet">
<!-- Volt CSS -->
<link type="text/css" href="{% static '/css/volt.css' %}" rel="stylesheet">
<!-- NOTICE: You can use the _analytics.html partial to include production code specific code & trackers -->
</head>
<body>
    <!-- NOTICE: You can use the _analytics.html partial to include production code specific code & trackers -->
    <main>
        <!-- Section -->
        <section class="vh-lg-100 mt-5 mt-lg-0 bg-soft d-flex align-items-center">
            <div class="container">
                <p class="text-center">
                    <a href="#" class="d-flex align-items-center justify-content-center">
                        <svg class="icon icon-xs me-2" fill="currentColor" viewBox="0 0 20 20" xmlns="http://www.w3.org/2000/svg"><path fill-rule="evenodd" d="M7.707 14.707a1 1 0 01-1.414 0l-4-4a1 1 0 010-1.414l4-4a1 1 0 011.414 1.414L5.414 9H17a1 1 0 110 2H5.414l2.293 2.293a1 1 0 010 1.414z" clip-rule="evenodd"></path></svg>
                        TOPへ戻る
                    </a>
                </p>
                <div class="row justify-content-center form-bg-image" data-background-lg="../../assets/img/illustrations/signin.svg">
                    <div class="col-12 d-flex align-items-center justify-content-center">
                        <div class="bg-white shadow border-0 rounded border-light p-4 p-lg-5 w-100 fmxw-500">
                            <div class="text-center text-md-center mb-4 mt-md-0">
                                <h1 class="mb-0 h3">ユーザ登録画面</h1>
                            </div>
                            <form action="" class="mt-4" method="POST">
                                <!-- Form -->
                                {% csrf_token %}
                                {% for field in form %}
                                {% if field.label == "ユーザー名" %}
                                <div class="form-group mb-4">
                                    <label for="user">{{ field.label }}</label>
                                    <div class="input-group">
                                        <span class="input-group-text" id="basic-addon1">
                                            <svg class="icon icon-xs text-gray-600" fill="currentColor" viewBox="0 0 20 20" xmlns="http://www.w3.org/2000/svg"><path fill-rule="evenodd" d="M10 9a3 3 0 100-6 3 3 0 000 6zm-7 9a7 7 0 1114 0H3z" clip-rule="evenodd"></path></svg>
                                        </span>
                                        {% render_field field class="form-control" placeholder="ユーザ名を入力" %}
                                       <!--  <input type="text" class="form-control" placeholder="ユーザ名を入力"> -->
                                    </div>
                                </div>
                                <!-- End of Form -->
                                {% elif field.label == "Email" %}
                                <div class="form-group mb-4">
                                    <label for="user">{{ field.label }}</label>
                                    <div class="input-group">
                                        <span class="input-group-text" id="basic-addon1">
                                            <svg class="icon icon-xs text-gray-600" xmlns="http://www.w3.org/2000/svg" viewBox="0 0 512 512"><!-- Font Awesome Free 5.15.3 by @fontawesome - https://fontawesome.com License - https://fontawesome.com/license/free (Icons: CC BY 4.0, Fonts: SIL OFL 1.1, Code: MIT License) --><path d="M502.3 190.8c3.9-3.1 9.7-.2 9.7 4.7V400c0 26.5-21.5 48-48 48H48c-26.5 0-48-21.5-48-48V195.6c0-5 5.7-7.8 9.7-4.7 22.4 17.4 52.1 39.5 154.1 113.6 21.1 15.4 56.7 47.8 92.2 47.6 35.7.3 72-32.8 92.3-47.6 102-74.1 131.6-96.3 154-113.7zM256 320c23.2.4 56.6-29.2 73.4-41.4 132.7-96.3 142.8-104.7 173.4-128.7 5.8-4.5 9.2-11.5 9.2-18.9v-19c0-26.5-21.5-48-48-48H48C21.5 64 0 85.5 0 112v19c0 7.4 3.4 14.3 9.2 18.9 30.6 23.9 40.7 32.4 173.4 128.7 16.8 12.2 50.2 41.8 73.4 41.4z"/></svg>
                                        </span>
                                        {% render_field field class="form-control" placeholder="Emailアドレスを入力" %}
                                       <!--  <input type="text" class="form-control" placeholder="ユーザ名を入力"> -->
                                    </div>
                                </div>
                                <!-- End of Form -->
                                {% elif field.label == "パスワード" %}
                                <div class="form-group">
                                    <!-- Form -->
                                    <div class="form-group mb-4">
                                        <label for="password">{{ field.label }}</label>
                                        <div class="input-group">
                                            <span class="input-group-text" id="basic-addon2">
                                                <svg class="icon icon-xs text-gray-600" fill="currentColor" viewBox="0 0 20 20" xmlns="http://www.w3.org/2000/svg"><path fill-rule="evenodd" d="M5 9V7a5 5 0 0110 0v2a2 2 0 012 2v5a2 2 0 01-2 2H5a2 2 0 01-2-2v-5a2 2 0 012-2zm8-2v2H7V7a3 3 0 016 0z" clip-rule="evenodd"></path></svg>
                                            </span>
                                            {% render_field field class="form-control" placeholder="パスワードを入力" %}
                                           <!--  <input type="password" placeholder="パスワードを入力" class="form-control" id="password" required> -->
                                        </div>
                                    </div>
                                    <!-- End of Form -->
                                    {% elif field.label == "パスワード(確認用)" %}
                                    <div class="form-group">
                                        <!-- Form -->
                                        <div class="form-group mb-4">
                                            <label for="password">{{ field.label }}</label>
                                            <div class="input-group">
                                                <span class="input-group-text" id="basic-addon2">
                                                    <svg class="icon icon-xs text-gray-600" fill="currentColor" viewBox="0 0 20 20" xmlns="http://www.w3.org/2000/svg"><path fill-rule="evenodd" d="M5 9V7a5 5 0 0110 0v2a2 2 0 012 2v5a2 2 0 01-2 2H5a2 2 0 01-2-2v-5a2 2 0 012-2zm8-2v2H7V7a3 3 0 016 0z" clip-rule="evenodd"></path></svg>
                                                </span>
                                                {% render_field field class="form-control" placeholder="パスワードを入力" %}
                                               <!--  <input type="password" placeholder="パスワード(確認用)を入力" class="form-control" id="password" required> -->
                                            </div>
                                        </div>
                                        <!-- End of Form -->
                                </div>
                                {% endif %}
                                {% endfor %}
                                {% for error in form.non_field_errors %}
                                  <div class="alert alert-danger" role="alert">
                                    <p>{{ error | linebreaksbr}}</p>
                                  </div>
                                {% endfor %}
                                <div class="d-grid">
                                    <button type="submit" class="btn btn-gray-800">登録</button>
                                </div>
                            </form>
                            <div class="d-flex justify-content-center align-items-center mt-4">
                                <span class="fw-normal">
                                    <a href="{% url 'chat:home' %}" class="fw-bold text-info">Home画面へ戻る</a>
                                </span>
                            </div>
                        </div>
                    </div>
                </div>
            </div>
        </section>
    </main>
    <!-- Core -->
<script src="{% static 'vendor/@popperjs/core/dist/umd/popper.min.js' %}"></script>
<script src="{% static 'vendor/bootstrap/dist/js/bootstrap.min.js' %}"></script>
<!-- Vendor JS -->
<script src="{% static 'vendor/onscreen/dist/on-screen.umd.min.js' %}"></script>
<!-- Slider -->
<script src="{% static 'vendor/nouislider/distribute/nouislider.min.js' %}"></script>
<!-- Smooth scroll -->
<script src="{% static 'vendor/smooth-scroll/dist/smooth-scroll.polyfills.min.js' %}"></script>
<!-- Charts -->
<script src="{% static 'vendor/chartist/dist/chartist.min.js' %}"></script>
<script src="{% static 'vendor/chartist-plugin-tooltips/dist/chartist-plugin-tooltip.min.js' %}"></script>
<!-- Datepicker -->
<script src=".{% static 'vendor/vanillajs-datepicker/dist/js/datepicker.min.js' %}"></script>
<!-- Sweet Alerts 2 -->
<script src="{% static 'vendor/sweetalert2/dist/sweetalert2.all.min.js' %}"></script>
<!-- Moment JS -->
<script src="https://cdnjs.cloudflare.com/ajax/libs/moment.js/2.27.0/moment.min.js' %}"></script>
<!-- Vanilla JS Datepicker -->
<script src="{% static 'vendor/vanillajs-datepicker/dist/js/datepicker.min.js' %}"></script>
<!-- Notyf -->
<script src="{% static 'vendor/notyf/notyf.min.js' %}"></script>
<!-- Simplebar -->
<script src="{% static 'vendor/simplebar/dist/simplebar.min.js"></script>
<!-- Github buttons -->
<script async defer src="https://buttons.github.io/buttons.js"></script>
<!-- Volt JS -->
<script src="{% static 'assets/js/volt.js' %}"></script>
</body>
</html>
htmlコードが長いですが、Django観点でポイントを解説します。
まず、冒頭で以下を記載します。
{% load static %}
{% load widget_tweaks %}
{% load static %}はテンプレートから静的ファイルを参照するための設定です。
{% load widget_tweaks %}はテンプレートでdjango-widgets-improvedモジュールを使うための設定です。
signup.htmlのメインは、以下のformタグ内でユーザ登録用のフォーム画面を表示しています。
<form action="" class="mt-4" method="POST">
    <!-- Form -->
    {% csrf_token %}
    {% for field in form %}
    {% if field.label == "ユーザー名" %}
    <div class="form-group mb-4">
        <label for="user">{{ field.label }}</label>
        <div class="input-group">
            <span class="input-group-text" id="basic-addon1">
                <svg class="icon icon-xs text-gray-600" fill="currentColor" viewBox="0 0 20 20" xmlns="http://www.w3.org/2000/svg"><path fill-rule="evenodd" d="M10 9a3 3 0 100-6 3 3 0 000 6zm-7 9a7 7 0 1114 0H3z" clip-rule="evenodd"></path></svg>
            </span>
            {% render_field field class="form-control" placeholder="ユーザ名を入力" %}
            <!--  <input type="text" class="form-control" placeholder="ユーザ名を入力"> -->
        </div>
    </div>
    <!-- End of Form -->
    {% elif field.label == "Email" %}
    <div class="form-group mb-4">
        <label for="user">{{ field.label }}</label>
        <div class="input-group">
            <span class="input-group-text" id="basic-addon1">
                <svg class="icon icon-xs text-gray-600" xmlns="http://www.w3.org/2000/svg" viewBox="0 0 512 512"><!-- Font Awesome Free 5.15.3 by @fontawesome - https://fontawesome.com License - https://fontawesome.com/license/free (Icons: CC BY 4.0, Fonts: SIL OFL 1.1, Code: MIT License) --><path d="M502.3 190.8c3.9-3.1 9.7-.2 9.7 4.7V400c0 26.5-21.5 48-48 48H48c-26.5 0-48-21.5-48-48V195.6c0-5 5.7-7.8 9.7-4.7 22.4 17.4 52.1 39.5 154.1 113.6 21.1 15.4 56.7 47.8 92.2 47.6 35.7.3 72-32.8 92.3-47.6 102-74.1 131.6-96.3 154-113.7zM256 320c23.2.4 56.6-29.2 73.4-41.4 132.7-96.3 142.8-104.7 173.4-128.7 5.8-4.5 9.2-11.5 9.2-18.9v-19c0-26.5-21.5-48-48-48H48C21.5 64 0 85.5 0 112v19c0 7.4 3.4 14.3 9.2 18.9 30.6 23.9 40.7 32.4 173.4 128.7 16.8 12.2 50.2 41.8 73.4 41.4z"/></svg>
            </span>
            {% render_field field class="form-control" placeholder="Emailアドレスを入力" %}
            <!--  <input type="text" class="form-control" placeholder="ユーザ名を入力"> -->
        </div>
    </div>
    <!-- End of Form -->
    {% elif field.label == "パスワード" %}
    <div class="form-group">
        <!-- Form -->
        <div class="form-group mb-4">
            <label for="password">{{ field.label }}</label>
            <div class="input-group">
                <span class="input-group-text" id="basic-addon2">
                    <svg class="icon icon-xs text-gray-600" fill="currentColor" viewBox="0 0 20 20" xmlns="http://www.w3.org/2000/svg"><path fill-rule="evenodd" d="M5 9V7a5 5 0 0110 0v2a2 2 0 012 2v5a2 2 0 01-2 2H5a2 2 0 01-2-2v-5a2 2 0 012-2zm8-2v2H7V7a3 3 0 016 0z" clip-rule="evenodd"></path></svg>
                </span>
                {% render_field field class="form-control" placeholder="パスワードを入力" %}
                <!--  <input type="password" placeholder="パスワードを入力" class="form-control" id="password" required> -->
            </div>
        </div>
        <!-- End of Form -->
        {% elif field.label == "パスワード(確認用)" %}
        <div class="form-group">
            <!-- Form -->
            <div class="form-group mb-4">
                <label for="password">{{ field.label }}</label>
                <div class="input-group">
                    <span class="input-group-text" id="basic-addon2">
                        <svg class="icon icon-xs text-gray-600" fill="currentColor" viewBox="0 0 20 20" xmlns="http://www.w3.org/2000/svg"><path fill-rule="evenodd" d="M5 9V7a5 5 0 0110 0v2a2 2 0 012 2v5a2 2 0 01-2 2H5a2 2 0 01-2-2v-5a2 2 0 012-2zm8-2v2H7V7a3 3 0 016 0z" clip-rule="evenodd"></path></svg>
                    </span>
                    {% render_field field class="form-control" placeholder="パスワードを入力" %}
                    <!--  <input type="password" placeholder="パスワード(確認用)を入力" class="form-control" id="password" required> -->
                </div>
            </div>
            <!-- End of Form -->
    </div>
    {% endif %}
    {% endfor %}
    {% for error in form.non_field_errors %}
        <div class="alert alert-danger" role="alert">
        <p>{{ error | linebreaksbr}}</p>
        </div>
    {% endfor %}
    <div class="d-grid">
        <button type="submit" class="btn btn-gray-800">登録</button>
    </div>
</form>accounts\views.pyで定義したSignUpビューから渡ってくるformオブジェクトを以下のようにforループで1つずつ取り出します。
{% for field in form %}

  {% if field.label == "ユーザー名" %}
   <label for="user">{{ field.label }}</label>
   {% render_field field class="form-control" placeholder="ユーザ名を入力" %}

  {% elif field.label == "Email" %}
     <label for="user">{{ field.label }}</label>
     {% render_field field class="form-control" placeholder="Emailアドレスを入力" %}

  {% elif field.label == "パスワード" %}
     <label for="password">{{ field.label }}</label>
     {% render_field field class="form-control" placeholder="パスワードを入力" %}

  {% elif field.label == "パスワード(確認用)" %}
     <label for="password">{{ field.label }}</label>
     {% render_field field class="form-control" placeholder="パスワードを入力" %}
  {% endif %}
{% endfor %}取り出したフォーム名(field.label)をチェックして、項目に応じて画像や項目幅を調整するため、上記のように分岐させています。
{% render_field field class="form-control" placeholder="xxxxxx%}の部分はdjango-widget-tweaksのタグで、最初の引数(field)でフォームフィールドのインスタンスを指定し、2つ目の引数で追加したい属性を指定します。
上記の場合は、フォームにform-controlクラスを適用してデザインを整えてくれます。
ホーム画面への戻るリンクを以下の通り定義しています。
<div class="d-flex justify-content-center align-items-center mt-4">
    <span class="fw-normal">
        <a href="{% url 'chat:home' %}" class="fw-bold text-info">Home画面へ戻る</a>
    </span>
</div>href属性に指定した{% url 'chat:home' %}ですが、現時点ではURLパターン(chat:home)はまだ存在しませんので後程定義します。
次にユーザログオン用のテンプレート(login.html)を作成します。templates\registration\login.htmlを作成して、以下のhtmlコードを定義します。
<!--
=========================================================
* Volt Pro - Premium Bootstrap 5 Dashboard
=========================================================
* Product Page: https://themesberg.com/product/admin-dashboard/volt-bootstrap-5-dashboard
* Copyright 2021 Themesberg (https://www.themesberg.com)
* License (https://themes.getbootstrap.com/licenses/)
* Designed and coded by https://themesberg.com
=========================================================
* The above copyright notice and this permission notice shall be included in all copies or substantial portions of the Software. Please contact us to request a removal.
-->
{% load static %}
{% load widget_tweaks %}
<!DOCTYPE html>
<html lang="ja">
<head>
    <meta http-equiv="Content-Type" content="text/html; charset=utf-8" />
<!-- Primary Meta Tags -->
<title>Volt Premium Bootstrap Dashboard - Sign in page</title>
<meta name="viewport" content="width=device-width, initial-scale=1, shrink-to-fit=no">
<meta name="title" content="Volt Premium Bootstrap Dashboard - Sign in page">
<meta name="author" content="Themesberg">
<meta name="description" content="Volt Pro is a Premium Bootstrap 5 Admin Dashboard featuring over 800 components, 10+ plugins and 20 example pages using Vanilla JS.">
<meta name="keywords" content="bootstrap 5, bootstrap, bootstrap 5 admin dashboard, bootstrap 5 dashboard, bootstrap 5 charts, bootstrap 5 calendar, bootstrap 5 datepicker, bootstrap 5 tables, bootstrap 5 datatable, vanilla js datatable, themesberg, themesberg dashboard, themesberg admin dashboard" />
<link rel="canonical" href="https://themesberg.com/product/admin-dashboard/volt-premium-bootstrap-5-dashboard">
<!-- Open Graph / Facebook -->
<meta property="og:type" content="website">
<meta property="og:url" content="https://demo.themesberg.com/volt-pro">
<meta property="og:title" content="Volt Premium Bootstrap Dashboard - Sign in page">
<meta property="og:description" content="Volt Pro is a Premium Bootstrap 5 Admin Dashboard featuring over 800 components, 10+ plugins and 20 example pages using Vanilla JS.">
<meta property="og:image" content="https://themesberg.s3.us-east-2.amazonaws.com/public/products/volt-pro-bootstrap-5-dashboard/volt-pro-preview.jpg">
<!-- Twitter -->
<meta property="twitter:card" content="summary_large_image">
<meta property="twitter:url" content="https://demo.themesberg.com/volt-pro">
<meta property="twitter:title" content="Volt Premium Bootstrap Dashboard - Sign in page">
<meta property="twitter:description" content="Volt Pro is a Premium Bootstrap 5 Admin Dashboard featuring over 800 components, 10+ plugins and 20 example pages using Vanilla JS.">
<meta property="twitter:image" content="https://themesberg.s3.us-east-2.amazonaws.com/public/products/volt-pro-bootstrap-5-dashboard/volt-pro-preview.jpg">
<!-- Favicon -->
<link rel="apple-touch-icon" sizes="120x120" href="{% static 'assets/img/favicon/apple-touch-icon.png' %}">
<link rel="icon" type="image/png" sizes="32x32" href="{% static 'assets/img/favicon/favicon-32x32.png' %}">
<link rel="icon" type="image/png" sizes="16x16" href="{% static 'assets/img/favicon/favicon-16x16.png' %}">
<link rel="manifest" href="{% static 'assets/img/favicon/site.webmanifest' %}">
<link rel="mask-icon" href="{% static 'assets/img/favicon/safari-pinned-tab.svg' %}" color="#ffffff">
<meta name="msapplication-TileColor" content="#ffffff">
<meta name="theme-color" content="#ffffff">
<!-- Sweet Alert -->
<link type="text/css" href="{% static 'vendor/sweetalert2/dist/sweetalert2.min.css" rel="stylesheet">
<!-- Notyf -->
<link type="text/css" href="{% static 'vendor/notyf/notyf.min.css" rel="stylesheet">
<!-- Volt CSS -->
<link type="text/css" href="{% static '/css/volt.css' %}" rel="stylesheet">
<!-- NOTICE: You can use the _analytics.html partial to include production code specific code & trackers -->
</head>
<body>
    <!-- NOTICE: You can use the _analytics.html partial to include production code specific code & trackers -->
    <main>
        <!-- Section -->
        <section class="vh-lg-100 mt-5 mt-lg-0 bg-soft d-flex align-items-center">
            <div class="container">
                <p class="text-center">
                    <a href="{% url 'chat:home' %}" class="d-flex align-items-center justify-content-center">
                        <svg class="icon icon-xs me-2" fill="currentColor" viewBox="0 0 20 20" xmlns="http://www.w3.org/2000/svg"><path fill-rule="evenodd" d="M7.707 14.707a1 1 0 01-1.414 0l-4-4a1 1 0 010-1.414l4-4a1 1 0 011.414 1.414L5.414 9H17a1 1 0 110 2H5.414l2.293 2.293a1 1 0 010 1.414z" clip-rule="evenodd"></path></svg>
                        TOPへ戻る
                    </a>
                </p>
                <div class="row justify-content-center form-bg-image" data-background-lg="../../assets/img/illustrations/signin.svg">
                    <div class="col-12 d-flex align-items-center justify-content-center">
                        <div class="bg-white shadow border-0 rounded border-light p-4 p-lg-5 w-100 fmxw-500">
                            <div class="text-center text-md-center mb-4 mt-md-0">
                                <h1 class="mb-0 h3">ログオン画面</h1>
                            </div>
                            <form action="" class="mt-4" method="POST">
                                <!-- Form -->
                                {% csrf_token %}
                                {% for field in form %}
                                {% if field.label == "メールアドレス" %}
                                <div class="form-group mb-4">
                                    <label for="user">{{ field.label }}</label>
                                    <div class="input-group">
                                        <span class="input-group-text" id="basic-addon1">
                                            <svg class="icon icon-xs text-gray-600" xmlns="http://www.w3.org/2000/svg" viewBox="0 0 512 512"><!-- Font Awesome Free 5.15.3 by @fontawesome - https://fontawesome.com License - https://fontawesome.com/license/free (Icons: CC BY 4.0, Fonts: SIL OFL 1.1, Code: MIT License) --><path d="M502.3 190.8c3.9-3.1 9.7-.2 9.7 4.7V400c0 26.5-21.5 48-48 48H48c-26.5 0-48-21.5-48-48V195.6c0-5 5.7-7.8 9.7-4.7 22.4 17.4 52.1 39.5 154.1 113.6 21.1 15.4 56.7 47.8 92.2 47.6 35.7.3 72-32.8 92.3-47.6 102-74.1 131.6-96.3 154-113.7zM256 320c23.2.4 56.6-29.2 73.4-41.4 132.7-96.3 142.8-104.7 173.4-128.7 5.8-4.5 9.2-11.5 9.2-18.9v-19c0-26.5-21.5-48-48-48H48C21.5 64 0 85.5 0 112v19c0 7.4 3.4 14.3 9.2 18.9 30.6 23.9 40.7 32.4 173.4 128.7 16.8 12.2 50.2 41.8 73.4 41.4z"/></svg>
                                        </span>
                                        {% render_field field class="form-control" placeholder="メールアドレスを入力" %}
                                       <!--  <input type="text" class="form-control" placeholder="ユーザ名を入力"> -->
                                    </div>
                                </div>
                                <!-- End of Form -->
                                {% elif field.label == "パスワード" %}
                                <div class="form-group">
                                    <!-- Form -->
                                    <div class="form-group mb-4">
                                        <label for="password">{{ field.label }}</label>
                                        <div class="input-group">
                                            <span class="input-group-text" id="basic-addon2">
                                                <svg class="icon icon-xs text-gray-600" fill="currentColor" viewBox="0 0 20 20" xmlns="http://www.w3.org/2000/svg"><path fill-rule="evenodd" d="M5 9V7a5 5 0 0110 0v2a2 2 0 012 2v5a2 2 0 01-2 2H5a2 2 0 01-2-2v-5a2 2 0 012-2zm8-2v2H7V7a3 3 0 016 0z" clip-rule="evenodd"></path></svg>
                                            </span>
                                            {% render_field field class="form-control" placeholder="パスワードを入力" %}
                                           <!--  <input type="password" placeholder="パスワードを入力" class="form-control" id="password" required> -->
                                        </div>
                                    </div>
                                    <!-- End of Form -->
                                </div>
                                {% endif %}
                                {% endfor %}
                                {% for error in form.non_field_errors %}
                                  <div class="alert alert-danger" role="alert">
                                    <p>{{ error | linebreaksbr}}</p>
                                  </div>
                                {% endfor %}
                                <div class="d-grid">
                                    <button type="submit" class="btn btn-gray-800">ログイン</button>
                                </div>
                            </form>
                            <div class="d-flex justify-content-center align-items-center mt-4">
                                <span class="fw-normal">
                                    アカウント未登録の方→
                                    <a href="{% url 'signup' %}" class="fw-bold text-info">アカウントを作成する</a>
                                </span>
                            </div>
                        </div>
                    </div>
                </div>
            </div>
        </section>
    </main>
    <!-- Core -->
<script src="{% static 'vendor/@popperjs/core/dist/umd/popper.min.js' %}"></script>
<script src="{% static 'vendor/bootstrap/dist/js/bootstrap.min.js' %}"></script>
<!-- Vendor JS -->
<script src="{% static 'vendor/onscreen/dist/on-screen.umd.min.js' %}"></script>
<!-- Slider -->
<script src="{% static 'vendor/nouislider/distribute/nouislider.min.js' %}"></script>
<!-- Smooth scroll -->
<script src="{% static 'vendor/smooth-scroll/dist/smooth-scroll.polyfills.min.js' %}"></script>
<!-- Charts -->
<script src="{% static 'vendor/chartist/dist/chartist.min.js' %}"></script>
<script src="{% static 'vendor/chartist-plugin-tooltips/dist/chartist-plugin-tooltip.min.js' %}"></script>
<!-- Datepicker -->
<script src=".{% static 'vendor/vanillajs-datepicker/dist/js/datepicker.min.js' %}"></script>
<!-- Sweet Alerts 2 -->
<script src="{% static 'vendor/sweetalert2/dist/sweetalert2.all.min.js' %}"></script>
<!-- Moment JS -->
<script src="https://cdnjs.cloudflare.com/ajax/libs/moment.js/2.27.0/moment.min.js' %}"></script>
<!-- Vanilla JS Datepicker -->
<script src="{% static 'vendor/vanillajs-datepicker/dist/js/datepicker.min.js' %}"></script>
<!-- Notyf -->
<script src="{% static 'vendor/notyf/notyf.min.js' %}"></script>
<!-- Simplebar -->
<script src="{% static 'vendor/simplebar/dist/simplebar.min.js"></script>
<!-- Github buttons -->
<script async defer src="https://buttons.github.io/buttons.js"></script>
<!-- Volt JS -->
<script src="{% static 'assets/js/volt.js' %}"></script>
</body>
</html>login.htmlは基本的にsignup.htmlと同じ形式でユーザログオンフォームを定義しています。
以下のformタグ内でビューからわかってくるユーザログオン用のformオブジェクトをfor文でループ処理し、fieldラベルがメールアドレスとパスワードのフォームを表示させるようにしています。
<form action="" class="mt-4" method="POST">
    <!-- Form -->
    {% csrf_token %}
    {% for field in form %}
    {% if field.label == "メールアドレス" %}
    <div class="form-group mb-4">
        <label for="user">{{ field.label }}</label>
        <div class="input-group">
            <span class="input-group-text" id="basic-addon1">
                <svg class="icon icon-xs text-gray-600" xmlns="http://www.w3.org/2000/svg" viewBox="0 0 512 512"><!-- Font Awesome Free 5.15.3 by @fontawesome - https://fontawesome.com License - https://fontawesome.com/license/free (Icons: CC BY 4.0, Fonts: SIL OFL 1.1, Code: MIT License) --><path d="M502.3 190.8c3.9-3.1 9.7-.2 9.7 4.7V400c0 26.5-21.5 48-48 48H48c-26.5 0-48-21.5-48-48V195.6c0-5 5.7-7.8 9.7-4.7 22.4 17.4 52.1 39.5 154.1 113.6 21.1 15.4 56.7 47.8 92.2 47.6 35.7.3 72-32.8 92.3-47.6 102-74.1 131.6-96.3 154-113.7zM256 320c23.2.4 56.6-29.2 73.4-41.4 132.7-96.3 142.8-104.7 173.4-128.7 5.8-4.5 9.2-11.5 9.2-18.9v-19c0-26.5-21.5-48-48-48H48C21.5 64 0 85.5 0 112v19c0 7.4 3.4 14.3 9.2 18.9 30.6 23.9 40.7 32.4 173.4 128.7 16.8 12.2 50.2 41.8 73.4 41.4z"/></svg>
            </span>
            {% render_field field class="form-control" placeholder="メールアドレスを入力" %}
            <!--  <input type="text" class="form-control" placeholder="ユーザ名を入力"> -->
        </div>
    </div>
    <!-- End of Form -->
    {% elif field.label == "パスワード" %}
    <div class="form-group">
        <!-- Form -->
        <div class="form-group mb-4">
            <label for="password">{{ field.label }}</label>
            <div class="input-group">
                <span class="input-group-text" id="basic-addon2">
                    <svg class="icon icon-xs text-gray-600" fill="currentColor" viewBox="0 0 20 20" xmlns="http://www.w3.org/2000/svg"><path fill-rule="evenodd" d="M5 9V7a5 5 0 0110 0v2a2 2 0 012 2v5a2 2 0 01-2 2H5a2 2 0 01-2-2v-5a2 2 0 012-2zm8-2v2H7V7a3 3 0 016 0z" clip-rule="evenodd"></path></svg>
                </span>
                {% render_field field class="form-control" placeholder="パスワードを入力" %}
                <!--  <input type="password" placeholder="パスワードを入力" class="form-control" id="password" required> -->
            </div>
        </div>
        <!-- End of Form -->
    </div>
    {% endif %}
    {% endfor %}
    {% for error in form.non_field_errors %}
        <div class="alert alert-danger" role="alert">
        <p>{{ error | linebreaksbr}}</p>
        </div>
    {% endfor %}
    <div class="d-grid">
        <button type="submit" class="btn btn-gray-800">ログイン</button>
    </div>
</form>
また、アカウント登録用のリンクを以下のコードで定義します。
<div class="d-flex justify-content-center align-items-center mt-4">
    <span class="fw-normal">
        アカウント未登録の方→
        <a href="{% url 'signup' %}" class="fw-bold text-info">アカウントを作成する</a>
    </span>
</div>accounts\urls.pyで定義した以下のユーザ登録用のURLパターン(signup)を逆引き参照するように設定しています。
#accounts\urls.py

urlpatterns = [
    path('signup/', views.SignUp.as_view(), name='signup'),
]
次にHome画面の表示用のURLパターンを定義します。
chat\urls.pyを新規作成し、以下のコードを定義します。
from django.urls import path
from chat.views import *

app_name = 'chat'

urlpatterns = [
    path('', Home.as_view(), name="home"),
]
名前空間名としてchatを定義しておきます。
また、Home画面を呼びだすビュー関数名をHomeクラスベースビューとして指定します。
Homeクラスベースは後程定義します。
次に、config\urls.py内でchat\urls.pyをインクルードする設定を追加しておきます。
from django.contrib import admin
from django.urls import path, include

urlpatterns = [
    path('admin/', admin.site.urls),
    path('accounts/', include('accounts.urls')),
    path('', include("chat.urls")),   #追加
]
次にchat\views.pyにTOP画面を表示するHOMEクラスを以下の通り定義します。
from django.shortcuts import render
from django.views.generic import TemplateView


class Home(TemplateView):
    #Home画面を表示するビュー
template_name = 'home.html'単純にTOP画面を表示するだけのため、TeamplateViewを継承してHomeクラスを定義しています。
呼び出すテンプレート名をtemplate_nameで指定しておきます。
次に、HOME画面のテンプレートを用意します。
templates\home.htmlを作成して以下のコードを定義します。
<!DOCTYPE html>
{% load static %}
<html lang="ja">
<head>
   <style>
        body{
            background-image: url("{% static 'images/top.png' %}");
            background-position: center;
            background-size: cover;
            height: 750px;
            background-repeat: no-repeat
        }

        .navbar{
            background-color: #5053fc;
            overflow: hidden;
            float: left;
            width: 100%;
            text-align: center;
            text-decoration: none;
            font-size: 18px;
            padding: 8px 8px;
            color: white
        }

        .navbar a:hover{
            text-decoration: none;
        }

        .navbar-right a{
            margin-left: 16px;
        }


    </style>
    <link rel="stylesheet" href="https://stackpath.bootstrapcdn.com/bootstrap/4.3.1/css/bootstrap.min.css"
          integrity="sha384-ggOyR0iXCbMQv3Xipma34MD+dH/1fQ784/j6cY/iJTQUOhcWr7x9JvoRxT2MZw1T" crossorigin="anonymous">
    <meta charset="utf-8">
    <meta name="viewport" content="width=device-width, initial-scale=1, shrink-to-fit=no">
    <title>Djangoチャットアプリ</title>
</head>
<body>

    <div class="navbar">
        <a href="/" class="text-white">Djangoチャットアプリ</a>
        <div class="navbar-right">
            <a href="{% url 'login' %}" class="login_text text-white">ログイン</a>
            <a href="{% url 'signup' %}" class="register text text-white">ユーザ登録</a>
        </div>
    </div>
    <script src="https://code.jquery.com/jquery-3.3.1.slim.min.js"
        integrity="sha384-q8i/X+965DzO0rT7abK41JStQIAqVgRVzpbzo5smXKp4YfRvH+8abtTE1Pi6jizo"
        crossorigin="anonymous"></script>
    <script src="https://cdnjs.cloudflare.com/ajax/libs/popper.js/1.14.7/umd/popper.min.js"
            integrity="sha384-UO2eT0CpHqdSJQ6hJty5KVphtPhzWj9WO1clHTMGa3JDZwrnQq4sF86dIHNDz0W1"
            crossorigin="anonymous"></script>
    <script src="https://stackpath.bootstrapcdn.com/bootstrap/4.3.1/js/bootstrap.min.js"
            integrity="sha384-JjSmVgyd0p3pXB1rRibZUAYoIIy6OrQ6VrjIEaFf/nJGzIxFDsf4x0xIM+B07jRM"
            crossorigin="anonymous"></script>
</body>
</html>
ログインページへのリンクとユーザ登録ページへのリンクを以下のコードで定義しています。
<div class="navbar-right">
    <a href="{% url 'login' %}" class="login_text text-white">ログイン</a>
    <a href="{% url 'signup' %}" class="register text text-white">ユーザ登録</a>
</div>次に、Django標準のユーザ認証機能を利用するため、config\urls.pyに以下の設定を追加します。
from django.contrib import admin
from django.urls import path, include

urlpatterns = [
    path('admin/', admin.site.urls),
    path('accounts/', include('accounts.urls')),
    path('accounts/', include('django.contrib.auth.urls')),#追加
    path('', include("chat.urls")),
]
accountsというURLパターン名でdjango.contrib.auth.urlsをインクルードしています。
既に説明しましたが、django.contrib.auth.urlsにはDjangoが標準で提供するユーザ認証機能で以下のようなURLパターンが定義されています。
urlpatterns = [
    path('login/', views.LoginView.as_view(), name='login'),
    path('logout/', views.LogoutView.as_view(), name='logout'),

    path('password_change/', views.PasswordChangeView.as_view(), name='password_change'),
    path('password_change/done/', views.PasswordChangeDoneView.as_view(), name='password_change_done'),

    path('password_reset/', views.PasswordResetView.as_view(), name='password_reset'),
    path('password_reset/done/', views.PasswordResetDoneView.as_view(), name='password_reset_done'),
    path('reset/<uidb64>/<token>/', views.PasswordResetConfirmView.as_view(), name='password_reset_confirm'),
    path('reset/done/', views.PasswordResetCompleteView.as_view(), name='password_reset_complete'),
]
django.contrib.auth.urlsをインクルードすることでlogin, logoutといったURLパターンを呼び出すだけでログオン処理やログアウト処理を実行することができるようになります。
以上で基本的な認証系機能の実装が完了しました。
開発サーバを起動してTOP画面(http://127.0.0.1:8000/)にアクセスしてみましょう。
以下のようなTOP画面が表示されればOKです。
画面右上のログイン、ユーザ登録ボタンを押すとそれぞれログイン画面、ユーザ登録画面に遷移します。

次に、ログイン画面からログオン後にチャットルームに遷移させる設定を追加します。
config\settings.pyの末尾に以下の設定を追加します。
#ログイン後のリダイレクトURL設定
LOGIN_REDIRECT_URL = '/chat_room/'
#ログアウト後のリダイレクト先
LOGOUT_REDIRECT_URL = '/' 次に、chat\urls.pyにチャットルームへ遷移するURLパターンを定義します。
from django.urls import path
from chat.views import *

app_name = 'chat'

urlpatterns = [
    path('', Home.as_view(), name="home"),
    path('chat_room/', ChatRoom.as_view(), name="chat_room"),  #追加
]次に、chat\views.pyにchatルーム画面へ遷移するChatRoomクラスビューを以下の様に定義します。
class ChatRoom(TemplateView):
    #Home画面を表示するビュー
    template_name = 'chat/chat_box.html'
以上で、ログオン→チャットルームへ遷移するロジックが完成しました。
最後にチャットルームのテンプレートを作成します。
共通テンプレート(base.html)とチャットルームのテンプレート(chat_box.html)の2つを作成します。
まずは、templates\chatフォルダを作成し、直下にbase.htmlを作成して以下のhtmlコードを定義します。
{% load static %}
<!DOCTYPE html>
<html lang="ja">
<head>
    <meta charset="utf-8">
    <!-- This file has been downloaded from Bootsnipp.com. Enjoy! -->
    <title>Django Chat</title>
        <meta name="viewport" content="width=device-width, initial-scale=1">
    <link href="http://maxcdn.bootstrapcdn.com/bootstrap/4.1.1/css/bootstrap.min.css" rel="stylesheet">
    <link rel="stylesheet" href="{% static 'css/chat_room.css' %}">
    <link href="https://cdnjs.cloudflare.com/ajax/libs/font-awesome/4.7.0/css/font-awesome.css" type="text/css" rel="stylesheet">
</head>
<body>
<html>
<head>
<nav class="navbar navbar-expand-md navbar-dark bg-info navbar-fixed-top">
    <button class="navbar-toggler" type="button" data-toggle="collapse" data-target="#navbarSupportedContent" aria-controls="navbarSupportedContent" aria-expanded="false" aria-label="Toggle navigation">
      <span class="navbar-toggler-icon"></span>
    </button>
    <div class="collapse navbar-collapse" id="navbarSupportedContent">
      <ul class="navbar-nav mr-auto">
      </ul>
      <ul class="navbar-nav">
       <li class="nav-item">
        <a class="nav-link" href="#">{{ user.username}}さん</a></li>
       <li class="nav-item">
        <a class="nav-link" href="#">検索</a></li>
       <li class="nav-item">
          <a class="nav-link" href="{% url 'logout' %}">ログアウト</a></li>
        <li class="nav-item">
          <a class="nav-link" href="{% url 'password_change' %}">パスワード変更</a>
      </li>
      </ul>
    </div>
  </nav>
</head>
<body>
<div class="container">
{% block title%}{% endblock %}
<div class="messaging">
      <div class="inbox_msg">
        <div class="inbox_people">
          <div class="headind_srch">
            <div class="recent_heading">
              <h5>ユーザ検索画面</h5>
            </div>
          </div>
          <div class="inbox_chat">
            <div class="chat_list active_chat">
              <div class="chat_people">
                <div class="chat_img"> <img src="https://ptetutorials.com/images/user-profile.png" alt="sunil"> </div>
                <div class="chat_ib">
                  <h5>AAA </h5>
                </div>
              </div>
            </div>
            <div class="chat_list">
              <div class="chat_people">
                <div class="chat_img"> <img src="https://ptetutorials.com/images/user-profile.png" alt="sunil"> </div>
                <div class="chat_ib">
                  <h5>BBB </h5>
                </div>
              </div>
            </div>
            <div class="chat_list">
                <div class="chat_people">
                  <div class="chat_img"> <img src="https://ptetutorials.com/images/user-profile.png" alt="sunil"> </div>
                  <div class="chat_ib">
                    <h5>CCC </h5>
                  </div>
                </div>
              </div>
       </div>
        </div>
        {% block contents%}{% endblock %}
      </div>
      <p class="text-center top_spac"> It is composed of Django + DRF + JavaScript.<a target="_blank" href="https://www.linkedin.com/in/sunil-rajput-nattho-singh/"></a></p>
    </div></div>
    </body>
    </html>
<script type="text/javascript"></script>
<script src="http://code.jquery.com/jquery-1.11.1.min.js"></script>
<script src="http://maxcdn.bootstrapcdn.com/bootstrap/4.1.1/js/bootstrap.min.js"></script>
</body>
</html>
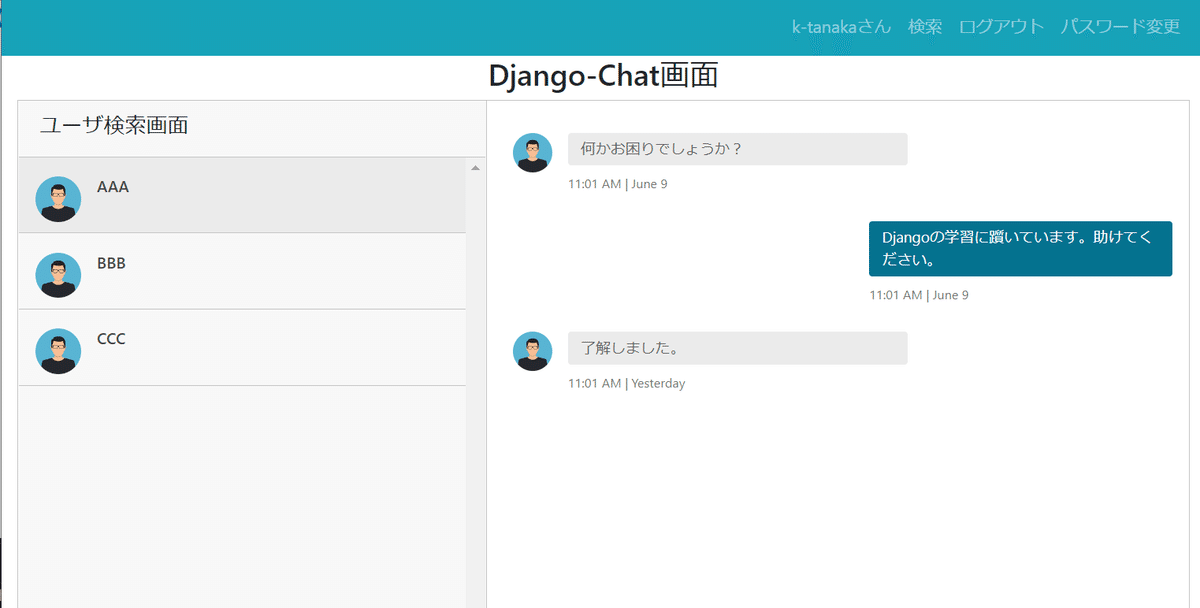
base.htmlには、チャット画面で共通利用するログオンユーザ名(user.username)の表示と、ログアウト、パスワード変更画面へのリンクを設定しています。
<ul class="navbar-nav">
<li class="nav-item">
<a class="nav-link" href="#">{{ user.username}}さん</a></li>
<li class="nav-item">
<a class="nav-link" href="#">検索</a></li>
<li class="nav-item">
    <a class="nav-link" href="{% url 'logout' %}">ログアウト</a></li>
<li class="nav-item">
    <a class="nav-link" href="{% url 'password_change' %}">パスワード変更</a>
</li>
</ul>次にtemplates\chat\chat_box.htmlを作成します。
{% extends './base.html' %}
{% load static %}
{% block title %}
<h3 class=" text-center">Django-Chat画面</h3>
{% endblock %}
{% block contents %}
<div class="mesgs">
    <div class="msg_history">
      <div class="incoming_msg">
        <div class="incoming_msg_img"> <img src="https://ptetutorials.com/images/user-profile.png" alt="sunil"> </div>
        <div class="received_msg">
          <div class="received_withd_msg">
            <p>何かお困りでしょうか?</p>
            <span class="time_date"> 11:01 AM    |    June 9</span></div>
        </div>
      </div>
      <div class="outgoing_msg">
        <div class="sent_msg">
          <p>Djangoの学習に躓いています。助けてください。</p>
          <span class="time_date"> 11:01 AM    |    June 9</span> </div>
      </div>
      <div class="incoming_msg">
        <div class="incoming_msg_img"> <img src="https://ptetutorials.com/images/user-profile.png" alt="sunil"> </div>
        <div class="received_msg">
          <div class="received_withd_msg">
            <p>了解しました。</p>
            <span class="time_date"> 11:01 AM    |    Yesterday</span></div>
        </div>
      </div>
    </div>
    <div class="type_msg">
      <div class="input_msg_write">
        <input type="text" class="write_msg" placeholder="メッセージを入力してください。" />
        <button class="msg_send_btn" type="button"><i class="fa fa-paper-plane-o" aria-hidden="true"></i></button>
      </div>
    </div>
  </div>
{% endblock %}
まず、base.htmlを拡張利用するため、以下のコードを追加します。
静的ファイルも扱うので、load staticタグも追加しておきます。
{% extends './base.html' %}
{% load static %}mesgsクラス内部にチャットの会話が表示されるような構成になっています。
現時点では、動的ではなくhtmlコード直書きで会話のサンプルを記載してあります。
それでは、TOP画面からログオンしてチャットルームに遷移する動作を確認してみましょう。
以下の通り、http://127.0.0.1:8000/にアクセス→「ログイン」ボタンを押して認証を行った後にチャットルーム(http://127.0.0.1:8000/chat_room/)へ遷移すればOKです。
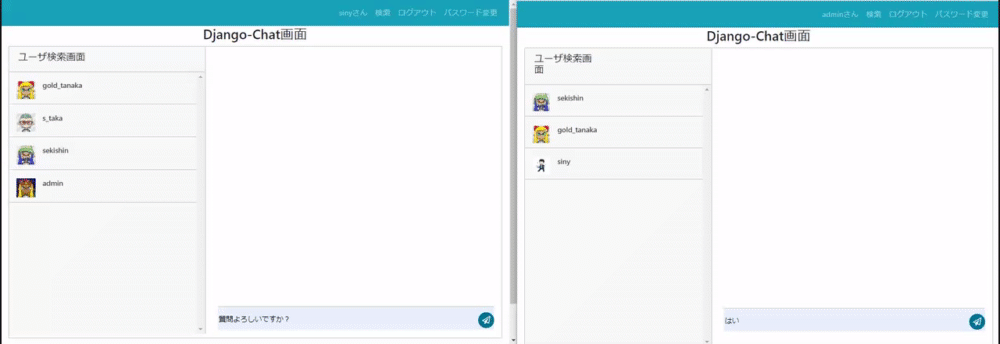
以下のようなチャット画面が表示されます。

また、http://127.0.0.1:8000/にアクセス→「ユーザ登録」→必要事項を入力して「登録」ボタンを押すとユーザが登録処理が実行され、自動的にログオン後にhttp://127.0.0.1:8000/chat_room/(下画面)にリダイレクトされることを確認しましょう。
以上で認証関連の設定は完了です。
補足
今回、templates\registrationフォルダを作成してその直下にlogin.htmlを配置し、ログイン画面遷移としてhome.htmlで以下の設定を定義しました。
<a href="{% url 'login' %}" class="login_text text-white">ログイン</a>これで、Home画面(http://127.0.0.1:8000/)上の「ログイン」ボタンを押すとログイン画面(http://127.0.0.1:8000/accounts/login/)へ遷移し、templates\registration\login.htmlが利用されてログイン画面が表示されるという流れになっています。
ログイン画面としてlogin.htmlを利用するという設定を特に行っていませんが、うまいこと利用してくれくれています。
これは、以下のような理由です。
今回、ログイン処理等はDjangoが標準で提供するdjango.contrib.authを利用しています。
※config/urls.pyで以下の通りdjango.contrib.auth.urlsをインクルードして利用できるようにしています。
path('accounts/', include('django.contrib.auth.urls')),#追加django\contrib\auth\urls.pyにはログイン用のURLパターンとして以下が定義されています。
path('login/', views.LoginView.as_view(), name='login'),さらに、LoginViewクラスを参照すると以下の通りtemplate_nameに‘registration/login.html`が指定されていることがわかります。
class LoginView(SuccessURLAllowedHostsMixin, FormView):
    """
    Display the login form and handle the login action.
    """
    form_class = AuthenticationForm
    authentication_form = None
    redirect_field_name = REDIRECT_FIELD_NAME
    template_name = 'registration/login.html'
    redirect_authenticated_user = False
extra_context = Noneただし、実際にLib\site-packages\django\contrib\auth\templates\registrationを参照するとわかりますが、login.htmlというテンプレート名は存在していません。
次に、Djangoが探索するテンプレートの優先順位が関係してきます。
Djangoにおけるテンプレートの探索順は、デフォルトでsettings.pyのTEMPLATES内に定義されているDIRで指定したディレクトリを最優先で探索するようになっています。
今回、以下の様に設定しているためDjangoプロジェクト直下のtemplatesフォルダが最優先で探索されることになります。
'DIRS': [os.path.join(BASE_DIR, 'templates')]DIRSパスの次にpip installでインストールしたパッケージやDjango標準で備わっているtemplatesフォルダが探索されます。
上記を踏まえ、今回のログオン処理時に利用されるlogin.htmlの探索順序をまとめると以下の様になっています。
優先順位1: Djangoプロジェクト\templates
優先順位2:Lib\site-packages\django\contrib\admin\templates
優先順位3:Lib\site-packages\django\contrib\auth\templates
LoginViewクラスでは、template_nameに‘registration/login.html`が指定されているため、具体的には以下の順でlogin.htmlを探索しに行くことになります。
優先順位1: Djangoプロジェクト\templates\
優先順位2:..\contrib\admin\templates\registration\login.html
優先順位3:..\contrib\auth\templates\registration\login.html
この時、最優先で探索されるDjangoプロジェクト\templates\直下に同じ名称のregistrationフォルダを作成し、login.htmlを配置することでDjangoプロジェクト\templates\registration\login.htmlが最優先で探索されるようになります。
上記のため、特にlogin.htmlの利用パスを指定していなくてもLoginViewクラス内のtemplate_nameの設定に従いDjangoプロジェクト\templates\registration\login.htmlを利用してくれるようになります。
ちなみに以下のパスにはlogin.htmlというテンプレートは存在していないため、自身でlogin.htmlを作成して配置する必要があります。
優先順位2:..\contrib\admin\templates\registration\
優先順位3:..\contrib\auth\templates\registration\
このチュートリアルでは扱いませんが、パスワード変更等のテンプレートについてもカスタマイズしたテンプレートをDjangoプロジェクト\templates\registration直下に配置することでテンプレートを上書きでカスタマイズすることができます。
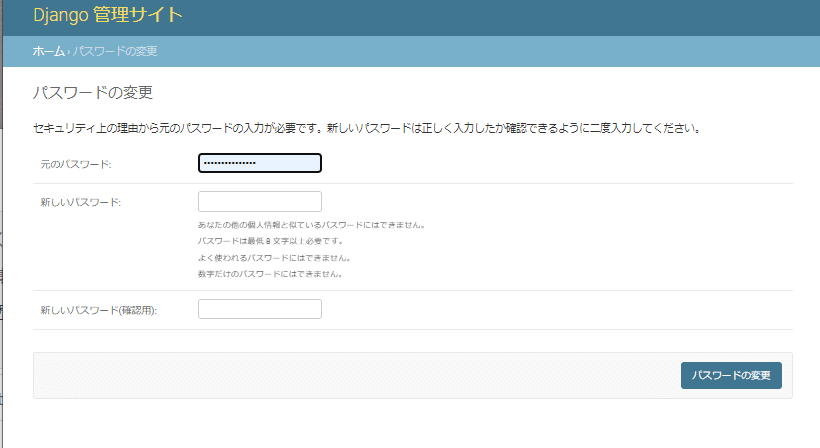
なお、パスワード変更のテンプレートについてはデフォルトでLib\site-packages\django\contrib\admin\templates\registration\password_change_form.htmlが利用されます。
これは、adminサイト用のパスワード変更画面テンプレートです。
ログインした後に画面上部の「パスワード変更」をおすと、以下の様にadminサイトのデザインが適用されたパスワード変更画面が表示されます。
以上でPart1は完了です。
Part2では、チャット対象のユーザの検索と追加機能の実装を行っていきます。
お疲れさまでした!
ここから先は

Djangoでリアルタイムチャットアプリを開発するレシピ
このマガジンはDjangoデリアリタイムチャットアプリを開発する方法を学べるチュートリアルノートです。 以下の3つの記事で構成されてい…
Amazonギフトカード5,000円分が当たる
主にITテクノロジー系に興味があります。 【現在興味があるもの】 python、Django,統計学、機械学習、ディープラーニングなど。 技術系ブログもやってます。 https://sinyblog.com/