WPFとNAudioで音楽プレイヤーを作る~第7回:連続再生に対応する~
第7回:連続再生に対応する
今回のポイント
WavewOutDeviceの状態によってボタンの文字と処理を切り替える
DispatcherTimerで楽曲の状態を監視する
現状の問題
前回の最後に以下のような問題を上げました。今回はそれらをすべて解決していきます。
楽曲が停止できない
→停止ボタンと一時停止ボタンを作る再生中に楽曲が変更できない
→楽曲が停止状態、または一時停止状態のとき、新しく選択された曲の再生処理を行う1曲の再生が終わったあと手動で再び再生しないといけない
→楽曲の状態を検知して次の曲を自動で再生する
完成形
先に完成形を載せておきます。
MainWindow.xaml
<Window x:Class="MusicPlayer.MVVM.View.MainWindow"
        xmlns="http://schemas.microsoft.com/winfx/2006/xaml/presentation"
        xmlns:x="http://schemas.microsoft.com/winfx/2006/xaml"
        xmlns:d="http://schemas.microsoft.com/expression/blend/2008"
        xmlns:mc="http://schemas.openxmlformats.org/markup-compatibility/2006"
        xmlns:local="clr-namespace:MusicPlayer"
        mc:Ignorable="d"
        Title="MainWindow" Height="450" Width="800"
        xmlns:viewmodels="clr-namespace:MusicPlayer.MVVM.ViewModel"
        xmlns:ui="http://schemas.modernwpf.com/2019"
        ui:WindowHelper.UseModernWindowStyle="True"
        d:DataContext="{d:DesignInstance Type=viewmodels:MainWindowViewModel}"
        Background="#262626"
        Foreground="White"
        MinHeight="600"
        MinWidth="950"
        xmlns:ctrl="clr-namespace:Itenso.Windows.Controls.ListViewLayout;assembly=Itenso.Windows.Controls.ListViewLayout"
        xmlns:i="http://schemas.microsoft.com/expression/2010/interactivity"
        xmlns:cmd="http://www.galasoft.ch/mvvmlight"
        >
    <Grid>
        <Grid.ColumnDefinitions>
            <ColumnDefinition Width="150" />
            <ColumnDefinition />
        </Grid.ColumnDefinitions>

        <Grid.RowDefinitions>
            <RowDefinition />
            <RowDefinition Height="80"/>
        </Grid.RowDefinitions>

        <Grid Grid.Column="0" Grid.Row="1">
            <Grid.ColumnDefinitions>
                <ColumnDefinition />
                <ColumnDefinition />
            </Grid.ColumnDefinitions>

            <Button
                Grid.Column="0"
                Width="30" Height="30"
                HorizontalAlignment="Center"
                Content="■"
                Command="{Binding OnStopButtonClickCommand}"
                />

            <Button
                Grid.Column="1"
                Width="30" Height="30"
                HorizontalAlignment="Center"
                Content="{Binding PlayButtonContent}"
                Command="{Binding OnPlayButtonClickCommand}"
                />
        </Grid>

        <ui:NavigationView  Background="#131313"
                            Grid.Column="0" Grid.Row="0"
                            x:Name="NaviView"
                            IsBackButtonVisible="Collapsed"
                            IsSettingsVisible="False"
                            IsTitleBarAutoPaddingEnabled="False"
                            IsPaneToggleButtonVisible="False"
                            PaneDisplayMode="Left"
                            Width="150"
                            >
            <ui:NavigationView.MenuItems>
                <ui:NavigationViewItem
                    Content="Music"
                    Icon="Audio"
                    IsSelected="True" />
            </ui:NavigationView.MenuItems>
        </ui:NavigationView>

        <Grid Background="#131313"
              Grid.Column="1" Grid.Row="0">
            <Grid.RowDefinitions>
                <RowDefinition Height="80"/>
                <RowDefinition />
            </Grid.RowDefinitions>

            <TextBlock Grid.Row="0"
                       Text="Music"
                       Margin="30,30,30,0"
                       FontWeight="Bold"
                       FontSize="24" />
            <ListView Grid.Row="1"
                      Margin="30,0,0,0"
                      x:Name="MusicList"
                      SelectionMode="Single"
                      ctrl:ListViewLayoutManager.Enabled="true"
                      ItemsSource="{Binding MusicList}"
                      >
                <ListView.View>
                    <GridView ScrollViewer.VerticalScrollBarVisibility="Auto">
                        <GridViewColumn Header="Title"
                                        DisplayMemberBinding="{Binding Title}"
                                        ctrl:ProportionalColumn.Width="8"/>
                        <GridViewColumn Header="Artist"
                                        DisplayMemberBinding="{Binding Artist}"
                                        ctrl:ProportionalColumn.Width="4"/>
                        <GridViewColumn Header="Album"
                                        DisplayMemberBinding="{Binding Album}"
                                        ctrl:ProportionalColumn.Width="5"/>
                        <GridViewColumn Header="Track"
                                        DisplayMemberBinding="{Binding Track}"
                                        ctrl:ProportionalColumn.Width="2"/>
                        <GridViewColumn Header="Time"
                                        DisplayMemberBinding="{Binding Time}"
                                        ctrl:ProportionalColumn.Width="3"/>
                    </GridView>
                </ListView.View>
                <i:Interaction.Triggers>
                    <i:EventTrigger EventName="SelectionChanged">
                        <cmd:EventToCommand Command="{Binding OnSelectionChangedCommand}" PassEventArgsToCommand="True"/>
                    </i:EventTrigger>
                </i:Interaction.Triggers>
            </ListView>
        </Grid>
    </Grid>
</Window>
MainWindowViewModel.cs
using GalaSoft.MvvmLight.Command;
using MusicPlayer.MVVM.Common;
using MusicPlayer.MVVM.Model;
using NAudio.Wave;
using System;
using System.Collections;
using System.Collections.Generic;
using System.ComponentModel;
using System.Threading;
using System.Windows.Controls;
using System.Windows.Input;
using System.Windows.Threading;

namespace MusicPlayer.MVVM.ViewModel
{
    class MainWindowViewModel : INotifyPropertyChanged
    {
        // 変数の更新通知用
        public event PropertyChangedEventHandler PropertyChanged;

        public MainWindowModel _model = new MainWindowModel();

        // 音声読み込み
        private AudioFileReader _afr;

        // 音楽再生用の出力デバイス
        private WaveOutEvent _outputDevice = new WaveOutEvent();

        // 選択された楽曲
        private Music _currentMusic;

        // 再生ボタンに表示する文字
        private string _playButtonContent = "▶";
        public string PlayButtonContent
        {
            get { return this._playButtonContent; }
            set
            {
                this._playButtonContent = value;
                NotifyPropertyChanged("PlayButtonContent");
            }
        }

        // 音楽の一覧
        private List<Music> _musicList;
        public List<Music> MusicList
        {
            get { return this._musicList; }
            set
            {
                this._musicList = value;
                NotifyPropertyChanged("MusicList");
            }
        }

        // 選択された楽曲
        private Music _selectedMusic;
        public Music SelectedMusic
        {
            get { return this._selectedMusic; }
            set { this._selectedMusic = value; }
        }

        // タイマー
        private DispatcherTimer _timer;

        private void NotifyPropertyChanged(String info)
        {
            if (PropertyChanged != null) PropertyChanged(this, new PropertyChangedEventArgs(info));
        }

        /// <summary>再生ボタンが押されたときのコマンド</summary>
        public ICommand OnPlayButtonClickCommand { get; set; }

        /// <summary>停止ボタンが押されたときのコマンド</summary>
        public ICommand OnStopButtonClickCommand { get; set; }

        /// <summary>ListViewで選択された曲が変わったときのコマンド</summary>
        public ICommand OnSelectionChangedCommand { get; set; }

        /// <summary>
        /// コンストラクタ
        /// </summary>
        public MainWindowViewModel()
        {
            // フォルダ内の音楽の読込
            MusicList = this._model.LoadMusicFiles();
            // 再生ボタン用のコマンド
            OnPlayButtonClickCommand = new MyRelayCommand(OnPlayButtonClick);
            // 停止ボタン用のコマンド
            OnStopButtonClickCommand = new MyRelayCommand(OnStopButtonClick);
            // ListView用のコマンド
            OnSelectionChangedCommand = new RelayCommand<SelectionChangedEventArgs>(OnSelectionChanged);
            // タイマーの初期化
            SetupTimer();
        }

        /// <summary>
        /// 再生ボタンが押されたときの処理
        /// </summary>
        private void OnPlayButtonClick()
        {
            // 起動直後で何も選択されていないときは何もしない
            if (SelectedMusic == null) return;
            // 曲の再生状況に応じて処理を分岐
            switch (this._outputDevice.PlaybackState)
            {
                case PlaybackState.Stopped:
                    // 状態①:停止→再生への変更
                    // 再生ボタンのテキストを一時停止に変更
                    PlayButtonContent = "||";
                    // 選択された曲を現在再生中の曲として設定
                    this._currentMusic = SelectedMusic;
                    // 出力デバイスに曲を設定
                    this._outputDevice.Init(InitializeStream(this._currentMusic));
                    // 再生
                    this._outputDevice.Play();
                    // タイマースタート
                    this._timer.Start();
                    break;
                case PlaybackState.Paused:
                    // 状態④:一時停止→再生への変更
                    // 再生ボタンのテキストを一時停止に変更
                    PlayButtonContent = "||";
                    if (_model.IsSelectedMusicChanged(_musicList,_currentMusic,_selectedMusic))
                    {
                        // 一時停止中に選択楽曲が変更されていた場合
                        // 停止処理
                        OnStopButtonClick();
                        // 再生開始処理
                        OnPlayButtonClick();
                        return;
                    }
                    // 再生
                    this._outputDevice.Play();
                    break;
                case PlaybackState.Playing:
                    // 状態②:再生→一時停止への変更
                    // 再生ボタンのテキストを再生に変更
                    PlayButtonContent = "▶";
                    this._outputDevice.Pause();
                    break;
                default:
                    break;
            }
        }

        /// <summary>
        /// 停止ボタンが押されたときの処理
        /// </summary>
        private void OnStopButtonClick()
        {
            // 曲の再生状況に応じて処理を分岐
            switch (this._outputDevice.PlaybackState)
            {
                case PlaybackState.Playing:
                    // 状態③:再生→停止への変更
                    // 再生ボタンのテキストを再生に変更
                    PlayButtonContent = "▶";
                    break;
                case PlaybackState.Paused:
                    // 状態⑤:一時停止→停止への変更
                    // 再生ボタンのテキストを再生に変更
                    PlayButtonContent = "▶";
                    break;
            }
            // タイマーストップ
            this._timer.Stop();
            // 停止
            _outputDevice.Stop();
        }

        /// <summary>
        /// ListViewで選択されたものが変わったときの処理
        /// </summary>
        /// <param name="e"></param>
        private void OnSelectionChanged(SelectionChangedEventArgs e)
        {
            if (e.AddedItems.Count != 0) this.SelectedMusic = (Music)e.AddedItems[0];
        }

        /// <summary>
        /// AudioFileReaderを初期化する
        /// </summary>
        /// <param name="music"></param>
        /// <returns></returns>
        private AudioFileReader InitializeStream(Music music)
        {
            // サウンドファイルを読み込む
            this._afr = new AudioFileReader(music.Path);
            return _afr;
        }

        /// <summary>
        /// タイマーの初期化処理
        /// </summary>
        private void SetupTimer()
        {
            this._timer = new DispatcherTimer(DispatcherPriority.Normal)
            {
                // インターバル
                Interval = TimeSpan.FromMilliseconds(500),
            };
            // タイマーメソッド
            this._timer.Tick += (sender, e) =>
            {
                // 再生中に停止した(1曲の再生が終わった)とき
                if (this._outputDevice.PlaybackState == PlaybackState.Stopped)
                {
                    // 次の曲がある場合は再生、無いならタイマーを止める
                    PlayNextOrStopTimer(this._currentMusic);
                }
            };
        }

        /// <summary>
        /// 次に再生する曲があるなら再生する、無ければタイマーを止める
        /// </summary>
        /// <param name="currentMusic"></param>
        private void PlayNextOrStopTimer(Music currentMusic)
        {
            // 再生中の曲のインデックスを取得
            int index = MusicList.IndexOf(currentMusic);
            if (MusicList.Count != index + 1)
            {
                // 次の曲がまだある時の処理
                // 再生中の曲を更新
                this._currentMusic = MusicList[++index];
                // outputDeviceに曲をセット
                this._outputDevice.Init(InitializeStream(this._currentMusic));
                // 再生ボタンのテキストを一時停止に変更
                PlayButtonContent = "||";
                // 再生
                this._outputDevice.Play();
            }
            else
            {
                // 再生ボタンのテキストを変える
                PlayButtonContent = "▶";
                // 次に再生できる曲がないのでタイマーを停止
                _timer.Stop();
            }
        }
    }
}
MainWindowModel.cs
using MusicPlayer.MVVM.Common;
using System;
using System.Collections.Generic;
using System.Linq;

namespace MusicPlayer.MVVM.Model
{
    public class MainWindowModel
    {
        /// <summary>
        /// 音楽ファイルの読込処理
        /// </summary>
        public List<Music> LoadMusicFiles()
        {
            // MUSIC配下のmp3ファイルのパスを全取得
            string[] filePaths = System.IO.Directory.GetFiles(@"C:\Users\kmpkp\Music\MUSIC", "*.mp3", System.IO.SearchOption.AllDirectories);

            // 音楽の情報を読み込んでリストに入れる
            List<Music> musicList = new List<Music>();
            foreach (string filePath in filePaths)
            {
                TagLib.File file = TagLib.File.Create(filePath);
                Music music = new Music()
                {
                    Path = filePath,
                    Title = file.Tag.Title,
                    Album = file.Tag.Album,
                    Artist = file.Tag.Performers[0],
                    Track = file.Tag.Track,
                    Time = new TimeSpan(0, 0, file.Properties.Duration.Minutes, file.Properties.Duration.Seconds),
                };
                musicList.Add(music);
            }

            return musicList.OrderBy(m => m.Album)
                           .ThenBy(m => m.Track)
                           .ToList();
        }

        /// <summary>
        /// 一時停止中にListViewで選択された曲が変更されたかどうかを判定する
        /// </summary>
        /// <param name="musicList"></param>
        /// <param name="currentMusic"></param>
        /// <param name="selectedMusic"></param>
        /// <returns></returns>
        public bool IsSelectedMusicChanged(List<Music> musicList, Music currentMusic, Music selectedMusic)
        {
            int currentMusicIndex = musicList.IndexOf(currentMusic);
            int selectedMusicIndex = musicList.IndexOf(selectedMusic);
            return currentMusicIndex != selectedMusicIndex;
        }
    }
}
ボタンを作る前に
今回は停止ボタンと一時停止ボタンを作るのですが、停止ボタンは独立した別のボタンとして、
一時停止ボタンは再生ボタンの処理を切り替えて実装したいと思います。
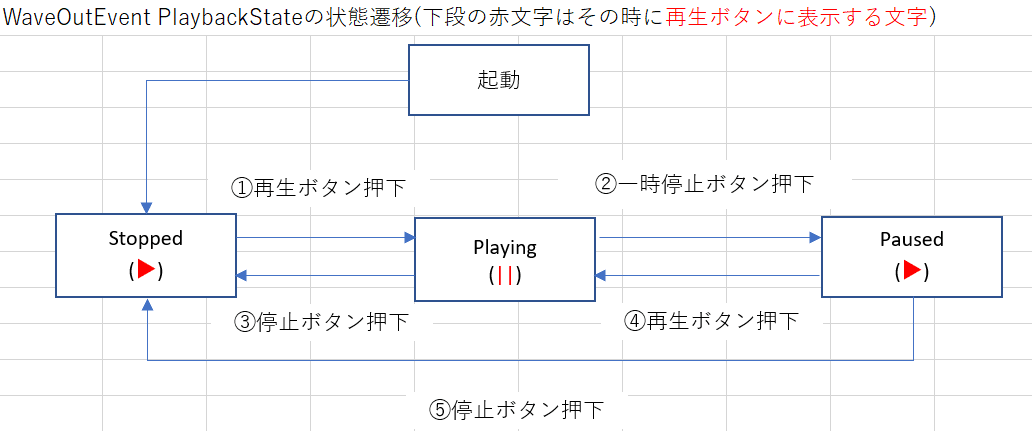
処理を切り替えて、という部分が厄介で、つまり楽曲の再生状況(= WaveOuteEventのPlaybackStateプロパティ)に応じてボタンに表示する文字を変えなければいけません。
状態遷移図を書いてみたので、このあとの解説と一緒に見てみてください。

停止ボタンを作る
それでは停止ボタンを作成します。
まずは画面側から。
MainWindow.xaml
第4回のときに画面全体をGridで4分割していましたが、そのうちの左下の区画をさらに2分割してそれぞれにボタンを配置しています。
停止ボタンのコマンドにはOnStopButtonClickCommandをバインドしています。
再生ボタンのContentには表示する文字を切り替えるためにPlayButtonContentをバインドしました。
<Grid>
    省略
    <Grid Grid.Column="0" Grid.Row="1">
        <Grid.ColumnDefinitions>
            <ColumnDefinition />
            <ColumnDefinition />
        </Grid.ColumnDefinitions>

        <Button
            Grid.Column="0"
            Width="30" Height="30"
            HorizontalAlignment="Center"
            Content="■"
            Command="{Binding OnStopButtonClickCommand}"
            />

        <Button
            Grid.Column="1"
            Width="30" Height="30"
            HorizontalAlignment="Center"
            Content="{Binding PlayButtonContent}"
            Command="{Binding OnPlayButtonClickCommand}"
            />
    </Grid>
    省略
</Grid>
MainWindowViewModel
まずは停止ボタン用のコマンドの追加とコンストラクタでの初期化を行います。
この辺りは定番の記述になります。
画面から何か引数を渡さなければならないということは無いのでMyRelayCommandを使っています。
(本当はこんなよくわからない使い分けをしないように作るべきですが…)
/// <summary>停止ボタンが押されたときのコマンド</summary>
public ICommand OnStopButtonClickCommand { get; set; }

/// <summary>
/// コンストラクタ
/// </summary>
public MainWindowViewModel()
{
    // フォルダ内の音楽の読込
    MusicList = this._model.LoadMusicFiles();
    // 再生ボタン用のコマンド
    OnPlayButtonClickCommand = new MyRelayCommand(OnPlayButtonClick);
    // 停止ボタン用のコマンド
    OnStopButtonClickCommand = new MyRelayCommand(OnStopButtonClick);
    // ListView用のコマンド
    OnSelectionChangedCommand = new RelayCommand<SelectionChangedEventArgs>(OnSelectionChanged);
}
次に再生ボタンに表示する文字用のプロパティを用意します。
起動時に▶を表示するように初期化しています。
// 再生ボタンに表示する文字
private string _playButtonContent = "▶";
public string PlayButtonContent
{
    get { return this._playButtonContent; }
    set
    {
        this._playButtonContent = value;
        NotifyPropertyChanged("PlayButtonContent");
    }
}
最後にコマンドから呼ばれる処理を作ります。
先程の状態遷移図とswitch文の処理を見比べてください。
また21行目のところは連続再生のときに使うので一旦コメントアウトしています。
/// <summary>
/// 停止ボタンが押されたときの処理
/// </summary>
private void OnStopButtonClick()
{
    // 曲の再生状況に応じて処理を分岐
    switch (this._outputDevice.PlaybackState)
    {
        case PlaybackState.Playing:
            // 状態③:再生→停止への変更
            // 再生ボタンのテキストを再生に変更
            PlayButtonContent = "▶";
            break;
        case PlaybackState.Paused:
            // 状態⑤:一時停止→停止への変更
            // 再生ボタンのテキストを再生に変更
            PlayButtonContent = "▶";
            break;
    }
    // タイマーストップ
    // this._timer.Stop();
    // 停止
    _outputDevice.Stop();
}
一時停止ボタンを作る
MainWindowViewModel
一時停止ボタンは再生ボタンの処理を切り替えて実装します。
第6回のときにOnPlayButtonClickメソッド内にswitch文を実装しましたが処理のない部分がありました。
今回はその部分を埋める形で処理を追加していきます。
状態遷移図を見てどういう処理を実装しているのか確認しながら見てみてください。
また、状態④:一時停止→再生への変更の処理の中で更に分岐しています。
これは一時停止中にListViewで選択された楽曲が変更されていた場合を想定しています。
それを判定するためにMainWindowModelに判定用のメソッドを用意しています。
変更されていなければ一時停止した曲を途中から再生します。
変更されていた場合は新しく選択された曲を始めから再生します。
/// <summary>
/// 再生ボタンが押されたときの処理
/// </summary>
private void OnPlayButtonClick()
{
    // 起動直後で何も選択されていないときは何もしない
    if (SelectedMusic == null) return;
    // 曲の再生状況に応じて処理を分岐
    switch (_outputDevice.PlaybackState)
    {
        case PlaybackState.Stopped:
            // 状態①:停止→再生への変更
            // 再生ボタンのテキストを一時停止に変更
            PlayButtonContent = "||";
            // 選択された曲を現在再生中の曲として設定
            this._currentMusic = SelectedMusic;
            // 出力デバイスに曲を設定
            this._outputDevice.Init(InitializeStream(this._currentMusic));
            // 再生
            this._outputDevice.Play();
            break;
        case PlaybackState.Paused:
            // 状態④:一時停止→再生への変更
            // 再生ボタンのテキストを一時停止に変更
            PlayButtonContent = "||";
            // 一時停止中に選択楽曲が変更されたか?
            if (_model.IsSelectedMusicChanged(_musicList,_currentMusic,_selectedMusic))
            {
                // 新しく選択された曲をはじめから再生する
                // 停止処理
                OnStopButtonClick();
                // 再生開始処理
                OnPlayButtonClick();
                return;
            }
            // 途中から再生
            this._outputDevice.Play();
            break;
        case PlaybackState.Playing:
            // 状態②:再生→一時停止への変更
            // 再生ボタンのテキストを再生に変更
            PlayButtonContent = "▶";
            this._outputDevice.Pause();
            break;
        default:
            break;
    }
}
MainWindowModel
一時停止中にListViewで選択された曲が変更されたかどうかを判定するメソッドを作成しました。
現在再生中の曲(currentMusic)とListViewで選択された曲(selectedMusic)のインデックスを比較しています。
/// <summary>
/// 一時停止中にListViewで選択された曲が変更されたかどうかを判定する
/// </summary>
/// <param name="musicList"></param>
/// <param name="currentMusic"></param>
/// <param name="selectedMusic"></param>
/// <returns></returns>
public bool IsSelectedMusicChanged(List<Music> musicList, Music currentMusic, Music selectedMusic)
{
    int currentMusicIndex = musicList.IndexOf(currentMusic);
    int selectedMusicIndex = musicList.IndexOf(selectedMusic);
    return currentMusicIndex != selectedMusicIndex;
}
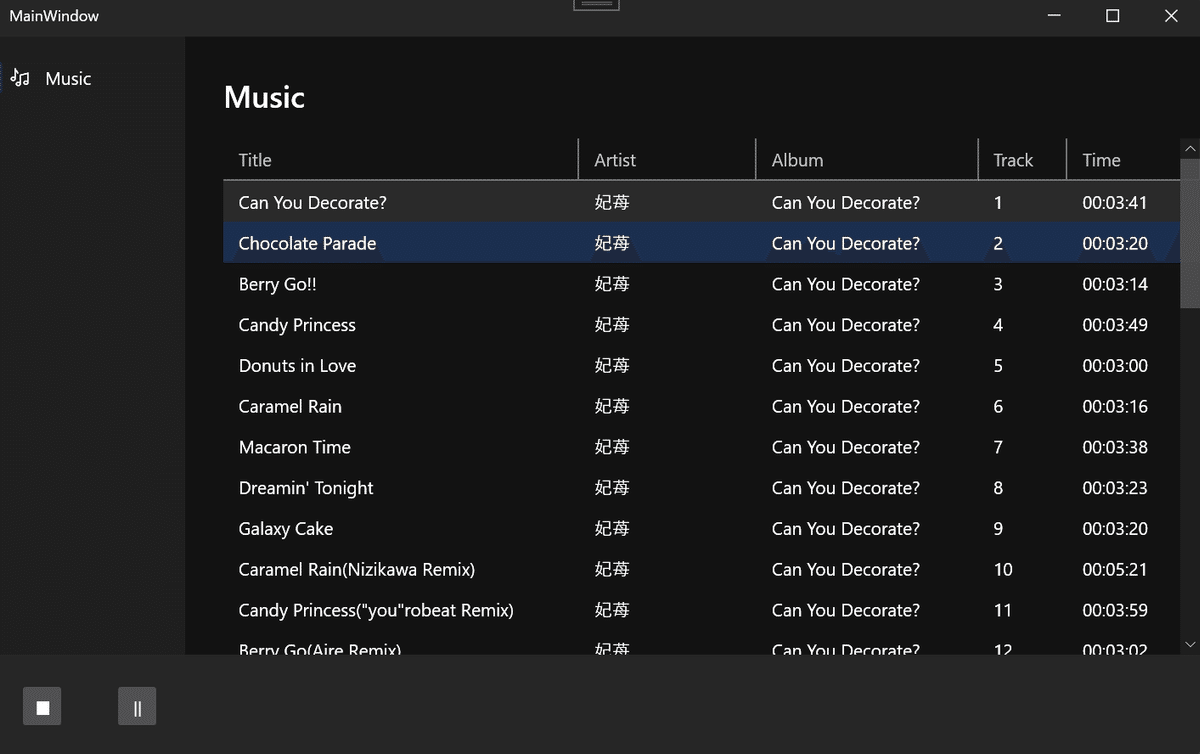
ここまでできたら実行してみましょう。
以下のところに注目して操作してみてください。
曲が再生できること
曲を再生すると再生ボタンの文字が変わること
一時停止ボタンを押すと曲が停止すること
再度再生ボタンを押すと途中から曲が再生されること
一時停止中にListViewで別の曲を選択したあとに再生ボタンを押すとその曲が始めから再生されること
停止ボタンを押すと曲が停止すること

連続再生に対応する
状態が増えて処理が複雑になってきましたがまだ終わりではありません。
今のままだと1曲分の再生が終わったあとに止まってしまいます。
連続再生できるように処理を追加しましょう。
連続再生処理を作る前に
連続再生の機能を作る前に、どのようにしてこの機能を実現するのか整理します。
ポイントとなるのは WaveOuteEventのPlaybackStateプロパティ です。
PlaybackStateプロパティは楽曲の再生中はPlayingの状態になりますが、1曲の再生が完了するとStoppedの状態に遷移します。
これをDispatcherTimerで検知して、Stoppedになったら次の曲を再生するという方法を取りたいと思います。
タイマーを実装する
まずはタイマーを用意します。
コンストラクタではタイマー初期化用のメソッドを呼び出すようにします。
// タイマー
private DispatcherTimer _timer;

/// <summary>
/// コンストラクタ
/// </summary>
public MainWindowViewModel()
{
    省略
    // タイマーの初期化
    SetupTimer();
}
タイマーの初期化処理はこのようになっています。
まずはタイマーのインスタンスを作成します。(9行目)
引数として渡すDispatcherPriorityの値によって処理呼び出しの優先順位を決められます。(詳細)
タイマーをインスタンス化する際にはIntarvalプロパティも設定します。
今回は500ミリ秒(0.5秒)に設定しました。
12行目からはタイマーでの処理を書いています。
先程述べたように_outputDevice.PlaybackStateの状態を監視しています。
1曲の再生が終わったことを検知したら次の曲を再生するメソッドを呼びます。(後述)
/// <summary>
/// タイマーの初期化処理
/// </summary>
private void SetupTimer()
{
    this._timer = new DispatcherTimer(DispatcherPriority.Normal)
    {
        // インターバル
        Interval = TimeSpan.FromMilliseconds(500),
    };
    // タイマーメソッド
    this._timer.Tick += (sender, e) =>
    {
        // 再生中に停止した(1曲の再生が終わった)とき
        if (this._outputDevice.PlaybackState == PlaybackState.Stopped)
        {
            // 次の曲がある場合は再生、無いならタイマーを止める
            PlayNextOrStopTimer(this._currentMusic);
        }
    };
}
このメソッドでは次に再生できる曲があるかどうかを判定しています。
MusicListの中でのcurrentMusicのインデックスを取得して、それがリストの終わりでなければ
次の曲を_outputDeviceにセットして再生します。
再生できるものがない場合はタイマーを停止します。
再生ボタンのテキストを変えるのも忘れずに。
/// <summary>
/// 次に再生する曲があるなら再生する、無ければタイマーを止める
/// </summary>
/// <param name="currentMusic"></param>
private void PlayNextOrStopTimer(Music currentMusic)
{
    // 再生中の曲のインデックスを取得
    int index = MusicList.IndexOf(currentMusic);
    if (MusicList.Count != index + 1)
    {
        // 次の曲がまだある時の処理
        // 再生中の曲を更新
        this._currentMusic = MusicList[++index];
        // outputDeviceに曲をセット
        this._outputDevice.Init(InitializeStream(this._currentMusic));
        // 再生ボタンのテキストを一時停止に変更
        PlayButtonContent = "||";
        // 再生
        this._outputDevice.Play();
    }
    else
    {
        // 再生ボタンのテキストを変える
        PlayButtonContent = "▶";
        // 次に再生できる曲がないのでタイマーを停止
        _timer.Stop();
    }
}
再生ボタンと停止ボタンの処理にもタイマーの開始、停止の処理を入れておきましょう。(20,39行目)
/// <summary>
/// 再生ボタンが押されたときの処理
/// </summary>
private void OnPlayButtonClick()
{
    // 起動直後で何も選択されていないときは何もしない
    if (SelectedMusic == null) return;
    // 曲の再生状況に応じて処理を分岐
    switch (this._outputDevice.PlaybackState)
    {
        case PlaybackState.Stopped:
            // 状態①:停止→再生への変更
            // 再生ボタンのテキストを一時停止に変更
            PlayButtonContent = "||";
            // 選択された曲を現在再生中の曲として設定
            this._currentMusic = SelectedMusic;
            // 出力デバイスに曲を設定
            this._outputDevice.Init(InitializeStream(this._currentMusic));
            // タイマースタート
            this._timer.Start();
            // 再生
            this._outputDevice.Play();
            break;
        省略
    }
}

/// <summary>
/// 停止ボタンが押されたときの処理
/// </summary>
private void OnStopButtonClick()
{
    // 曲の再生状況に応じて処理を分岐
    switch (this._outputDevice.PlaybackState)
    {
        省略
    }
    // タイマーストップ
    this._timer.Stop();
    // 停止
    _outputDevice.Stop();
}
これでまた実行してみましょう。
曲の再生が終わったあとに次の曲が流れると思います。
次回は寂しい画面下部に表示やスライダーを追加していきたいと思います。
備考
再生ボタンのテキストを▶とか||などとベタ書きしていますが本来は定数として宣言しておいたほうがいいです。
