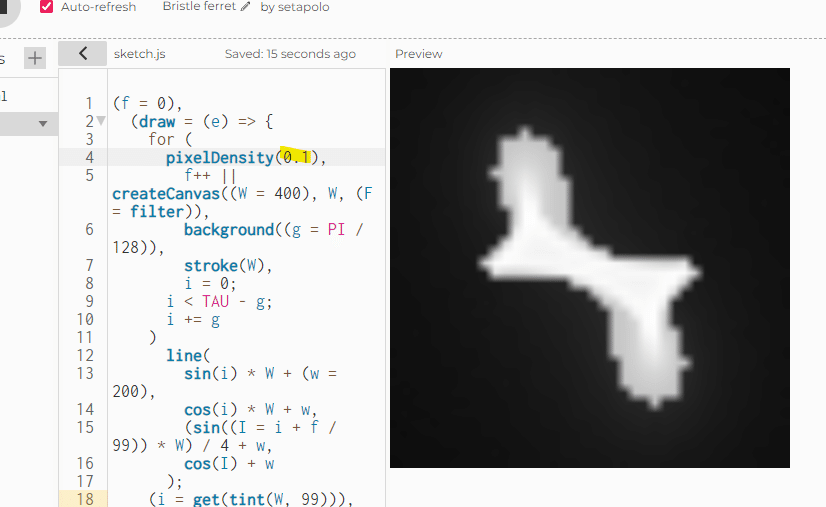
🐟動的な幾何学模様とビジュアルエフェクトの生成 でめきんユニバース

解説をお願いします
#つぶやきProcessing #genuary4 #genuary
— Koma Tebe (@KomaTebe) January 4, 2023
f=0,draw=e=>{for(pixelDensity(.9),f++||createCanvas(W=400,W,F=filter),background(g=PI/128),stroke(W),i=0;i<TAU-g;i+=g)line(sin(i)*W+(w=200),cos(i)*W+w,sin(I=i+f/99)*W/4+w,cos(I)+w);i=get(tint(W,99)),F(BLUR,1),F(THRESHOLD,.4),image(i,0,0)} pic.twitter.com/HK1SUhS4lY
f = 0,
draw = (e) => {
for (
pixelDensity(0.9),
f++ || createCanvas((W = 400), W, (F = filter)),
background((g = PI / 128)),
stroke(W),
i = 0;
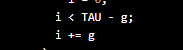
i < TAU - g;
i += g
)
line(
sin(i) * W + (w = 200),
cos(i) * W + w,
(sin((I = i + f / 99)) * W) / 4 + w,
cos(I) + w
);
(i = get(tint(W, 99))), F(BLUR, 1), F(THRESHOLD, 0.4), image(i, 0, 0);
};
変数と初期設定
f = 0:アニメーションフレームをカウントする変数です。
pixelDensity(0.9):キャンバスのピクセル密度を設定します。これは、ディスプレイのデフォルトピクセル密度と比べて少し低く設定されています。
createCanvas((W = 400), W, (F = filter)):幅と高さが400ピクセルのキャンバスを作成し、Wに400を代入します。また、Fをfilter関数に代入しています。
background((g = PI / 128)):背景色を設定していますが、ここではgをPI / 128の値に設定して使用しています。gは後で円を描く際のステップサイズとしても使われます。
メインループ
forループはTAU(円周率の2倍、つまり360度)までの範囲で繰り返され、各ステップでg(角度のステップサイズ)を加算します。
line関数は、動的に変化する幾何学模様の線を描画します。sinとcos関数を使用して、円周上の位置を計算し、その位置から線を引きます。f / 99を使って線の向きを時間とともに変化させています。
フィルターの適用
get(tint(W, 99)):キャンバスから画像を取得し、その画像に対して透明度を設定します。
F(BLUR, 1), F(THRESHOLD, 0.4):取得した画像に対して、ぼかし(BLUR)としきい値(THRESHOLD)フィルターを適用します。これにより、画像の視覚的な印象が大きく変わります。
image(i, 0, 0):最終的な画像をキャンバスに描画します。
このコードは、時間の経過と共に変化する魅力的なビジュアルエフェクトを作成するための素晴らしい例です。幾何学的な形状が徐々に進化し、フィルターが適用されることで、視覚的に引き込まれるアートワークが生成されます。
// Initialize frame counter
let f = 0;

// Function to draw each frame
function draw(e) {
  // Set the pixel density to 0.9 for the sketch
  pixelDensity(0.9);

  // Setup the canvas and initial drawing settings only once
     background(0); // Set the background to a light color
  if (f === 0) {
    createCanvas(400, 400); // Create a square canvas of 400x400 pixels

    stroke(400); // Set the stroke weight to 400
  }
  f++; // Increase frame counter

  let W = 400; // Canvas width and also used for stroke weight
  let w = 200; // Center position for drawing lines
  let g = PI / 128; // Step angle for drawing lines

  // Draw lines in a loop
  for (let i = 0; i < TAU - g; i += g) {
    // Calculate the starting point of the line
    let startX = sin(i) * W + w;
    let startY = cos(i) * W + w;

    // Calculate the ending point of the line with animation effect
    let I = i + f / 99; // Adjusting the angle based on the frame counter to create animation
    let endX = (sin(I) * W) / 4 + w;
    let endY = cos(I) + w;

    // Draw the line from start to end points
    line(startX, startY, endX, endY);
  }

  // Apply effects to the whole canvas
  let i = get(); // Get the image of the current canvas
  filter(BLUR, 1); // Apply a blur effect
  filter(THRESHOLD, 0.4); // Apply a threshold effect to create a high-contrast look
  image(i, 0, 0); // Draw the modified image back to the canvas
}//https://twitter.com/KomaTebe/status/1610615984582455298いいなと思ったら応援しよう!