
女の子がウィンク - Stable DiffusionとPythonの画像処理と自動化(2)

https://www.youtube.com/@TokyoRockGirlAI
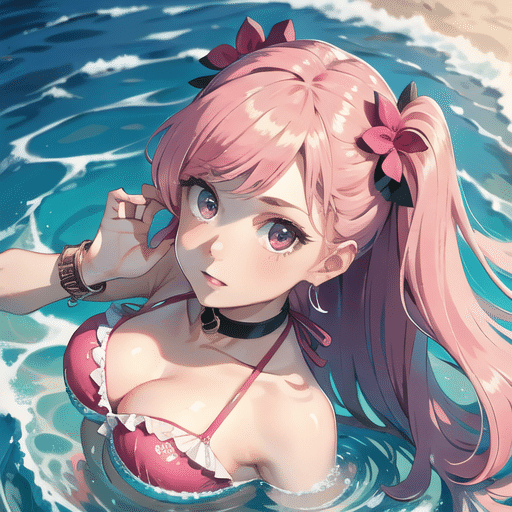
はい、まずはこちらをみましょう。
きれいな女の子が、ウィンクしてあなたを誘ってくれています。
これ、Stable Diffusion とかなんか、ともかく楽にできる方法あったら教えてください。
僕は Stable Diffusion で、目を開いた画像と閉じた画像を作るのが精いっぱいでした。
じゃあどうしてその動画はアニメーションになってんのかって、Python の画像処理に頼っちゃったわけですよ・・・
いいじゃん。これでいいんだよもう。
アニメーターじゃない人間がアニメを作れればそれでいいじゃん。
動作環境
前回の記事と同じです。詳細はそちらへ。
ただ、今回使う LoRA は SD15 ベースなので、XL 使いたい方は、自分でなんとかウィンクさせてください。
ウィンクした女の子を作る
LoRA を見つける
すいません、これ、みんな知ってたんでしょうね。。
したことなかったんで、見つけるまで苦労しちゃいました。
普通にプロンプトいじるだけじゃダメだったんですね。
ウィンク用の LoRA が必要だったんですねー。
ダウンロードして、Stable Diffusion の models/Lora に入れましょう。
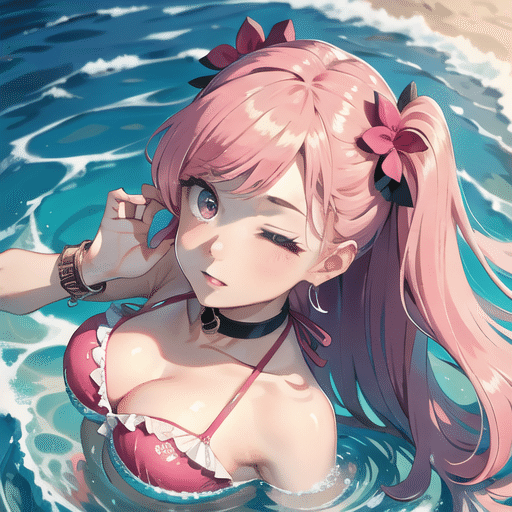
両目を開いている女の子を作る
まあ、こんなのみんな簡単だよね。
txt2img でこんな適当なプロンプトでつくっちゃえ。
ただ、ネガティブプロンプトにあらかじめ両目が閉じないように、とは指定しておきます。
Prompt :
masterpiece,best quality,1 girl,extreme close up,pink bandeau bikini,from_above,

Negative Prompt :
(worst quality,low quality:2),text,ugly face,bad face,bad anatomy,deformed eyes,
missing fingers,acnes,skin blemishes,nsfw,nude,nipples,
(both eyes closed:1.8),
できました。
ここで作成した画像をディレクトリに保存して、img2img へ Send image… の絵のボタンで全体を移してください。
片目だけ閉じてる女の子を作る
全体の画像は変えたくないけど、ウィンクして目だけ動かしたいから、片目だけが閉じた画像を作ります。
僕はここのやり方知らなかったんで、見つけるのに苦労しましたが、なんてことない。
img2img の Inpaint でさっくりですよ。
すでに img2img にプロンプトやら画像やらなにやらがコピーされているはずです。されてなければ txt2img の画像が生成されたところから Send image… のボタンを押してません。
ともかく目を閉じさせるので、LoRA を使うプロンプトを追加します。
Prompt :
masterpiece,best quality,1 girl,extreme close up,pink bandeau bikini,from_above,
<lora:ddw_v1:0.75>,wink,one eye closed,
で、Inpaint のところで、目のあたりを塗ります。
ブラウザ上から塗れたんですね。マスク画像でも用意しなきゃいけないのかと思ってましたよ。
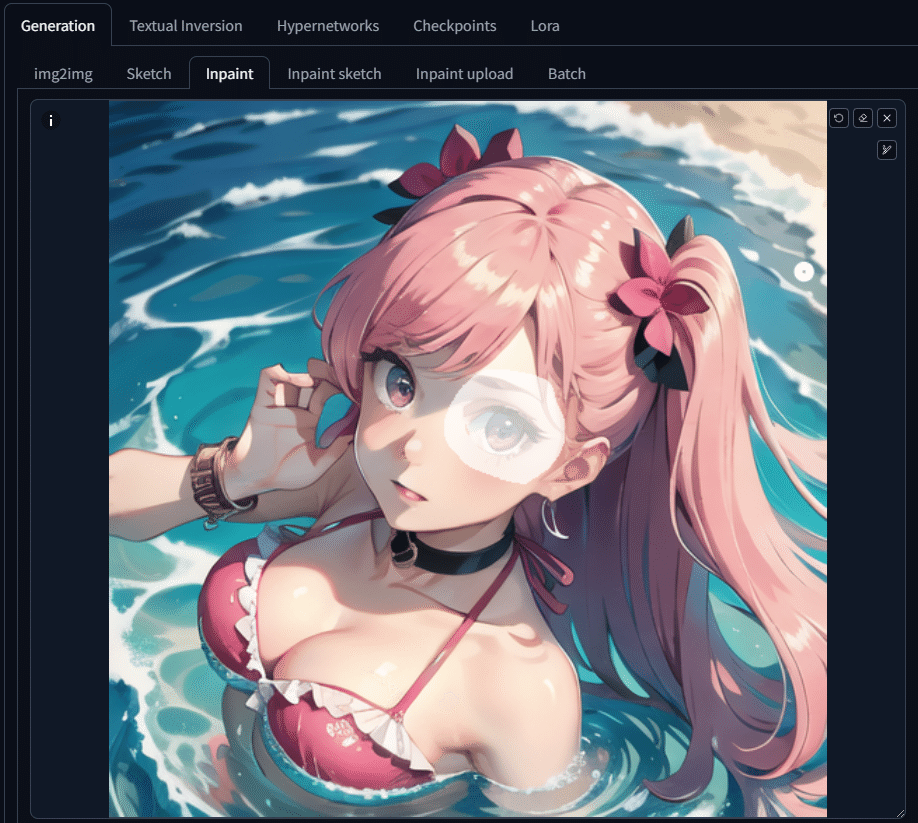
あと、画像サイズが txt2img から引き継がれないこともあるようなので、画像サイズを同じになるようにしてください。
Generate!
さっき保存した同じディレクトリに保存しましょう。
アニメにしちゃう - Python 登場
なにかっつーとすぐにプログラムに頼ってしまいます。
何のために webui があるんでしょうね。。。
( 理論的なこと - 読み飛ばしていいです )
前回の歩く女の子では結局不採用になった補完処理ですが、今回は役に立ちました。が、アルファ値はいらないので、RGB だけで、線形補完させました。今回これが使えたのは、透過がないからですねー。
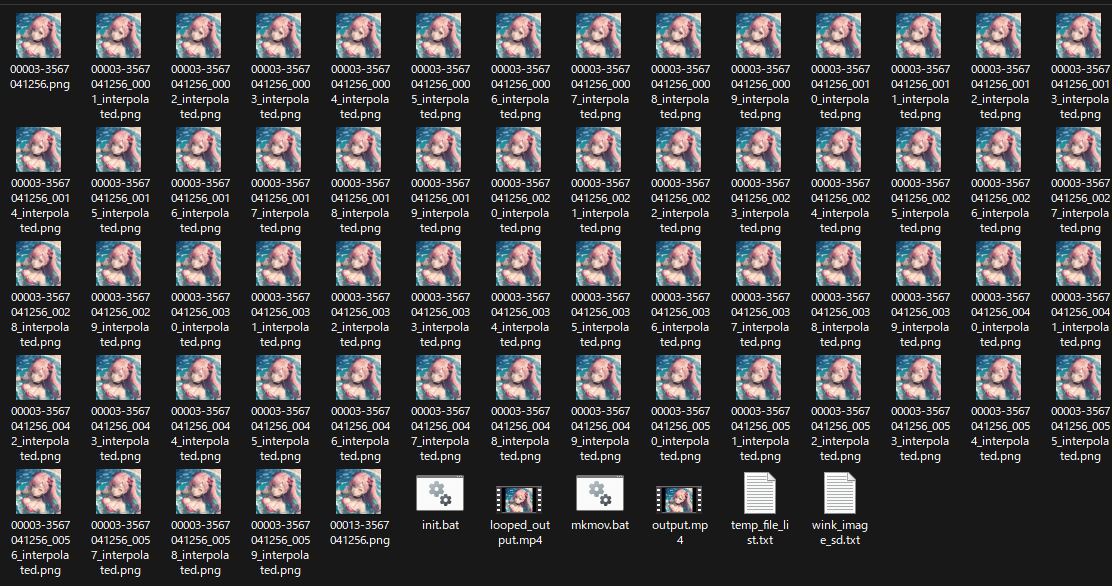
Python のコードを実行
はい、以下のコードを、Stable Diffusion がインストールされているディレクトリに置きましょう。rgb_interpolate.py とでもしましょうか。
from PIL import Image, ImageEnhance
import numpy as np
import math
import os

def blend_images_rgb(img1, img2, blending_factor):
    """
    2つのRGB画像をブレンドする

    :param img1: 最初の画像(PIL Image)
    :param img2: 2番目の画像(PIL Image)
    :param blending_factor: ブレンディングの強さ(0から1の間)
    :return: ブレンドされた画像(PIL Image)
    """
    img1_array = np.array(img1.convert('RGB'))
    img2_array = np.array(img2.convert('RGB'))

    # RGBチャンネルを線形補間
    blended_array = img1_array * (1 - blending_factor) + img2_array * blending_factor

    return Image.fromarray(blended_array.astype(np.uint8))

def interpolate_images(image1_path, image2_path, output_image_prefix, output_image_postfix, frames=5):
    """ 2つの画像間を補間します。
    """

    # Load images
    img1 = Image.open(image1_path).convert('RGB')
    img2 = Image.open(image2_path).convert('RGB')

    # Ensure both images are the same size
    size = img1.size

    interpolated_images_path = []

    for i in range(frames):
        output_path = f'{output_image_prefix}_{i+1:04d}_{output_image_postfix}.png'
        print('Interpolating ' + output_path.split(os.sep)[-1] + ' ...', end='', flush=True)

        # Calculate progression factor
        t = (i + 1.0) / frames if frames > 1 else i
        # Apply sine-based easing function
        eased_t = (math.sin((t - 0.5) * math.pi) + 1) / 2
        # Adjust the easing curve to make changes near the original images even smaller
        adjusted_t = eased_t ** 1.5  # You can adjust this exponent to control the curve
        # Calculate denoising strength
        denoising_strength = max(0.001, min(0.999, adjusted_t))

        # Blend images including alpha channel
        blended_img = blend_images_rgb(img1, img2, denoising_strength)

        # Convert blended image to RGB for img2img
        rgb_img = blended_img.convert('RGB')

        print('Done', flush=True)

        #result.image.save(output_path)
        rgb_img.save(output_path)
        interpolated_images_path.append(output_path)

    return interpolated_images_path

def process_all_images(directory, frames):
    """ すべての画像を処理します。
    """
    # ディレクトリ内のすべてのPNGファイルを取得し、ソート
    image_files = sorted([f for f in os.listdir(directory) if f.lower().endswith('.png')])

    # 隣接する画像ペアに対してinterpolate_imagesを呼び出す
    for i in range(len(image_files) - 1):
        image1_path = os.path.join(directory, image_files[i])
        image2_path = os.path.join(directory, image_files[i+1])

        # 出力ファイル名のベースを作成
        output_base = os.path.splitext(image_files[i])[0]

        # interpolate_images関数を呼び出す
        interpolated_images_path = interpolate_images(
            image1_path,
            image2_path,
            os.path.join(directory, output_base),
            'interpolated',
            frames=frames
        )

        print(f"Processed: {image_files[i]} and {image_files[i+1]}")

def test_images(directory, frames, prompt, negative_prompt):
    # ディレクトリ内のすべてのPNGファイルを取得し、ソート
    image_files = sorted([f for f in os.listdir(directory) if f.lower().endswith('.png')])[0:2]

    # 隣接する画像ペアに対してinterpolate_imagesを呼び出す
    for i in range(len(image_files) - 1):
        image1_path = os.path.join(directory, image_files[i])
        image2_path = os.path.join(directory, image_files[i+1])

        # 出力ファイル名のベースを作成
        output_base = os.path.splitext(image_files[i])[0]

        # interpolate_images関数を呼び出す
        interpolated_images = interpolate_images(
            image1_path,
            image2_path,
            os.path.join(directory, output_base),
            'interpolated',
            frames=frames,
            prompt=prompt,
            negative_prompt=negative_prompt
        )

        print(f"Processed: {image_files[i]} and {image_files[i+1]}")

if __name__ == '__main__':
    DIR='D:\\wink'
    process_all_images(DIR, 59)
    print("Interpolation completed successfully.")
配置したら、コマンドプロンプトから以下を実行。
cd stable-diffusion-webui
venv\Scripts\activate
python rgb_interpolate.py
だだだだだーーー、っと補完された画像がめっちゃできます。
ffmpeg で映像へ
これを ffmpeg で映像に変換します。
ここでいきなり、ffmpeg ってなに?という方は、前回の記事をどうぞ。
ですが、この画像群、両目を開いている画像が閉じた画像へ変化しているだけなので、後ろに逆再生の画像も追加します。
以下のバッチファイルを、画像があるディレクトリに作成しましょう。
mkmov.bat とかみたいなファイル名でいいでしょう。
@echo off
chcp 65001 > nul
setlocal enabledelayedexpansion

:: Default values
set "output_file=output.mp4"
set "file_list=temp_file_list.txt"
set "video_duration=2"
set "file_pattern=*.png"
set "bg_r=00"
set "bg_g=00"
set "bg_b=00"

echo File pattern: %file_pattern%
echo Output file: %output_file%
echo Video duration: %video_duration% seconds
echo Background color: #%rgb_r%%rgb_g%%rgb_b%

:: Count matching files and calculate framerate
set file_count=0
for %%F in (%file_pattern%) do set /a file_count+=1
set /a framerate=file_count/video_duration
if %framerate% lss 1 set framerate=1

echo Number of matching files: %file_count%
echo Calculated framerate: %framerate%

:: Create a new file list with matching files
if exist "%file_list%" del "%file_list%"
for %%F in (%file_pattern%) do (
    echo file '%%~fF'>>"%file_list%"
)

:: Use FFmpeg to create video from the file list with specified background color, preserving transparency
ffmpeg -y -f concat -safe 0 -r %framerate% -i "%file_list%" ^
-filter_complex "[0:v]scale=1920:1080:force_original_aspect_ratio=decrease,pad=1920:1080:(ow-iw)/2:(oh-ih)/2:color=#00000000,format=rgba[scaled];color=c=0x%bg_r%%bg_g%%bg_b%:s=1920x1080[bg];[bg][scaled]overlay=format=auto,format=yuv420p[v]" ^
-map "[v]" ^
-c:v libx264 ^
-preset ultrafast ^
-crf 23 ^
-t %video_duration% ^
"%output_file%"

echo Video creation complete. Output file: %output_file%

ffmpeg -i %output_file% -filter_complex "[0:v]split[v1][v2];[v2]reverse[rev];[v1][rev]concat=n=2:v=1[outv]" -map "[outv]" looped_%output_file%

echo Looped video creation complete. Output file: looped_%output_file%

echo File list saved as: %file_list%

pause
あとは、なんなら、このバッチファイルをエクスプローラからダブルクリックしてもいいです。
looped_xxxx.mp4 みたいなファイルができたら完成!
追加情報
以下の LoRA は、どちらの目を閉じるか決めるのに役立つかもしれません。
ddw_v1 と組み合わせないと機能しないみたいでした。
masterpiece,best quality,1 girl,extreme close up,pink bandeau bikini,from_above,
<lora:rightwink_v120:1>,<lora:ddw_v1:0.75>,wink,one eye closed,
masterpiece,best quality,1 girl,extreme close up,pink bandeau bikini,from_above,
<lora:leftwink_v120:1>,<lora:ddw_v1:0.75>,wink,one eye closed,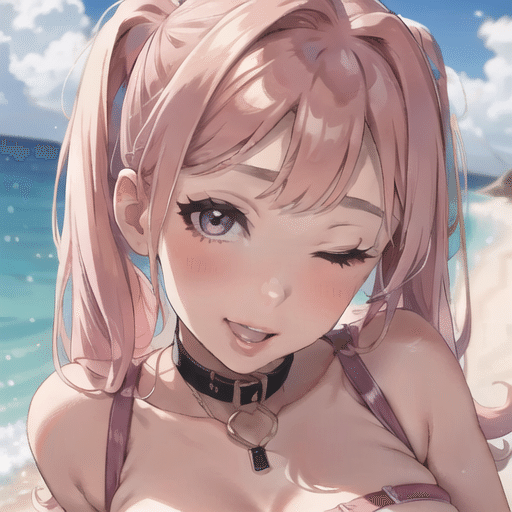
終わりに
地味に、ウィンクをさせる LoRA が必要だったことと、img2img の Inpaint で一部だけ変化させられることが勉強になりました。
どんだけ wink とか one eye closed とかのプロンプトを入れても、全然ウィンクしてくれないんだもの。
今回はこんな感じでした。
実はまさか Stable Diffusion 系で 2 回目の記事を書くとは思ってなかったんですが、今後もなにかと書いていこうかなと思います。
はい、宣伝。
ここまで読んだらせめて MV でも鑑賞して、チャンネル登録オナシャス。
してくんないと、いつか記事は有料にしちゃうよ!
これ、音楽のスタイルに、witch house っていうテイスト入れたんですが、我ながら気に入っています。