
ReclineとGitHub Copilotで楽々Web開発!天気予報アプリを作ってみた(コード付き)

どうも、syuです。
最近、コード生成AIの進化が目覚ましいですよね。特にGitHub Copilotの活躍は目を見張るものがありますが、今回はさらに一歩進んで、Reclineというツールと組み合わせて、驚くほど簡単にWeb開発ができることをご紹介したいと思います!
*環境 Windows11
Reclineって何?手軽にWeb開発を始めるために
Reclineは、簡単に言うと、AIを活用してWebアプリケーションの雛形を自動生成してくれる、まさにツールです。これまで、面倒だった環境構築やファイル作成の手間を大幅に削減し、開発者はよりクリエイティブな作業に集中できるようになります。強みは・・・値段が安いこと。GitHubCopilotの利用料月額10ドルで利用することができます。
*ドルでの支払手数料が心配な方へ。感覚で言うと手数料は2-3%くらい、ひょっとしたらもっと低いかもしれません。いつでもサブスクは退会できますのでご安心を。
まずはReclineをインストールして、実際に動かしてみましょう!
Recline インストール手順
Reclineは、以下の手順で簡単にインストールできます。
事前準備としてVScodeをインストールし、GitHubCopilotに登録します。
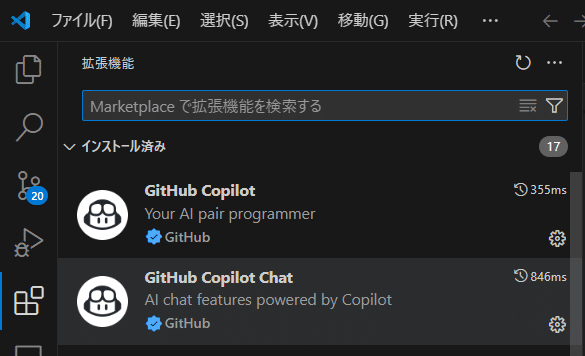
VScodeからGitHubCopilotの拡張機能をインストールします。
GitHubCopilotのログインを求められます。
*拡張機能は2つありましたが両者の機能の違いは調べていません。どちらもインストールできます。
リポジトリをクローンします。
ターミナルを開いて、以下のコマンドを実行してください。
git clone https://github.com/julesmons/recline.git
cd ./recline
必要なパッケージをインストールします。
pnpm installReclineの拡張機能をパッケージ化します。
pnpm run packageVisual Studio CodeにReclineの拡張機能をインストールします。
以下のコマンドで拡張機能をインストールします。
code --install-extension ./recline-0.2.11.vsix*注意点: 上記コマンド中の recline-0.2.11.vsix の部分は、ダウンロードしたReclineのバージョンによってファイル名が異なる可能性があります。パッケージ化されたディレクトリ内にある .vsix ファイル名を確認して、適宜修正してください。
Reclineの日本語対応とファイル参照について
現時点では、Reclineの日本語対応はまだ発展途上です。しかし、ファイル参照に関する問題など、いくつかの課題については近い将来修正される可能性があります。
Reclineの日本語対応に関する最新情報や、利用時の注意点については、以下のブログ記事が参考になります。
日本語対応と追加ファイルの参照については以下
①日本語対応は以下のファイルを修正
/src/extension/utils/sanitize.ts
/**
* Utility functions for sanitizing user input
*/
/**
* Removes control characters and non-printable characters from text
* while preserving newlines
*/
export function sanitizeUserInput(text: string): string {
return text
.replace(/\r\n/g, "\n") // Normalize line endings
.replace(/[\x00-\x09\x0B-\x1F\x7F]/g, "") // Remove control chars except newline ***
// .replace(/[^\x20-\x7E\n]/g, "") // Remove non-ASCII chars except newline ***
.trim();
}
/**
* Removes any shell prompt artifacts from terminal output
*/
export function sanitizeTerminalOutput(text: string): string {
return text
.replace(/\r/g, "") // Remove standalone CR
.replace(/[%$#>]\s*$/, "") // Remove shell prompts
.replace(/[\x00-\x09\x0B-\x1F\x7F]/g, "") // Remove control chars ***
.trim();
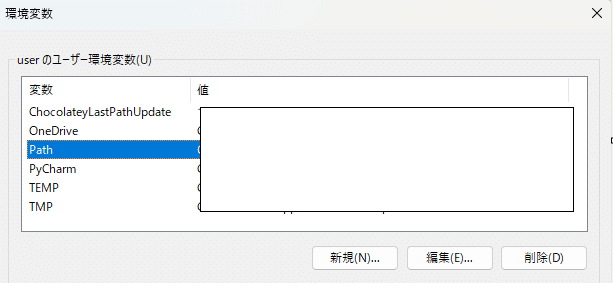
}②ファイル参照は以下のURLからダウンロードしパスを通す。
*パスを通すのはWindowsでは一般的に”環境変数を編集”を検索ボタンで打って、

Pathに追加
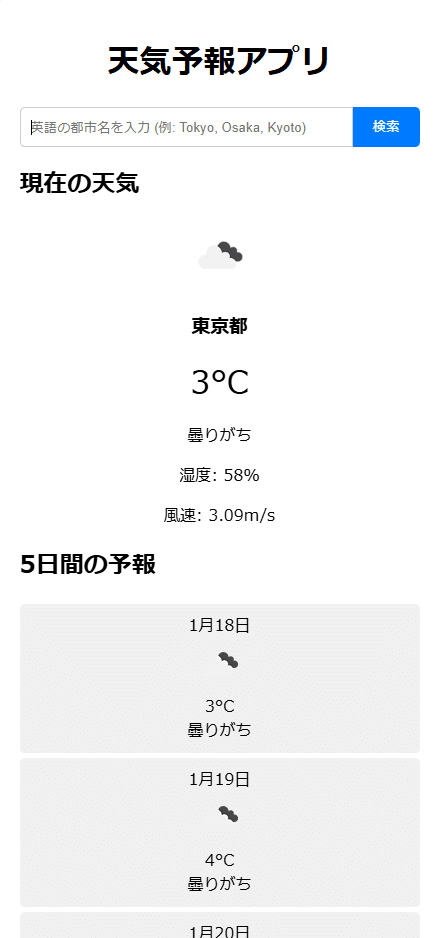
ReclineとGitHub Copilotで天気予報アプリを作ってみた!
さて、Reclineのインストールが完了したら、いよいよ実際にWebアプリケーションを作ってみましょう!今回は、ReclineとGitHub Copilotの力を借りて、簡単な天気予報アプリを作成してみました。
Reclineを使うと、作りたいアプリケーションの概要を指示するだけで、必要なファイルやフォルダ構成を自動で生成してくれます。例えば、「シンプルな天気予報アプリを作りたい」と指示するだけで、HTML、CSS、JavaScriptの基本的なファイルが用意されます。
さらに、GitHub Copilotとの連携が強力で、例えばJavaScriptのファイルを開いて、「現在の天気を取得する関数を書いて」とコメントすると、APIの呼び出しからデータの処理まで、必要なコードを提案してくれるので、コーディングが本当に楽になります。
今回の天気予報アプリでは、以下のOpenWeatherMapのAPIを利用しました。APIを利用するには、上記サイトでAPIキーを取得する必要があります。無料で取得できるので、ぜひ試してみてください。
ReclineとGitHub Copilotの組み合わせでWeb開発に苦手意識を持っていた方でも、驚くほど簡単にWebアプリケーションを作成できるはずです。
参考: 生成したコード(html, css, javascript)
#index.html

<!DOCTYPE html>
<html lang="en">
<head>
  <meta charset="UTF-8">
  <meta name="viewport" content="width=device-width, initial-scale=1.0">
  <title>天気予報アプリ</title>
  <link rel="stylesheet" href="style.css">
</head>
<body>
  <div class="container">
    <h1>天気予報アプリ</h1>
    <div class="search-box">
      <input type="text" id="city-input" placeholder="英語の都市名を入力 (例: Tokyo, Osaka, Kyoto)">
      <button id="search-btn">検索</button>
    </div>
    <div class="weather-info">
      <div id="error-message" class="error"></div>
      <div class="weather-card" id="current-weather">
        <h2>現在の天気</h2>
        <div id="weather-details"></div>
      </div>
      <div class="forecast-container" id="forecast">
        <h2>5日間の予報</h2>
        <div id="forecast-cards"></div>
      </div>
    </div>
  </div>
  <script src="script.js"></script> </body>
</html>
#style.css
body {
font-family: sans-serif;
background-color: #f4f4f4;
display: flex;
justify-content: center;
align-items: center;
min-height: 100vh;
margin: 0;
}
.container {
background-color: #fff;
border-radius: 5px;
box-shadow: 0 2px 5px rgba(0, 0, 0, 0.1);
padding: 20px;
width: 400px;
}
h1 {
text-align: center;
margin-bottom: 20px;
}
.search-box {
display: flex;
margin-bottom: 20px;
}
#city-input {
flex-grow: 1;
padding: 10px;
border: 1px solid #ccc;
border-radius: 5px 0 0 5px;
outline: none;
}
#search-btn {
background-color: #007bff;
color: #fff;
border: none;
padding: 10px 20px;
border-radius: 0 5px 5px 0;
cursor: pointer;
}
.error {
color: red;
margin-bottom: 10px;
display: none;
}
.weather-card,
.forecast-container {
margin-bottom: 20px;
}
.weather-card h2,
.forecast-container h2 {
margin-top: 0;
}
.weather-icon {
width: 64px;
height: 64px;
}
.forecast-card {
background-color: #f0f0f0;
border-radius: 5px;
padding: 10px;
margin-bottom: 5px;
text-align*: center;
}
.forecast-card img {
width: 50px;
height: 50px;
}#script.js
const API_KEY = '**'; // あなたのAPIキーが正しいことを確認してください
const BASE_URL = 'https://api.openweathermap.org/data/2.5';
const cityInput = document.getElementById('city-input');
const searchBtn = document.getElementById('search-btn');
const errorMessage = document.getElementById('error-message');
const weatherDetails = document.getElementById('weather-details');
const forecastCards = document.getElementById('forecast-cards');
async function getWeatherData(city) {
try {
// URLエンコードして都市名を処理
const encodedCity = encodeURIComponent(city);
// 現在の天気を取得
const currentWeatherResponse = await fetch(
`${BASE_URL}/weather?q=${encodedCity}&appid=${API_KEY}&units=metric&lang=ja`
);
if (!currentWeatherResponse.ok) {
throw new Error('都市が見つかりません。英語の都市名で入力してください (例: Tokyo, Osaka, Kyoto)');
}
const currentWeather = await currentWeatherResponse.json();
// 5日間の予報を取得
const forecastResponse = await fetch(
`${BASE_URL}/forecast?q=${encodedCity}&appid=${API_KEY}&units=metric&lang=ja`
);
if (!forecastResponse.ok) {
throw new Error('予報データの取得に失敗しました。');
}
const forecast = await forecastResponse.json();
displayWeather(currentWeather);
displayForecast(forecast);
errorMessage.style.display = 'none';
} catch (error) {
console.error(error); // エラーをコンソールに出力
errorMessage.textContent = error.message;
errorMessage.style.display = 'block';
weatherDetails.innerHTML = '';
forecastCards.innerHTML = '';
}
}
function displayWeather(data) {
const weather = data.weather[0];
const temp = Math.round(data.main.temp);
weatherDetails.innerHTML = `
<div style="text-align: center;">
<img src="https://openweathermap.org/img/wn/${weather.icon}@2x.png" alt="${weather.description}" class="weather-icon">
<h3>${data.name}</h3>
<p style="font-size: 2em; margin: 10px 0;">${temp}°C</p>
<p>${weather.description}</p>
<div style="margin-top: 15px;">
<p>湿度: ${data.main.humidity}%</p>
<p>風速: ${data.wind.speed}m/s</p>
</div>
</div>
`;
}
function displayForecast(data) {
// 3時間ごとのデータから、各日の代表的な天気を取得する
const dailyData = {};
data.list.forEach(item => {
const date = item.dt_txt.split(' ')[0];
if (!dailyData[date]) {
dailyData[date] = item; // 各日の最初のデータを代表とする
}
});
forecastCards.innerHTML = Object.values(dailyData).map(day => {
const weather = day.weather[0];
const temp = Math.round(day.main.temp);
const date = new Date(day.dt_txt).toLocaleDateString('ja-JP', {
month: 'short',
day: 'numeric'
});
return `
<div class="forecast-card">
<div>${date}</div>
<img src="https://openweathermap.org/img/wn/${weather.icon}.png" alt="${weather.description}" class="weather-icon">
<div>${temp}°C</div>
<div>${weather.description}</div>
</div>
`;
}).join('');
}
// イベントリスナーの設定
searchBtn.addEventListener('click', () => {
const city = cityInput.value.trim();
if (city) {
getWeatherData(city);
}
});
cityInput.addEventListener('keypress', (e) => {
if (e.key === 'Enter') {
const city = cityInput.value.trim();
if (city) {
getWeatherData(city);
}
}
});
// 初期表示として東京の天気を表示
window.addEventListener('load', () => {
getWeatherData('Tokyo');
});