ちょい調べた!拡散モデルとは?【実装編】
今までの「ちょい調べた!拡散モデル」シリーズで、拡散モデルの原理と学習アルゴリズムについて、数学的に解説してきました。今回は、実際にPythonでの実装を試みます!具体的には、FashionMNISTデータセットを使って、拡散モデルを学習し、新たなデータを生成することを目指します。Google Colaboratoryノードブックも用意していますので、参考までに試してみてください。
データセット
まず、データセットを確認しておきましょう。FashionMNISTは、Zalando の衣料品画像(28x28)からなるデータセットです。今回は torchvision から用意します。
from torchvision import datasets, transforms
from torch.utils.data import DataLoader

def prepare_dataset(batch_size):
    preprocessor = transforms.ToTensor()
    dataset = datasets.FashionMNIST(root="./data", download=True, transform=preprocessor)
    dataloader = DataLoader(dataset, batch_size=batch_size, shuffle=True)

    return dataloader
実際の画像は以下のような感じです。

ニューラルネットワークの構築
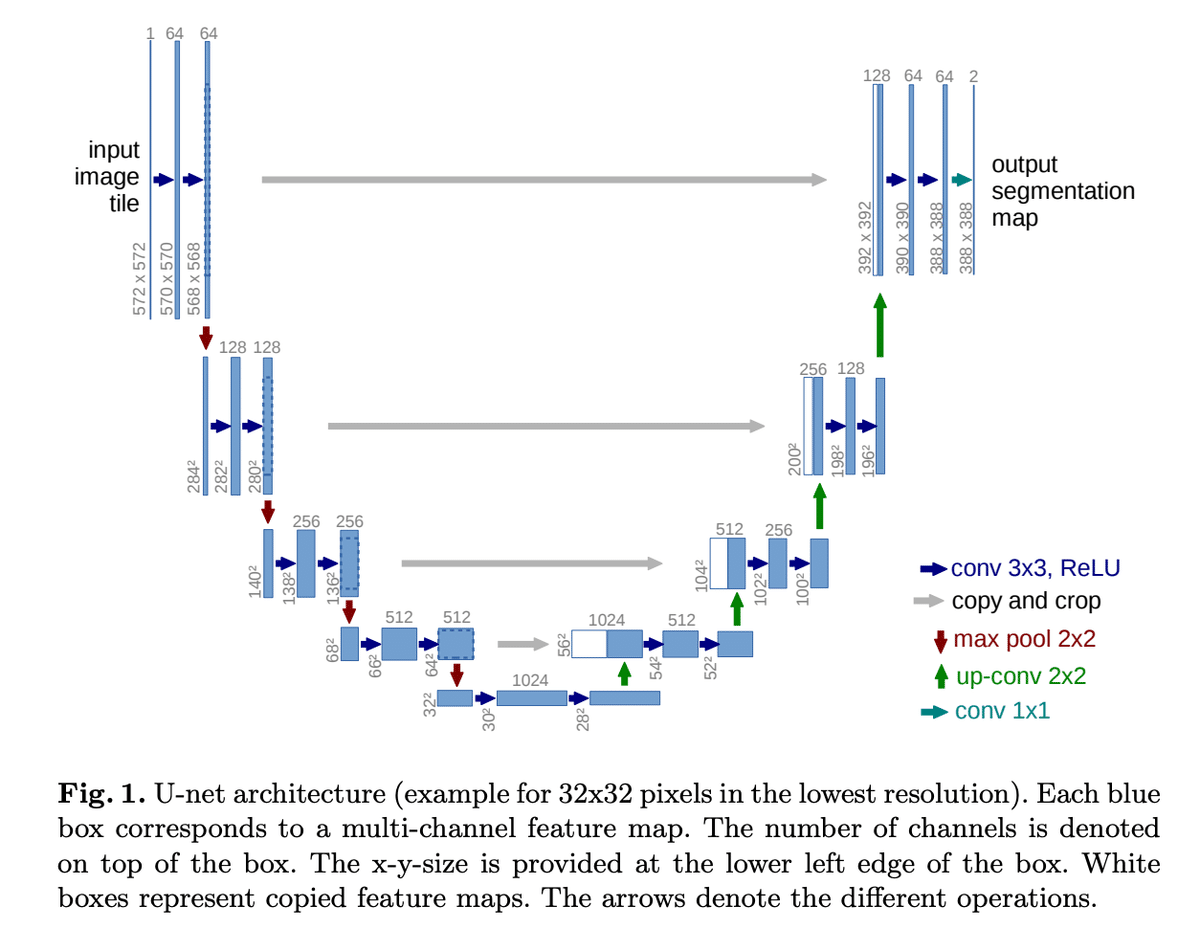
デノイズ過程でのノイズ除去はニューラルネットワークによって行われます。まず、そのニューラルネットワークを構築しておきます。画像データを処理するニューラルネットワークとして、UNetというモデルアーキテクチャ由来のモデルがよく使われています。ここでは、UNetの詳細を述べませんが、詳しく知りたい方は元の論文である「U-Net: Convolutional Networks for Biomedical Image Segmentation」を参照してください。

UNetの大まかなアーキテクチャーとしては、大きく分けて以下の3つの部分で構成されています。全体的な構造は、左右対称のU字型に見えることから「U-Net」と名付けられています。
縮小パス (Contracting Path): 複数の畳み込み層で、画像の特徴を抽出します。
ボトルネック (Bottleneck): 縮小パスと拡張パスの間の橋渡し
拡張パス (Expanding Path): アップサンプリング層と畳み込み層を交互に繰り返すことで、画像の解像度を復元します。
今回は、UNetの入力として、画像の他に、時刻 t も使います。そのため、時刻 t を実数のベクトルに変換するものも用意します。それは、自然言語処理のモデルなどでよく使われている位置埋め込み層に当たります。今回は、単純のため、自然言語処理分野で主流となったTransformerモデルで使われているSinusoidal Positional Encodingを採用します。
import torch

def time_embedding(time_steps, time_dim, device='cpu'):
    max_time = len(time_steps)
    embeddings = torch.zeros(max_time, time_dim, device=device)

    idx = torch.arange(0, time_dim, device=device)
    div_term = torch.exp(idx / (2 * time_dim) * torch.log(torch.tensor(10000.0)))

    for t in range(max_time):
        embeddings[t, 0::2] = torch.sin(time_steps[t] / div_term[::2])
        embeddings[t, 1::2] = torch.cos(time_steps[t]  / div_term[1::2])

    return embeddings
import torch
import torch.nn as nn
class ConvBlock(nn.Module):
"""
A convolutional block with time embedding.
"""
def __init__(self, in_channels, out_channels, time_dim):
"""
Args:
in_channels (int): Number of input channels.
out_channels (int): Number of output channels.
time_dim (int): Dimension of the time embedding.
"""
super(ConvBlock, self).__init__()
self.conv = nn.Sequential(
nn.Conv2d(in_channels, out_channels, kernel_size=(3, 3), padding=(1, 1)),
nn.BatchNorm2d(out_channels),
nn.ReLU(),
nn.Conv2d(out_channels, out_channels, kernel_size=(3, 3), padding=(1, 1)),
nn.BatchNorm2d(out_channels),
nn.ReLU()
)
self.linear = nn.Sequential(
nn.Linear(time_dim, in_channels*2),
nn.ReLU(),
nn.Linear(in_channels*2, in_channels)
)
def forward(self, x, t=None):
"""
Args:
x (torch.Tensor): Input tensor.
t (torch.Tensor): Time embedding tensor.
Returns:
x (torch.Tensor): Output tensor.
"""
if t is not None:
t = self.linear(t)
t = t.view(x.size(0), -1, 1, 1)
x = x + t
x = self.conv(x)
return xclass UNetWithTime(nn.Module):
"""
A U-Net model with time embedding.
"""
def __init__(self, in_channels=1, out_channels=1, time_dim=512):
"""
Args:
in_channels (int): Number of input channels.
out_channels (int): Number of output channels.
time_dim (int): Dimension of the time embedding.
"""
super(UNetWithTime, self).__init__()
self.time_dim = time_dim
self.time_embedding = time_embedding
# down sampling
self.down_conv1 = ConvBlock(in_channels, 64, time_dim)
self.down_conv2 = ConvBlock(64, 128, time_dim)
# bottleneck
self.bottleneck = ConvBlock(128, 256, time_dim)
# up sampling
self.up_conv2 = ConvBlock(256+128, 128, time_dim) # concat with down sampling
self.up_conv1 = ConvBlock(128+64, 64, time_dim) # concat with down sampling
# output
self.out = nn.Conv2d(64, out_channels, kernel_size=1)
# max pooling
self.max_pool = nn.MaxPool2d(kernel_size=2, stride=2)
# up sampling
self.up_sample = nn.Upsample(scale_factor=2, mode='bilinear', align_corners=True)
def forward(self, x, time_steps):
"""
Args:
x (torch.Tensor): Input tensor.
time_steps (torch.Tensor): Time steps.
Returns:
x (torch.Tensor): Output tensor.
"""
t = self.time_embedding(time_steps, self.time_dim, device=x.device)
x1 = self.down_conv1(x, t)
x = self.max_pool(x1)
x2 = self.down_conv2(x, t)
x = self.max_pool(x2)
x = self.bottleneck(x, t)
x = self.up_sample(x)
x = self.up_conv2(torch.cat([x, x2], dim=1), t)
x = self.up_sample(x)
x = self.up_conv1(torch.cat([x, x1], dim=1), t)
x = self.out(x)
return x拡散過程とデノイズ過程の実装
次に、拡散モデルの「拡散過程」と「デノイズ過程」をもつ Diffuser クラスを用意します。今回は、デノイズ過程のニューラルネットワークとして、上記構築したUNetWithTimeを使います。また、そのネットワークの予測は、ノイズ予測とします。ノイズ予測ネットワークを用いる場合の学習アルゴリズムは、前回の記事を参照してください。
from tqdm import tqdm
import torch

class Diffuser:
    def __init__(self, max_steps, beta_start=0.001, beta_end=0.01, device='cpu'):
        """
        Args:
            max_steps (int): Maximum number of steps in diffusion step.
            beta_start (float): Initial value of beta.
            beta_end (float): Final value of beta.
        """
        self.device = device
        self.max_steps = max_steps
        self.betas = torch.linspace(beta_start, beta_end, max_steps, device=self.device)
        self.alphas = 1 - self.betas
        self.alphas_cumprod = self.alphas.cumprod(dim=0)

    def diffuse(self, x, t):
        """
        Args:
            x (torch.Tensor): Input tensor.
            t (torch.Tensor): Time embedding tensor.
        Returns:
            x (torch.Tensor): Output tensor.
        """
        noise = torch.randn_like(x, device=self.device)
        alpha_cumprod = self.alphas_cumprod[t-1].view(-1, 1, 1, 1)
        x_t = torch.sqrt(alpha_cumprod) * x + torch.sqrt(1 - alpha_cumprod) * noise

        return x_t, noise

    def denoise(self, model, x, t):
        """
        Args:
            x (torch.Tensor): Input tensor.
            t (torch.Tensor): Time embedding tensor.
        Returns:
            x (torch.Tensor): Output tensor.
        """
        _t = t-1
        alpha = self.alphas[_t].view(-1, 1, 1, 1)
        alpha_cumprod = self.alphas_cumprod[_t].view(-1, 1, 1, 1)
        alpha_cumprod_prev = self.alphas_cumprod[_t-1].view(-1, 1, 1, 1)

        model.eval()
        with torch.no_grad():
            pred_noise = model(x, t)
        model.train()

        noise = torch.randn_like(x, device=self.device)
        noise[t == 1] = 0

        mu = (x - ((1-alpha) / torch.sqrt(1-alpha_cumprod)) * pred_noise) / torch.sqrt(alpha)
        std = torch.sqrt((1-alpha) * (1-alpha_cumprod_prev) / (1-alpha_cumprod))
        return mu + noise * std
拡散過程の処理(diffuse)とデノイズ(denoise)の他に、画像を生成するサンプリング処理(sample)とそれを表示できる形式のデータへの変換(convert_to_image)も実装しておきます。
from tqdm import tqdm
import torch

class Diffuser:
    def __init__(self, max_steps, beta_start=0.001, beta_end=0.01, device='cpu'):
        ...

    def diffuse(self, x, t):
        ...

    def denoise(self, model, x, t):
        ...

    def convert_to_image(self, x):
        x = x.clamp(0, 1)
        x = (x * 255).type(torch.uint8)
        return x

    def sample(self, model, sample_shape=(1, 1, 32, 32)):
        bsz = sample_shape[0]
        x = torch.randn(sample_shape, device=self.device)

        for i in tqdm(range(self.max_steps, 0, -1)):
            t = torch.tensor([i] * bsz, device=self.device, dtype=torch.long)
            x = self.denoise(model, x, t)

        x = torch.stack([self.convert_to_image(x[i]) for i in range(bsz)])
        return x
学習
ここまで、必要なものが揃えましたので、実際に学習を行いましょう!学習に関するハイパーパラメータを以下のようにまとめてせってしておきます。
in_channels = 1
img_size = 32
batch_size = 128
max_steps = 1000
time_dim = 100
lr = 1e-3
epochs = 10
学習の手続きとしては以下のように実装できます。
def main():
    # Hyperparameters
    in_channels = 1
    img_size = 32
    batch_size = 128
    max_steps = 1000
    time_dim = 100
    lr = 1e-3
    epochs = 10
    if torch.cuda.is_available():
        device = 'cuda'
    elif torch.backends.mps.is_available():
        device = 'mps'
    else:
        device = 'cpu'

    # Prepare dataset
    dataloader = prepare_dataset(batch_size)

    # Initialize model and diffuser
    model = UNetWithTime(in_channels=in_channels, time_dim=time_dim).to(device)
    diffuser = Diffuser(max_steps=max_steps, device=device)
    optimizer = Adam(model.parameters(), lr=lr)

    # Training loop
    losses = []
    for epoch in range(epochs):
        loss_sum = 0.0
        cnt = 0

        for images, labels in tqdm(dataloader):
            optimizer.zero_grad()
            x = images.to(device)
            t = torch.randint(1, max_steps+1, (len(x),), device=device)

            x_noisy, noise = diffuser.diffuse(x, t)
            noise_pred = model(x_noisy, t)
            loss = F.mse_loss(noise, noise_pred)

            loss.backward()
            optimizer.step()

            loss_sum += loss.item()
            cnt += 1

        loss_avg = loss_sum / cnt
        losses.append(loss_avg)
        print(f'Epoch {epoch} | Loss: {loss_avg}')

    # save model
    torch.save(model.state_dict(), "data/FashionMNIST/model.pth")

    plt.plot(losses)
    plt.xlabel('Epoch')
    plt.ylabel('Loss')
    plt.show()

    images = diffuser.sample(model, (batch_size, 1, img_size, img_size))
    show_images([img[0] for img in images.to('cpu')])
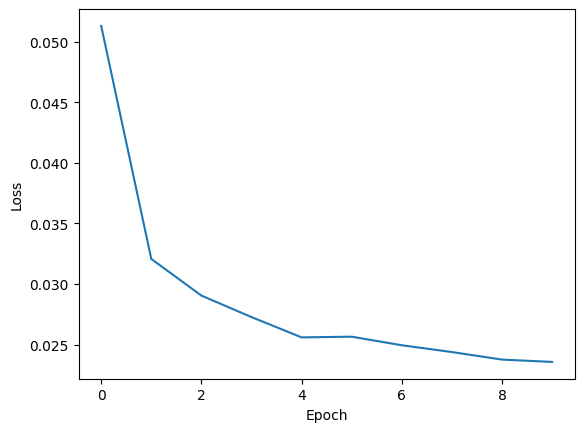
実際に学習を実行してみた結果、損失関数がこんな感じで推移しています。

そして、気になる生成された画像ですが、こんな感じでした!


おわりに
今回、拡散モデルについて、原理から学習アルゴリズムまで、そして、その実装をまとめ、記事シリーズにしました。基本的に、個人の勉強を整理する目的として書きましたが、皆さんにとって少しでも参考になれば嬉しいです。今後も定期的に学んだことを整理して記事にしていくと思います!
参考文献
Olaf Ronneberger et al. U-Net: Convolutional Networks for Biomedical Image Segmentation. MICCAI 2015.
Vaswani et al. Attention Is All You Need.NIPS 2017.
