
Firebaseプッシュ通知とAndroid通知チャネルを深く掘り下げる

この記事は弊社のフルスタックエンジニア:Ashish Dahalが作成した記事です。英語版はこちらをご覧ください。
Medium
読者の皆さん、こんにちは。Firebaseプッシュ通知とAndroid通知チャネルについての最新記事をお届けします。この記事では、Firebase プッシュ通知(クラウドメッセージング)の統合と Android 通知チャネルの役割について説明します。
はじめに
Firebase Push Notification サービスのデモアプリケーション(FCM Application)をビルドしてみましょう。
Flutterプロジェクトをセットアップする:
ターミナルを開き、以下のコマンドを実行する。
flutter create fcm_demo🔥 Firebase Setup :
1. Firebase Consoleにアクセスする。
2. Create a projectをクリック。32

3.プロジェクト名を入力します。例 fcm-demo
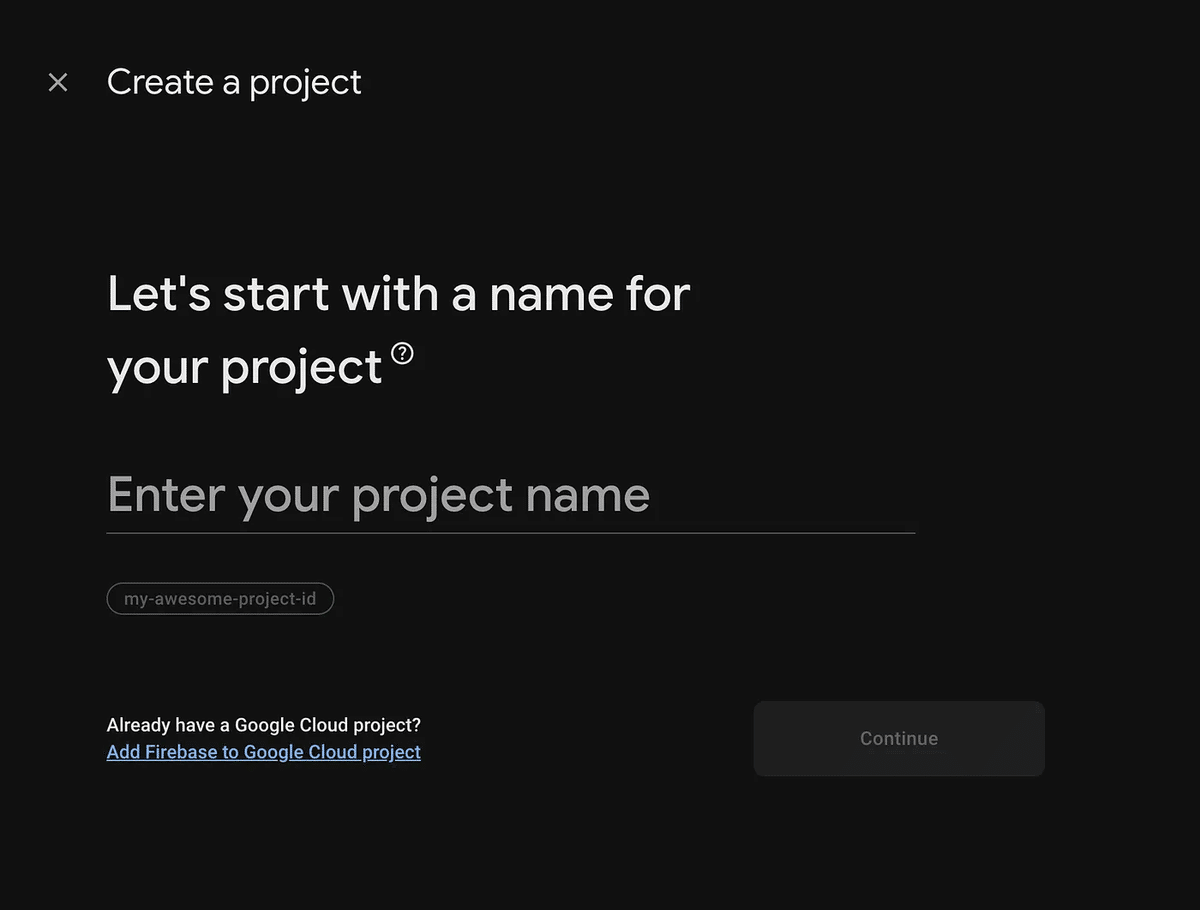
4.Googleアナリティクスを有効にする(オプション)。
5.続けるをクリックします。
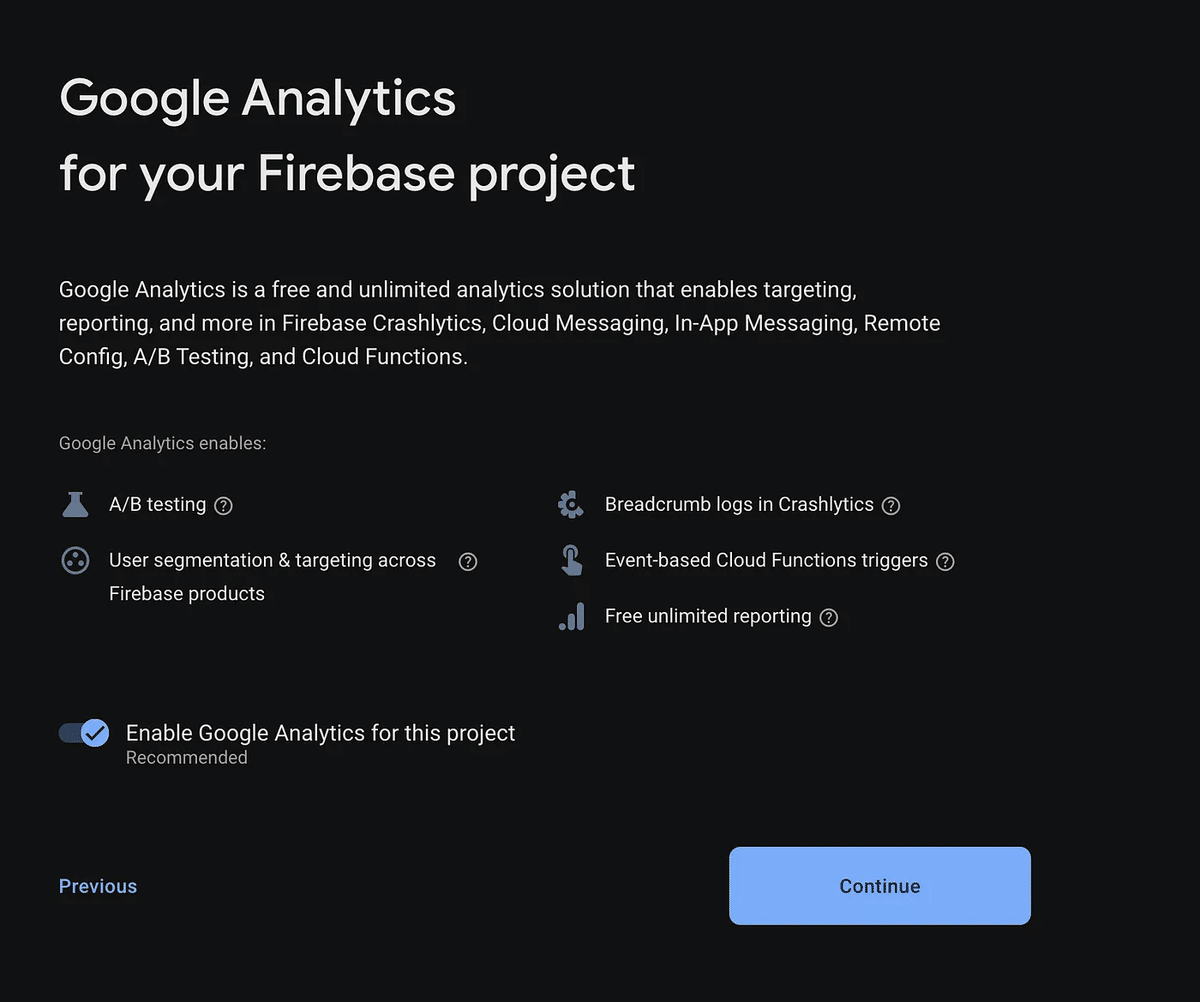
6.Select an accountをクリックし、Default Account for Firebaseを選択します。
7.Create Projectをクリックします。

8.これでFirebaseプロジェクトの作成は完了です。

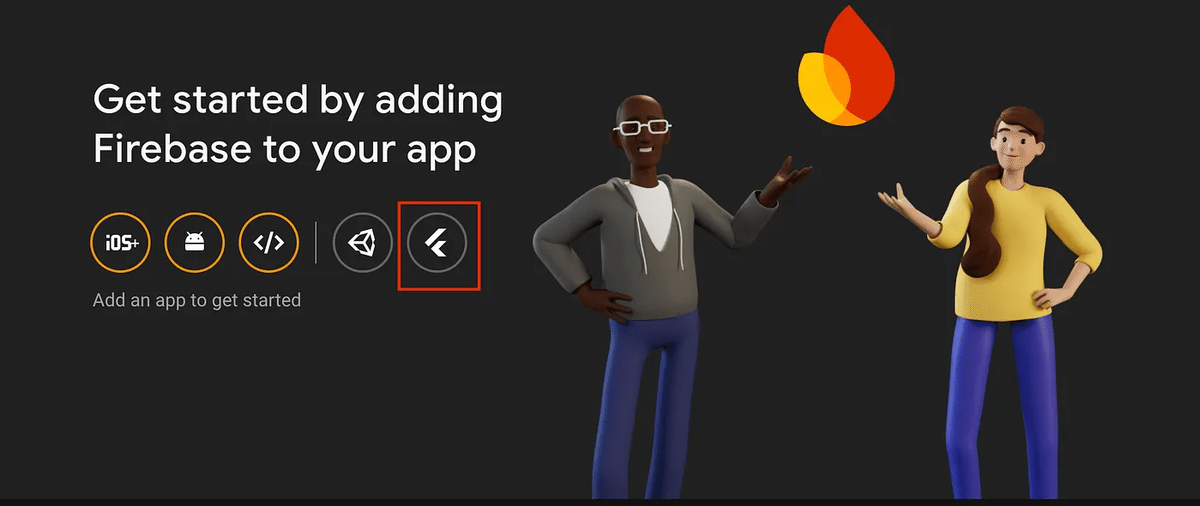
Firebaseプロジェクトにアプリを追加する
flutter icontoを選択し、flutterアプリを追加する。
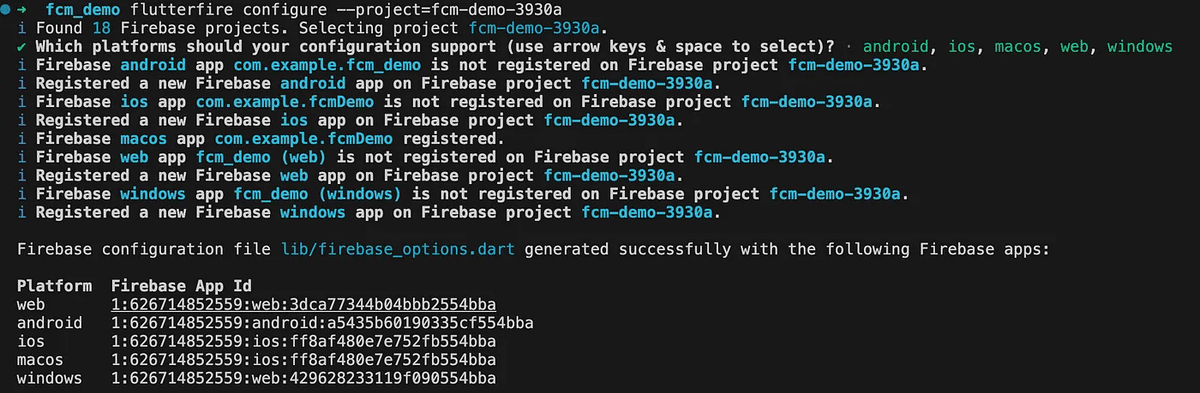
続行する前に、以下を確認してください: Firebase CLIをインストールしてログインする(run firebase login)
以下のコマンドを使ってFlutterFire CLIをインストールし、実行する。
//From any directory, run this command
dart pub global activate flutterfire_cli
//Then, at the root of your Flutter project directory, run this command
flutterfire configure --project=<firebase_project_name_id>
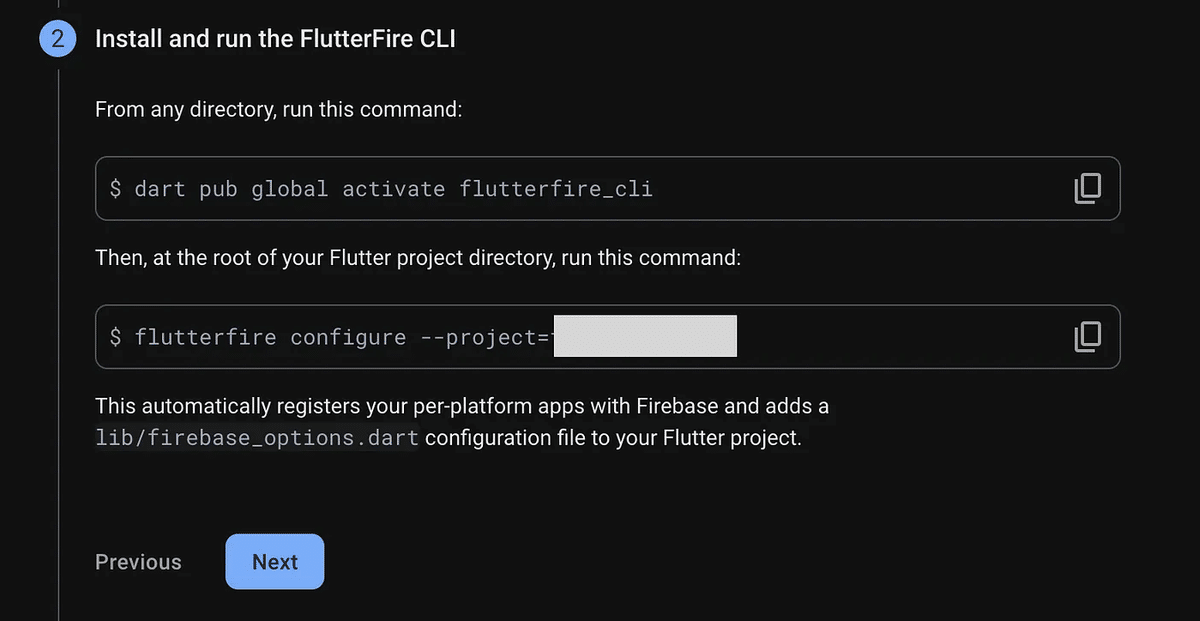
これにより、プラットフォームごとのアプリが自動的にFirebaseに登録され、Flutterプロジェクトにlib/firebase_options.dart設定ファイルが追加される。
Firebase Messaging Setup:
📱Android Setup:
デフォルトの Firebase Cloud Messaging (FCM) パーミッションを追加する必要はありません。しかし、Android携帯の一部のアプリの通知がグレーのアイコンを表示していることに気づくかもしれません。これを避けるには、必ずカスタムアイコンを追加し、通知の背景色を指定してください。
<meta-data
 android:name="com.google.firebase.messaging.default_notification_icon"
 android:resource="@drawable/ic_stat_notification" />


 <meta-data
 android:name="com.google.firebase.messaging.default_notification_color"
 android:resource="@color/colorAccent" />
上記のメタデータをandroid>main>AndroidManifest.xmlファイルに追加する。
<application
        android:label="FCM Demo"
        android:name="${applicationName}"
        android:icon="@mipmap/ic_launcher">
        <activity
            android:name=".MainActivity"
            android:exported="true"
            android:launchMode="singleTop"
            android:theme="@style/LaunchTheme"
            android:configChanges="orientation|keyboardHidden|keyboard|screenSize|smallestScreenSize|locale|layoutDirection|fontScale|screenLayout|density|uiMode"
            android:hardwareAccelerated="true"
            android:windowSoftInputMode="adjustResize">

         <meta-data
          android:name="com.google.firebase.messaging.default_notification_icon"
          android:resource="@drawable/ic_stat_notification" />

         <meta-data
          android:name="com.google.firebase.messaging.default_notification_color"
          android:resource="@color/colorAccent" />


 </application>
  ...
  ...
これで、アプリのアイコンや通知を描画可能な中に置き換えることができます
📱IOSのセットアップ:Androidと同じで、デフォルトのFirebase Cloud Messaging (FCM)パーミッションを追加する必要はありませんが、IOS用の機能とAPNSキーを追加する必要があります:
バックグラウンド・モード機能
Background Modes機能は、プッシュ通知などのバックグラウンド・サービスを管理するために必要です。これを有効にすると、アプリがアクティブに使用されていない場合でも、アプリがバックグラウンドで実行され、ポップアップ通知が表示されます。

Background Modes機能が有効になったら、Background Modes設定でBackground FetchとRemote Notificationsが選択されていることを確認する。

2. プッシュ通知機能
もう一つの重要な機能はプッシュ通知です。アプリでプッシュ通知サービスを提供するために、プッシュ通知機能が有効になっていることを確認してください。

3. APNSキー
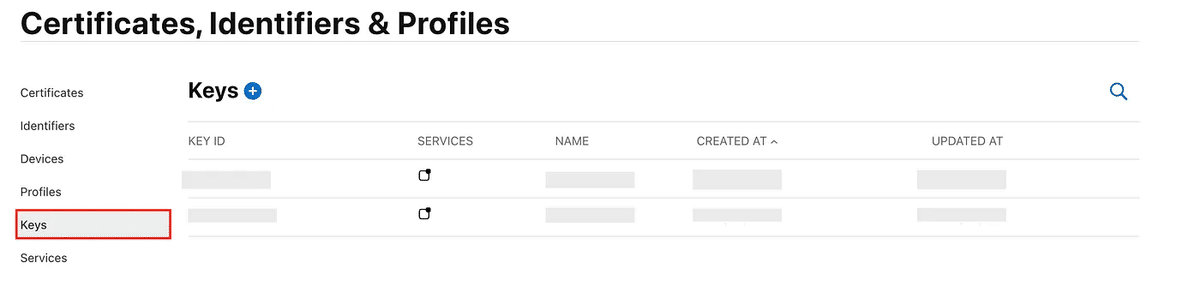
Apple Developerポータルにアクセスし、Certificates, Identifiers & Profilesに移動します。
Keysセクションを選択し、+ボタンをクリックします。
新しいキーを登録します: キー名を入力し、Apple Push Notifications service(APNs)のチェックボックスを選択し、Continueをクリックします。
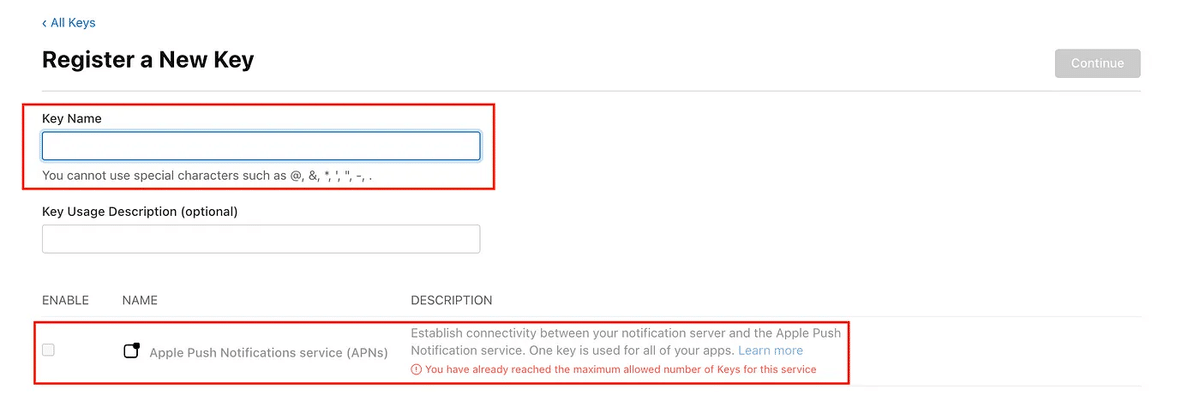
キーの詳細を表示し、[ダウンロード]ボタンをクリックします。

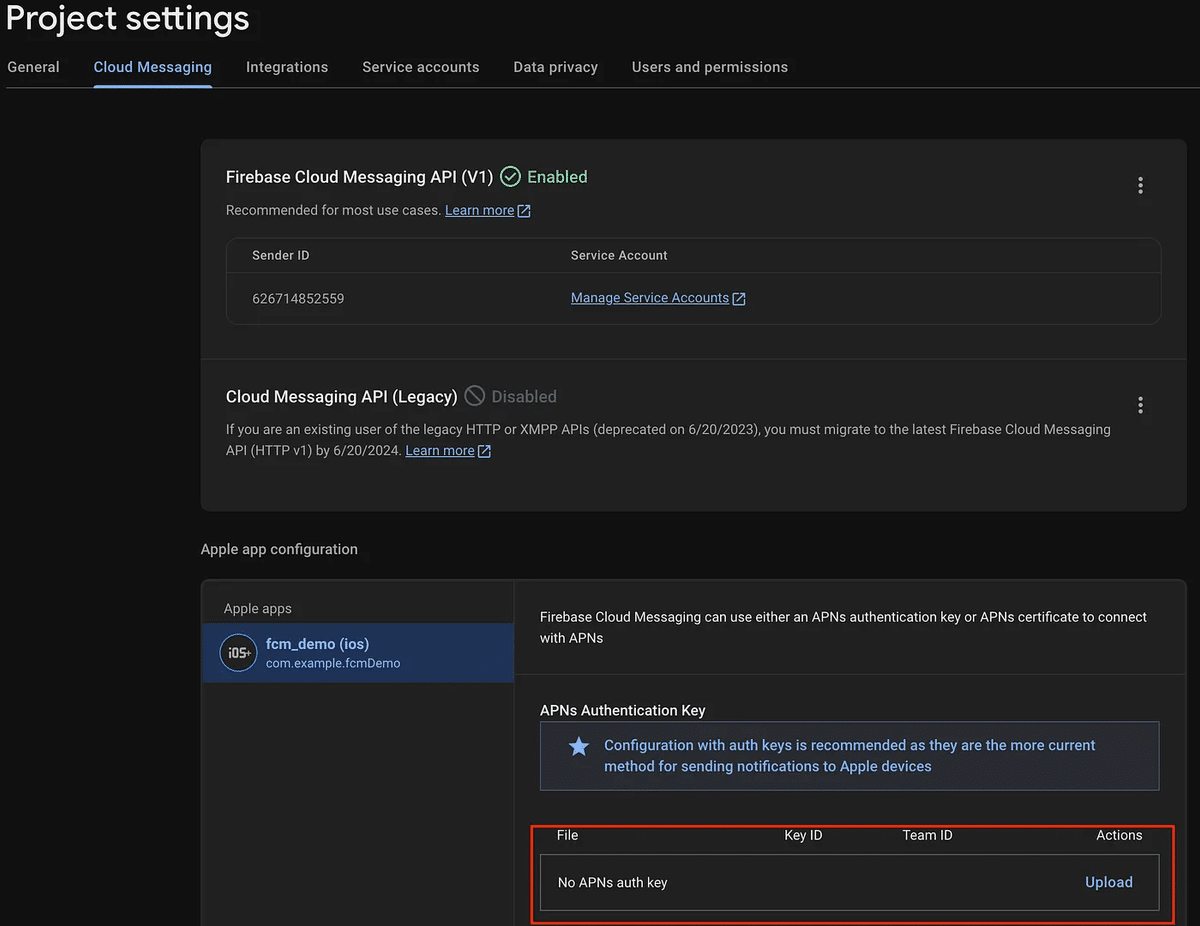
FirebaseのiOSアプリセクションに移動し、Cloud Messagingtabを開き、ダウンロードしたFCMキーをアップロードする。
FCMとFirebase Core Packageを追加します:
次に、pubspec.yamlfile に依存関係を追加する必要があります:
dependencies:
  firebase_messaging: <current_version>
  firebase_core:<current_version>
FCMトークンを使用してFirebase Messaging経由で受信した通知を管理するnotification_service.dartファイルを作成します。このサービスは、すべてのアプリの状態(フォアグラウンド、バックグラウンド、終了)の通知を処理します。
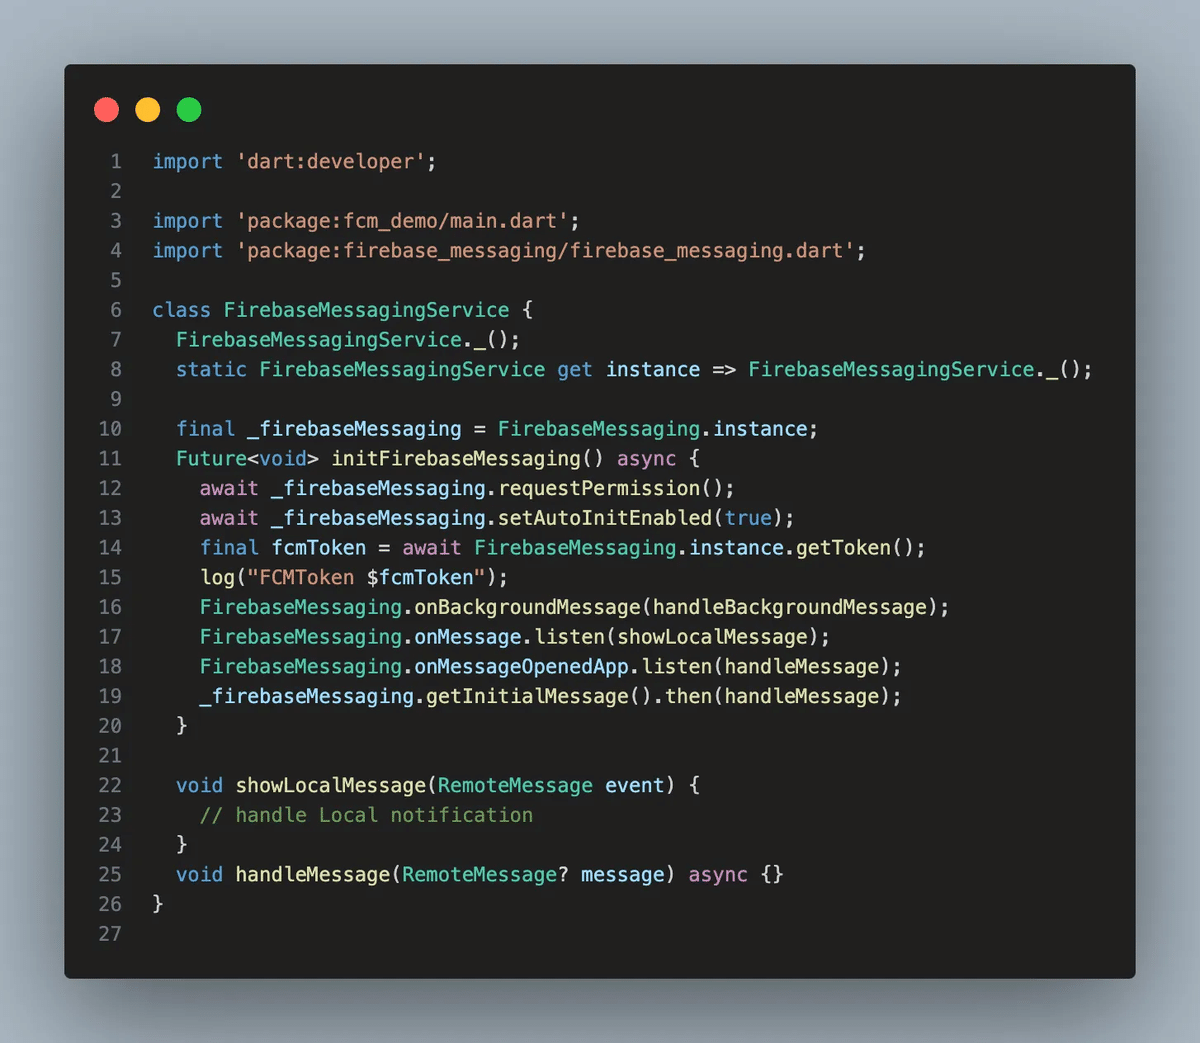
Firebase Messaging SDK が提供する main.dart ファイルで、アプリがバックグラウンドで実行されている間のバックグラウンド通知を管理するために、別のスレッドと Firebase Messaging サービスを設定します。

notification_service.dartファイルで、FlutterアプリのFirebase Cloud Messaging (FCM)を自動的に初期化するsetAutoInitEnabled関数を有効にします。これにより、アプリの起動時にFCMが自動的に初期化され、デバイストークンが取得されます。

Flutterアプリを実行し、通知を受け取れるか確認してみよう。
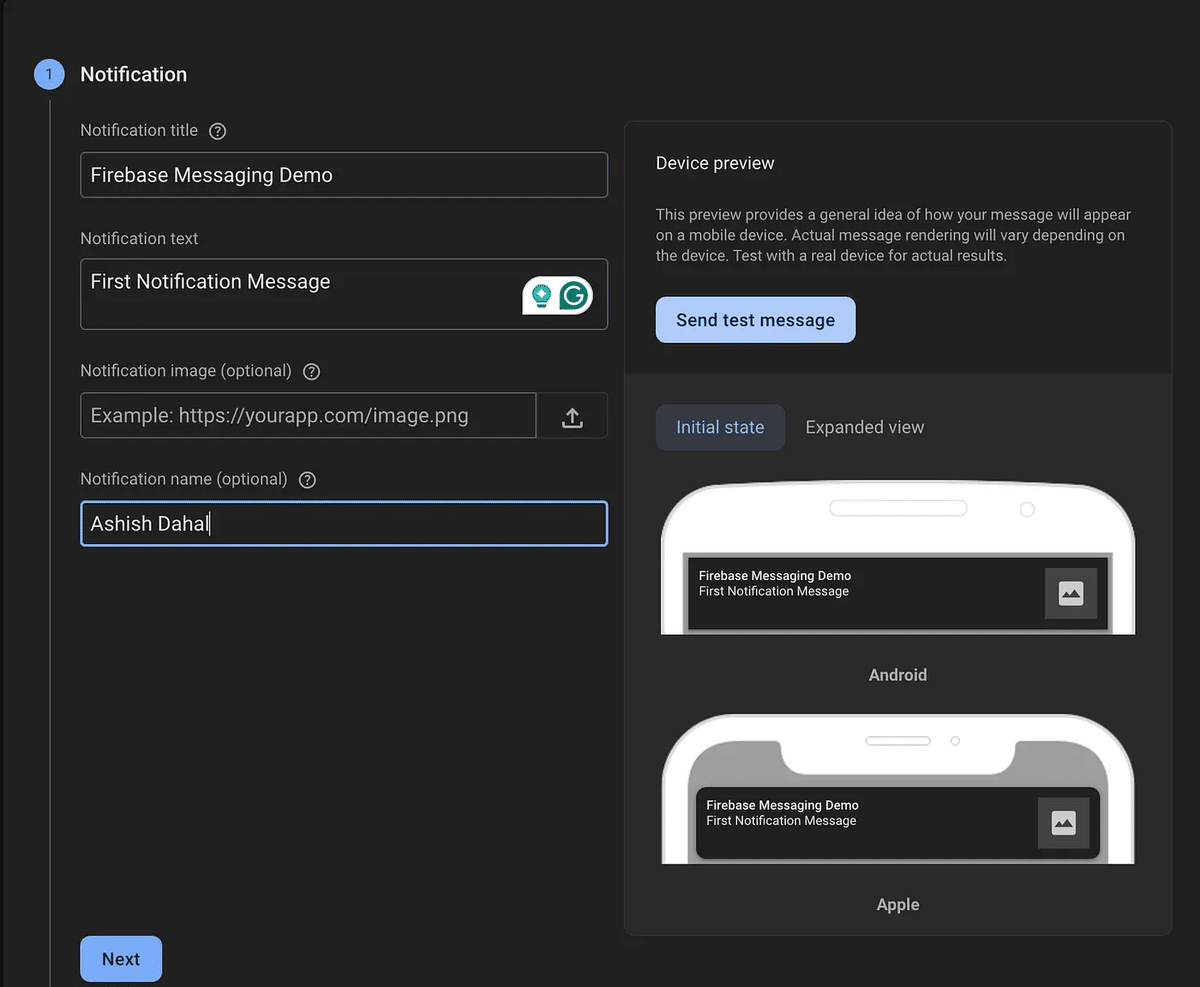
Firebaseメッセージングコンソールに移動します。最初のメッセージなので、最初のキャンペーンを作成するを選択する必要があります。Firebase Notification messagesを選択し、Createをクリックします。

メッセージのタイトル、テキスト、名前を入力してください。
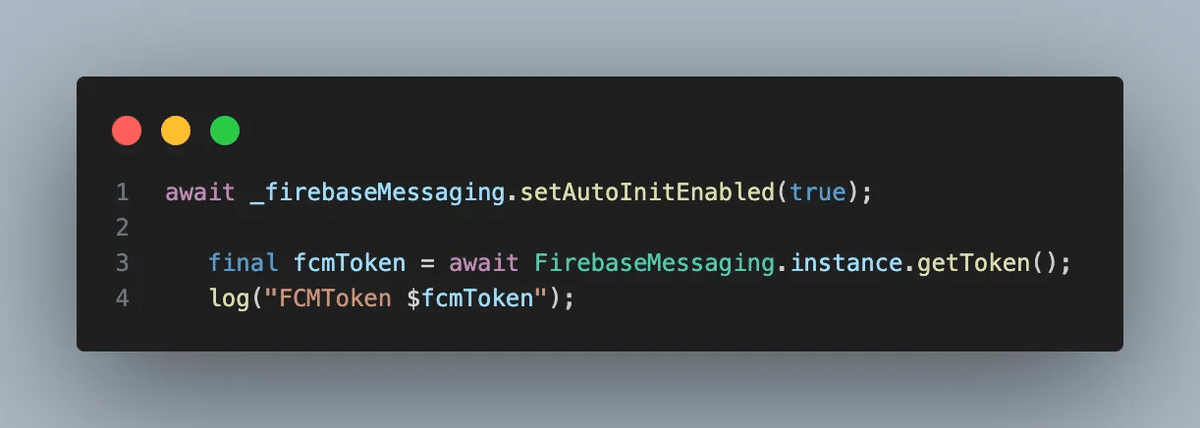
次に、以下のコードを使用して、テスト用にFCMトークンを手動で取得することができます。
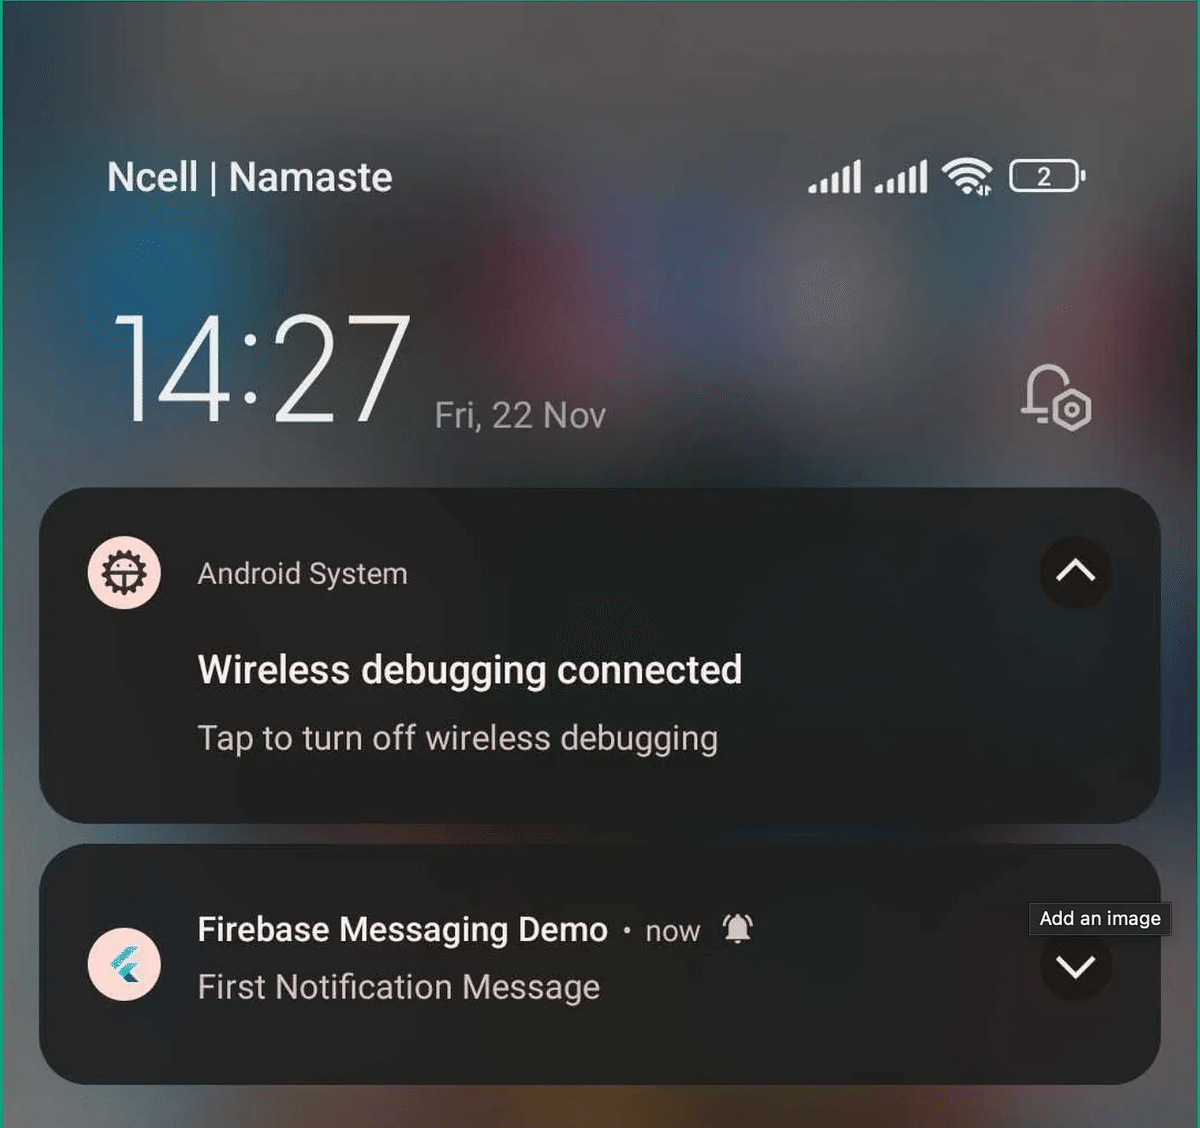
コンソールからFCMトークンをコピーし、送信テストメッセージボタンをクリックし、FCM登録トークンの追加フィールドに貼り付け、ボタンをクリックします。

Hurray 🎉 🎉 私たちのリアル・アンドロイド・デバイスに無事に通知が表示されました。デフォルトでは、通知をクリックするとアプリが開きます。
Android 通知チャネル
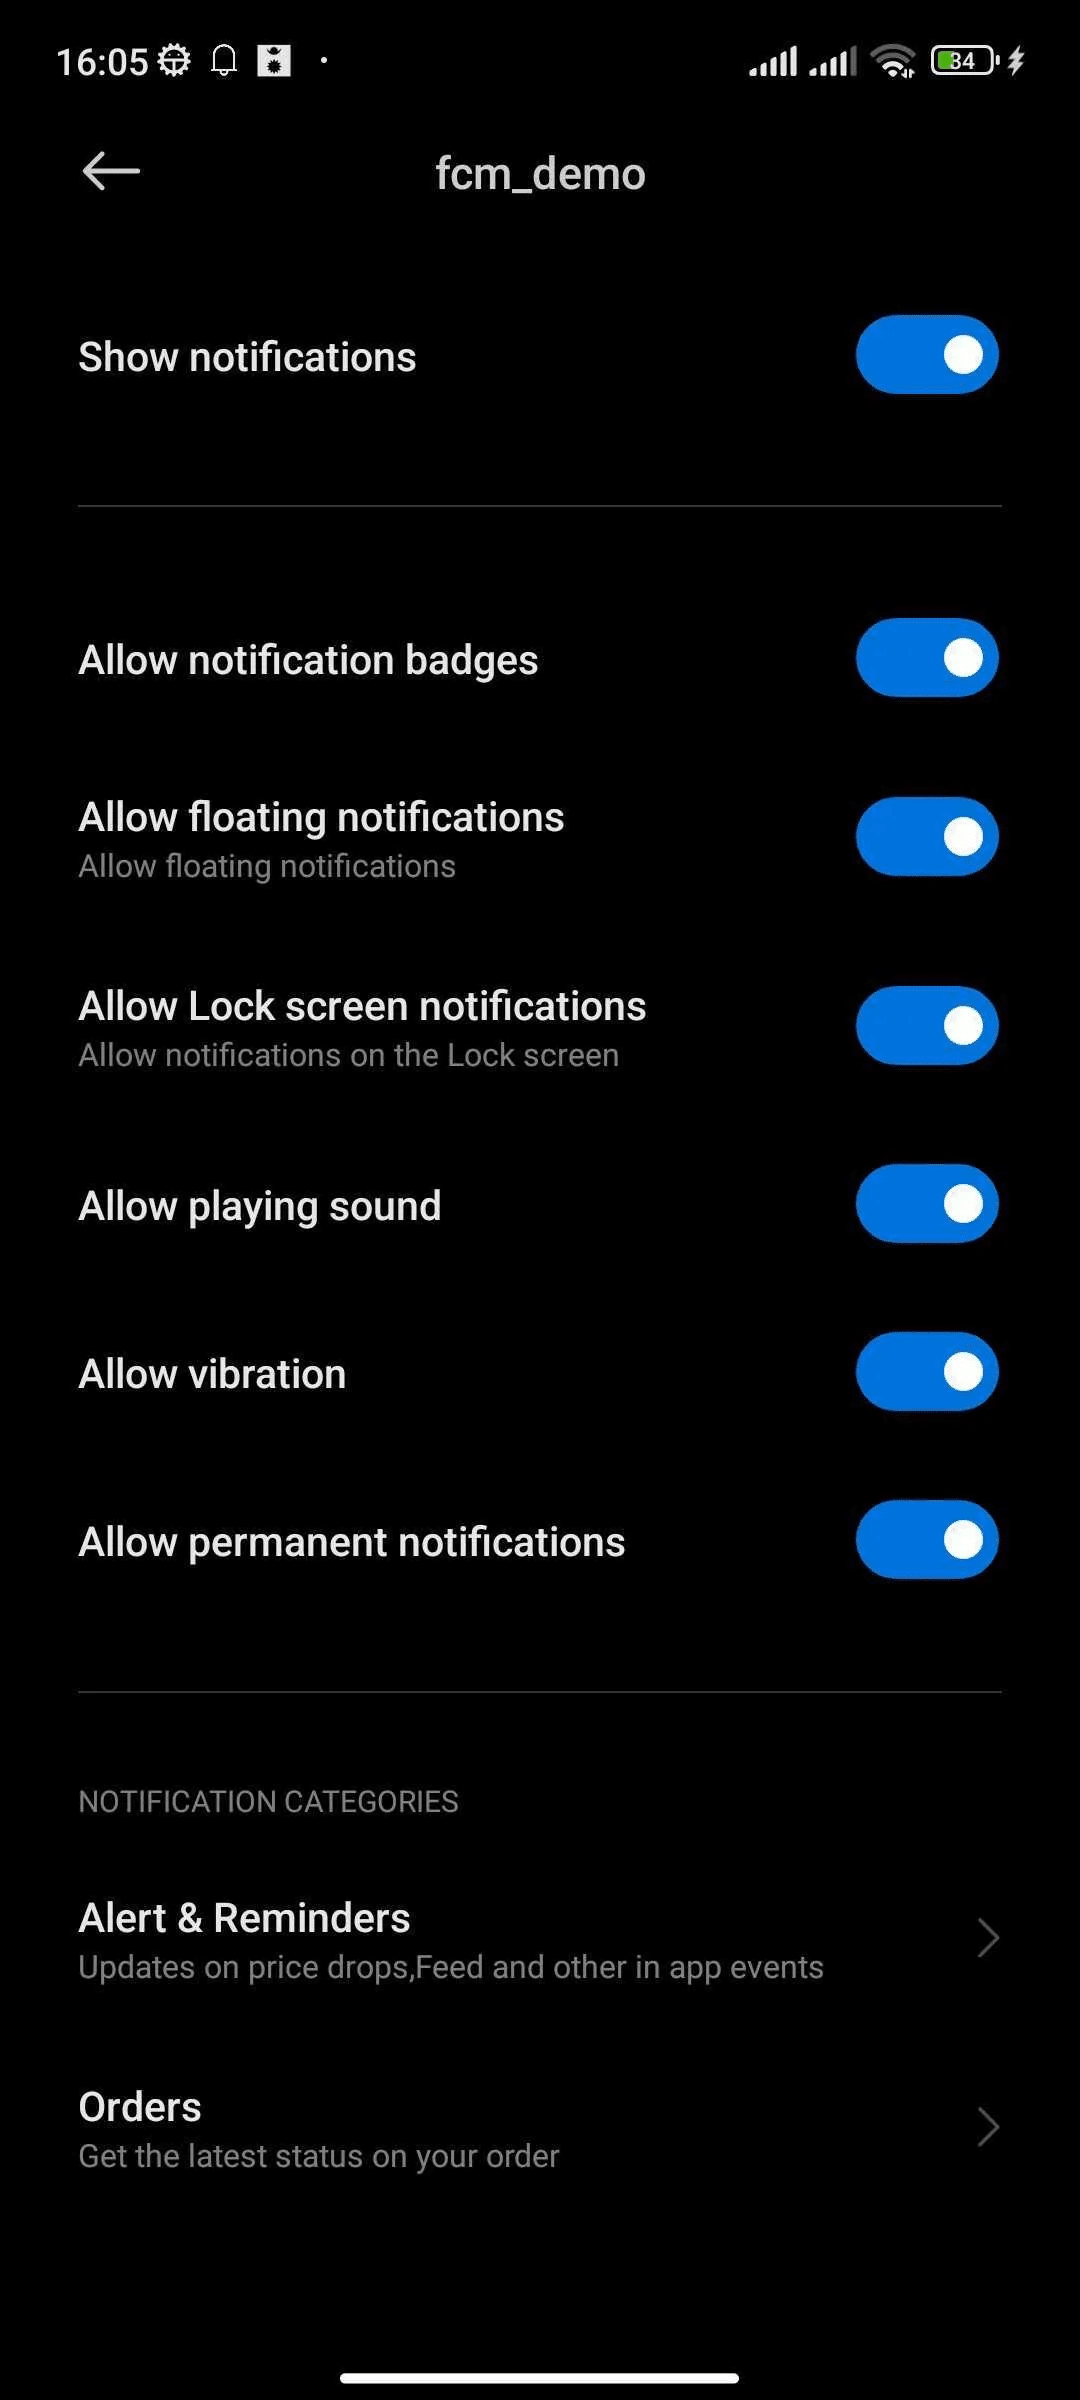
通知チャネルは、Android 8.0(API Level 26)で導入された、最新のAndroidアプリ開発において重要な機能です。開発者が通知を異なるチャンネルに分類できるようにすることで、より良いユーザー体験を提供します。ユーザーは、サウンド、バイブレーション、重要度の設定など、各チャネルの動作をカスタマイズすることができ、アプリの通知とのインタラクションをより自由にコントロールすることができます。
なぜ通知チャンネルなのか?Android 8.0以前は、すべての通知がシステムによって平等に扱われていたため、ユーザーがコントロールできる範囲は限られていました。例えば、あなたのアプリがアラート&リマインダー通知と注文通知の両方を送信する場合、ユーザーは一方のタイプ(例えば、アラート&リマインダー)の設定を無音にしたり、調整したりすることができます。
通知チャンネルの主な特徴
サウンド 各通知チャンネルに特定のサウンドを設定できます。
バイブレーション: 各チャネルは、振動パターンを持つことができ、または消音することができます。
重要度 通知がどの程度目立つかを設定できます(例:低い、高い、緊急)。
ユーザーのカスタマイズ: ユーザーは各チャンネルの通知を個別にコントロールできます。
Flutterに通知チャンネルを実装する方法
まず、pubspec.yamlファイルにflutter_local_notificationsパッケージを追加します。
flutter_local_notifications:<current_version>2.local_notification_service.dartファイルを作成し、通知アイコンなど必要な詳細をすべて設定する。また、通知チャネルの重要性を強調するshowLocalNotificationメソッドを定義します。
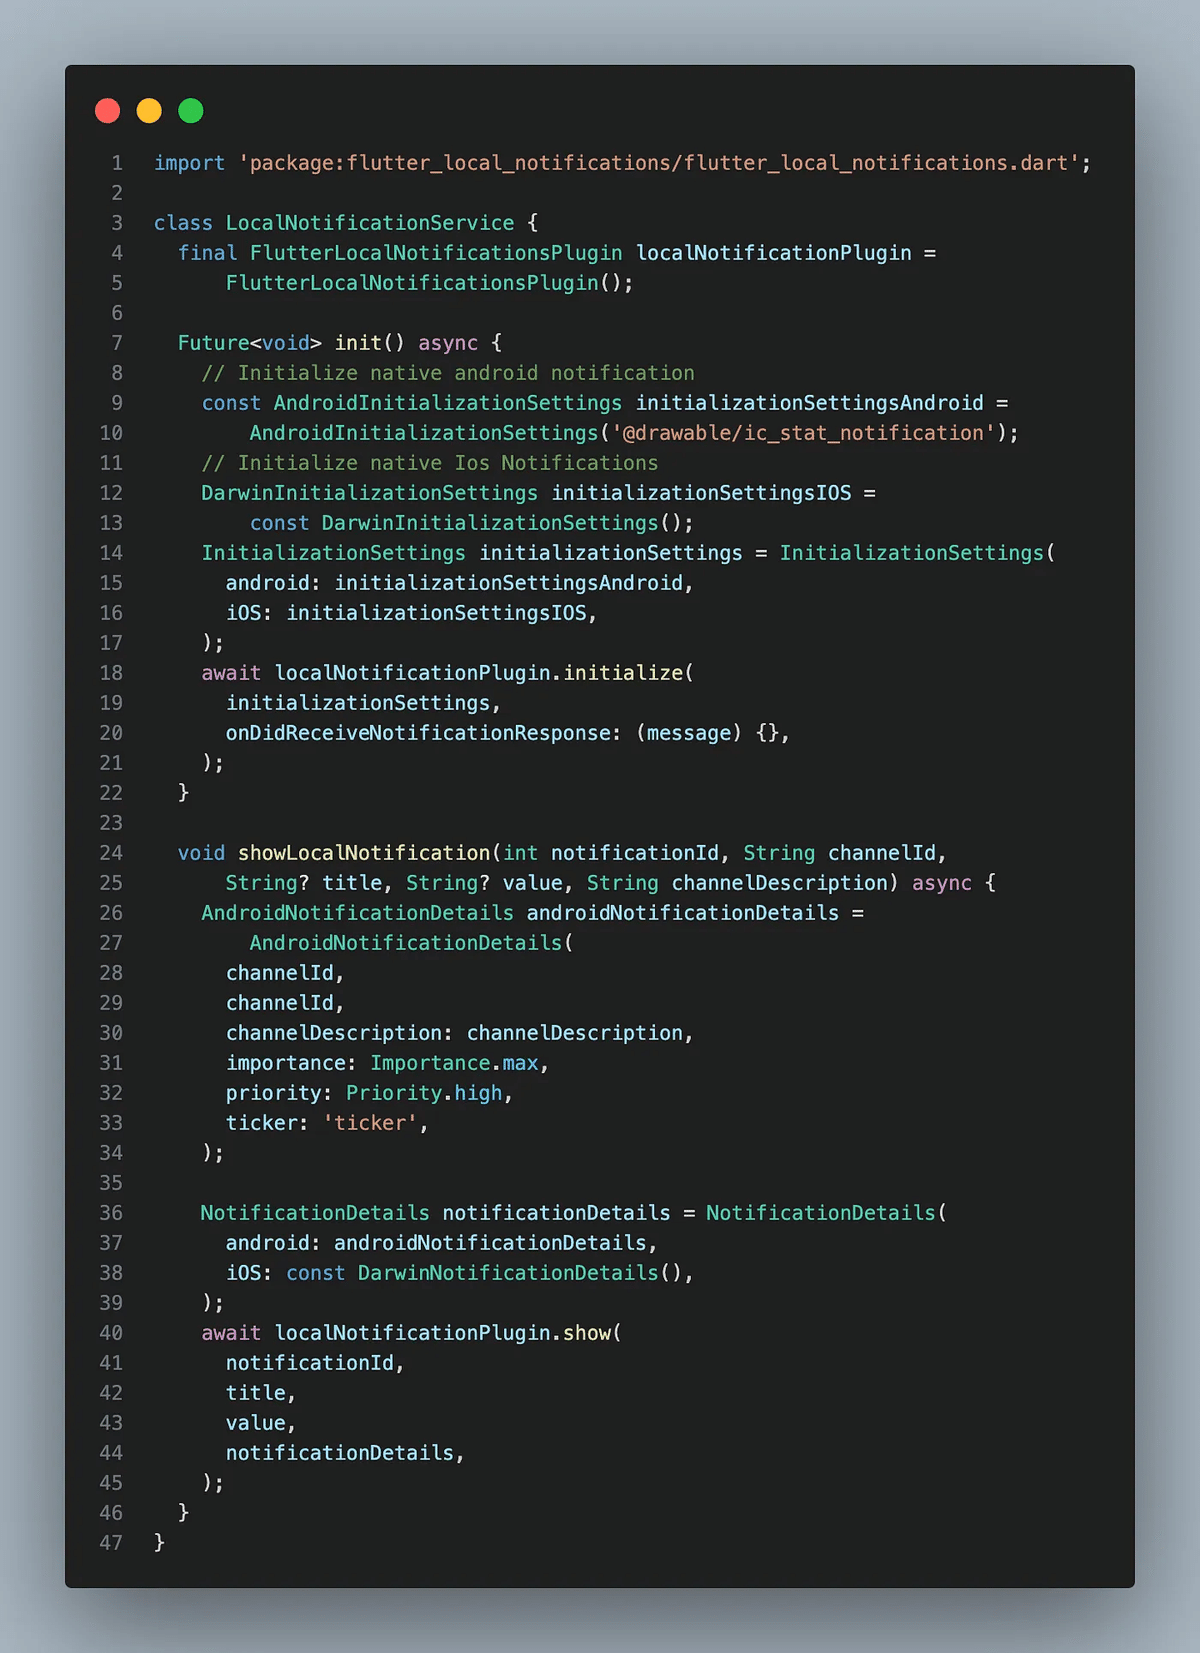
3.main.dartファイルでlocal_notification_serviceプラグインを初期化する。

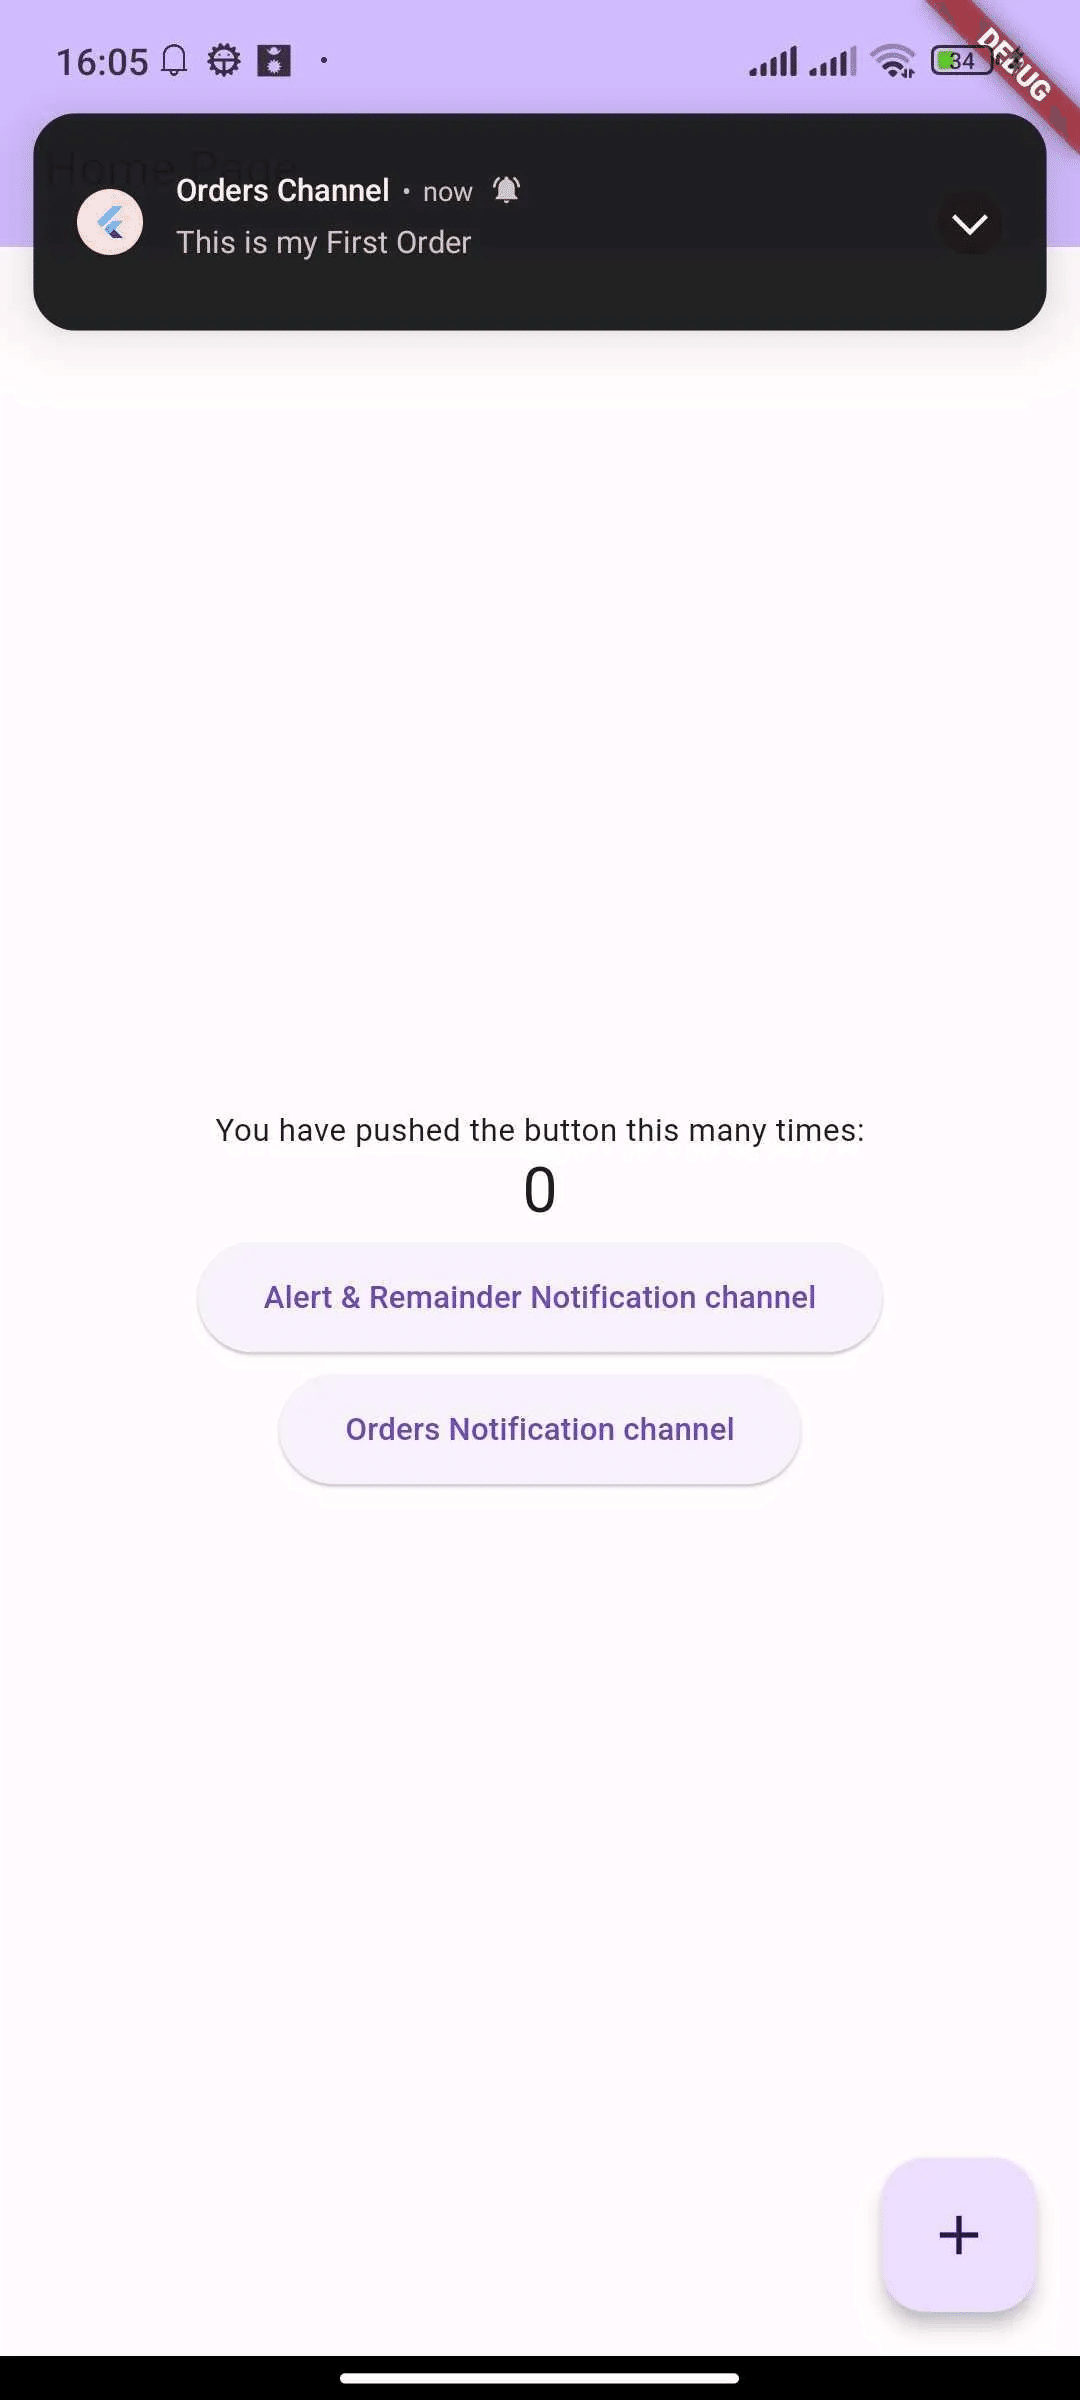
4.これで通知チャンネルが作成されたので、特定のチャンネルに通知を送ることができます。showLocalNotificationメソッドを使うと、特定のチャンネルに通知を送ることができます。

この設定では、2つの異なるチャンネルがあります:1つはアラート&リマインダー用、もう1つは注文用です。各チャンネルのサウンド、バイブレーション、通知の優先度を個別に調整できます。

結論
この記事では、FlutterアプリケーションでFirebase Push NotificationとAndroid通知チャンネルを統合するための包括的なガイドを提供します。FlutterプロジェクトのセットアップとFirebaseプロジェクトの作成から始まり、アプリをFirebaseに追加する手順、AndroidとiOSの両プラットフォーム用のFirebase Messagingを設定する手順が続きます。主なステップには、必要なパーミッションの追加、通知アイコンの設定、iOS用のバックグラウンドモードの有効化などがあります。 この記事では、Android 8.0で導入されたAndroidの通知チャンネルの重要性を強調し、ユーザーが通知の種類ごとに音やバイブレーションなどの通知動作をカスタマイズできるようにしている。最後に、Flutterに通知チャンネルを実装する方法を概説し、開発者が通知を効果的に管理し、ユーザー体験を向上させることを可能にする。
Happy Coding 🎉
協業開発及び開発パートナーをお探しのお客様へ
弊社は、ネパールに海外拠点を持ち、生成AI、モバイルアプリ、システム開発を中心に事業を展開する企業です。
自社サービスの開発経験を活かし、クライアント様と共に事業を創造することを重視し、創業以来、スタートアップから中小企業、大手企業、自治体まで、幅広い開発実績があります。プロダクトはユーザーが使いやすいように設計しており、企画から開発、保守運用まで対応しています。開発技術を厳選し限定することで、セキュリティ、プロダクトの品質向上に努めており、事業開発に関する課題を深く理解し、最適なご提案が可能です
お問い合わせはこちらから:
お問い合わせフォーム:https://readytowork.jp/