
Next.js with React Testing Library, Jest, and TypeScript

この記事は弊社のフルスタックエンジニア:Raj Chaudharyが作成した記事です。
What is the Jest testing library?
Jest is a popular JavaScript testing framework, and the “Jest Testing Library” is not a separate entity but typically refers to a testing library called “@testing-library/jest” that works in conjunction with Jest. It is part of the larger Testing Library family, which provides a set of testing utilities to help developers write more effective and maintainable tests for their JavaScript applications, including React applications.
Some of the key utilities provided by this library include:
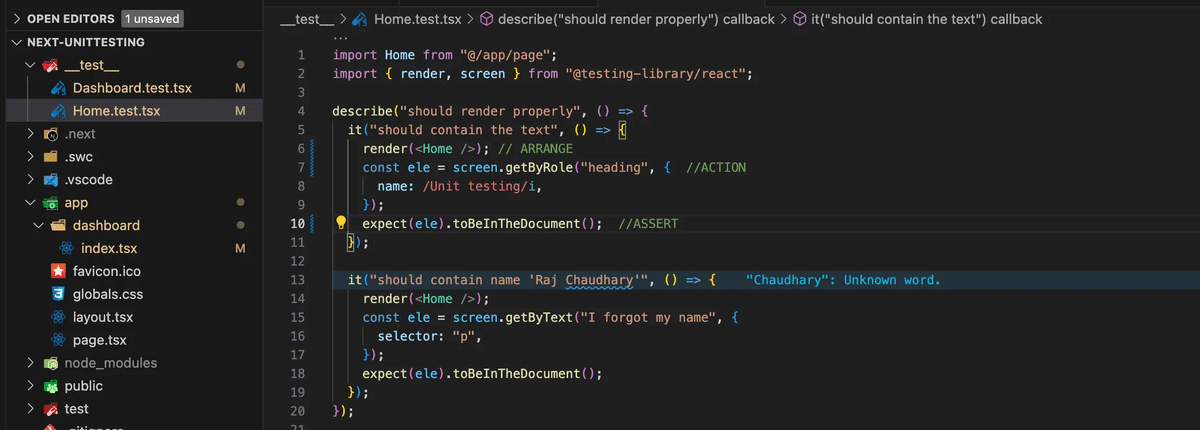
render: Used to render React components within the testing environment.
fireEvent: Used to simulate user events like clicks, typing, etc.
screen: A query selector that allows you to access elements rendered in the test.
Assertions: A set of built-in assertions to verify that your components behave as expected.
Today, I want to introduce testing in Next.js with Jest, the React Testing Library, and TypeScript. We will discuss testing in Next.js using Jest, the React Testing Library, and TypeScript. Today’s lesson aims to help you get set up and go with Jest and React.
I am using a testing Library in a Next.js project using TypeScript. And currently, that can be a little difficult, so I want to help you navigate some of the trouble spots along the way. Let’s start by creating a new Next.js project.
Create a new next js project and open the parent folder. Type npx create-next-app@latest and press enter. After that, we need to give the project a name. I’m going to call this next-unit testing. We need to install the library that is needed for jest testing with typescript.
“@testing-library/jest-dom @testing-library/react @testing-library/user-event jest jest-environment-jsdom ts-jest”
And you can compare it to mine. You may have newer versions if you’re watching this in the future. But this is essentially what you should have.

Now while we’re in the package.json let’s scroll up to our scripts and let’s add a couple of test scripts. So underneath Lent let’s add test and then beside test, we’re just going to run Jest for the test script and then we’ll have another one that says test then a colon, and watch. And this will allow us to keep watching any changes.

“test”: “jest”,
“test:watch”:”jest — watchAll”
So here we’ll have jest — watchAll flags which will allow us to continually run the tests if they change fairly quickly.
We’ve already installed the dependencies here and then let's talk about creating a Jest config file. I’m going to create a jest.config.js instead of a .mjs and I’ll show you why as well but first of all let’s just look at the code they have here. You can go to Next.js docs and in the next js jest testing copy the code and put it in our Jest config file.

Back in VS Code let’s create a new file at the same level as the package.json file (root directory). Then we want jest.config.js and we will paste everything into this file.
Let’s make a few changes and I’ll show you how to work around this. So just a couple of changes to make here to make everything work. We’re going to change this import line although we’re still going to import from next/jest.

We’re using the .js here because we’re not going to have a module we’re just going to say const nextJest = require(next/jest). So we’re just using a common js import here with require instead of the es6 import that we had before. After that with our export at the bottom instead of export default, we’ll say module.exports = createJestConfig(config) and everything should be good now. So if you get that error along the way make sure you check the import line and the export line here and it should go away as well.
Note: Need a preset line and there we just say ts-jest. Make sure you have all three of these inside of the config.
preset: “ts-jest”
Now we also need a Jest setup file so let’s quickly create that and that is jest.setup.js and then inside of this we’re just going to have one line and that is import then inside of quotes we’ll have at testing library and then we have jest-dom.
import “@testing-library/jest-dom/extend-expect”;

We can write a simple test to make sure that they are actually on that page so now that we’re ready to write a test let’s create our first file in the test directory and let’s call this home.test.tsx now why did I call it home instead of page well if we look back at the page and of course every page or every route inside of the next JS app with the app routers named page.tsx so we don’t want to go with that we want to go with what did we name the component. Well, this is the export default function home so I’m naming the test home.test.tsx and yes these test files do need to end in .tsx or .jsx.

If you do have the current issue shown in the above figure then we’re going to roll this back to a testing-library/jest-dom that works just a little bit better for us works as expected so let’s open up the terminal type npm I -D and then we’ll have to say @testing-library/jest-dom@5.16.5. and roll back our version to 5.16.5 and the issue will be fixed.

Roll backtesting library jest dom to the following version: "@testing-library/jest-dom": "^5.16.5",
As we can see the error will be resolved after rolling back the test library and we can run our test.
Now let's test open up a terminal and I should be able to type npm test and it should run properly.
You can see one test passed and one test failed which should be as we expected.

Conclusion
In summary, Jest is a powerful and widely adopted testing framework for JavaScript that provides a comprehensive set of features for testing code, making it easier to catch bugs and maintain code quality in your JavaScript applications.
You can check React Testing Library docs there you can find the introduction examples and that will of course help you get started but what really could help you is the API documentation. It shows all of those different options as well. So this article is about the setup and pointing you in the right direction to learn about testing and resolving the issue that faced while doing Research on jest testing with Typescript and Next js. Follow the article and you will successfully implement your testing library without any issue.
Thank you!
協業開発及び開発パートナーをお探しのお客様へ
弊社は、ネパールに海外拠点を持ち、生成AI、モバイルアプリ、システム開発を中心に事業を展開する企業です。
自社サービスの開発経験を活かし、クライアント様と共に事業を創造することを重視し、創業以来、スタートアップから中小企業、大手企業、自治体まで、幅広い開発実績があります。プロダクトはユーザーが使いやすいように設計しており、企画から開発、保守運用まで対応しています。開発技術を厳選し限定することで、セキュリティ、プロダクトの品質向上に努めており、事業開発に関する課題を深く理解し、最適なご提案が可能です
お問い合わせはこちらから:
お問い合わせフォーム:https://readytowork.jp/
直通番号:080-8940-7169