UE5から始める C++ & BP 13 【Blueprint版】Array(配列)

やっと配列までたどり着きました。
書いていると書かないことが沢山あります。
全部書いても勉強するには難しくなりすぎるので、かなり省略しています。
省略しても基本文法のすべてを説明できていないです。
プログラミン言語のごく一部でも膨大。
ようやく基本文法のゴールが見えてきました。
もう少し!
頑張ります。
前回は「Event Dispatcher」方法について調査しました。
今回は「Array(配列)」方法について調査していきます。
【Blueprint】Array(配列)
今回できること
変数をArray(配列)に変更します。
Array(配列)の設定方法や取得について解説します。
Array(配列)の取得でよく使用する2つの方法について解説します。
Array(配列)をランダムに取得する。
Array(配列)を剰余(%)を使用して順番に取得する。
学習用の新規レベル「Chapter_2_Array」を作成する
学習用の新規レベルを作成します。
[File]メニューから[New Level…]を選択します。
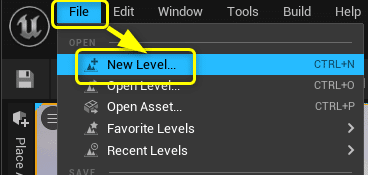
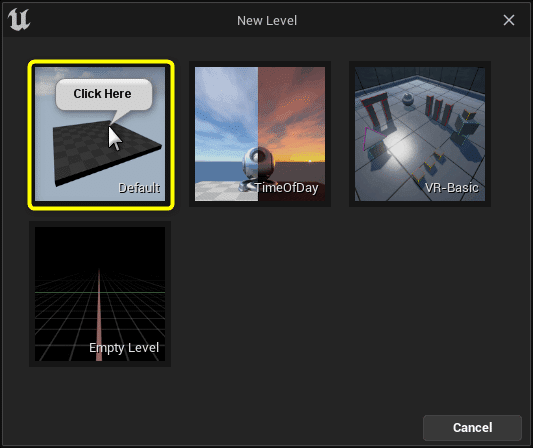
[Default]を選択します。
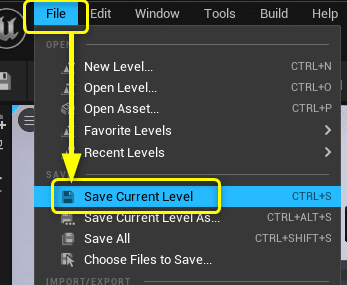
[File]メニューからCurrent Levelを保存します。
ショートカット「Ctrl + S」でも保存できます。
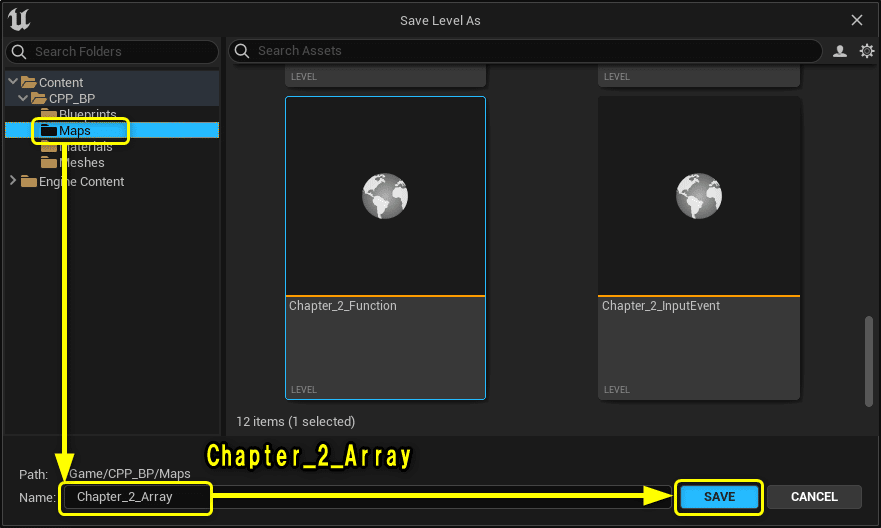
「Maps」フォルダを選択し、Nameに「Chapter_2_Array」を入力し、[Save]ボタンをクリックします。
Blueprintを複製する
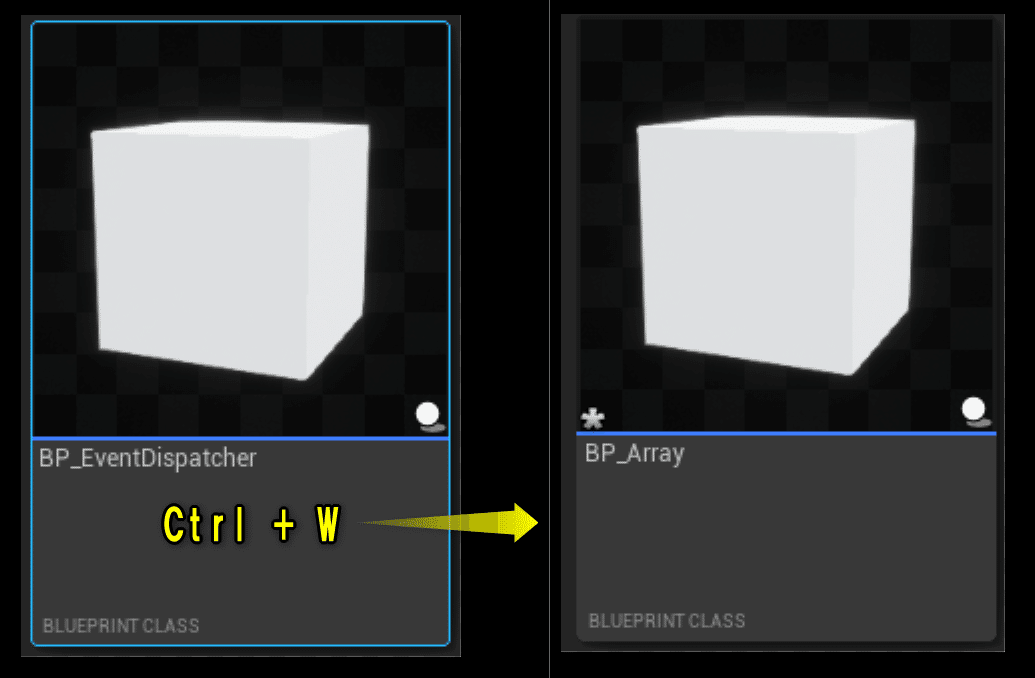
「BP_EventDispatchcer」を複製(Ctrl + W)して、「BP_Array」を作成します。
変数[Message]を配列の変数[Messages]に変更する
変数[Message]を配列の変数[Messages]に変更します。
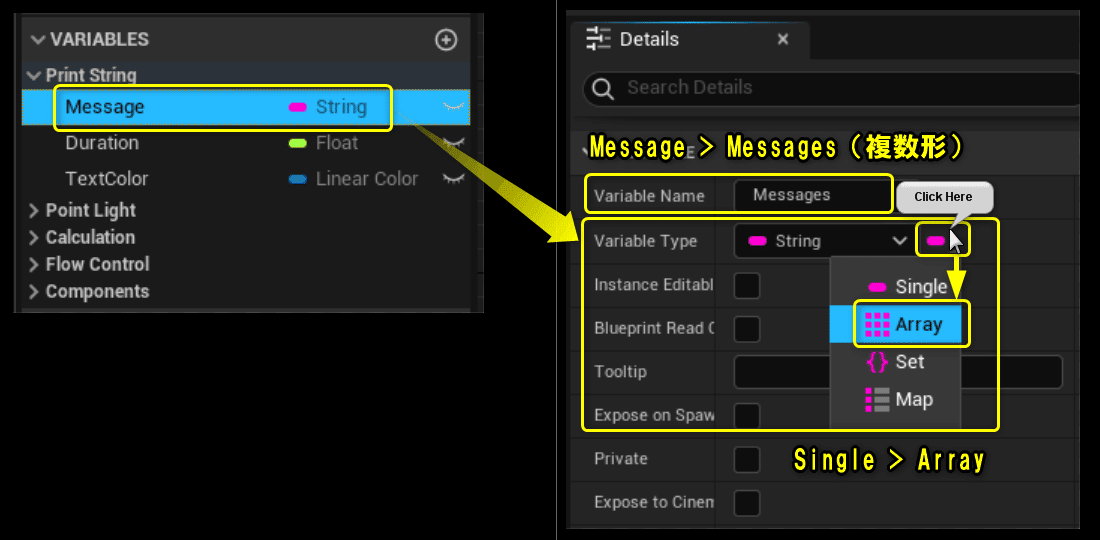
変数[Message]を選択し、Variable Nameを[Messages]に変更します。配列の変数を宣言する時は複数形の名前にすると配列ということが分かりやすくなります。
Variable Typeの右端のアイコンをクリックし、[Array(配列)]を選択します。

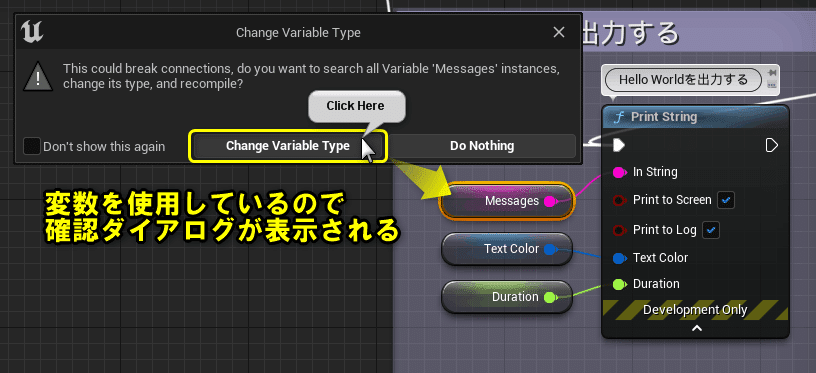
Variable TypeをArray(配列)に変更すると、変数をEvent Graphで使用しているので確認ダイアログが表示されます。[Change Variable Type]をクリックします。
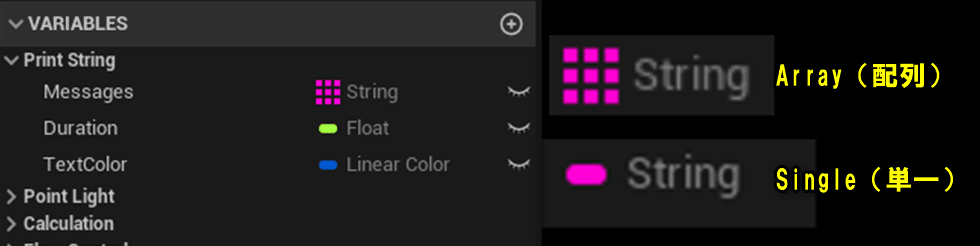
[My Blueprint]パネルの変数[Messages]のVariable Typeのアイコンが変わっています。アイコンを確認することで変数が配列か判別できます。
変数[Messages]にDefault Valueを設定する
変数[Messages]にDefault Valueを設定します。
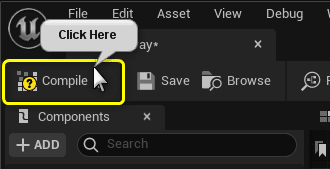
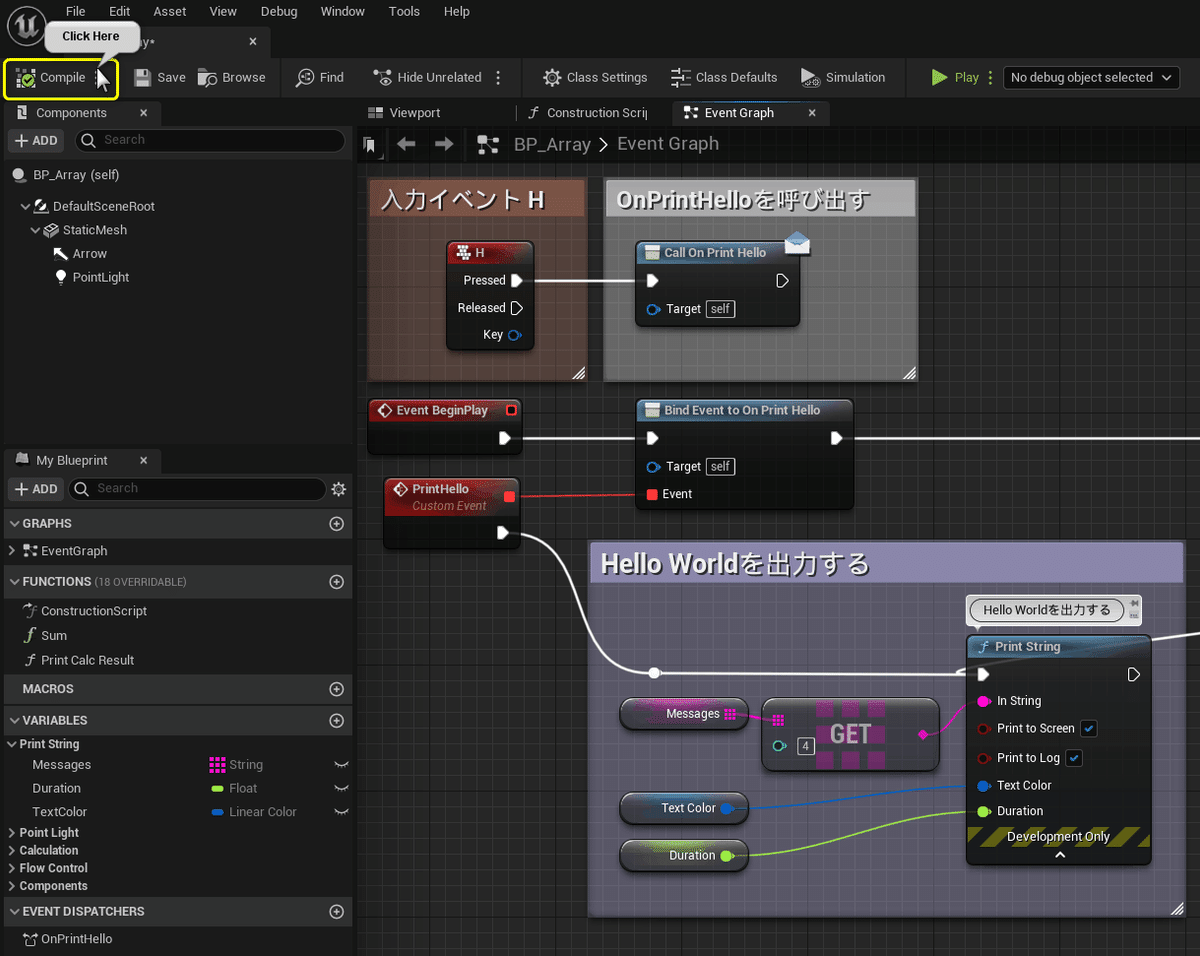
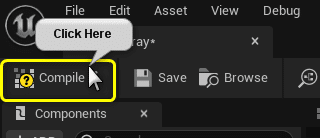
Default Valueを設定するので、[Compile]ボタンをクリックします。
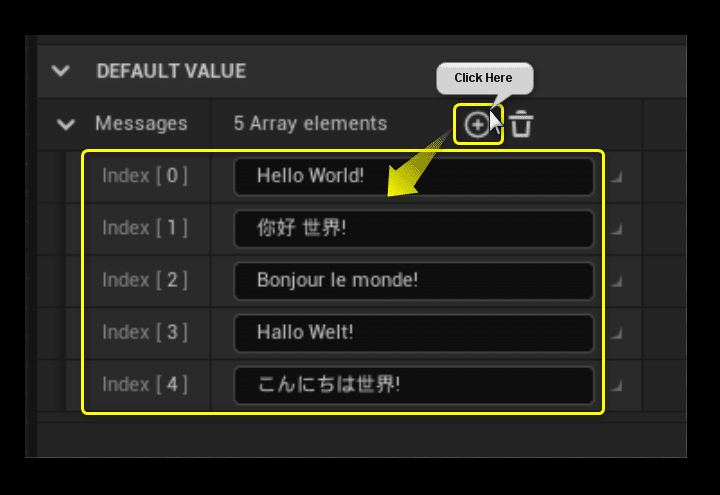
Array(配列)はDefault Valueの設定方法が変わります。

Default Valueの[+]ボタンをクリックすると設定できる要素が増えます。
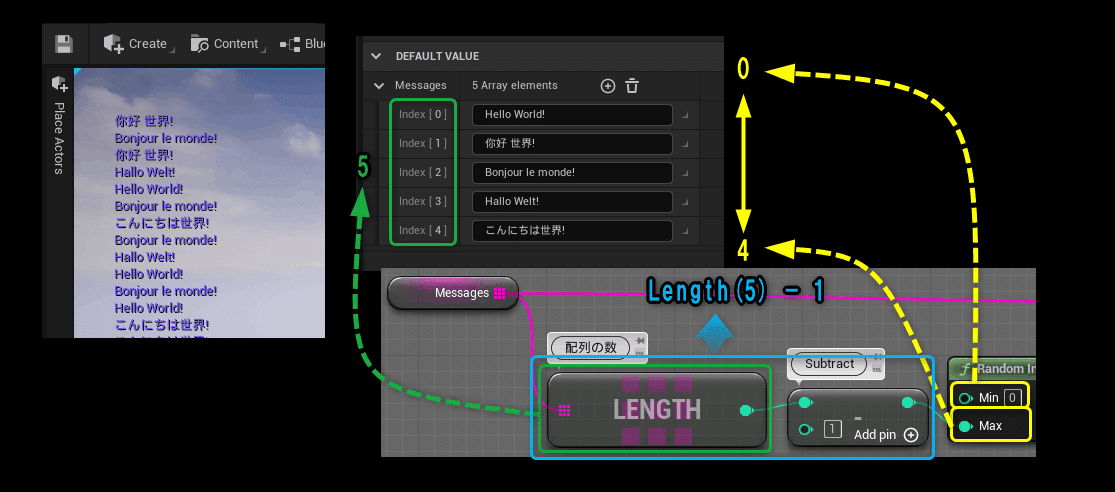
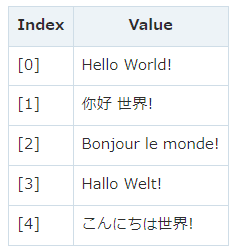
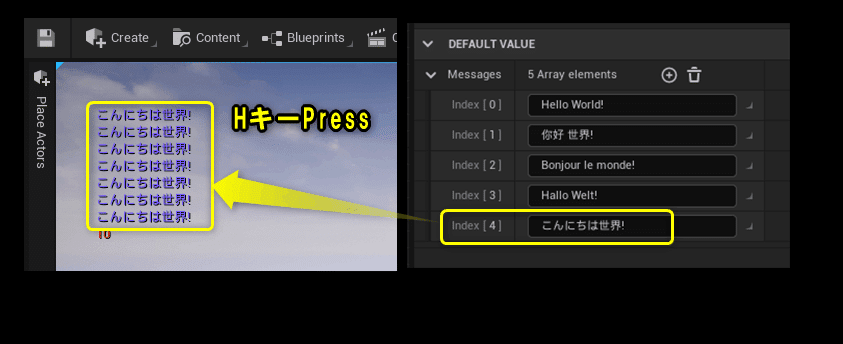
以下の表の国ごとの"Hello World!"を内容をDefault Valueに設定します。
配列の数え方は[0]が1番目になります。
変数[Messages]から値を取得する
変数[Messages]から値を取得します。
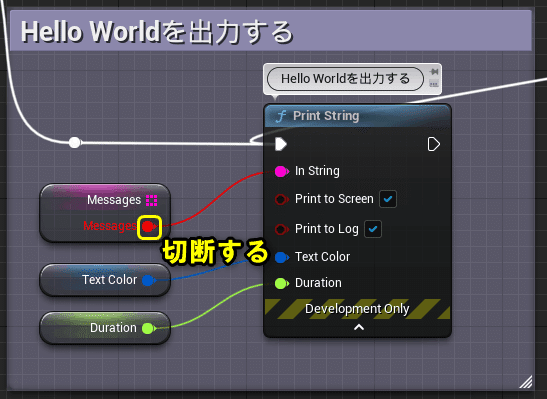
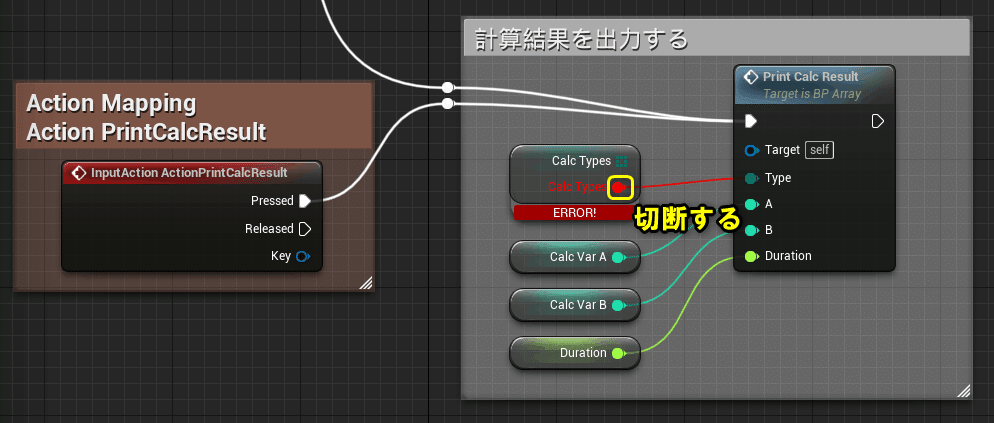
Variable Typeを変更したので、変数[Messages]のGetノードでエラーが発生しています。エラーとなっているピンの接続を切断します。
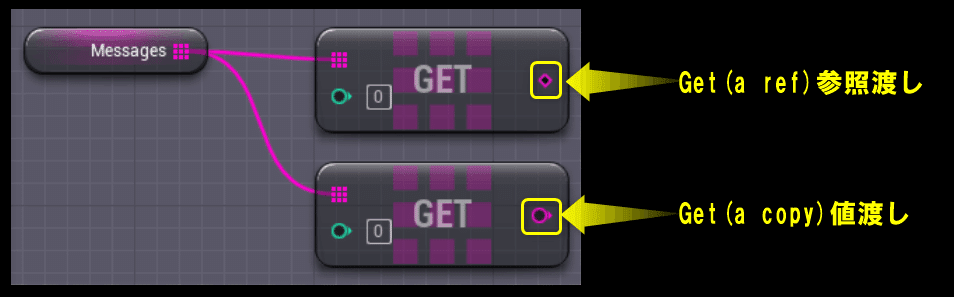
変数[Messages]のGetノードからDrag&Dropし、[Get(a ref)]を選択します。

Array(配列)のGetノードには[Get(a ref)]と[Get(a copy)]の2種類があります。
Function(関数)で説明した「参照渡し」と「値渡し」でArray(配列)の値を取得するかの違いです。
Get(a ref):参照渡しで値を取得します。
Get(a copy):値渡しで値を取得します。
日本語の"こんにちは世界!"を取得するように、Getノードの数値には[4]を設定します。
Getノードを[Print String]ノードの[In String]に接続します。

[Compile]ボタンをクリックします。
Level Editorに戻り、「BP_Array」をViewportにDrag&Dropします。
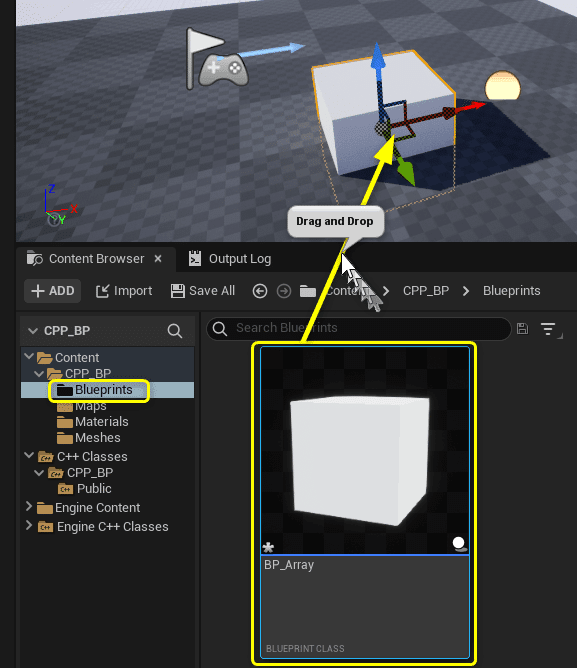
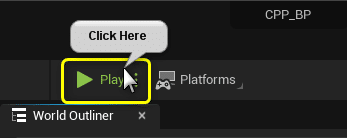
Level Editorの[Play]ボタンをクリックします。

[H]キーをPressすると、変数[Messages]のIndex[4]に設定した文字列が表示されます。
変数[Messages]からランダムに値を取得する
変数の取得方法についてよく使う方法を2つ紹介します。
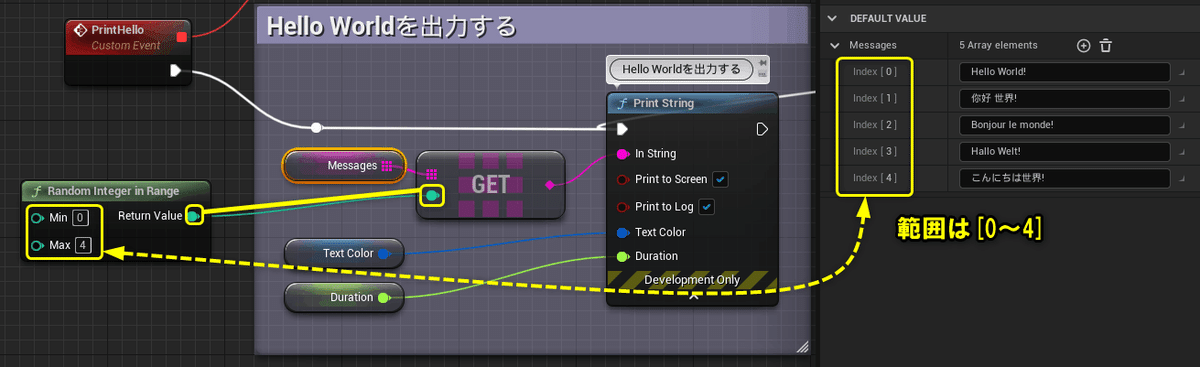
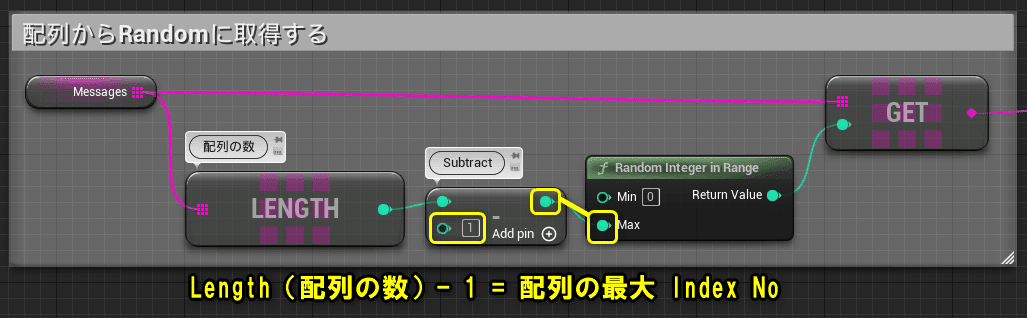
まずは、変数[Messages]からランダムに値を取得する方法です。
メニューから[Random Integer in Range]を選択します。
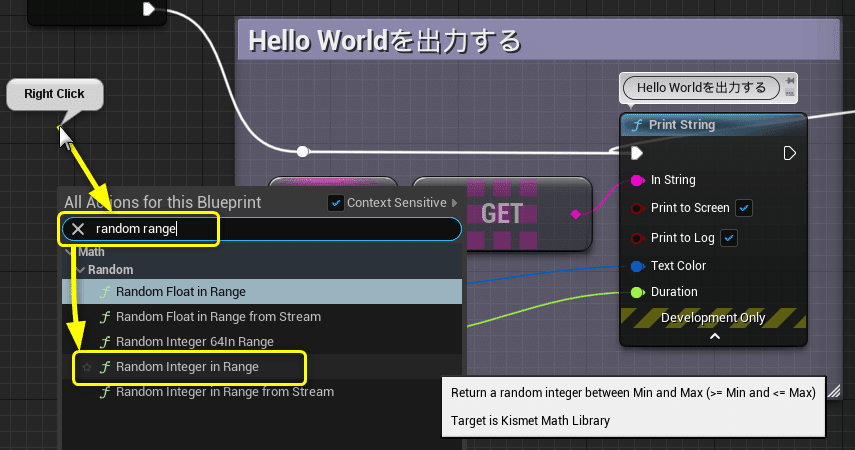
[Random Integer in Range]の[Max]ピンに配列の最後のIndex Noである[4]を設定します。
[Random Integer in Range]の[Return Value]ピンとGetノードを接続します。
配列は[0]から始まるので、Index NoのMaxは「配列数 - 1」になります。
[compile]ボタンをクリックします。

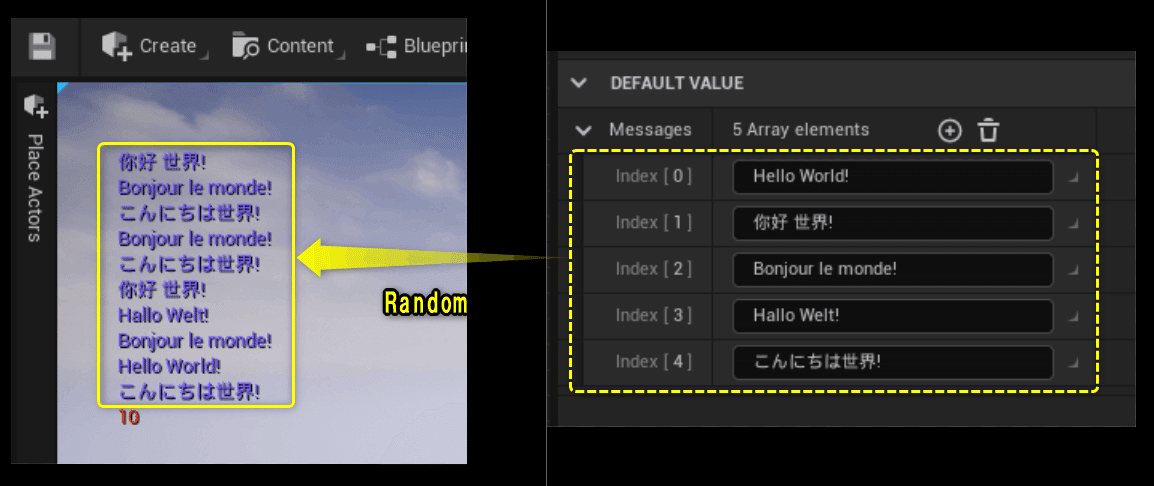
Level Editorの[Play]ボタンをクリックします。

[H]キーをPressすると、変数[Messages]の文字列がランダムに表示されます。
配列数が変わっても処理を変えずに済むように変更します。
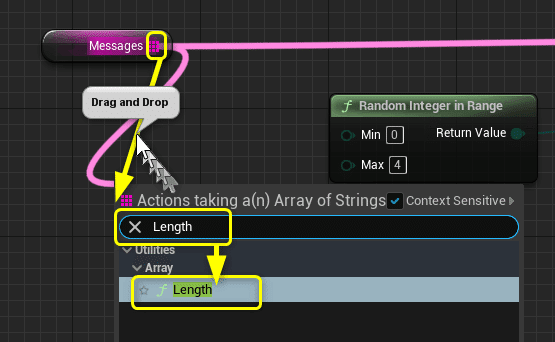
変数[Messages]からDrag&Dropし、[Length]を選択します。
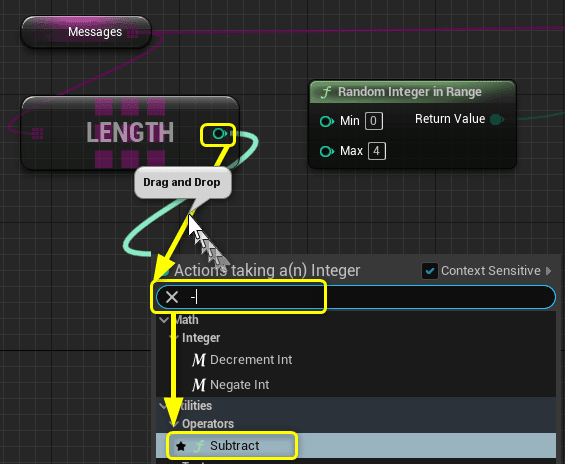
[Length]のアウトプットピンからDrag&Dropし、[Subtract(-)]を選択します。
[Subtract]のアウトプットピンを[Random Integaer in Range]の[Max]ピンに接続します。
配列は[0]から始まるので、Index NoのMaxは「配列数 - 1」になります。
配列の数を増やしても処理を変えずにMaxの値を取得できます。
[compile]ボタンをクリックします。
Level Editorの[Play]ボタンをクリックします。
[H]キーをPressすると、先ほどと同じように配列の文字列をランダムに取得できます。配列数が変わってもMaxの値を変更せずに済むので[Length]ノードを使用した取得は便利です。

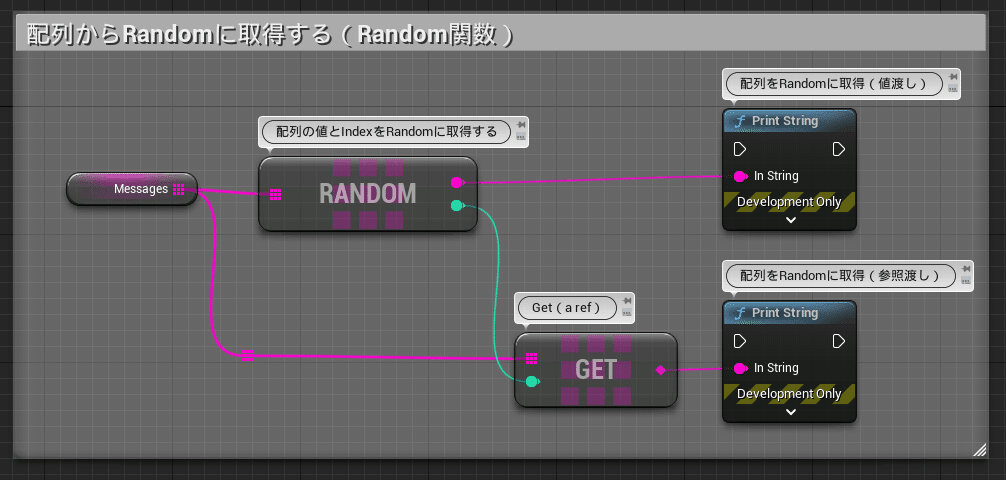
配列からRandomのElementとIndexを取得できるRandom関数があります。
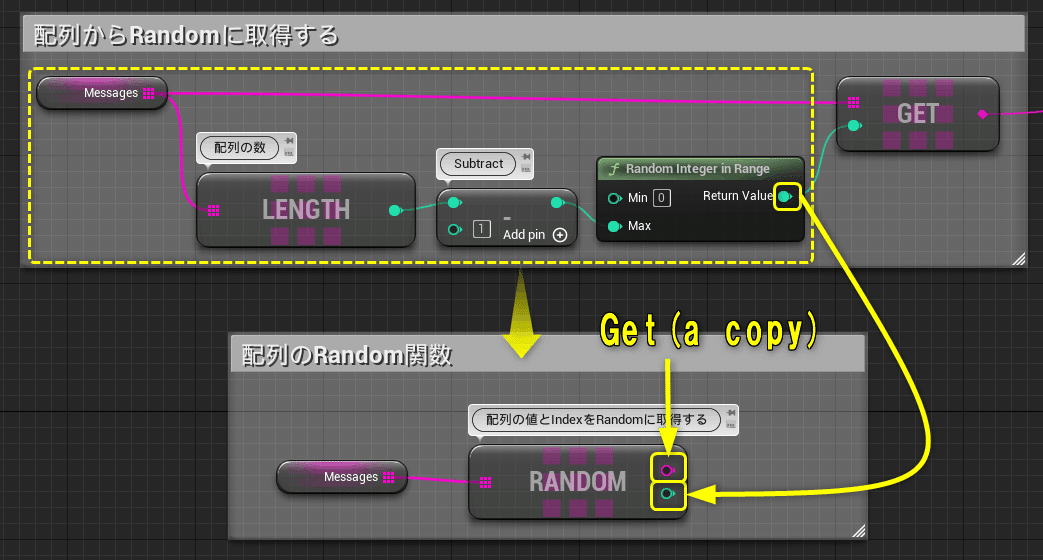
Random関数から取得できるElementは値渡しになるので、参照渡しにしたい場合はRandom関数のIndexをGet(a ref)に渡して取得します。
変数[CalcType]を配列の変数[CalcTypes]に変更する
次に、剰余(%)を使用して、順番に配列を取得する方法について説明します。
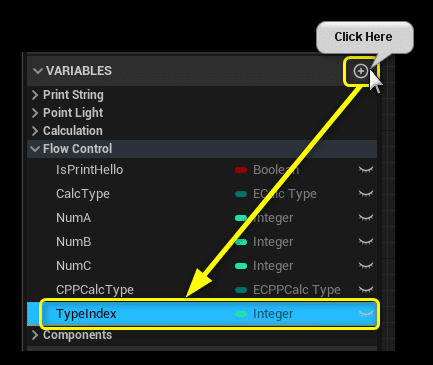
Index番号を保持するための変数[TypeIndex]を宣言します。

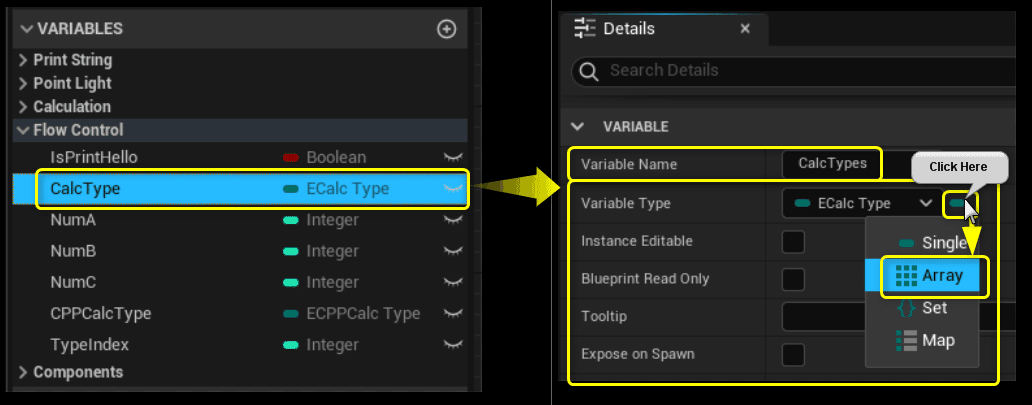
変数[CalcType]を選択し、Variable Nameを[CalcTypes]に変更します。
Variable Typeの右端のアイコンをクリックし、[Array(配列)]を選択します。
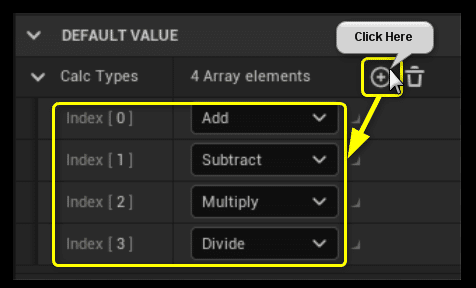
Default Valueを設定するので、[Compile]ボタンをクリックします。

変数[CalcTypes]のDefault Valueを設定します。

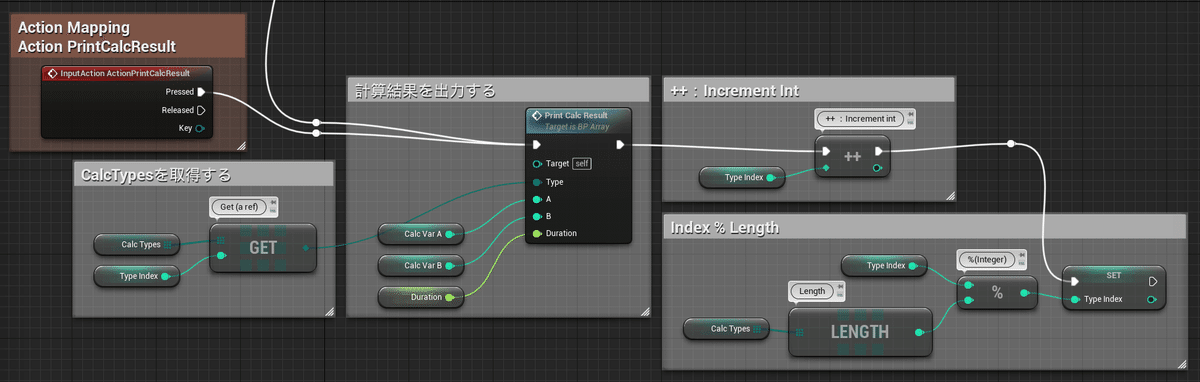
変数[CalcTypes]の値を順番に取得して出力する
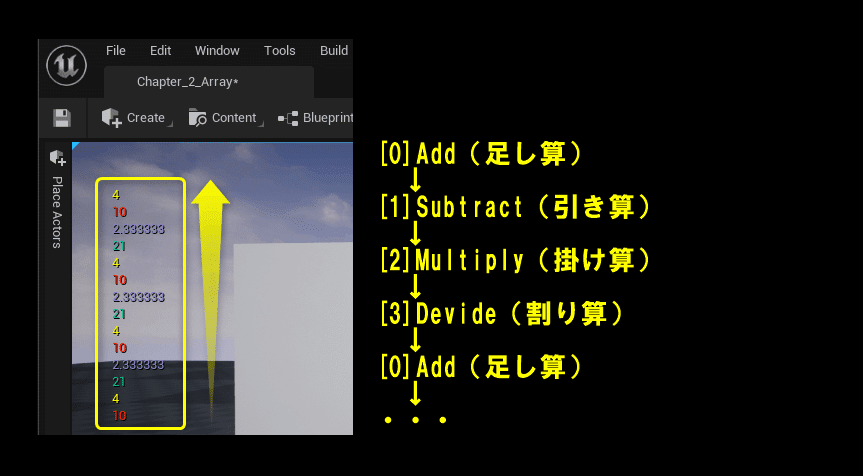
変数[CalcTypes]の値を順番([0:Add]> [1:Subtract] > [2:Multiply] > [3:Divide] > [0:Add] > 繰り返し)に出力するように処理を編集します。
Variable Typeを変更したのでエラーになっているピンの接続を切断します。
変数[CalcTypes]の値を変数[TypeIndex]で取得します。
先ほど追加した変数[TypeIndex]のGetを追加します。
変数[TypeIndex]のGetノードと変数[CalcTypes]のGetを接続します。

Function[PrintCalcResult]実行後に、TypeIndexをIncrementします。
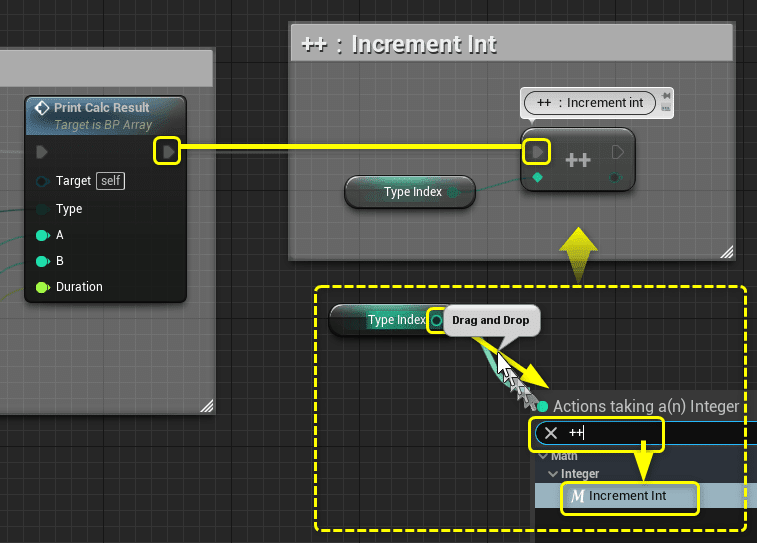
Incrementは変数の値を[+1]してくれるノードです。
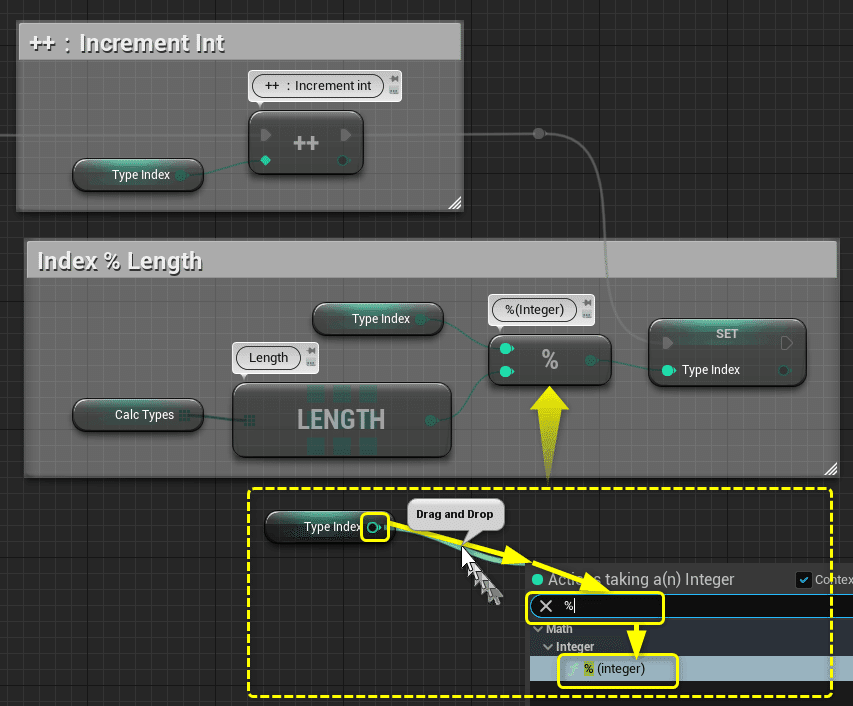
Increamentをして[+1]した変数[TypeIndex]の値をループする計算を追加します。
「%」は割り算の余り(剰余)を取得できるノードです。
「7 ÷ 3 = 2 余り1」の「余り1」を取得できます。
現在のIndex ÷ Length(配列数)の余りを求めると、配列のIndexをオーバーすることがなくなります。
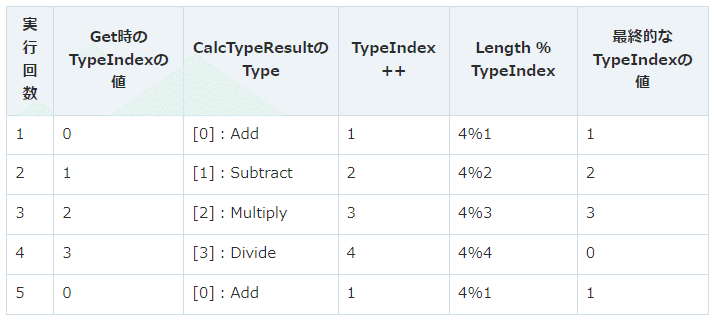
「4 ÷ Length(4) = 1 余り0」になるので、配列数とIndexが同じになっても、配列のIndexをオーバーせずに最初の[0]に戻せます。
実行回数が配列数を越えるように実行した時の変数[TypeIndex]の値を表にしました。
[[3]:Divide]実行後、[[0]:Add]に戻って繰り返します。
[compile]ボタンをクリックします。

Level Editorの[Play]ボタンをクリックします。

[C]キーをPressすると、変数[CalcTypes]の値を順番([0:Add]> [1:Subtract] > [2:Multiply] > [3:Divide] > [0:Add] > 繰り返し)に出力します。
現在のIndex ÷ Length(配列数)の余りを現在のIndexに設定する処理はif文で最大数を比較しなくて済むのでスマートな書き方になります。

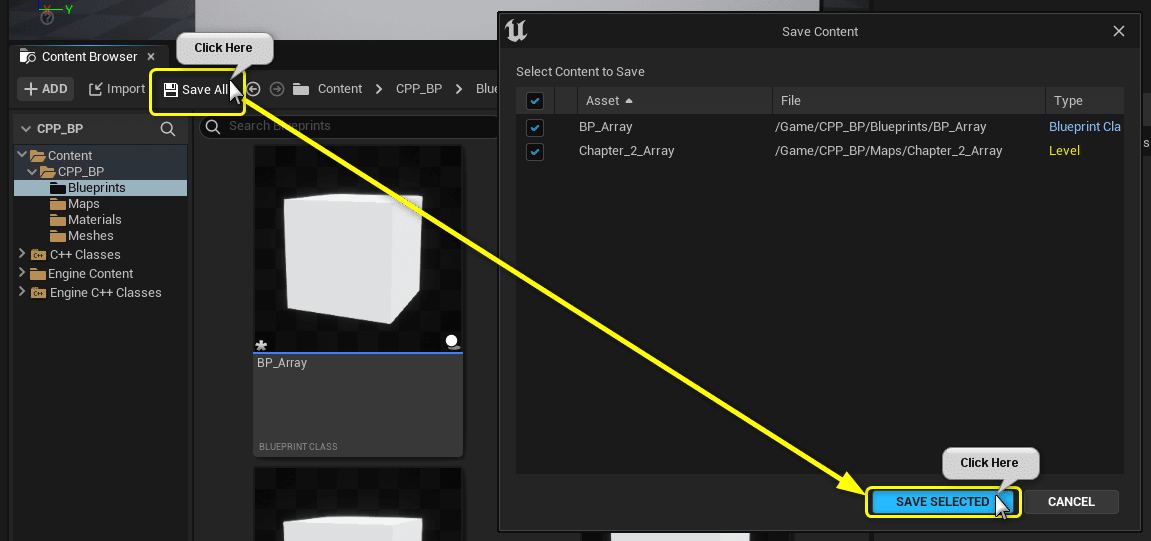
すべて保存
Blueprint側の説明はここまでになります。
[Content Browser]から[Save All]ボタンをクリックし、[Save Selected]ボタンをクリックしてプロジェクトの変更のあったアセットをすべて保存します。
まとめ
寝たり起きたりでやっと書き終わりました。
ゴールが近づくほど一気に駆け抜けないとゴールできない。
今が一番苦しい時ですね。
抜けられないトンネルはない
もう少し!
参照URL
UE4から始めるC++&Blueprint 進捗とロードマップ
Zennで進捗報告を行い、GitHubでロードマップを公開中です。
よかったら覗いてみてください。