【three.js】2次元極座標系可視化用円形ポリゴンの作り方

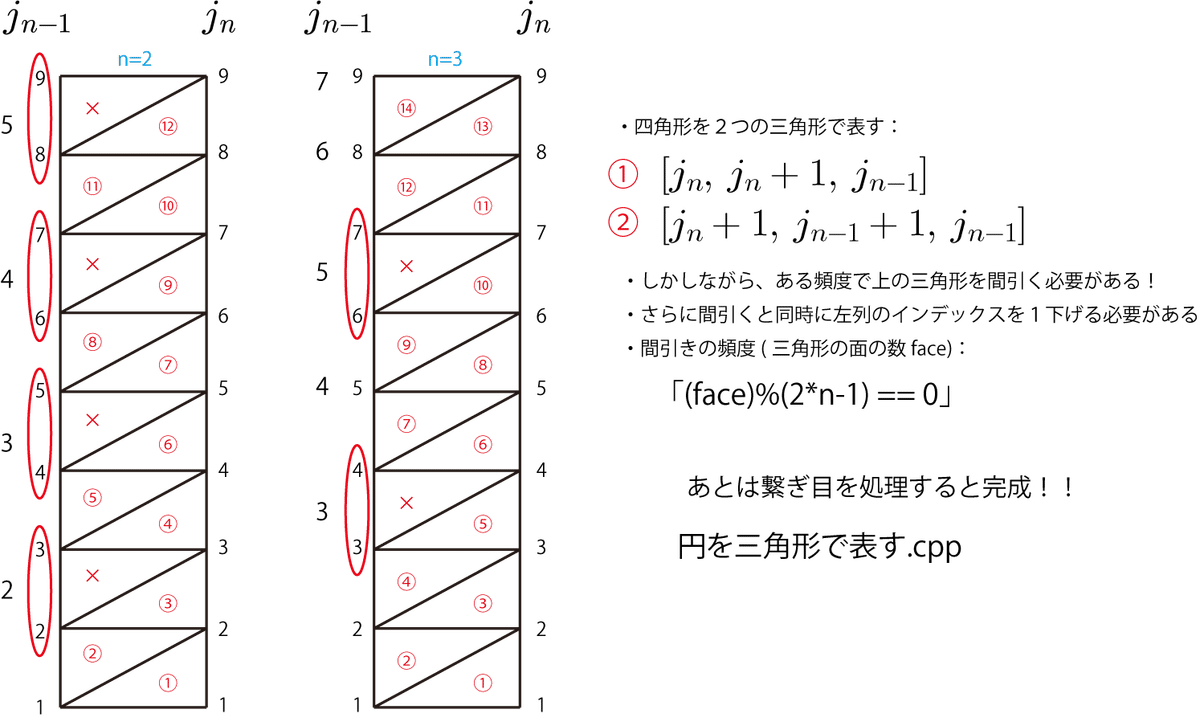
2次元極座標系の物理量を可視化するために必要な円形ポリゴンを作成したので、作り方を紹介するよ。ポリゴンは三角形で生成する必要がるのだけれども、その頂点座標と三角形を指定するインデックス配列を設定する必要があるね。下図のように内側から三角形を次のように定義するよ。
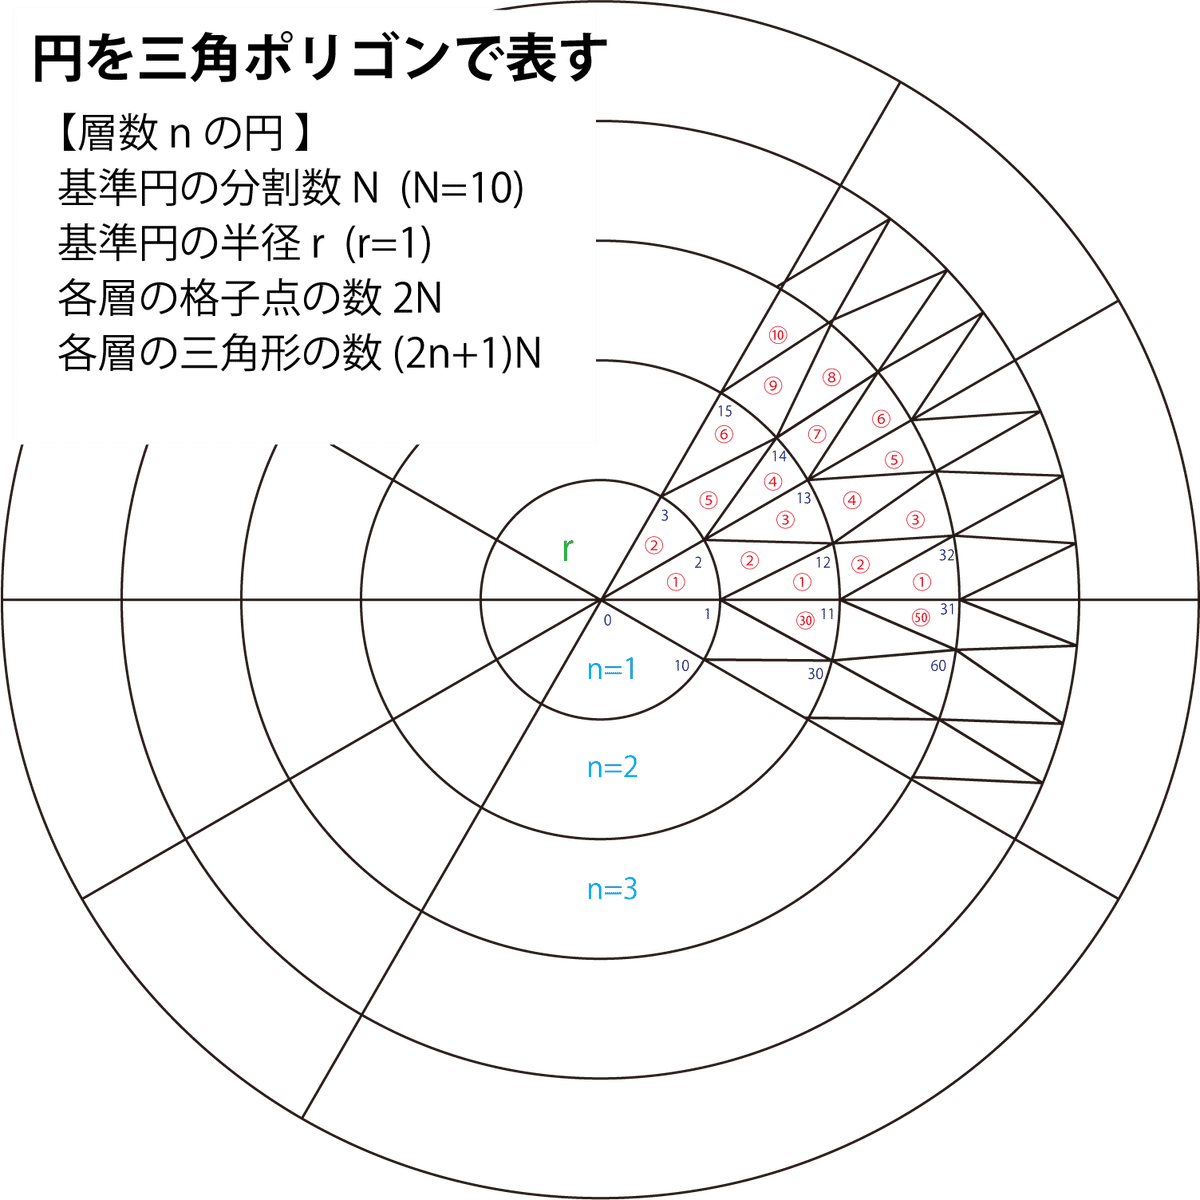
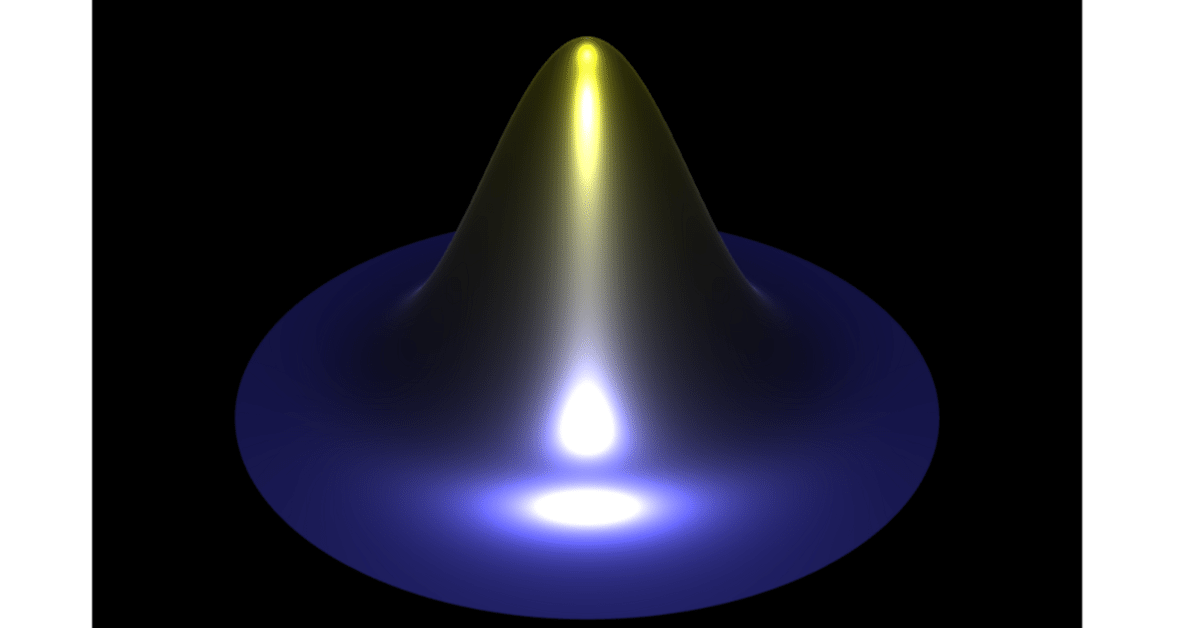
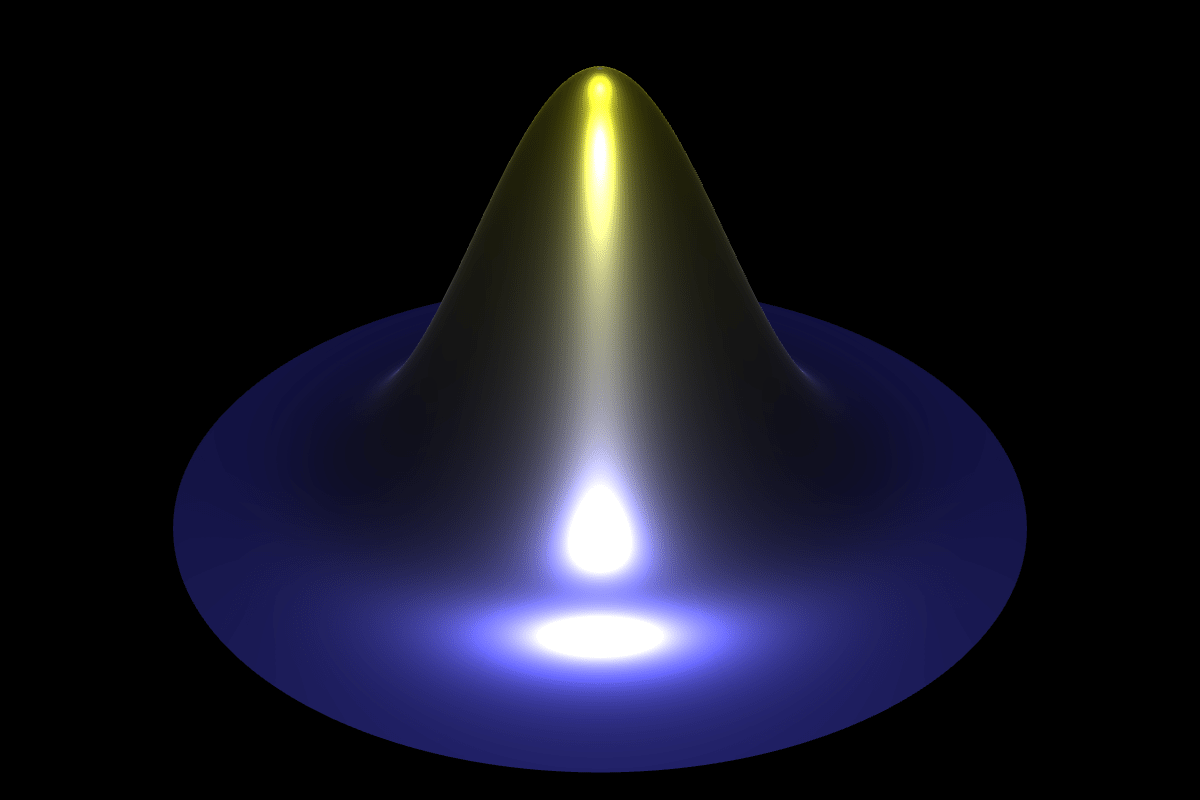
中心の座標番号を0として、1層目の頂点番号は1~10の10分割をとすると、2層目は20分割、3層目は30分割となるね。基準円の半径を$${r}$$として任意の層数までの円ポリゴンを作ることができるよ。下図は円形ポリゴン作成後、ガウス分布を与えた結果だよ。
プログラムソース:HTML
上記の円形ポリゴンを作成するプログラムソースを以下に示すよ。もし良かったら試してみてくださーい!
<!DOCTYPE html>
<html>
<head>
<meta charset="UTF-8">
<title>2次元極座標系可視化用円形ポリゴン</title>
<style>
*{padding:0px; margin:0px}
div#canvas-frame{
	width: 1200px;  /* 横幅 */
	height: 800px; /* 縦幅 */
	overflow:hidden;
}
</style>
<script type="importmap">
	{
		"imports": {
			"three": "https://unpkg.com/three@0.168.0/build/three.module.js",
			"three/addons/": "https://unpkg.com/three@0.168.0/examples/jsm/"
		}
	}
</script>
<script type="module">
import * as THREE from 'three';
import { TrackballControls } from 'three/addons/controls/TrackballControls.js';
////////////////////////////////////////////////////////////////////
// windowイベントの定義
////////////////////////////////////////////////////////////////////
window.addEventListener("load", function () {
	threeStart(); //Three.jsのスタート関数の実行
});
////////////////////////////////////////////////////////////////////
// Three.jsスタート関数の定義
////////////////////////////////////////////////////////////////////
function threeStart() {
	initThree();  //Three.js初期化関数の実行
	initLight();  //光源初期化関数の実行
	initObject(); //オブジェクト初期化関数の実行
	initCamera(); //カメラ初期化関数の実行
	loop();       //無限ループ関数の実行
}
////////////////////////////////////////////////////////////////////
// Three.js初期化関数の定義
////////////////////////////////////////////////////////////////////
//グローバル変数の宣言
let renderer,    //レンダラーオブジェクト
    scene,       //シーンオブジェクト
    canvasFrame; //キャンバスフレームのDOM要素
function initThree() {
	//キャンバスフレームDOM要素の取得
	canvasFrame = document.getElementById('canvas-frame');
	//レンダラーオブジェクトの生成
	renderer = new THREE.WebGLRenderer({ antialias: true });

	if (!renderer) alert('Three.js の初期化に失敗しました');
	//レンダラーのサイズの設定
	renderer.setSize(canvasFrame.clientWidth, canvasFrame.clientHeight);
	//キャンバスフレームDOM要素にcanvas要素を追加
	canvasFrame.appendChild(renderer.domElement);

	//レンダラークリアーカラーの設定
	renderer.setClearColor(0x000000, 1.0);

	//シーンオブジェクトの生成
	scene = new THREE.Scene();
}
////////////////////////////////////////////////////////////////////
// カメラ初期化関数の定義
////////////////////////////////////////////////////////////////////
//グローバル変数の宣言
let camera;    //カメラオブジェクト
let trackball;
function initCamera() {

	//カメラオブジェクトの生成
	camera = new THREE.PerspectiveCamera(30, canvasFrame.clientWidth / canvasFrame.clientHeight, 1, 10000);
	//カメラの位置の設定
	camera.position.set(0, -30, 20);
	//カメラの上ベクトルの設定
	camera.up.set(0, 0, 1);
	//カメラの中心位置ベクトルの設定
	camera.lookAt(0, 0, 2); //トラックボール利用時は自動的に無効

	/*
	//トラックボールオブジェクトの宣言
	trackball = new TrackballControls(camera, canvasFrame);

	//トラックボール動作範囲のサイズとオフセットの設定
	trackball.screen.width = canvasFrame.clientWidth;                        //横幅
	trackball.screen.height = canvasFrame.clientHeight;                      //縦幅
	trackball.screen.offsetLeft = canvasFrame.getBoundingClientRect().left;  //左オフセット
	trackball.screen.offsetTop = canvasFrame.getBoundingClientRect().top;    //右オフセット

	//トラックボールの回転無効化と回転速度の設定
	trackball.noRotate = false;
	trackball.rotateSpeed = 2.0;

	//トラックボールの拡大無効化と拡大速度の設定
	trackball.noZoom = false;
	trackball.zoomSpeed = 4.0;

	//トラックボールのカメラ中心移動の無効化と中心速度の設定
	trackball.noPan = false;
	trackball.panSpeed = 1.0;
	trackball.target = new THREE.Vector3(0, 0, 0);

	//トラックボールのスタティックムーブの有効化
	trackball.staticMoving = true;
	//トラックボールのダイナミックムーブ時の減衰定数
	trackball.dynamicDampingFactor = 0.3;
	*/
}
////////////////////////////////////////////////////////////////////
// 光源初期化関数の定義
////////////////////////////////////////////////////////////////////
//グローバル変数の宣言
let directionalLight,  //平行光源オブジェクト
    ambientLight;      //環境光オブジェクト
function initLight() {
	//平行光源オブジェクトの生成
	directionalLight = new THREE.DirectionalLight(0xffffff, 2.0);
	//平行光源オブジェクトの位置の設定
	directionalLight.position.set(0, -25, 25);
	//平行光源オブジェクトのシーンへの追加
	scene.add(directionalLight);

	//平行光源オブジェクトの生成
	directionalLight = new THREE.DirectionalLight(0xffffff, 3.0);
	//平行光源オブジェクトの位置の設定
	directionalLight.position.set(0, 0, 10);
	//平行光源オブジェクトのシーンへの追加
	scene.add(directionalLight);

	//環境光オブジェクトの生成
	ambientLight = new THREE.AmbientLight(0x666666);
	//環境光オブジェクトのシーンへの追加
	scene.add(ambientLight);

}
////////////////////////////////////////////////////////////////////
// オブジェクト初期化関数の定義
////////////////////////////////////////////////////////////////////
function gaussian(x,y,t){
	let sigma = 4;
	let omega = 2 * Math.PI / 100;
	return 10 * Math.exp( - (x**2+y**2)/sigma**2 ) * Math.cos(omega*t);
}

function initObject() {
	let n_max = 100; //円の層数
	let radius1 = 0.1;
	let r_max = radius1 * n_max; //規格化定数
	let N = 10; //基準円の分割数
	let N_max = (n_max + 1) * n_max / 2 * N; //ポリゴンの数

	//形状オブジェクトの宣言
	let geometry = new THREE.BufferGeometry();
	//アトリビュート変数のサイズを指定
	let positions = []; //頂点座標
	let colors = [];    //頂点色
	positions.push(0.0, 0.0, gaussian(0,0,0));
	colors.push(1, 1, 1)
	for (let n = 1; n <= n_max; n++) {
		let dphi = 2.0 * Math.PI / (n * N);
		let radius = radius1 * n;
		for (let j = 1; j <= n * N; j++) {
			let phi = dphi * (j - 1);
			let i = j + (n - 1) * n / 2 * N;
			let x = radius * Math.cos(phi);
			let y = radius * Math.sin(phi);
			let z = gaussian(x,y,0);
			//頂点座標データの追加
			positions.push(x, y, z);
			colors.push(0.9*gaussian(x,y,0)/gaussian(0,0,0) +0.1, 0.9*gaussian(x,y,0)/gaussian(0,0,0)+0.1, 1.0 - 0.9*gaussian(x,y,0)/gaussian(0,0,0) -0.1);
		}
	}

	let indices = [];
	for(let j=0; j<N; j++){
		indices[ 3 * j + 0 ] = 0;
		indices[ 3 * j + 1 ] = j + 1;
		indices[ 3 * j + 2 ] = (j!=9)? j + 2 : 1;
	}
	for (let n = 2; n <= n_max; n++) {
		let face = 0; //三角形の数
		let inm = 0; //内側の三角形の間引き数
		for (let j = 1; j <= n * N; j++) { //jは長方形の数
			let im = j + (n - 2) * (n - 1) / 2 * N - inm;
			let ip = j + (n - 1) * n / 2 * N;
			//長方形を三角形に分割する

			face++; //三角形の数を++

			if (face == (2 * n - 1) * N) im -= (n - 1) * N; //最後の下の三角形の場合だけ、余分にたされる量を引く
			//下の三角形
			indices[3 * (n - 1) * (n - 1) * N + 3 * (face - 1)] = ip;
			indices[3 * (n - 1) * (n - 1) * N + 3 * (face - 1) + 1] = (ip + 1 > (n + 1) * n / 2 * N) ? ip + 1 - n * N : ip + 1;
			indices[3 * (n - 1) * (n - 1) * N + 3 * (face - 1) + 2] = im;

			if ((face) % (2 * n - 1) != 0) {
				face++; //三角形の数を++
				//上の三角形
				indices[3 * (n - 1) * (n - 1) * N + 3 * (face - 1)] = (ip + 1 > (n + 1) * n / 2 * N) ? ip + 1 - (n + 1) * n / 2 * N : ip + 1;
				indices[3 * (n - 1) * (n - 1) * N + 3 * (face - 1) + 1] = (im + 1 > (n - 1) * n / 2 * N) ? im + 1 - (n - 1) * N : im + 1;
				indices[3 * (n - 1) * (n - 1) * N + 3 * (face - 1) + 2] = im;
			} else {
				inm++;
			}
		}
	}

	//アトリビュート変数に設定
	geometry.setIndex( indices );
	geometry.setAttribute( 'position', new THREE.Float32BufferAttribute( positions, 3 ) );
	geometry.setAttribute( 'color', new THREE.Float32BufferAttribute( colors, 3 ) );
	geometry.attributes.position.needsUpdate = true;
	geometry.computeVertexNormals();
	//材質オブジェクトの宣言と生成
	let material = new THREE.MeshStandardMaterial({ color:0xFFFFFF, roughness: 0.3, metalness: 1.0, vertexColors: true, side:THREE.DoubleSide });
	//2次元格子オブジェクトの生成
	let circle = new THREE.Mesh( geometry, material );


	//カラーマップオブジェクトのシーンへの追加
	scene.add( circle );
}
////////////////////////////////////////////////////////////////////
// 無限ループ関数の定義
////////////////////////////////////////////////////////////////////
//グローバル変数の宣言
let step = 0; //ステップ数
let recorder;
function loop() {
	//トラックボールによるカメラオブジェクトのプロパティの更新
	//trackball.update();

	//レンダリング
	renderer.render(scene, camera);


	requestAnimationFrame(loop);
}

</script>
</head>
<body>
	<div id="canvas-frame"></div><!-- canvas要素を配置するdiv要素 -->
</body>
</html>