【three.js webGL】2次元カラーマップの作り方

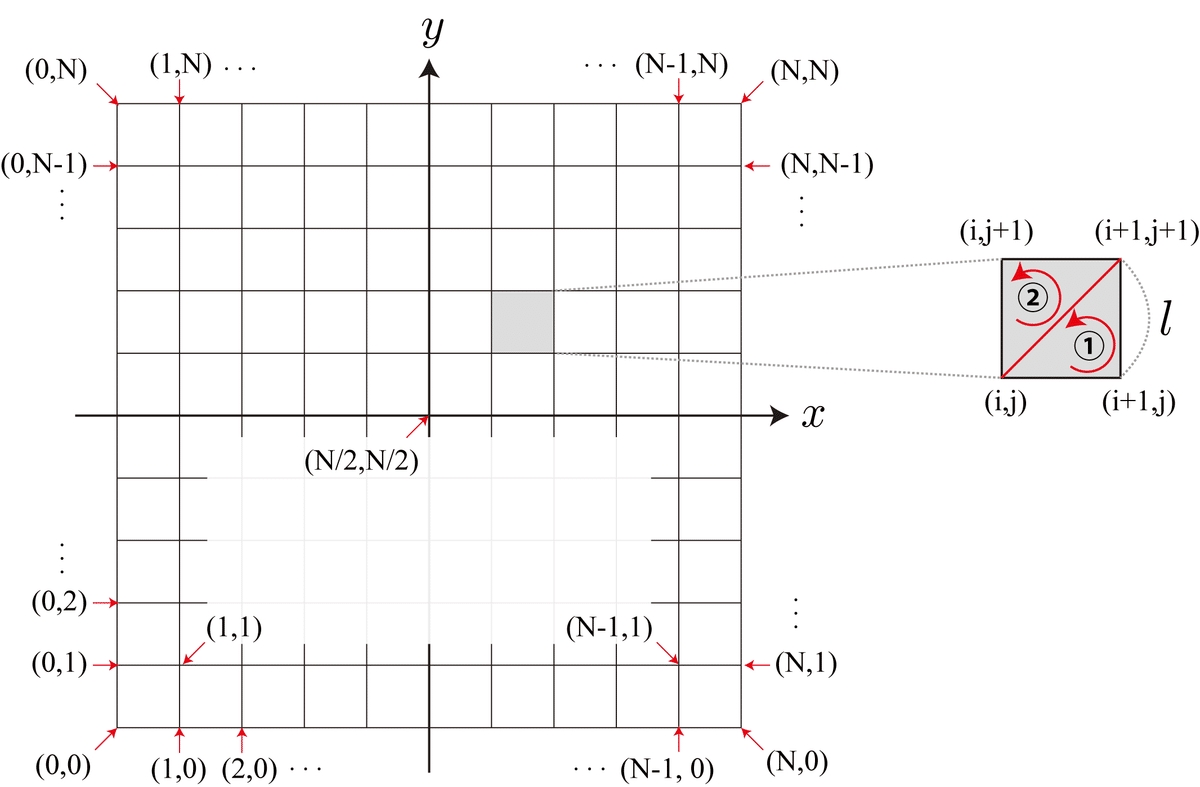
今日はthree.jsで2次元平面上の各点に任意の色を指定することで、意味のある2次元配色を与えることで何かしらの量を可視化する2次元カラーマップの作り方を解説するよ。今回は下図のようなN✕Nの格子を個の小さな正方形を配置してポリゴンを生成し、(N+1)✕(N+1)個の格子点にそれぞれ任意の色を設定するよ。
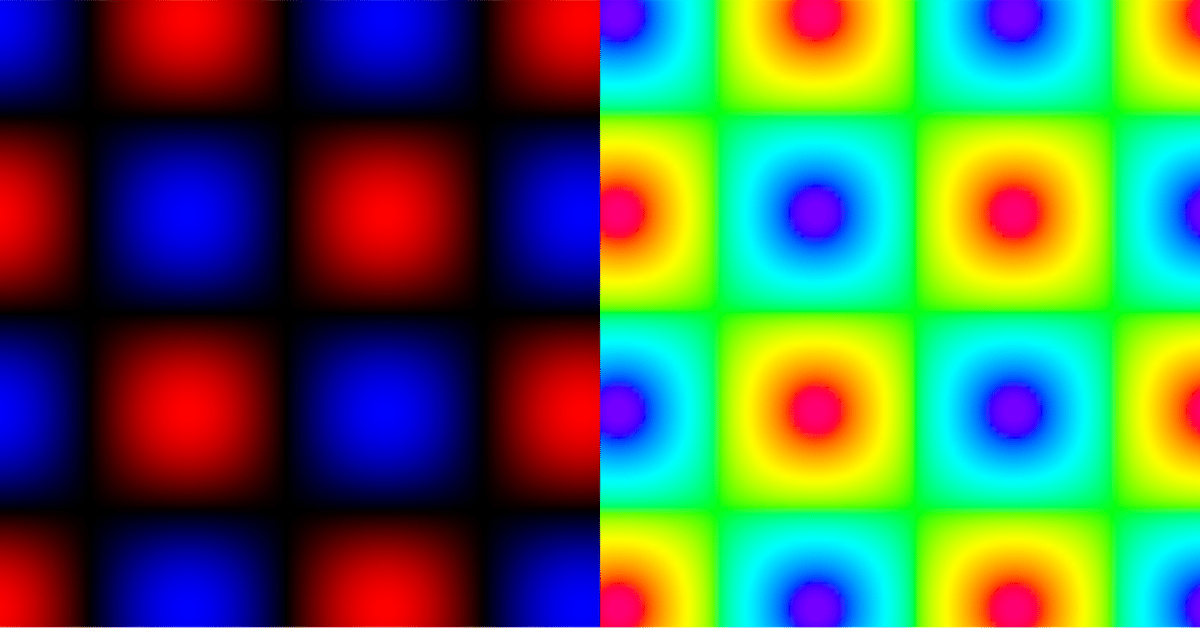
下のアニメーションは各点$$(x,y)$$の値を次の式で設定して、1を赤、-1を青となるように各点の描画色を指定した結果だよ。
$$
F(x,y,t) = \sin(\frac{x}{2}+\omega t) \times \sin(\frac{y}{2}+\omega t)
$$
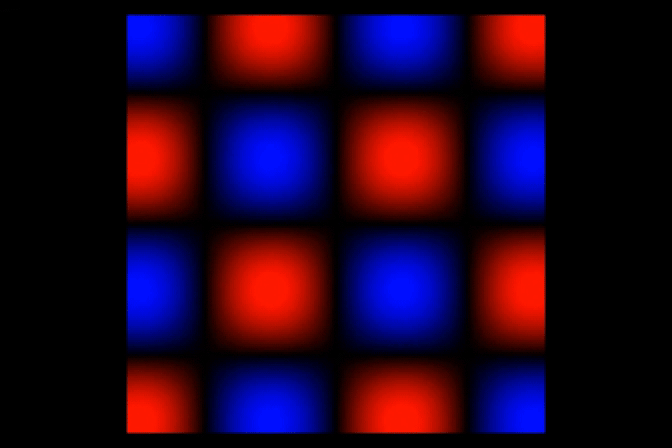
上記は格子点の値をRGBで指定したけれども、HLSで指定することもできるよ。

Javascript プログラムソース
2次元カラーマップを実装するJavascript プログラムソースを以下に示すよ。もしよろしければ試してみてください。これからも応援よろしくお願いしまーす。
<!DOCTYPE html>
<html>
<head>
<meta charset="UTF-8">
<title>2次元カラーマップのテスト</title>
<style>
*{padding:0px; margin:0px}
div#canvas-frame{
	width: 1200px;  /* 横幅 */
	height: 800px; /* 縦幅 */
	overflow:hidden;
}
</style>
<script type="importmap">
	{
		"imports": {
			"three": "https://unpkg.com/three@0.168.0/build/three.module.js",
			"three/addons/": "https://unpkg.com/three@0.168.0/examples/jsm/"
		}
	}
</script>
<script type="module">
import * as THREE from 'three';
import { TrackballControls } from 'three/addons/controls/TrackballControls.js';
////////////////////////////////////////////////////////////////////
// windowイベントの定義
////////////////////////////////////////////////////////////////////
window.addEventListener("load", function () {
	threeStart(); //Three.jsのスタート関数の実行
});
////////////////////////////////////////////////////////////////////
// Three.jsスタート関数の定義
////////////////////////////////////////////////////////////////////
function threeStart() {
	initThree();  //Three.js初期化関数の実行
	initLight();  //光源初期化関数の実行
	initObject(); //オブジェクト初期化関数の実行
	initCamera(); //カメラ初期化関数の実行
	loop();       //無限ループ関数の実行
}
////////////////////////////////////////////////////////////////////
// Three.js初期化関数の定義
////////////////////////////////////////////////////////////////////
//グローバル変数の宣言
let renderer,    //レンダラーオブジェクト
    scene,       //シーンオブジェクト
    canvasFrame; //キャンバスフレームのDOM要素
function initThree() {
	//キャンバスフレームDOM要素の取得
	canvasFrame = document.getElementById('canvas-frame');
	//レンダラーオブジェクトの生成
	renderer = new THREE.WebGLRenderer({ antialias: true });

	if (!renderer) alert('Three.js の初期化に失敗しました');
	//レンダラーのサイズの設定
	renderer.setSize(canvasFrame.clientWidth, canvasFrame.clientHeight);
	//キャンバスフレームDOM要素にcanvas要素を追加
	canvasFrame.appendChild(renderer.domElement);

	//レンダラークリアーカラーの設定
	renderer.setClearColor(0x000000, 1.0);

	//シーンオブジェクトの生成
	scene = new THREE.Scene();
}
////////////////////////////////////////////////////////////////////
// カメラ初期化関数の定義
////////////////////////////////////////////////////////////////////
//グローバル変数の宣言
let camera;    //カメラオブジェクト
let trackball;
function initCamera() {

	//カメラオブジェクトの生成
	camera = new THREE.PerspectiveCamera(30, canvasFrame.clientWidth / canvasFrame.clientHeight, 1, 10000);
	//カメラの位置の設定
	camera.position.set(0, 0, 2);
	//カメラの上ベクトルの設定
	camera.up.set(0, 1, 0);
	//カメラの中心位置ベクトルの設定
	camera.lookAt(new THREE.Vector3(0,0,0)); //トラックボール利用時は自動的に無効


}
////////////////////////////////////////////////////////////////////
// 光源初期化関数の定義
////////////////////////////////////////////////////////////////////
//グローバル変数の宣言
let directionalLight,  //平行光源オブジェクト
    ambientLight;      //環境光オブジェクト
function initLight() {
	//平行光源オブジェクトの生成
	directionalLight = new THREE.DirectionalLight(0xffffff, 2.0, 0);
	//平行光源オブジェクトの位置の設定
	directionalLight.position.set(0, -50, 50);
	//平行光源オブジェクトのシーンへの追加
	scene.add(directionalLight);

	//環境光オブジェクトの生成
	ambientLight = new THREE.AmbientLight(0x666666);
	//環境光オブジェクトのシーンへの追加
	scene.add(ambientLight);

}
////////////////////////////////////////////////////////////////////
// オブジェクト初期化関数の定義
////////////////////////////////////////////////////////////////////
let colormap; //カラーマップ2Dオブジェクト
let xmin = -10;
let xmax = 10;
let ymin = -10;
let ymax = 10;

function F( x, y, t ){
	let omega = Math.PI/60;
	return Math.sin( x/2 + t*omega ) * Math.sin( y/2 + t*omega ) ;
}
function initObject() {

	let N = 100;
	let values = []
	for (let i = 0; i <= N; i++) {
		values[ i ] = [];
		for (let j = 0; j <= N; j++) {
			let x = xmin + (xmax - xmin) * i / N;
			let y = ymin + (ymax - ymin) * j / N;
			values[i][j] = F( x, y, 0 );
		}
	}

	//2次元カラーマップオブジェクトの生成
	colormap = new Colormap2D( {
		N : N,   //頂点の数
		l : 1.0/N, //格子間隔
		min : -1,          //最小値
		max : 1,           //最大値
		colorParameter : {
			backWhite : false, //RGBモード時の0点を白とするフラグ
			HSLMode : false,   //HSLモード実行のフラグ
			H0 : 0.70,         //Hの始点(HSLモード時)
			Hw : 0.73,         //Hの変化の傾き(HSLモード時)
			S : 1,             //Sの値(HSLモード時)
			L : 0.5            //Lの値(HSLモード時)
		},
		fieldValues :values
	});

	//カラーマップオブジェクトのシーンへの追加
	scene.add( colormap.CG );
}
////////////////////////////////////////////////////////////////////
// 無限ループ関数の定義
////////////////////////////////////////////////////////////////////
//グローバル変数の宣言
let step = 0; //ステップ数
function loop() {
	//トラックボールによるカメラオブジェクトのプロパティの更新
	//trackball.update();

	//ステップ数のインクリメント
	let t = step;
	let N = colormap.N;
	for (let i = 0; i <= N; i++) {
		for (let j = 0; j <= N; j++) {
			let x = xmin + (xmax - xmin) * i / N;
			let y = ymin + (ymax - ymin) * j / N;
			colormap.setValue( i, j, F( x, y, t ));
		}
	}

	colormap.updateColormap();
	//レンダリング
	renderer.render(scene, camera);
	//ステップ数のインクリメント
	step++;
	//「loop()」関数の呼び出し
	requestAnimationFrame(loop);
}

////////////////////////////////////////////////////////////////////
// 2次元カラーマップクラスの定義
////////////////////////////////////////////////////////////////////
class Colormap2D {
	constructor( parameter ){
		parameter = parameter || {};

		//格子点数
		this.N = parameter.N || 100;
		//格子間隔
		this.l = parameter.l || 1.0 / this.N;

		//場の量の最小値と最大値
		this.min = (parameter.min !== undefined)? parameter.min : 0;   //最小値
		this.max = (parameter.max !== undefined)? parameter.max : 1;   //最大値

		//色関連パラメータ
		let p = parameter.colorParameter || {};
		this.colorParameter = {
			HSLMode : p.HSLMode || false,             //HSLモード実行のフラグ
			H0 : (p.H0 !== undefined )? p.H0 : 0.70,  //Hの始点(HSLモード時)
			Hw : (p.Hw !== undefined )? p.Hw : 0.73,  //Hの変化(HSLモード時)
			S : (p.S !== undefined )? p.S : 1,        //Sの値(HSLモード時)
			L : (p.L !== undefined )? p.L : 0.5,      //Lの値(HSLモード時)
			backWhite : p.backWhite || false          //中間値を白とするフラグ(RGBモード時)
		};

		//場の値(2重配列)
		this.fieldValues = parameter.fieldValues || [];

		//コンピュータ・グラフィックスオブジェクト
		this.CG = null;

		//カラーマップの初期化
		this.initColormap();
	}

	//2次元カラーマップを実現するために必要な初期設定を行う
	initColormap (){

		//形状オブジェクトの宣言
		let geometry = new THREE.BufferGeometry();
		//アトリビュート変数のサイズを指定
		let positions = []; //頂点座標
		let colors = [];    //頂点色

		//頂点座標の準備
		for (let i = 0; i <= this.N; i++) {
			for (let j = 0; j <= this.N; j++) {
				let nx = (-this.N / 2 + i) * this.l;
				let ny = (-this.N / 2 + j) * this.l;
				let nz = 0;
				//頂点座標データの追加
				positions.push( nx, ny, nz );
				colors.push(0, 0, 0)
			}
		}

		let indices = [];
		//面指定配列の準備
		for (let i = 0; i < this.N; i++) {
			for (let j = 0; j < this.N; j++) {
				//頂点番号
				let ii = (this.N + 1) * i + j;
				//面指定用頂点インデックスを追加
				indices.push( ii, ii + (this.N + 1), ii + (this.N + 1) + 1);
				//面指定用頂点インデックスを追加
				indices.push( ii, ii + (this.N + 1) + 1, ii + 1 );
			}
		}

		//アトリビュート変数に設定
		geometry.setIndex( indices );
		geometry.setAttribute( 'position', new THREE.Float32BufferAttribute( positions, 3 ) );
		geometry.setAttribute( 'color', new THREE.Float32BufferAttribute( colors, 3 ) );

		//材質オブジェクトの宣言と生成
		let material = new THREE.MeshBasicMaterial({ color:0xFFFFFF, vertexColors: true });
		//2次元格子オブジェクトの生成
		this.CG = new THREE.Mesh( geometry, material );

		//場の量の設定
		if( this.fieldValues.length > 0 ){
			//カラーマップの配色を更新
			this.updateColormap();
		} else {
			//2重配列の初期化
			for (let i = 0; i <= this.N; i++) {
				this.fieldValues[ i ] = [];
			}
		}
	}
	updateColormap ( ){

		for (let i = 0; i <= this.N; i++) {
			for (let j = 0; j <= this.N; j++) {
				let c = this.getColor( i, j );
				//頂点番号
				let ii = (this.N + 1) * i + j;
				this.CG.geometry.attributes.color.array[3 * ii + 0] = c.r;
				this.CG.geometry.attributes.color.array[3 * ii + 1] = c.g;
				this.CG.geometry.attributes.color.array[3 * ii + 2] = c.b;
			}
		}

		//頂点色データ更新
		this.CG.geometry.attributes.color.needsUpdate = true;
	}

	getColor ( i ,j ){
		//場の量の取得
		let f = this.fieldValues[i][j];

		//カラーマップ関連プロパティ
		let p = this.colorParameter;
		if( p.HSLMode ){

			let value;
			if (f < this.min) value = 0;
			else if (f > this.max) value = this.max - this.min;
			else value = f - this.min;
			let H = p.H0 - ( value / (this.max - this.min) ) * p.Hw;

			//L値の取得
			let L = p.L;

			//HSL形式で指定した色オブジェクトを返す
			return new THREE.Color( ).setHSL( H, p.S, L, THREE.SRGBColorSpace );

		} else {

			//描画範囲の中心値を取得
			let c = ( this.max + this.min ) / 2;
			//中心値よりも大きい場合
			let R = ( f > c )? ( f - c )/( this.max - c ) : 0;
			if( R > 1 ) R = 1;
			//中心値よりも小さい場合
			let B = ( f < c )? (c - f)/( c - this.min ) : 0;
			if( B > 1 ) B = 1;
			let G;
			//中心値の色を白色とする場合
			if( p.backWhite ){
				G = 1 - ( R + B );
				R = R + G;
				B = B + G;
			} else {
				G = 0;
			}

			return new THREE.Color().setRGB(R, G, B, THREE.SRGBColorSpace);

		}

	}

	setValue ( i , j, value ){

		this.fieldValues[i][j] = value || 0;

	}
}
</script>
</head>
<body>
	<div id="canvas-frame"></div><!-- canvas要素を配置するdiv要素 -->
</body>
</html>