Creality CR-30をBirthT社のベルト型プリンター用Curaプラグインで動かす
何をしたの?
Creality社から発売されているベルト型プリンターCR-30をBirthT社(日本発ベルトプリンターLeeeを開発)が公開されいるCuraプラグインで動かしてみました。動作確認をしたCuraのバージョンは現時点(2021/07/21)最新の4.10です。
CR-30にはCreality Belt CuraというCura 3.6をベースにした専用スライサーが付属してきます。しかし、スライサー自身がかなり前のCuraなので今となっては非常に使いづらい…。と、いうわけで最新のCura 4.10でCR-30を動作させたいな!となりました。
ベルト型3Dプリンターって?
ベルト型やベルトタイプ、ベルトコンベア式、ベルトコンベア式無限Z軸…などなど色々な名称があります。(何が一般的なんだろう)
簡単に説明すると通常のFFF 3Dプリンターで造形するベッドがベルトコベアになっており、造形物の取り外しをすることなく延々と3Dプリントすることができます。
長手方向のワークサイズがベルトコベアになるため、かなり長いものを作ることも技術的に可能となりました。
(下記Leeeの紹介映像)
下準備 (色々ダウンロードしたり)
最新のCura本体は下記からダウンロードしておきます。
(ある程度3Dプリンタの知識がある想定で説明割愛します。)
BirthT社のベルト型3DプリンターのCuraプラグインは下記で公開されています。
ページ中央付近にWin/Mac別々のインストール方法が書かれているのでCuraのプラグイン初心者でも安心です。
Cura4.8に対応したベルト型プリンタ用のプラグインを公開いたしました。
— BirthT@ベルトコンベア型3Dプリンタ「Leee」 (@BirthT_3D) February 22, 2021
興味のある方は是非使ってみてください!https://t.co/PMlHm7MfJ4 pic.twitter.com/xWQW98xPKF
下準備 (スライサーの設定値を移行する)
Creality Beltに保存されているプリンターの設定をCura4.10に移行しましょう。
プリンターの設定各設定値はこんな感じです。

G-Codeの開始 下記、項目に貼り付けたG-Code
G90               ; Set to Absolute Positioning
M82               ; Set extruder to absolute mode
G21               ; Metric values
G28 X Y
G92 Z0 E0   ; Set all axis to 0
;home X
G1 Y2             ; Move Y axis off the bed
G28 X0 F2000      ; Home X axis
G1 X170 Z5 F4000  ; Move X to the center
;probe Y
M908 P5 S10       ; Setting the motor current of the Y1 motor off
M908 P1 S10       ; Setting the motor current of the Y2 motor off
G1 Y20 G3000      ; Move Y up
M400              ; Wait for current moves to finish
M908 P5 S25       ; Setting the motor current of the Y1 motor very low
M908 P1 S25       ; Setting the motor current of the Y2 motor off
G1 Y0 F500        ; Move Y down into the belt
M400              ; Wait for current moves to finish
M908 P5 S140      ; Setting the motor current of the Y1 motor to normal
M908 P1 S140      ; Setting the motor current of the Y2 motor to normal
G92 Y{blackbelt_z_offset}
;purge
G1 Y2             ; Move Y axis off the bed
G1 F15000         ; Set high feedrate
G1 X170 F10000    ; Move the print head to the center and break the melt
G1 X200 Y 1 G1 E10; Extruder 10mm material and move to the side
G1 E15            ; Extrude 5mm more
G1 Z10 E18 F500   ; Move belt 5mm and keep extruding
G1 Z30            ; Move the belt a bit further without extruding
G92 Z0            ; Zero Belt
G92 E0            ; Zero the extruded length
G1 E-4 F3900      ; Retract 4mm at 65mm/s
;prepare printing
G1 E0             ; Move extruder back to 0
G92 E-1.5         ; Add 1.5mm start distance
M117 CREALITYBELT Printing...

;˅˅˅˅˅˅˅˅˅˅˅˅˅˅˅˅ - copy from here / paste codes just under here - ˅˅˅˅˅˅˅˅˅˅˅˅˅˅˅˅

M107              ; Start with the fan off
G-Codeの終了 下記、項目に貼り付けたG-Code
G92 E0   ; Set Extruder to zero
G1 E-6   ; Retract 6mm
G92 Z0   ; Set Belt to zero
G1 Z15   ; Move Belt 15mm before starting up the next product
G92 Z0   ; Set Belt to zero again

;˄˄˄˄˄˄˄˄˄˄˄˄˄˄˄˄ - copy up to here / paste codes just above here - ˄˄˄˄˄˄˄˄˄˄˄˄˄˄˄˄

M104 S0  ; Extruder heater off
M140 S0  ; Heated bed heater off
M106 S0  ; Part cooling fan off
M106 P1 S0  ; Rear fan off
G92 Z0
G1 Z10 F1000
G28 X0 F2000
G1 Z20 F1000
G1 X170 F2000
G1 Y{blackbelt_z_offset} F2000
M18      ; Disable all stepper motors
copy up to hereとか書いてあるけど、とりあえず丸々コピペする

Cura 4.10にBeltPrinterSlicing(Beta)プラグインを入れ、各設定値を反映した画面です。
地平線の彼方まで続くベッドが面白い。
ちなみにCreality Belt Curaではベルトの設定は右側のツールに統合されていたりします。

BeltPrinterSlicing(Beta) を実際に使ってみる
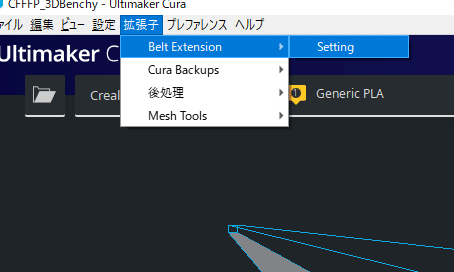
プラグイン導入後は下図のようにベルトの設定を呼び出します。
[拡張子] → [Belt Extension] → [Setting]

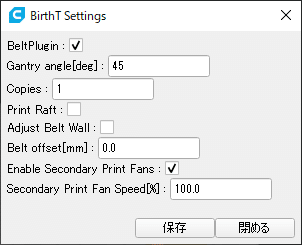
[Setting]をクリックすると、設定画面が表示されます。
下図の設定値を入力し[保存]しましょう。

[Adjust Belt Wall]はオフにしていますが、この中の数値を前述のCreality Belt Curaの設定値でコピペしてしまうと、BeltPrinterSlicing(Beta)では設定値の単位が違うらしく注意が必要です。
あとは、通常通り[スライス]をクリックすると45度傾いた状態でパスが生成されます。(下図は分かりやすく3DBenchyをスライスしたもの)

ちゃんと複数のxyzCalibrationCubeが造形されました!!

まだキャリブレーションがいまいちで造形精度が整っていないのはご愛嬌
さいごに
最新のCura 4.10でBirthT社製プラグインを導入し、Creality CR-30を稼働させる事ができました。
@BirthT_3D様、Twitterにてプラグインの設定やG-Codeの分析等々、多大なるご助力を賜り誠にありがとうございました!
プラグインの機能要望やバグ報告等はTwitterにて募集されているようです。
まだまだベルト型3Dプリンタのユーザー人口は少ないかと思いますが、この記事が何かの参考になれば幸いです。
僕がベルト型3Dプリンターの立ち上げ時に参考にさせていただいた記事
