Photo by
kazushinakamura
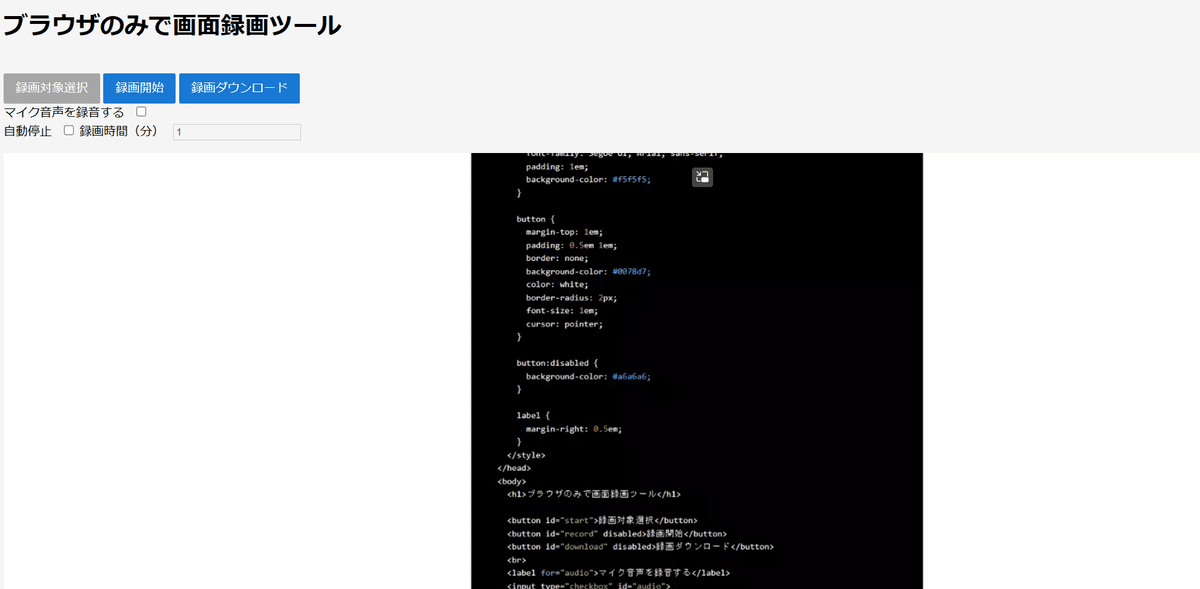
【ツール】ブラウザだけで画面録画をするツール その③

前回紹介した「【ツール】ブラウザだけで画面録画をするツール その②」にChatGPTの助けを借りて録画後のプレビュー機能を追加してみました。
これまでの機能
画面録画
ウインドウ録画
ブラウザタブ録画
マイク録音(オンオフ切り替え)
録画自動停止
収録ダウンロード
録画後プレビュー
スクリーンショット
ができるようになりました。
準備
使い方は以下のコードをメモ帳などで「ブラウザ録画.htm」など拡張子.htmなどで保存しEdgeやChromeで開くと使えます。
<!DOCTYPE html>
<html>

<head>
  <title>ブラウザのみで画面録画ツール</title>
  <style>
    body {
      font-family: Segoe UI, Arial, sans-serif;
      padding: 1em;
      background-color: #f5f5f5;
    }
    button {
      margin-top: 1em;
      padding: 0.5em 1em;
      border: none;
      background-color: #0078d7;
      color: white;
      border-radius: 2px;
      font-size: 1em;
      cursor: pointer;
    }
    button:disabled {
      background-color: #a6a6a6;
    }
    label {
      margin-right: 0.5em;
    }
  </style>
</head>

<body>
  <h1>ブラウザのみで画面録画ツール</h1>
  <button id="start">録画対象選択</button>
  <button id="record" disabled>録画開始</button>
  <button id="download" disabled>録画ダウンロード</button>
  <br>
  <label for="audio">マイク音声を録音する</label>
  <input type="checkbox" id="audio">
  <br>
  <label for="autoStop">自動停止</label>
  <input type="checkbox" id="autoStop">
  <label for="duration">録画時間(分)</label>
  <input type="number" id="duration" value="1" disabled>
  <br>
  <video id="preview" controls style="width:100%; margin-top:1em;" hidden></video>
  <script>
    const startButton = document.getElementById('start');
    const recordButton = document.getElementById('record');
    const downloadButton = document.getElementById('download');
    const preview = document.getElementById('preview');
    const audioInput = document.getElementById('audio');
    const autoStopInput = document.getElementById('autoStop');
    const durationInput = document.getElementById('duration');

    let mediaRecorder, stream, chunks = [], recordingTimeoutId;

    startButton.addEventListener('click', async () => {
      const constraints = {
        video: { cursor: 'always' },
        audio: audioInput.checked ? { echoCancellation: true } : false,
      };
      stream = await navigator.mediaDevices.getDisplayMedia(constraints);
      recordButton.disabled = false;
      startButton.disabled = true;
    });

    recordButton.addEventListener('click', () => {
      if (mediaRecorder && mediaRecorder.state === 'recording') {
        stopRecording();
      } else {
        startRecording();
      }
    });

    autoStopInput.addEventListener('change', () => {
      durationInput.disabled = !autoStopInput.checked;
    });

    downloadButton.addEventListener('click', () => {
      const blob = new Blob(chunks, { type: 'video/webm' });
      const url = URL.createObjectURL(blob);
      const a = document.createElement('a');
      a.href = url;
      a.download = 'recording.webm';
      a.click();
      URL.revokeObjectURL(url);
    });

    function startRecording() {
      chunks = [];
      mediaRecorder = new MediaRecorder(stream);
      mediaRecorder.ondataavailable = (event) => {
        if (event.data.size > 0) chunks.push(event.data);
      };
      mediaRecorder.onstop = () => {
        const blob = new Blob(chunks, { type: 'video/webm' });
        preview.src = URL.createObjectURL(blob);
        preview.hidden = false;
        downloadButton.disabled = false;
      };
      mediaRecorder.start();
      recordButton.textContent = '録画停止';

      if (autoStopInput.checked) {
        const duration = durationInput.value * 60 * 1000; // minutes to milliseconds
        recordingTimeoutId = setTimeout(stopRecording, duration);
      }
    }

    function stopRecording() {
      clearTimeout(recordingTimeoutId);
      mediaRecorder.stop();
      recordButton.textContent = '録画開始';
    }
  </script>
</body>

</html>
使い方
「録画対象選択」ボタンをクリックします。
録画したい画面を選択します。
「マイク音声を録音する」にチェックを入れると、マイクからの音声も録音します。
「録画開始」ボタンをクリックして録画を開始します。
録画を停止するには再度「録画開始」ボタンをクリックします。
「録画ダウンロード」ボタンをクリックすると、録画データがダウンロードされます。
録画データの再生方法
録画データはWebM形式で保存されます。WebMファイルはほとんどのブラウザで直接再生することができます。ダウンロードしたファイルをブラウザにドラッグ&ドロップするだけで、録画内容を確認することができます。
また、一部のメディアプレーヤーでも再生することが可能です。VLCメディアプレーヤーなどはWebM形式をサポートしています。