
1日でPythonを理解する(動画付き)1/3限目(windows)

00:00 ~ 4:15
こんにちは!
Pythonは、とても人気のあるプログラミング言語です。
データを分析したり、AIを開発したりと、今後ますます需要が増えると思われます。今のうちにサクッと学んでおきましょう!
動画とセットで見るとわかりやすいです。
そもそもプログラミングって何?
PCに「文字」で命令しているだけです!
文字(コード)で
「マウスをここに動かして」
「この大きさでウィンドウ作って」
「このURLを開いて」
と命令しているのです。
なんで色々な言語があるの?
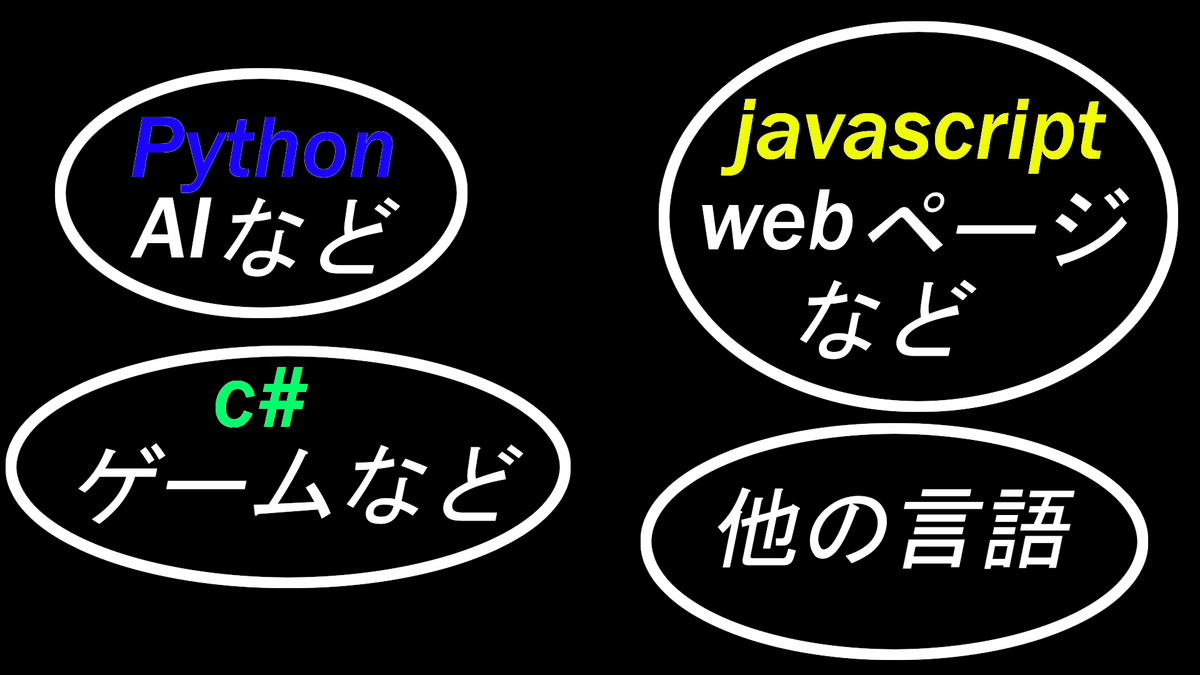
そのジャンルに最適化されているということです。
他の言語でもAIの計算はできる(はず)ですが、とても面倒、処理速度が遅いなどなど。
面倒ですが最適化された言語を学んで書いた方が楽なのです。
ネットでよく見るオブジェクト指向とは?
猫ちゃん達がマウントをとりたくて喧嘩しているだけです。
そっとしておきましょう。
心構え
コードを暗記して書いていると思われがちですが、
1行も覚えていません。
ネットで調べてコピペしているだけです。
覚えている暇があったら次の行を書いてください。
そういうことです。
とは言っても、それ以前のルールや基本(あまりにも出てくるもの)を知らないと、どこをコピペするのかすらわからないですね。
なのでこれからその基本を学んでいきましょう!
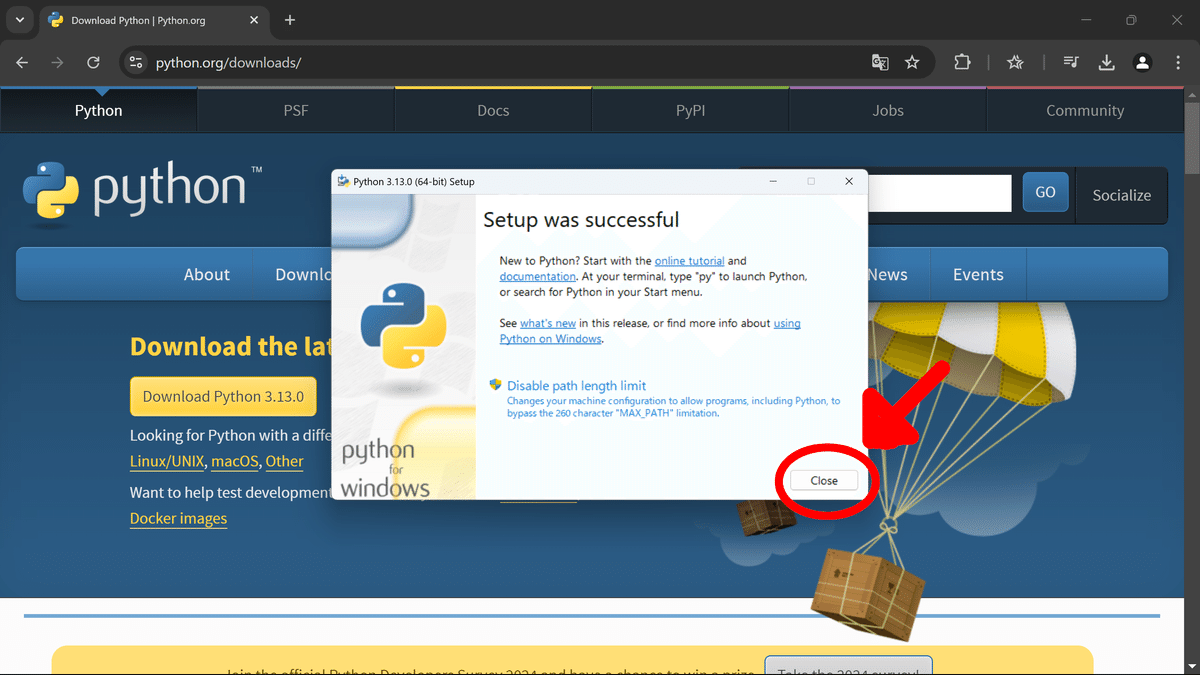
Pythonインストール(windows)
こちらのPython公式サイトへ行き
画像のように進んでいきます。


ダウンロードが終わりましたら、そのexeファイルをダブルクリックします。
GoogleChromを使っているなら

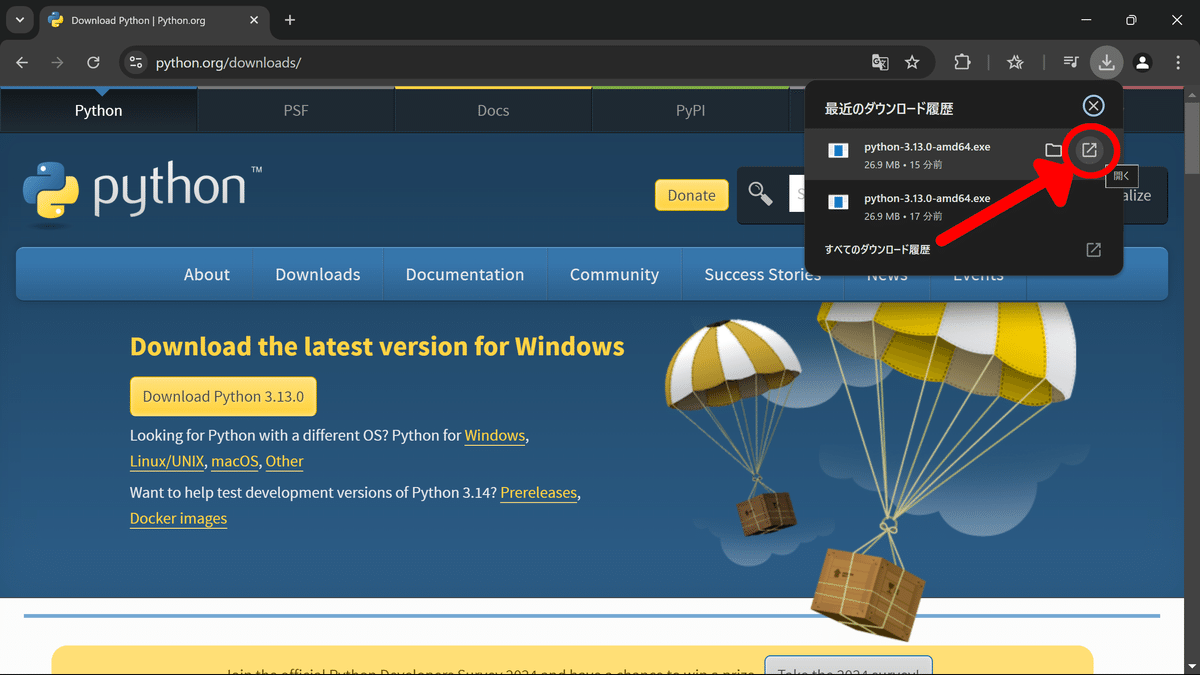
これでできます。
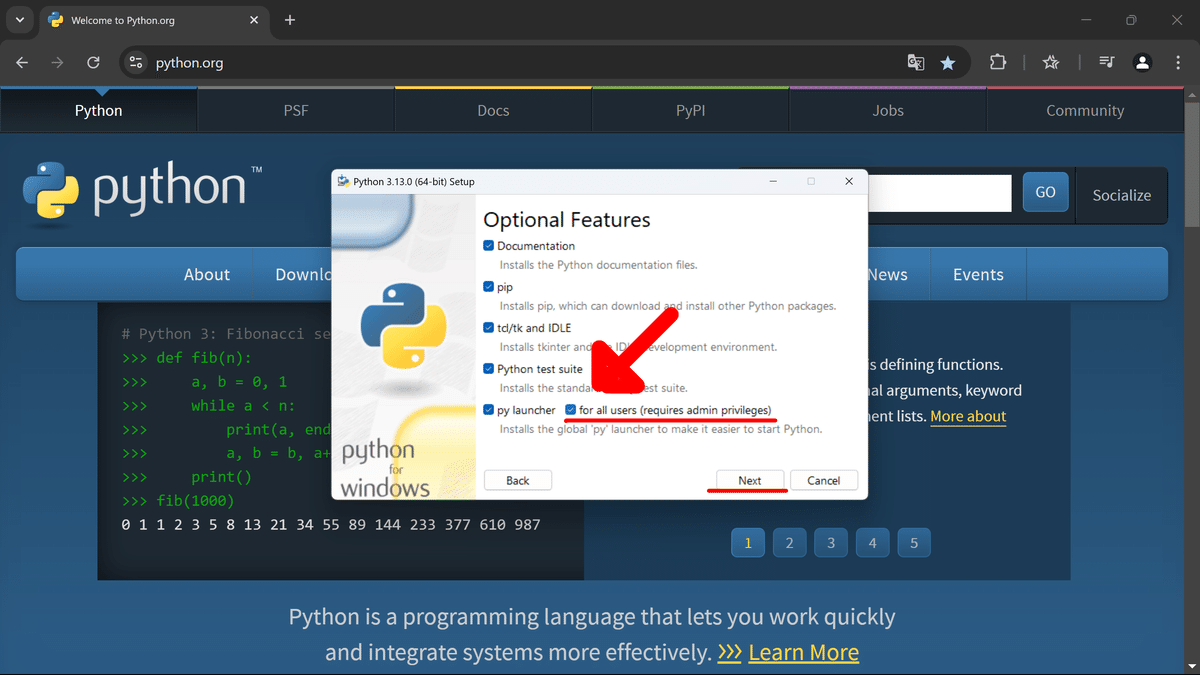
インストーラーが開いたら「Add python.exe to PATH」にチェック。
以後pythonのコードはこれ(このバージョン)で開くよと宣言しているのです。

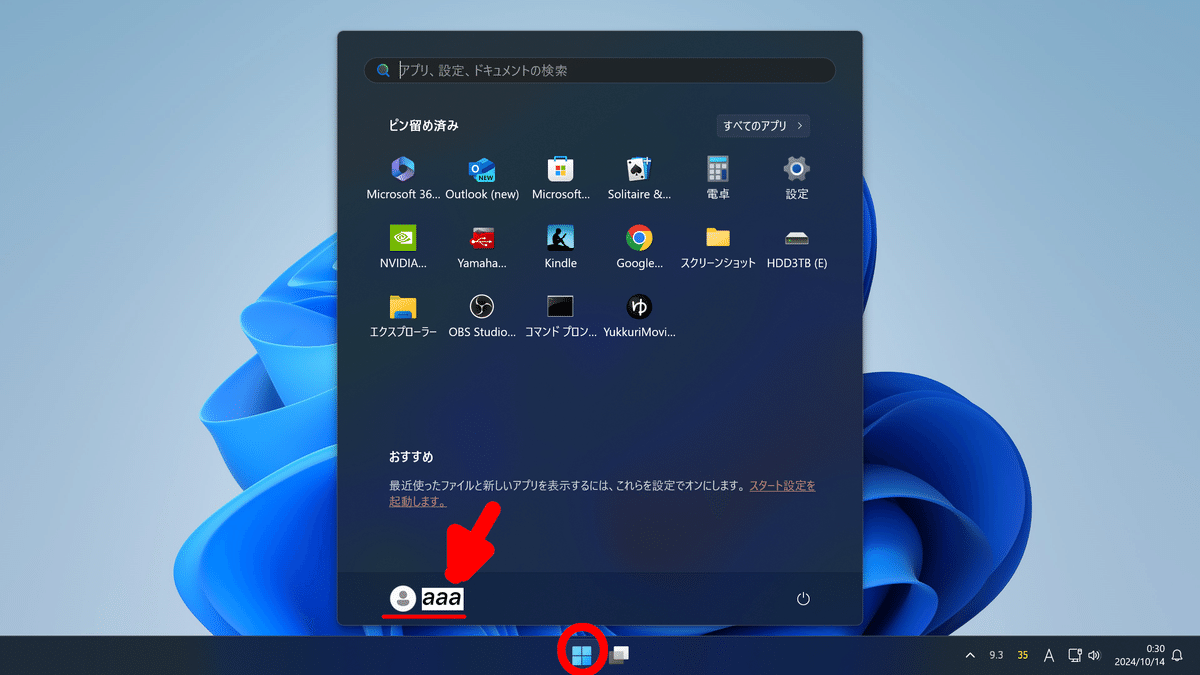
赤丸をクリックしてユーザー名を確認
ユーザー名が英語なら↓


終わりです
ユーザー名が日本語なら↓
(きっとどこかでエラーになってしまう)
「Add python.exe to PATH」にチェック後、
「Customize installation」をクリック

「for all users」にチェックして、
「Next」
「install python ○○ for all users」にチェック
これでインストールするフォルダ名がすべて英語に変わりました。
これで大丈夫です。
「install」をクリック

警告がでても「はい」で。
お終いです。
JupyterLab(ジュピターラボ)をインストールする
これだけでもpythonを実行することができますが、
毎回コマンドで打たなくてはなりません。
要は、ダブルクリックしても実行してくれないのです。

コマンドでそのファイルがある所まで行き、
「python+ファイル名」を打たなくてならない
これでは、はかどりません。はかどらないのです。
なのでJupyterLab(ジュピターラボ)といものをインストールします。
インターネットを見るブラウザで動くもので、
そこにコードを書いていて再生ボタンを押すだけで実行してくれます。
ブラウザで動くものなのでコードを見られている気もしますが、インターネットに繋がっていなくても動きます。安心です。
それでは早速インストールしていきましょう!
1.「windowsボタン」を右クリックして「検索」をクリック

2.「コマンドプロンプト」と入力
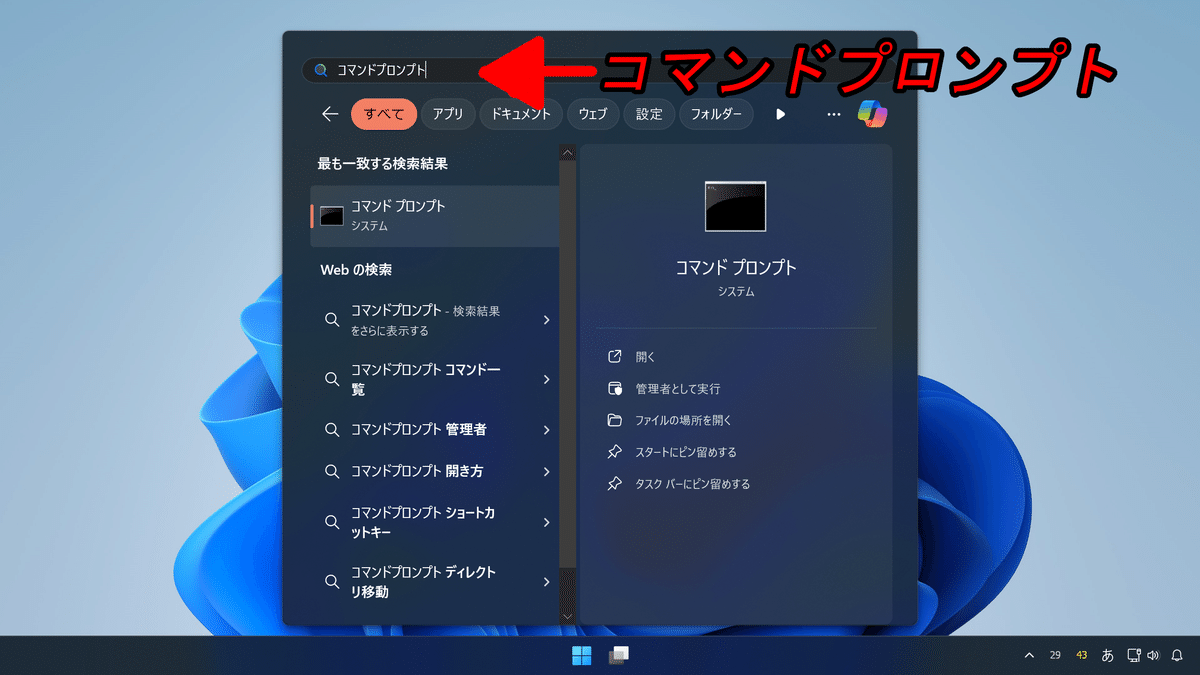
3.今後も使用するのでスタートにピン留めしておきます

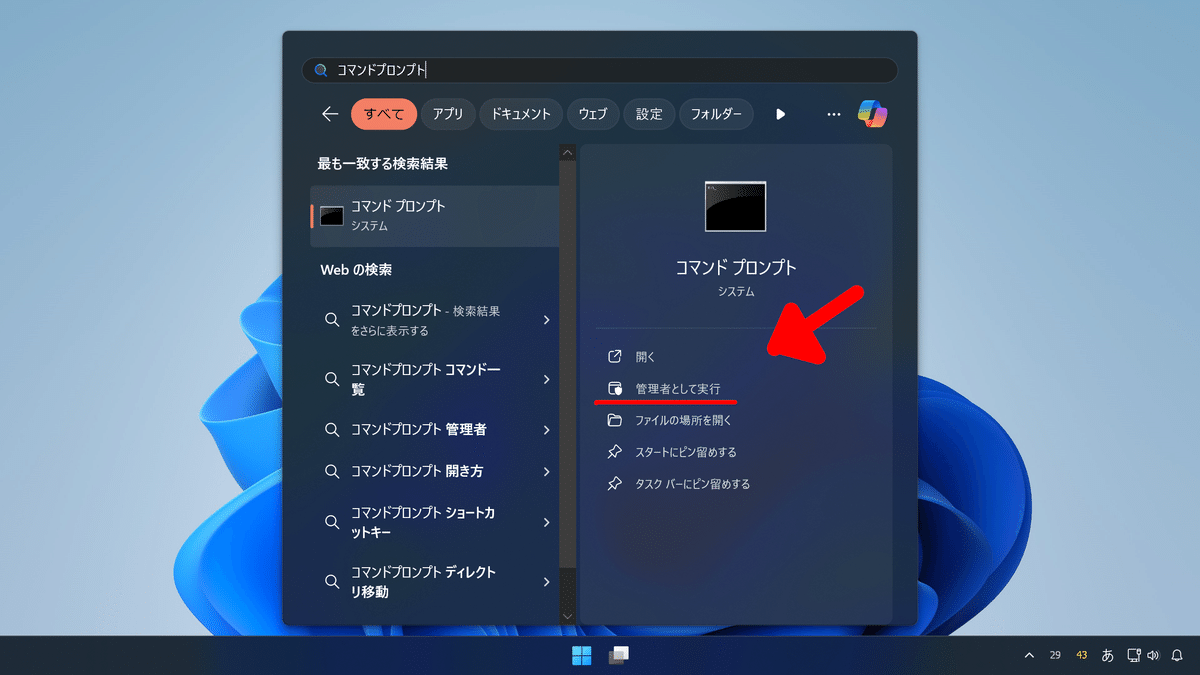
4.管理者として実行
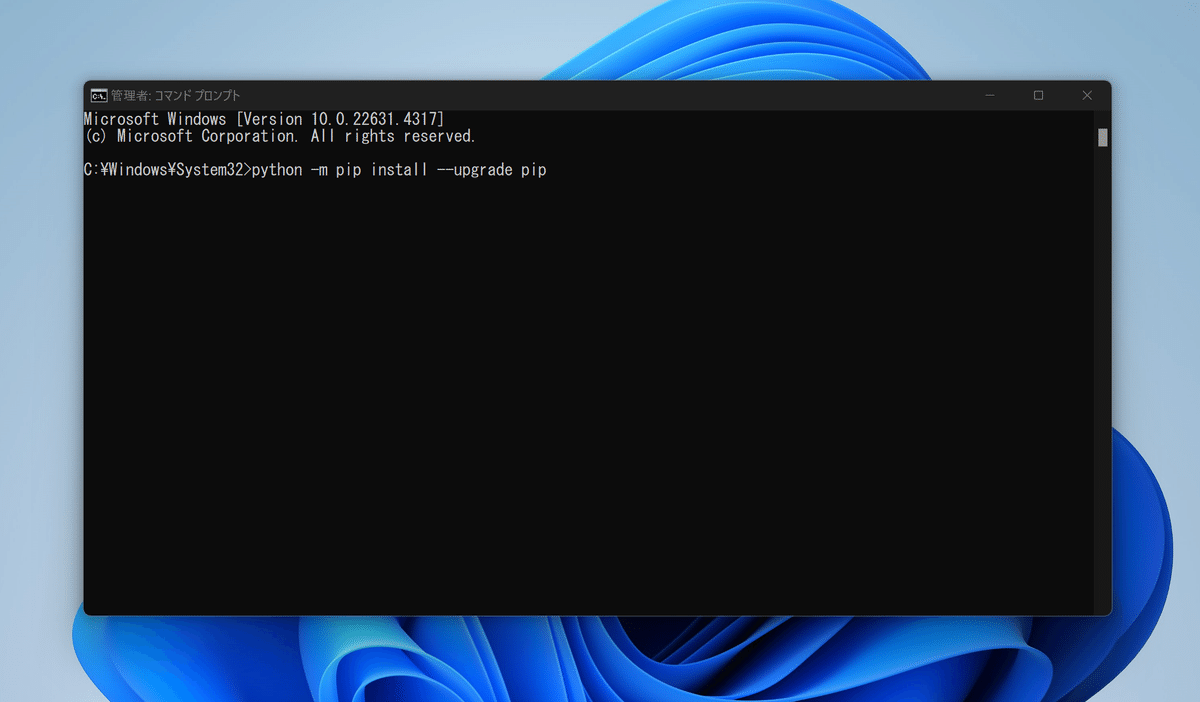
5.コマンドに
python -m pip install --upgrade pipと打ちエンター
6.コマンドに
pip install jupyterlabと打ちエンター

これでインストールできました。
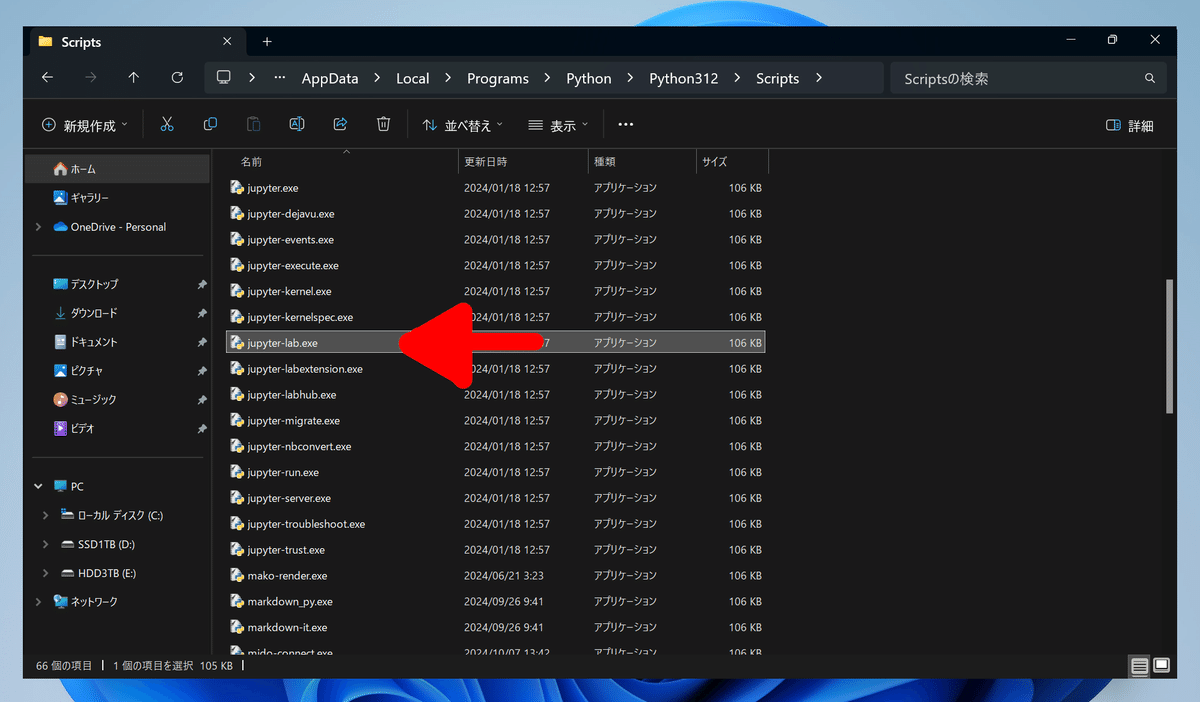
しかし、実行するための「jupyter-lab.exe」ファイルがかなり奥の方にあり、毎回ダブルクリックしに行くのは大変です。
なので次は「jupyter-lab.exe」ファイルをデスクトップに移動します。
JupyterLabをデスクトップに移動
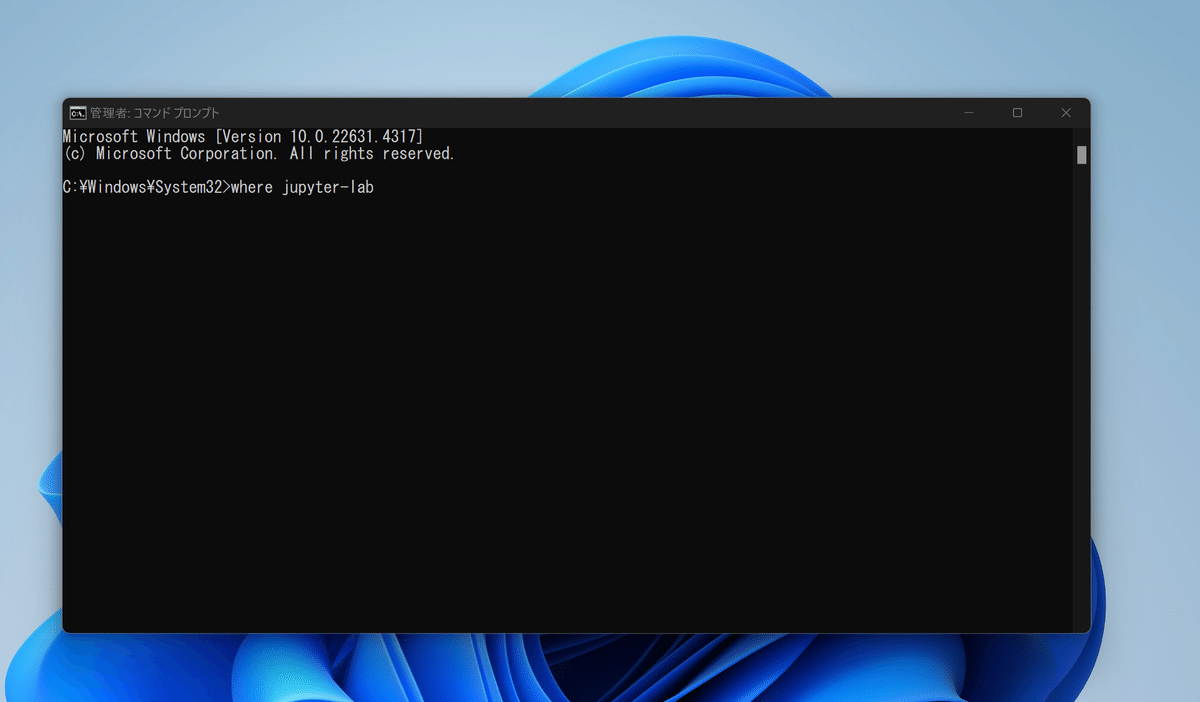
1.「jupyter-lab.exe」ファイルの場所を探します。
コマンドに
where jupyter-labと打ちエンター
2.出てきた場所の「¥jupyter-lab.exe」の手前までを
「ctrl + c」でコピー
※「¥」が「/」になっているかもしれません。
一緒の意味なので気にせずコピーしてください。
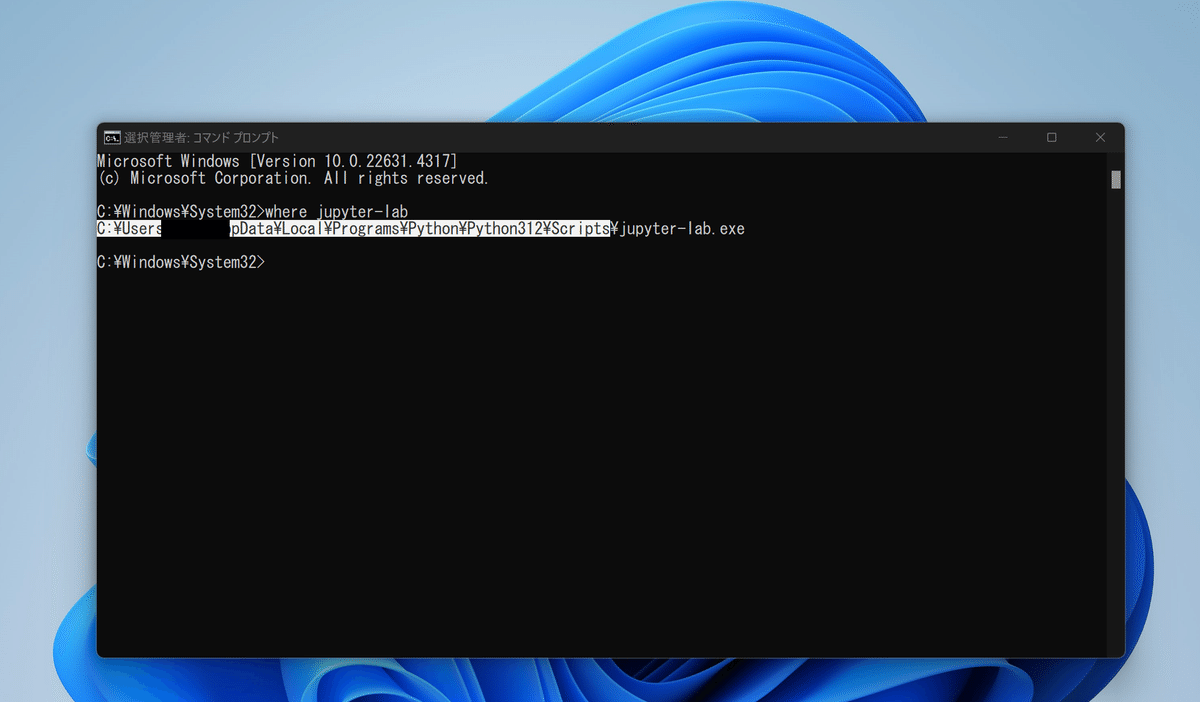
これで「jupyter-lab.exe」ファイルの場所が取得できました。
3.デスクトップにフォルダを作る。

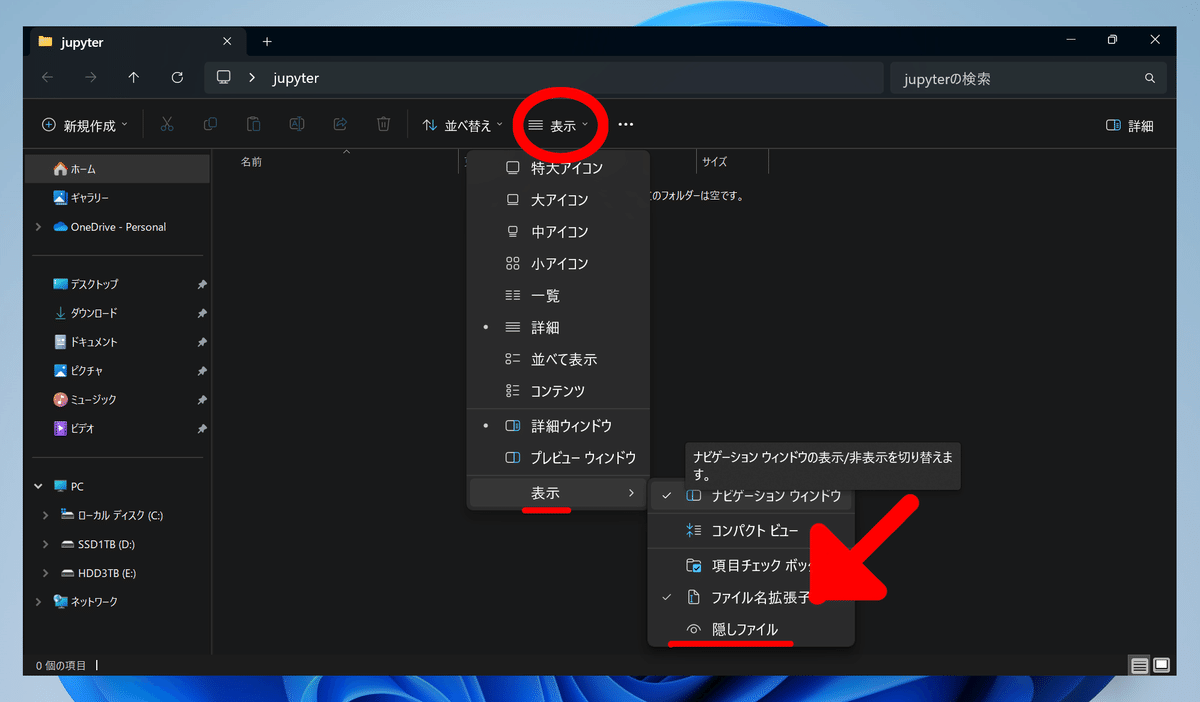
4.隠しファイルを表示させます。
今作ったフォルダを開き、
「表示」→「表示」→「隠しファイル」
5.四角で囲ってある所に先ほどコピーした
「jupyter-lab.exe」ファイルの場所を貼り付けエンター

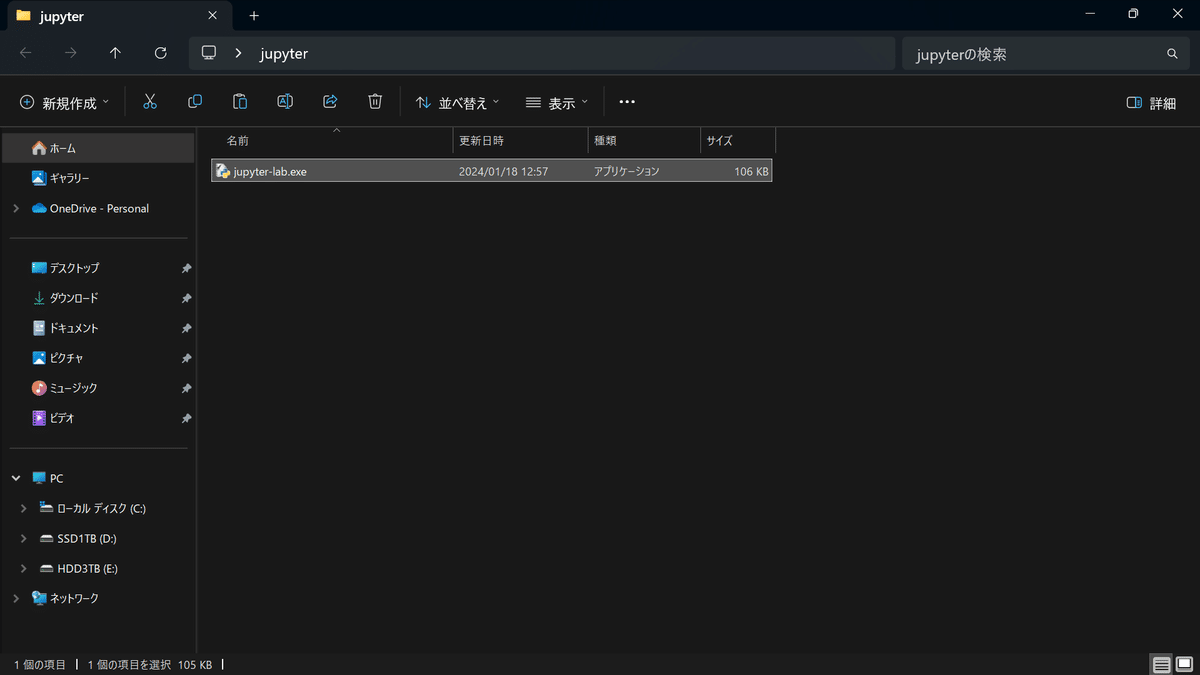
6.その中から「jupyter-lab.exe」を右クリック→切り取り(ハサミのマーク)して、
デスクトップに作ったフォルダに移動します。
※コピーと切り取りは違います。
・コピー ‥ 元の場所にファイル残る
・切り取り‥ 元の場所にファイル残らない(移動)
コピーでも動作しましたが、もしかしたらどこかでエラーに
なってしまうかもしれないので切り取り(移動)させておきましょう。
7.隠しファイルを隠す。
私はやっていません。
お終い。
とりあえず起動してみる
今のexeファイルをダブルクリックすればjupyter-labが起動してくれます。
※変な黒い画面が出てきますが、起動中は消さないでください。
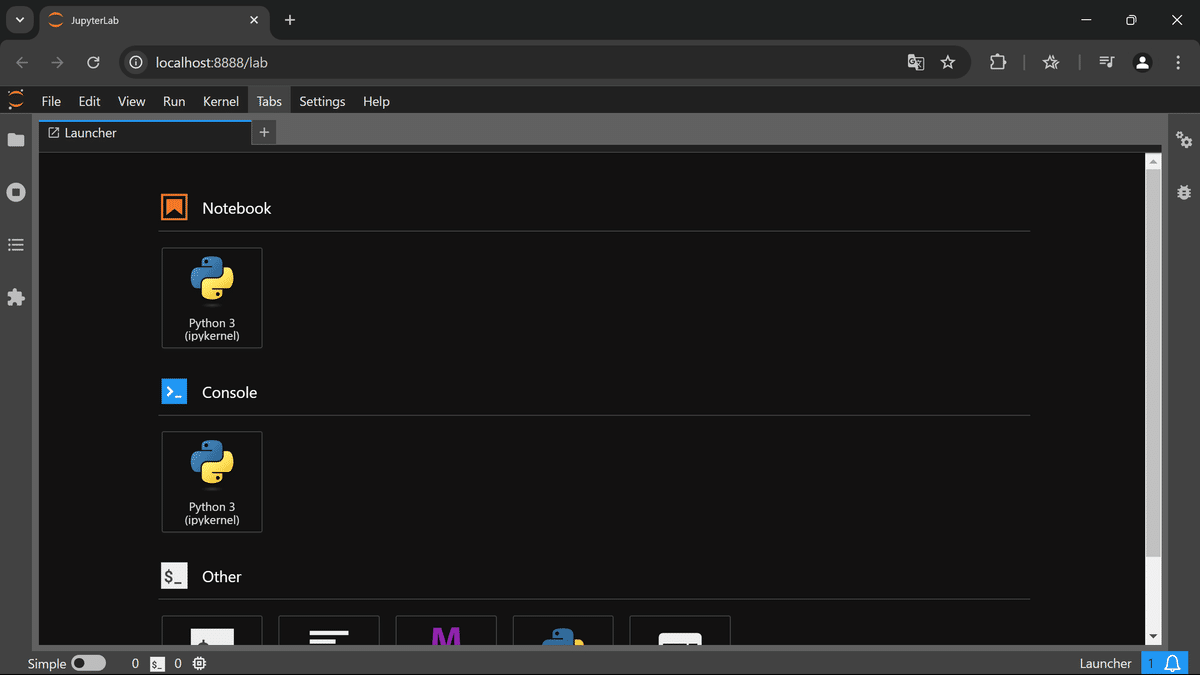
Notebookをクリックで新しいノート(コードを書くところ)を作ってくれます。

ここにコードを書いていきます!
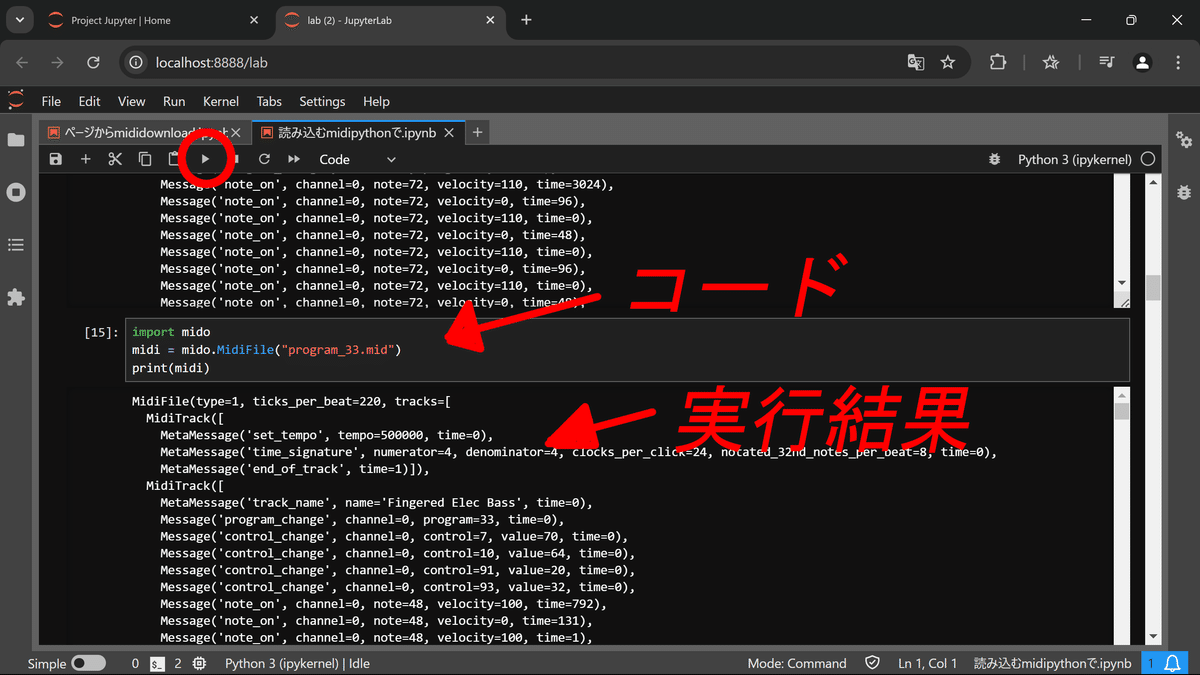
jupyterlabの基本的なこと
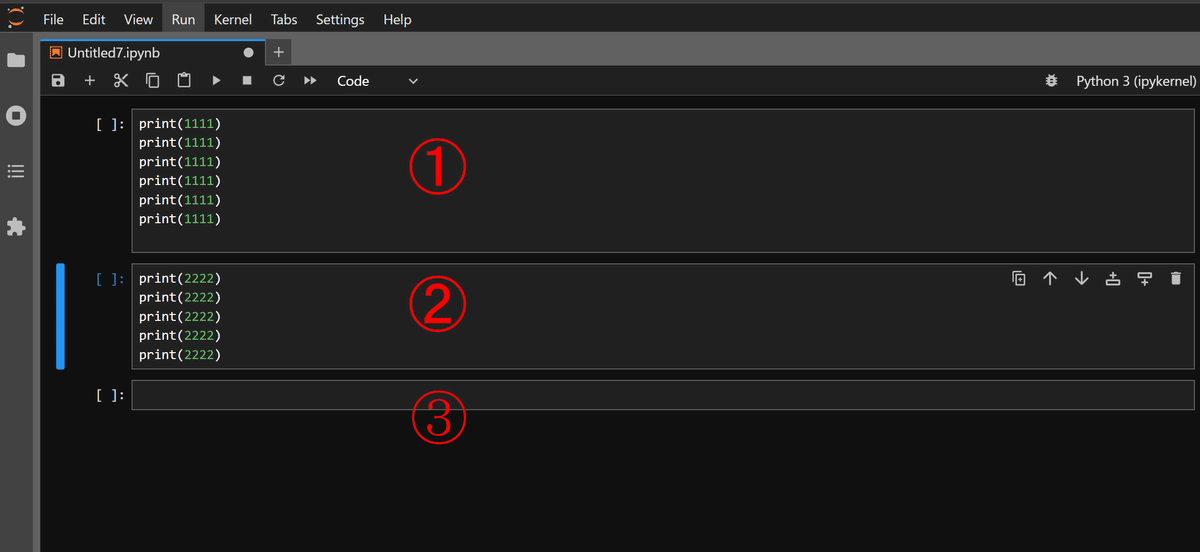
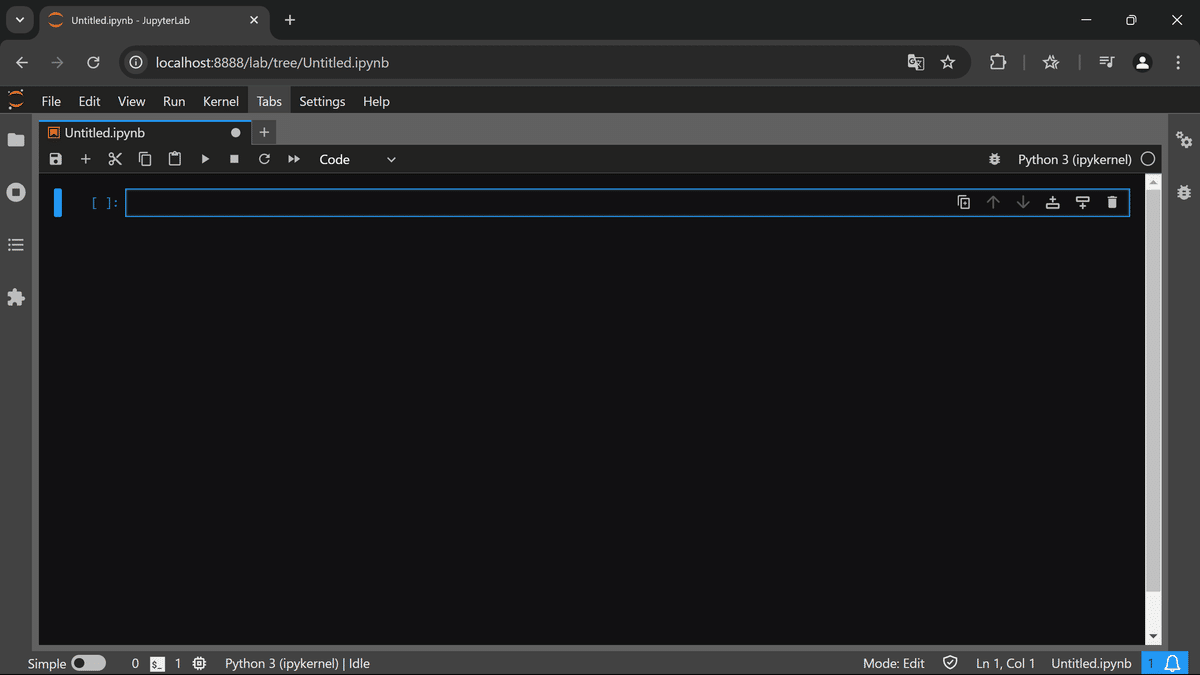
jupyterlabでは、セルごとにコードを実行できます。
上の画像では、3つのセルがあります。

➁の一番左側に青いラインがついていますが、これがアクティブなセルです。
再生ボタンをクリックすると➁のコードが読まれます。

四角のアイコンで停止(強制終了)できます。
これでも止まらないことがあるので、その際は右上のバッテン(ブラウザ閉じる)をクリックしてください。よくあります。
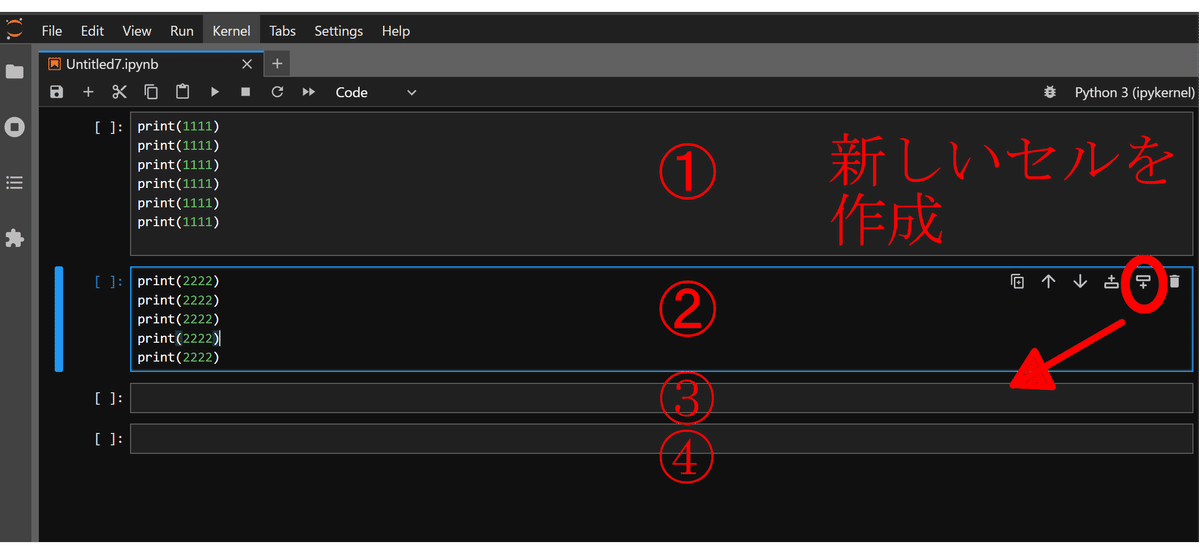
右側のアイコンをクリックすると新しいセルを作成できます。

左上のアイコンですべてのコードが保存されます。
小まめに保存しましょう!
おしまいです!
ここまで来たら、休憩しましょう!
わからないものをインストールするのはなかなかエネルギーを使うものです。
2限目‥下の次の記事から進んでください。