
画面遷移をする時に値を渡してみた

基礎的な部分なので備忘用に残します
◉サンプル

・プロジェクト全体像


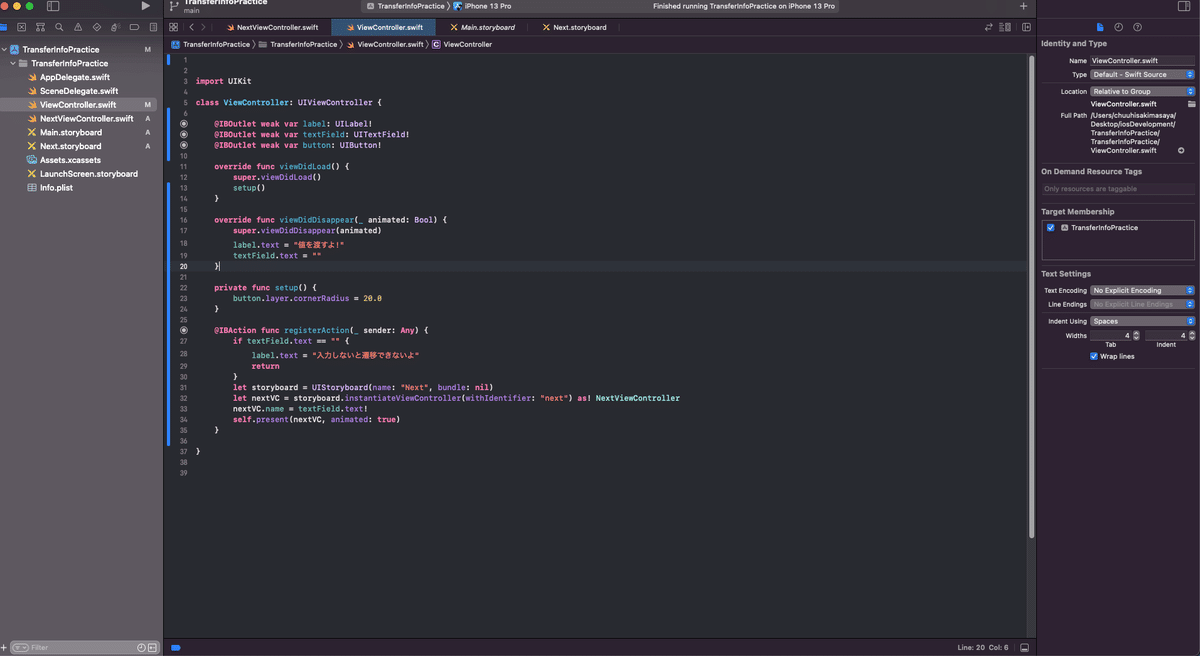

◆ViewController.swiftのコード全体
import UIKitclass ViewController: UIViewController {
@IBOutlet weak var label: UILabel!
@IBOutlet weak var textField: UITextField!
@IBOutlet weak var button: UIButton!
override func viewDidLoad() {
super.viewDidLoad()
setup()
}
//画面遷移をした後の処理
override func viewDidDisappear(_ animated: Bool) {
super.viewDidDisappear(animated)
//ラベルのテキストを初期状態に戻す
label.text = "値を渡すよ!"
//テキストフィールドを空にしておく
textField.text = ""
}
//ボタンの角を丸くする
private func setup() {
button.layer.cornerRadius = 20.0
}
//登録ボタンを押したときの処理
@IBAction func registerAction(_ sender: Any) {
//テキストフィールドに何も入力が無かったら画面遷移は行わない
if textField.text == "" {
label.text = "入力しないと遷移できないよ"
return
}
//画面遷移先の指定 & 実際に遷移をする
let storyboard = UIStoryboard(name: "Next", bundle: nil)
let nextVC = storyboard.instantiateViewController(withIdentifier: "next") as! NextViewController
nextVC.name = textField.text!
self.present(nextVC, animated: true)
}
}◆NextViewController.swiftのコード全体
import UIKitclass NextViewController: UIViewController {
@IBOutlet weak var nameLabel: UILabel!
@IBOutlet weak var back: UIButton!
//テキストフィールドの値を保持するために使用
public var name = ""
override func viewDidLoad() {
super.viewDidLoad()
//遷移してきた時にテキストフィールドの値を表示する
nameLabel.text = "私の名前は\(name)です"
back.layer.cornerRadius = 20.0
}
//戻る処理
@IBAction func backAction(_ sender: Any) {
dismiss(animated: true)
}
}しっかりと使いこなして応用できるようにしていきたいですね!
今回は以上です。