Clineの内部がどうなってるのかをClineに解読させたら衝撃的だった
こんにちはNappsの榎本です、Claudeの出してる開発エージェントのCline、コードベースを理解して開発してくれるので、どんなふうに内部が動いてるのかをCline自身に解説させてみました。仕組みを知りたい人は、最後のまとめを読んでください。
Clineはオープンソースで開発されてるのでコードはGItHub(github.com/cline/)にありますので、クローンしてきてCline自身に質問して理解していきたいと思います。
PJの構成
どんなファイル構成になっているのかをCline自身に解説してもらいます
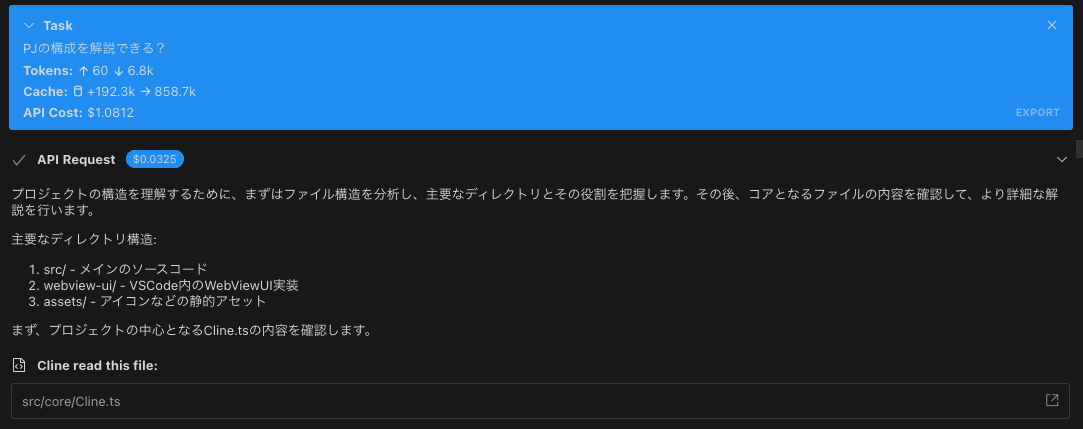
途中経過を経て
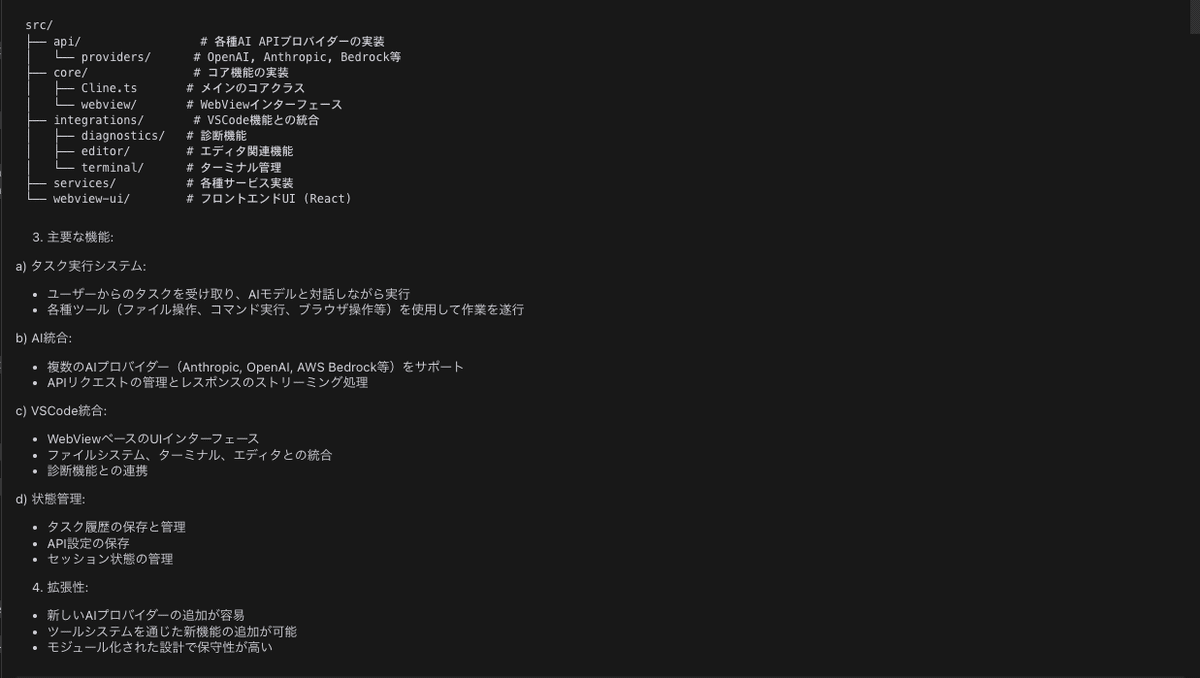
Cline.ts: メインのコアクラスでタスク実行、ツール使用、API通信を管理してることを教えてくれました
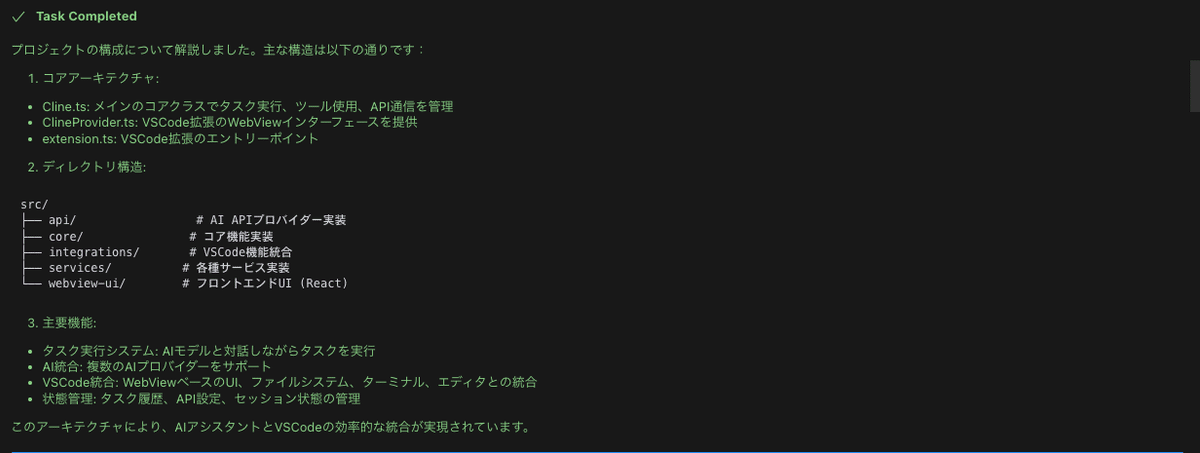
Cline.tsを読んでも流れが掴めないので「ユーザがチャット欄に入力してからの流れを教えて」と質問し、どの順番で呼ばれてるのかを確認します
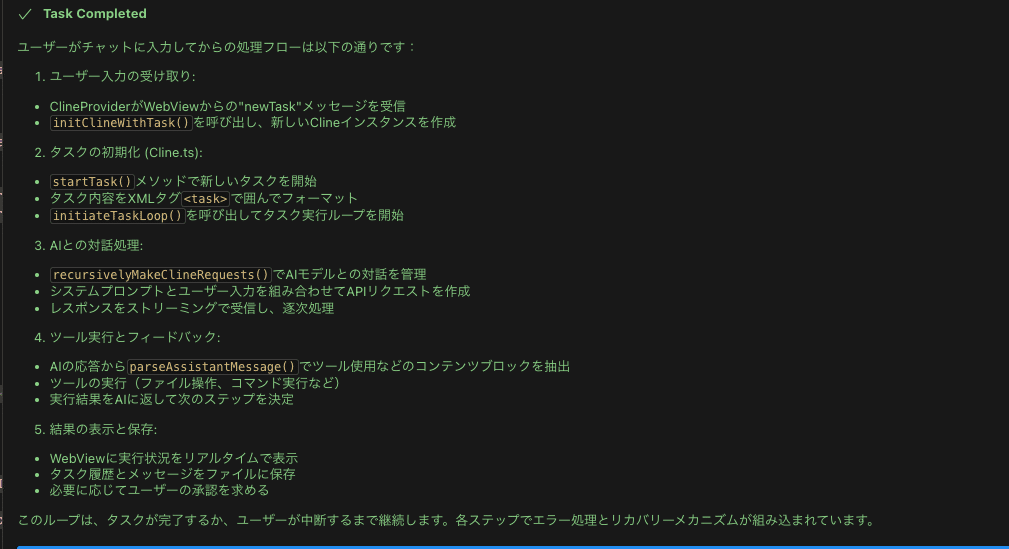
新しいタスクが開始されると初期化処理の末に「recursivelyMakeClineRequests」を呼び出しAPIに通信を行い、結果をパースして描画、タスクが完了するまでつづくと書かれています。さらに「recursivelyMakeClineRequests」を解説させます
recursivelyMakeClineRequestsメソッドは、AIとの対話を管理する中核的な機能を担っています。主な処理フローは以下の通りです:

前処理とコンテキスト準備:
// 環境情報の収集
const [parsedUserContent, environmentDetails] = await this.loadContext(userContent, includeFileDetails)
// APIリクエスト開始を通知
await this.say("api_req_started", ...)
APIストリーミング処理:
const stream = this.attemptApiRequest(previousApiReqIndex)
for await (const chunk of stream) {
    switch (chunk.type) {
        case "usage":  // トークン使用量の追跡
            inputTokens += chunk.inputTokens
            outputTokens += chunk.outputTokens
            break
        case "text":   // AIからの応答テキスト処理
            assistantMessage += chunk.text
            this.assistantMessageContent = parseAssistantMessage(assistantMessage)
            this.presentAssistantMessage()
            break
    }
}
メッセージの処理と表示:
parseAssistantMessage()でAIの応答をコンテンツブロックに分解
presentAssistantMessage()で各ブロックを順次処理:
テキストブロック: ユーザーに表示
ツールブロック: 対応するツールを実行
ツール実行の制御:
if (this.didRejectTool) {
    // ユーザーがツールを拒否した場合、応答を中断
    assistantMessage += "\n\n[Response interrupted by user feedback]"
    break
}
if (this.didAlreadyUseTool) {
    // 1メッセージで1つのツールのみ実行可能
    assistantMessage += "\n\n[Response interrupted by a tool use result...]"
    break
}
再帰的な処理:
// ツールの実行結果をAIに返して次のステップを決定
const didEndLoop = await this.recursivelyMakeClineRequests(this.userMessageContent)
エラー処理とリカバリー:
APIエラーの処理
ツール実行エラーの処理
ユーザーによるタスク中断の処理
このメソッドは、各ステップでユーザーとの対話を保ちながら、AIの応答を適切に処理し、必要なツールを実行する制御フローを提供しています。
環境情報と一緒にAPIに渡しており、ここは単にAPIを読んでるだけですので、環境情報を深掘りするために、「ファイル一覧をどこで渡してるかを解説させました」
はい、プロジェクトのファイル構造は以下の流れで最初にAIに送られます:

タスク開始時のstartTask()で、initiateTaskLoop()を呼び出す際にincludeFileDetails = trueが設定されます:
private async startTask(task?: string, images?: string[]): Promise<void> {
    await this.say("text", task, images)
    let imageBlocks: Anthropic.ImageBlockParam[] = formatResponse.imageBlocks(images)
    await this.initiateTaskLoop([
        {
            type: "text",
            text: `<task>\n${task}\n</task>`,
        },
        ...imageBlocks,
    ])
}
initiateTaskLoop()では、最初の呼び出し時のみファイル詳細を含めます:
private async initiateTaskLoop(userContent: UserContent): Promise<void> {
    let nextUserContent = userContent
    let includeFileDetails = true  // 初回のみtrue
    while (!this.abort) {
        const didEndLoop = await this.recursivelyMakeClineRequests(nextUserContent, includeFileDetails)
        includeFileDetails = false  // 2回目以降はfalse
        // ...
    }
}
recursivelyMakeClineRequests()内でloadContext()を呼び出し、環境詳細を取得:
const [parsedUserContent, environmentDetails] = await this.loadContext(userContent, includeFileDetails)
userContent.push({ type: "text", text: environmentDetails })
getEnvironmentDetails()で実際のファイル構造を取得:
if (includeFileDetails) {
    details += `\n\n# Current Working Directory (${cwd.toPosix()}) Files\n`
    const [files, didHitLimit] = await listFiles(cwd, true, 200)
    const result = formatResponse.formatFilesList(cwd, files, didHitLimit)
    details += result
}
このように、タスクの最初のメッセージにのみプロジェクトの完全なファイル構造が含まれ、その後のメッセージでは必要な場合にのみ特定のファイルやディレクトリの情報が含まれます。これにより、AIは最初からプロジェクトの全体像を把握した上でタスクに取り組むことができます。
実際に送ってる内容を確認するために深掘ります
VSCode関連の情報:
// 現在表示されているファイル
details += "\n\n# VSCode Visible Files"
const visibleFiles = vscode.window.visibleTextEditors
    ?.map((editor) => editor.document?.uri?.fsPath)
    .filter(Boolean)
    .map((absolutePath) => path.relative(cwd, absolutePath).toPosix())
    .join("\n")

// 開いているタブ
details += "\n\n# VSCode Open Tabs"
const openTabs = vscode.window.tabGroups.all
    .flatMap((group) => group.tabs)
    .map((tab) => (tab.input as vscode.TabInputText)?.uri?.fsPath)
    .filter(Boolean)
    .map((absolutePath) => path.relative(cwd, absolutePath).toPosix())
    .join("\n")
ターミナル情報:
// アクティブなターミナルの状態
details += "\n\n# Actively Running Terminals"
for (const busyTerminal of busyTerminals) {
    details += `\n## Original command: \`${busyTerminal.lastCommand}\``
    const newOutput = this.terminalManager.getUnretrievedOutput(busyTerminal.id)
    // ...
}

// 非アクティブなターミナルの出力
details += "\n\n# Inactive Terminals"
// ...
プロジェクトのファイル構造:
if (includeFileDetails) {
    details += `\n\n# Current Working Directory (${cwd.toPosix()}) Files\n`
    // デスクトップの場合は自動的にファイル一覧を表示しない
    const isDesktop = arePathsEqual(cwd, path.join(os.homedir(), "Desktop"))
    if (isDesktop) {
        details += "(Desktop files not shown automatically. Use list_files to explore if needed.)"
    } else {
        // 再帰的にファイル一覧を取得(最大200ファイルまで)
        const [files, didHitLimit] = await listFiles(cwd, true, 200)
        const result = formatResponse.formatFilesList(cwd, files, didHitLimit)
        details += result
    }
}
これらの情報は以下のような形式でAIに送られます:

<environment_details>
# VSCode Visible Files
src/core/Cline.ts
src/core/webview/ClineProvider.ts

# VSCode Open Tabs
src/core/Cline.ts
src/core/webview/ClineProvider.ts

# Current Working Directory (/Users/user/project) Files
.eslintrc.json
.gitignore
package.json
src/
src/core/
src/core/Cline.ts
src/core/webview/
src/core/webview/ClineProvider.ts
...
</environment_details>
この情報により、AIは:

現在のプロジェクト構造を理解
開いているファイルやタブの状態を把握
実行中のコマンドやその出力を確認
できるようになり、より的確なアシスタンスを提供できます。
一式送ってそうです。実際にコード生成する流れがわからなかったので、コード生成をどこでやってるかを聞いてみます
コード生成の主な流れは以下の通りです:
AIによるコード生成:
// Cline.tsのrecursivelyMakeClineRequestsメソッドで
// AIからのレスポンスをストリーミングで受信
for await (const chunk of stream) {
switch (chunk.type) {
case "text":
assistantMessage += chunk.text
// 応答をパースしてコンテンツブロックに分解
this.assistantMessageContent = parseAssistantMessage(assistantMessage)
// ブロックを処理
this.presentAssistantMessage()
break
}
}
ファイル作成/編集の処理 (write_to_fileツール):
case "write_to_file": {
const relPath: string | undefined = block.params.path
let newContent: string | undefined = block.params.content
// ファイルの存在確認
const absolutePath = path.resolve(cwd, relPath)
fileExists = await fileExistsAtPath(absolutePath)
// コンテンツの前処理
if (newContent.startsWith("```")) {
// コードブロックマーカーの除去
newContent = newContent.split("\n").slice(1).join("\n").trim()
}
// 差分表示用のメッセージを準備
const completeMessage = JSON.stringify({
tool: fileExists ? "editedExistingFile" : "newFileCreated",
content: fileExists ? undefined : newContent,
diff: fileExists ? formatResponse.createPrettyPatch(
relPath,
this.diffViewProvider.originalContent,
newContent
) : undefined,
})
// ユーザーの承認を待つ
const didApprove = await askApproval("tool", completeMessage)
if (didApprove) {
// 変更を保存
const { newProblemsMessage, userEdits, finalContent } =
await this.diffViewProvider.saveChanges()
}
}
ユーザーフィードバックの処理:
if (userEdits) {
// ユーザーが編集を加えた場合
pushToolResult(
`The user made the following updates to your content:\n\n${userEdits}\n\n` +
`The updated content has been successfully saved to ${relPath.toPosix()}. ` +
`Here is the full, updated content of the file:\n\n` +
`<final_file_content path="${relPath.toPosix()}">\n${finalContent}\n</final_file_content>\n\n` +
`Please note:\n` +
`1. You do not need to re-write the file with these changes\n` +
`2. Proceed with the task using this updated file content\n` +
`3. If the user's edits have changed the requirements, adjust your approach`
)
}
エラー処理とバリデーション:
// コードの前処理(エスケープ文字の処理など)
if (!this.api.getModel().id.includes("claude")) {
if (newContent.includes(">") ||
newContent.includes("<") ||
newContent.includes(""")
) {
newContent = newContent
.replace(/>/g, ">")
.replace(/</g, "<")
.replace(/"/g, '"')
}
}
// 問題の警告表示
showOmissionWarning(this.diffViewProvider.originalContent || "", newContent)
変更の保存と状態の更新:
// ファイル変更の記録
this.didEditFile = true
// ターミナル出力の更新待ち
if (busyTerminals.length > 0 && this.didEditFile) {
await delay(300) // ターミナルの更新を待つ
}
この流れにより:
AIが生成したコードは必ずユーザーの承認を得てから適用
差分表示により変更内容を明確に提示
ユーザーは変更を編集可能
エラーや問題点を自動的に検出
変更後の状態を適切に追跡
という安全で効率的なコード生成プロセスが実現されています。なるほどtool_useでwrite_fileに来ると、コードが書き出されるようですので、ほぼプロンプトで作ってそうです。プロンプトを確認してみます
AIによるコード生成の流れは以下のようになっています:

システムプロンプトの設定:
// src/core/prompts/system.ts
export const SYSTEM_PROMPT = async (cwd: string, supportsComputerUse: boolean) => `
You are Cline, a highly skilled software engineer with extensive knowledge in many programming languages, frameworks, design patterns, and best practices.
...
`
このプロンプトには以下の重要な要素が含まれています:

ツールの使用方法と制約
各ツールの詳細な説明とパラメータ
コーディング規約とベストプラクティス
環境情報(OS、シェル、作業ディレクトリなど)
コンテキストの提供:
// Cline.tsのloadContext()で環境情報を収集
const [parsedUserContent, environmentDetails] = await this.loadContext(userContent, includeFileDetails)
環境情報には以下が含まれます:

プロジェクトのファイル構造
開いているファイル
アクティブなターミナル
VSCode関連の状態
AIへのリクエスト生成:
// Cline.tsのrecursivelyMakeClineRequests()で
const stream = this.attemptApiRequest(previousApiReqIndex)
リクエストには以下が含まれます:

システムプロンプト
ユーザーのタスク
環境情報
会話履歴
コード生成とレビュー:
// write_to_fileツールの処理
case "write_to_file": {
    // コードの前処理(マークダウンやエスケープ文字の処理)
    if (newContent.startsWith("```")) {
        newContent = newContent.split("\n").slice(1).join("\n").trim()
    }

    // 差分表示による変更の可視化
    const completeMessage = JSON.stringify({
        tool: fileExists ? "editedExistingFile" : "newFileCreated",
        diff: fileExists ? formatResponse.createPrettyPatch(
            relPath,
            this.diffViewProvider.originalContent,
            newContent
        ) : undefined,
    })

    // ユーザーの承認を待つ
    const didApprove = await askApproval("tool", completeMessage)
}
安全性とエラー処理:
ユーザーの承認が必要
差分表示による変更の明確化
エラーの自動検出
問題点の警告表示
ファイルの完全な内容を要求
このように、AIによるコード生成は:

詳細なプロンプトによる高品質なコード生成
プロジェクトコンテキストの理解
段階的な生成と検証
ユーザーとの対話的なレビュー
安全性とエラー処理の重視
という特徴を持ち、高品質で安全なコード生成を実現しています。
つまりコードを書くという内容はプロンプトには持っておらず、自律的にコードを生成し、write_fileで出力してるようです、本当に定義されてないのか確認してみます。
システムプロンプトには、冒頭で以下のようにAIの基本的な能力を定義しています:

You are Cline, a highly skilled software engineer with extensive knowledge in many programming languages, frameworks, design patterns, and best practices.
その後、CAPABILITIESセクションで具体的なツールと能力について説明しています:

CAPABILITIES

- You have access to tools that let you execute CLI commands on the user's computer, list files, view source code definitions, regex search, use the browser, read and write files, and ask follow-up questions. These tools help you effectively accomplish a wide range of tasks, such as writing code, making edits or improvements to existing files, understanding the current state of a project, performing system operations, and much more.
しかし、直接的なコーディング能力についての詳細な言及は含まれていません。代わりに:

ツールを通じた実装:
write_to_fileツールを使用してコードを書く
既存コードの編集や改善
ファイル構造の理解と適切な配置
コーディング規約とベストプラクティス:
- When creating a new project, organize all new files within a dedicated project directory unless the user specifies otherwise.
- Structure the project logically, adhering to best practices for the specific type of project being created.
- When making changes to code, always consider the context in which the code is being used.
- Ensure that your changes are compatible with the existing codebase and that they follow the project's coding standards and best practices.
プロジェクト理解:
- Be sure to consider the type of project (e.g. Python, JavaScript, web application) when determining the appropriate structure and files to include.
- Also consider what files may be most relevant to accomplishing the task, for example looking at a project's manifest file would help you understand the project's dependencies.
エンジニアとしてだけ定義されてるのがわかります
まとめ
ClineのSystemプロンプトでは9つのツールが定義されています。
	"execute_command",
	"read_file",
	"write_to_file",
	"search_files",
	"list_files",
	"list_code_definition_names",
	"browser_action",
	"ask_followup_question",
	"attempt_completion",
Clineはユーザのタスクに応じてツールを組み合わせてタスクをこなすようにSystemプロンプトで定義されており、タスク開始時にPJ内のファイル一覧など環境情報が渡されます。ユーザのタスクをこなすために必要なファイルがある場合read_fileを返し、コードでファイルを読み込み、AIとの対話ログに積みます。ファイルがコンテキストで渡され生成可能になるととSystemプロンプトは自動的に生成を始めるという仕組みになってるようです。
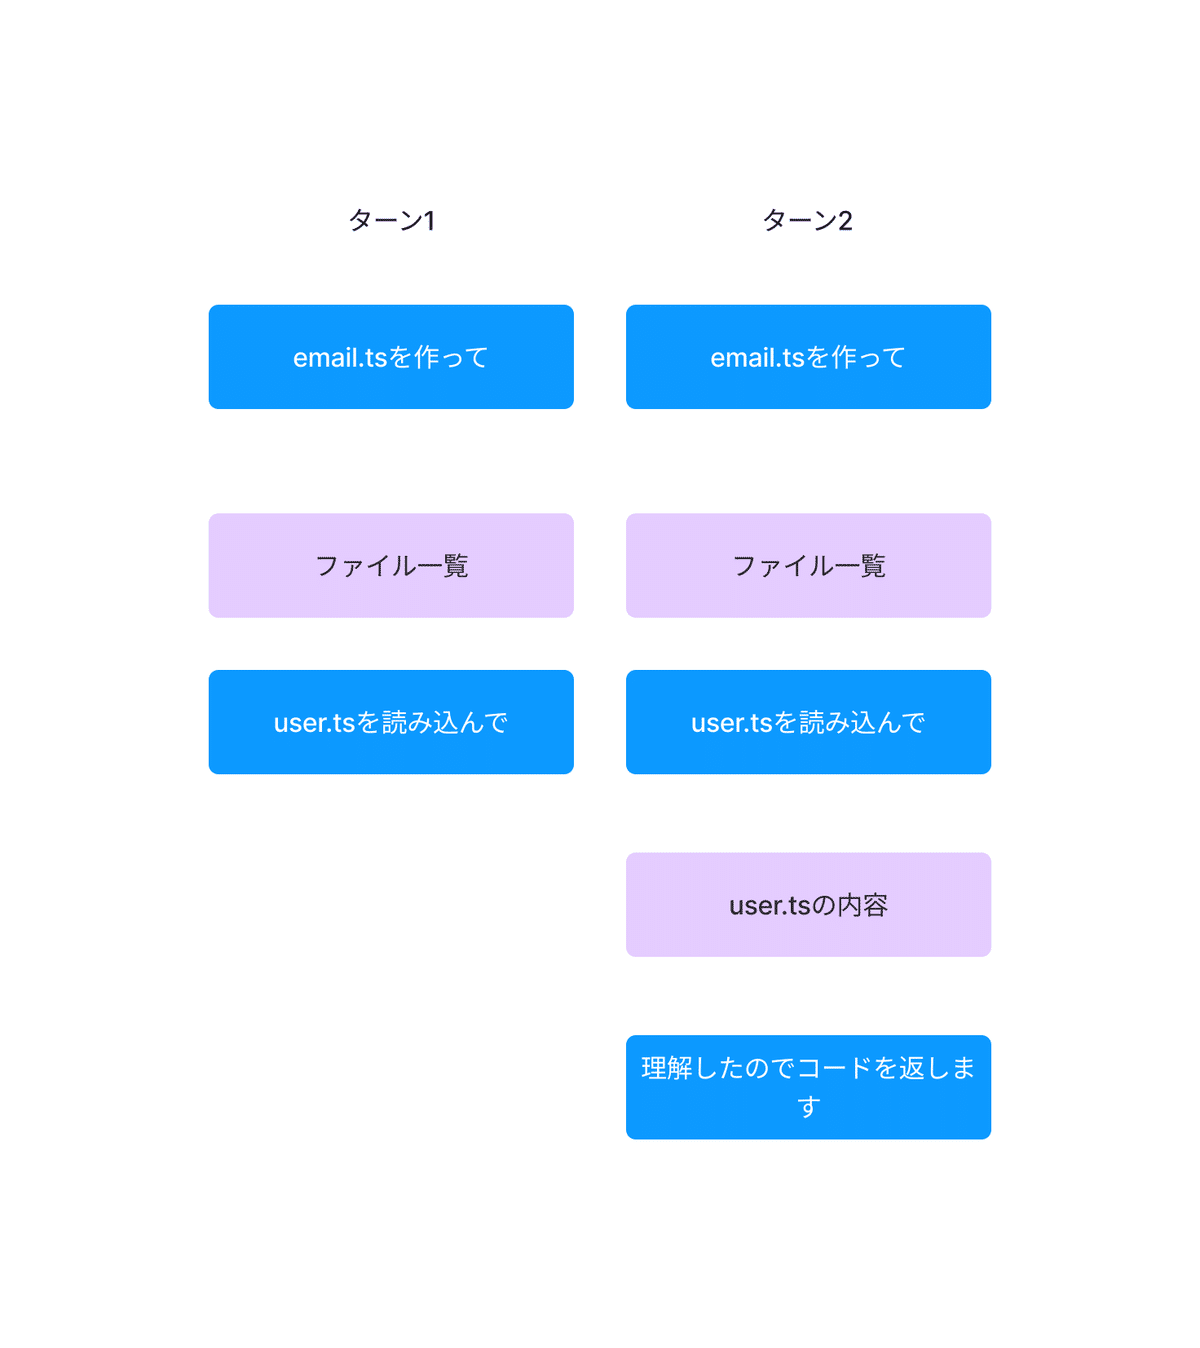
ターン1、ターン2と進んでいきターン数は非常に大きくなります
おまけ
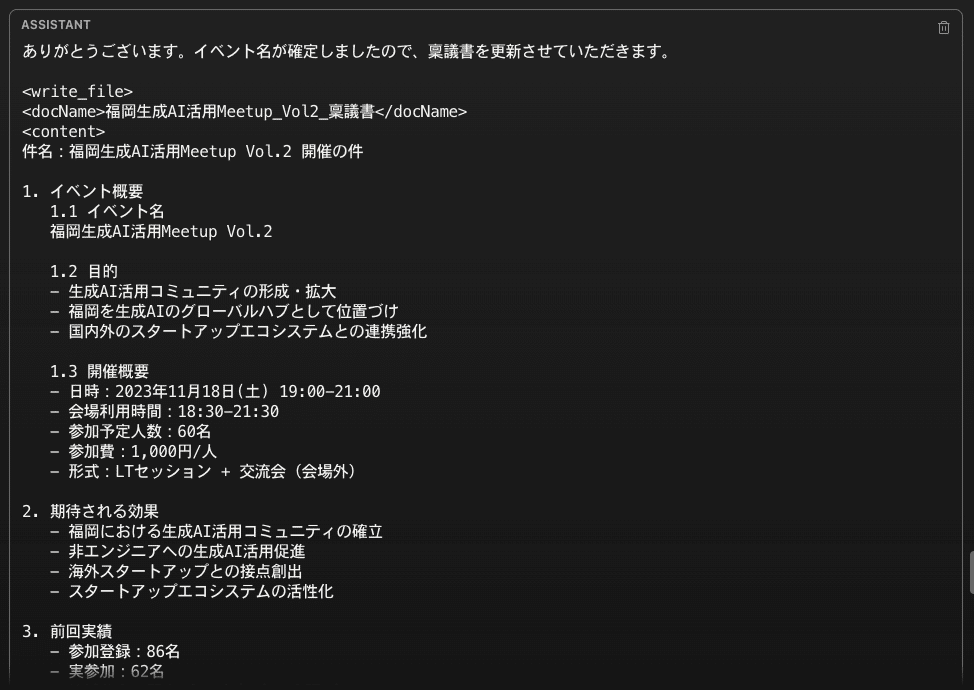
AIエージェントがここまで自律的に動くことが衝撃的だったので、有能な秘書のモックを作ってみました。
ToolsIUseで、下記を定義します。
## Load Standard Operating Procedure
<read_file>
<docName>イベント受付マニュアル</docName>
</read_file>

## Save Standard Operating Procedure
<write_file>
<docName>イベント受付マニュアル</docName>
<content>マニュアルの内容</content>
</write_file>
AIの結果、擬似的なユーザの結果を渡しながらConsoleで検証すると
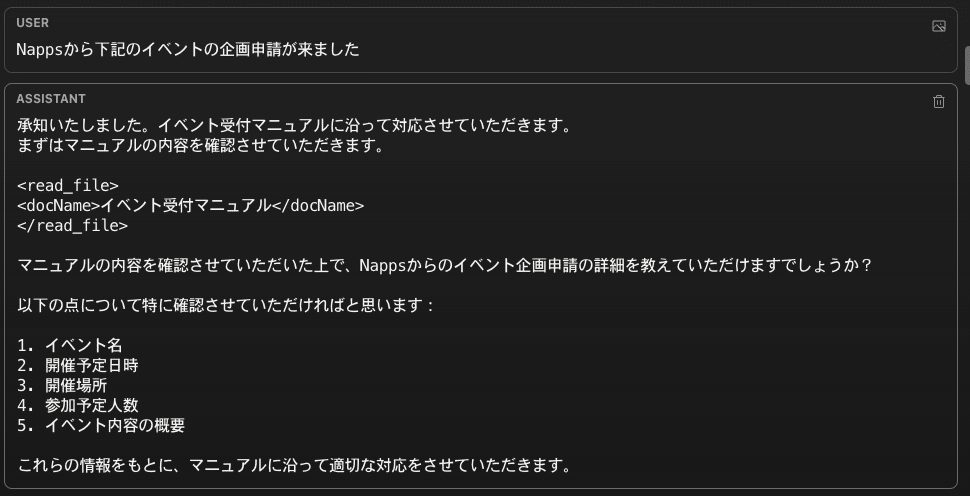
マニュアルがないことを返すと

マニュアルの作成を始めました
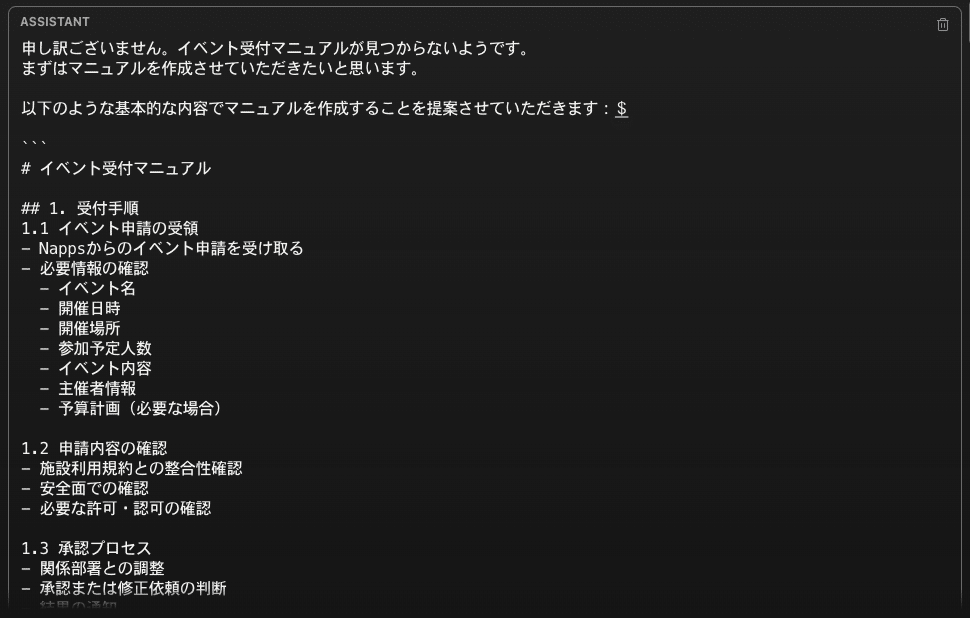
Yesと返すと

稟議書のライティングを開始してくれました👏
