プリコネクラン運営してるところのDiscord Botすごくね?ワイも作りたい。
いろんなところのクランのDiscord鯖にお邪魔させてもらったけど、それぞれ便利なBotを沢山活用していてすごいなって思って見てました。
これ、自分もなんか作って遊べないか?って気になったのでちょっと調べてみたので作成までの奮闘記をまとめてみました。
ちなみに当方、プログラム弱者の民だからお手柔らかに頼みます。
1.今回の目標
いきなりクラバトで運用するようなガチな凸管理Botなんてものの作成は無理に決まってるので、簡単なメッセージ送受信ができるBotを考えました。
ということで今回は「!song」というワードを送信した時、Botが「なかよしセンセーション」の歌詞っぽい何かを返してくれるという産業廃棄物を作ろうと思います。
返してくれるのは歌詞っぽい何かなので、歌詞ではありません。
歌詞ではありません。(大事なことなので)
わかりますね?JAS○ACさん
2.そもそもどうやって作るの
いやほんとにどうやって作るの。Discirdのテキストチャットを何らかの方法でバックエンドで動くプログラムに送って、送られてきたメッセージをうまいこと処理して、Discordの鯖に返すイメージでいる。
言うだけなら簡単だけど、やるのはめんどくさそう。
チャットの処理だから非同期通信に長けたNodeとかのほうがいいんだろうけど、環境用意できないから、今回はPHPでやってみることにします。
なんとかなるやろ。先駆者あんまりいなさそうだけど。
#0 まえがき
作りながら書いてるから文章まとまって無いけど許してね。
#1 設計
1.設計書?そんなものは知らん
設計書なんてものは無い。全てはワイの頭の中やで。
とはいえ簡単にアウトプットしておく。
・Laravel 8.0
・PHP 7.4
・OSとかはレンタル鯖だからCentOSのなんか。詳細は知らない。
想定
①「!song」とチャットに打ち込まれた時Laravelコントローラーの適当なメソッドを動かす。(なんか方法あるやろ)
②メソッドでメッセージ処理してLaravelの通知を発火
③なんらかの方法でDiscord鯖が発火をリッスン。
④Botがチャンネルに書き込んでくれる。
雰囲気。完璧。
2.DB設計
「なかよしセンセーション」の歌詞を返すだけならDBを持つ必要は無いんだけど、例えばあとで「青春スピナー」も返してほしい気分になった時困るから、一応歌詞を保存するDBは持とうかな。
あ、歌詞じゃない。歌詞っぽい何かね。間違えないように。
ということでざっくり必要そうなのを考える
レンタル鯖だから詳細しらんけど、MySql5.7あたり。

idが数値なのはLaravelのデフォだから許してね。変更できるけどデフォで。
となると、コマンドの仕様も変えないと都合悪くなりそう。
例えば「!song 1」とかかな?IDを指定して、コマンドを叩いた時に対象のレコードを引っ張って来て返却とかが良さそう。
え?”1”がどの歌に対応しているかわからない?気合で覚えろなの
#2 製造
1.まずはDiscord側の準備
プリコネで連携クランに入るまで、ほぼDiscord使ったことがなかったので手探り。
①とりあえずDiscordのBotを動かす自分のテスト鯖を立てます。
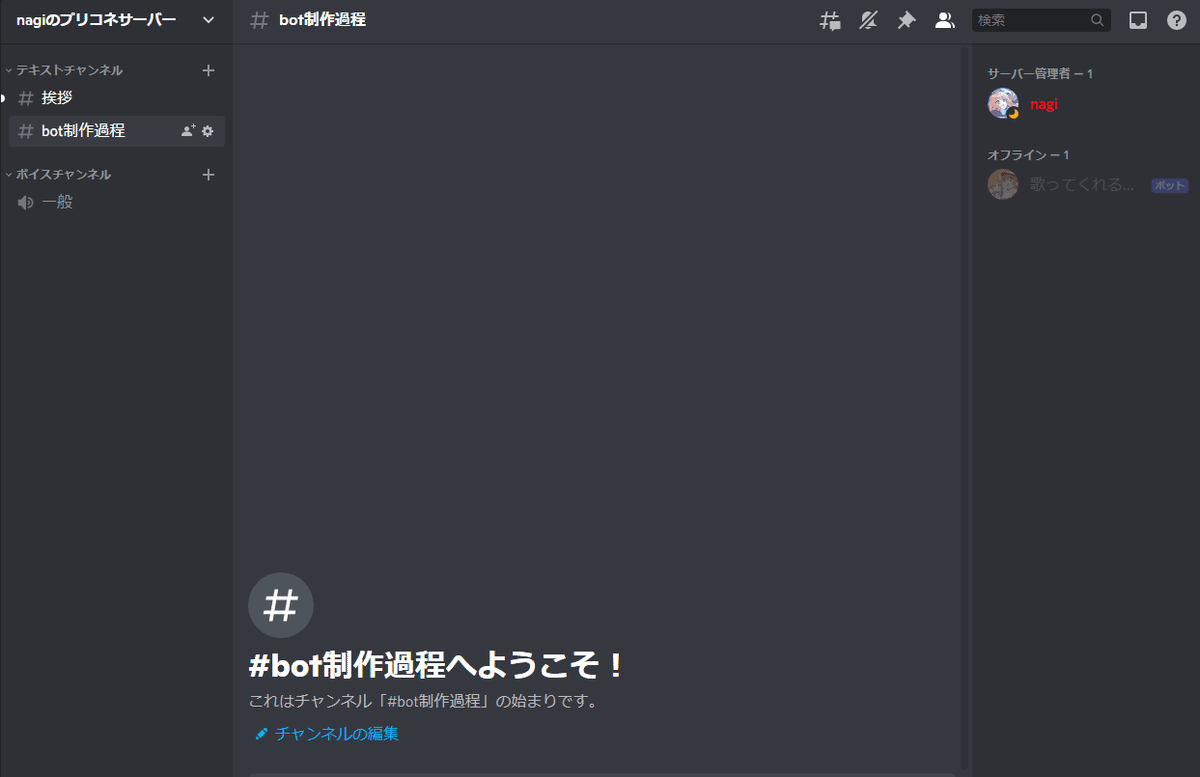
…立てました。適当にチャンネルも作ってこんな感じ

②Discord DeveloperPortal にアクセスしてアプリ登録?みたいなのをします。NameってなんのNameなのかわからなかったけど、多分Botの名前だと思うから適当に名前をつけとく。
※追記 後で見返したらどっちかというとプロジェクト名的なやつだった。


で、Botってリンクあったからこの中のAdd Botボタンを押してみる

YES! do it!
どうやら作成が完了したらしいので、アイコンだけ設定しました。

ほかは一旦何も触らず、Botの招待URLの発行を行う。
左の「OAuth2」→「URL Generator」でBotにチェックを入れると下にURLが出てきたので、それを入力。

で、URLにアクセス。

右側にBotが表示された。
多分このままだとチャンネルへの書き込み権限とか無いから無意味なBotになってるので、権限など再調整が必要。
とりあえず下準備しただけ。意外と簡単。
③さっき放置した権限を作り直す。
先程権限を何も与えてなかったので、付け直し。

てことで再度招待。これでおそらく権限系は大丈夫。
2.Laravelアプリケーションの作成
いよいよ持ってめんどくさそうなところ。
とりあえずアプリ作成から。Laravelのプロジェクト起こしとか、前提準備は端折ります。普通にcomposerコマンドでプロジェクト起こします。

Gitの設定とか諸々済ませる。PC変えてた都合でGitHubに登録してたSSHキーとか紛失してて草。そこらへんのトラブルは今回本題じゃないのですっ飛ばします。
コントローラを作成
<?php

namespace App\Http\Controllers;

use App\Models\Songs;
use Illuminate\Http\Request;

class SongBotNotificationController extends Controller
{
    /**
     * Display a listing of the resource.
     *
     * @return \Illuminate\Http\Response
     */
    public function index()
    {
        //
    }

    /**
     * Show the form for creating a new resource.
     *
     * @return \Illuminate\Http\Response
     */
    public function create()
    {
        //
    }

    /**
     * Store a newly created resource in storage.
     *
     * @param  \Illuminate\Http\Request  $request
     * @return \Illuminate\Http\Response
     */
    public function store(Request $request)
    {
        //
    }

    /**
     * Display the specified resource.
     *
     * @param  \App\Models\Songs  $songs
     * @return \Illuminate\Http\Response
     */
    public function show(Songs $songs)
    {
        //
    }

    /**
     * Show the form for editing the specified resource.
     *
     * @param  \App\Models\Songs  $songs
     * @return \Illuminate\Http\Response
     */
    public function edit(Songs $songs)
    {
        //
    }

    /**
     * Update the specified resource in storage.
     *
     * @param  \Illuminate\Http\Request  $request
     * @param  \App\Models\Songs  $songs
     * @return \Illuminate\Http\Response
     */
    public function update(Request $request, Songs $songs)
    {
        //
    }

    /**
     * Remove the specified resource from storage.
     *
     * @param  \App\Models\Songs  $songs
     * @return \Illuminate\Http\Response
     */
    public function destroy(Songs $songs)
    {
        //
    }
}
Resourcesでコントローラーを作成。Laravel作るの5億年ぶりだから命名規則とか全部忘れたので、名前は適当。
※追記:モデル名がSongsになってるが、後に間違いだと気づいてSongに変更
routes/api.phpに適当なエンドポイントを設定。
※データ呼び出しだけだからapiって考えたけど、クロスサイトあーだこーだの対策がデフォで有効になってるからそこらへんの設定外す方法をこの時考えてなかった。
<?php

use Illuminate\Http\Request;
use Illuminate\Support\Facades\Route;

use App\Http\Controllers\SongBotNotificationController;
/*
|--------------------------------------------------------------------------
| API Routes
|--------------------------------------------------------------------------
|
| Here is where you can register API routes for your application. These
| routes are loaded by the RouteServiceProvider within a group which
| is assigned the "api" middleware group. Enjoy building your API!
|
*/
Route::get('/song', [SongBotNotificationController::class, 'index']);
んで、Controllerのindexメソッドをちょいと改変
    /**
     * Display a listing of the resource.
     *
     * @return \Illuminate\Http\Response
     */
    public function index(Request $request)
    {
       return $request
    }
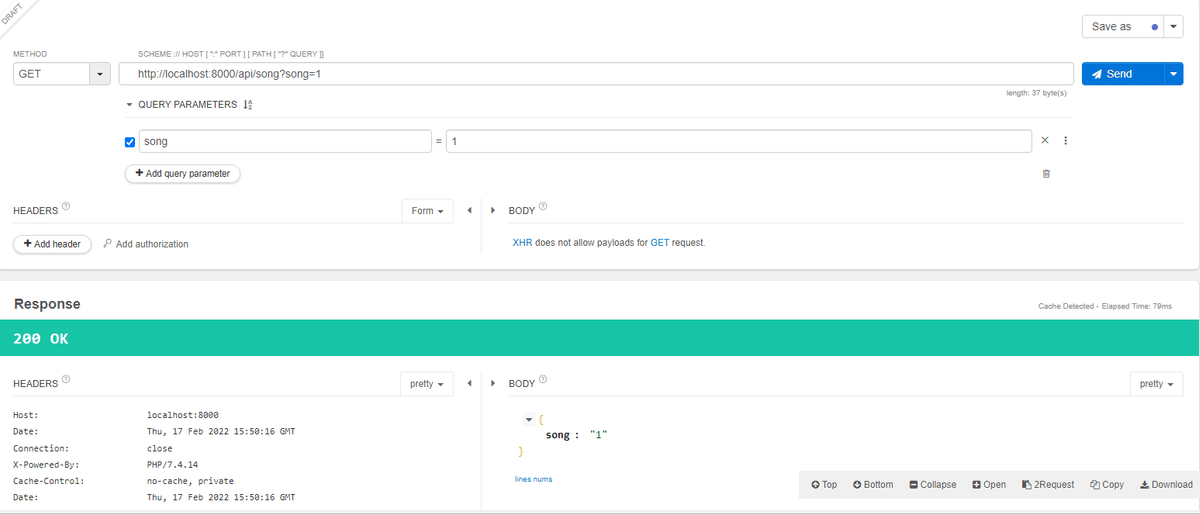
↑ただのAPIの疎通の確認のため。要求したリクエストがそのまま帰ってくるだけ。
APITesterで問題ないか確認

んで、APIはOK。
次はDBの下準備をしようと思う。
適当にローカル環境にスキーマをつくります。

テーブルはLaravelのMigrationで作りますか。
ということで先にLaravelのdatabase.phpとかapp.phpとか.envとか諸々設定しちゃいます。(端折ります。Gitでも覗いて見て)

疎通確認。Usersとかいらないけど、デフォでmigrate。いっつもここらへん失敗してDB作成失敗するから一発で行けてよかった。
んで、ほんとにほしいのはSongsテーブルなので、Songsテーブルを作るMigrationファイルを作成。
<?php

use Illuminate\Database\Migrations\Migration;
use Illuminate\Database\Schema\Blueprint;
use Illuminate\Support\Facades\Schema;

class CreateSongsTable extends Migration
{
    /**
     * Run the migrations.
     *
     * @return void
     */
    public function up()
    {
        Schema::create('songs', function (Blueprint $table) {
            $table->id()->comment('歌詞っぽい何かキー');
            $table->longText('lyrics')->nullable()->comment('歌詞っぽい何かコンテンツ');
            $table->char('state_fl', 1)->default("0")->comment('状態フラグ');
            $table->timestamps();
        });
    }

    /**
     * Reverse the migrations.
     *
     * @return void
     */
    public function down()
    {
        Schema::dropIfExists('songs');
    }
}
で、migrate!

テーブルが作成されました。
今回は仮データもLaravel上で作ってしまおう。seed機能を使います
<?php

namespace Database\Seeders;

use Illuminate\Database\Seeder;

class DatabaseSeeder extends Seeder
{
    /**
     * Seed the application's database.
     *
     * @return void
     */
    public function run()
    {
        $this->call([
            SongSeeder::class,
        ]);
    }
}
seedファイルの中身も作成
<?php

namespace Database\Seeders;

use Illuminate\Database\Seeder;
use Illuminate\Support\Facades\DB;

class SongSeeder extends Seeder
{
    /**
     * Run the database seeds.
     *
     * @return void
     */
    public function run()
    {
        DB::table('songs')->insert([
            'lyrics' => "歌詞的ななんか",
            'state_fl' => "0",
        ]);
    }
}
php artisan db:seed
で、データベースを見てみる
select * from songs
created_at とupdated_atってseedだとNullなのか。タイムスタンプ入ると思ってた。seedファイル修正しておく
<?php

namespace Database\Seeders;

use Illuminate\Database\Seeder;
use Illuminate\Support\Facades\DB;
use DateTime;

class SongSeeder extends Seeder
{
    /**
     * Run the database seeds.
     *
     * @return void
     */
    public function run()
    {
        DB::table('songs')->insert([
            'lyrics' => "歌詞的ななんか",
            'state_fl' => "0",
            'created_at' => new DateTime(),
            'updated_at' => new DateTime(),
        ]);
    }
}
でdb:seed

これでOK。とりあえずDB準備は終わった。
次はmodelを作成してみる。
Songsテーブルに対するモデルなので、モデル名称は「Song」となります。Laravelってこの辺の命名規則気にしないと動かない事あるのがアレ
<?php

namespace App\Models;

use Illuminate\Database\Eloquent\Factories\HasFactory;
use Illuminate\Database\Eloquent\Model;

class Song extends Model
{
    use HasFactory;
}
今回DBはLaravelのデフォルト準拠で作成し、他に必要な設定はないのでSongモデルはこれ以上なにもしません。
次にDiscordに通知を送るための準備をします。
これ使います。とりあえずドキュメント通りすすめて、

セットアップまで完了。トークン認証が行われるとBotもオンラインに変わりました。

次に通知クラスを作成
<?php

namespace App\Notifications;

use Illuminate\Bus\Queueable;
use Illuminate\Contracts\Queue\ShouldQueue;
use Illuminate\Notifications\Messages\MailMessage;
use Illuminate\Notifications\Notification;

class LyricsNotification extends Notification
{
    use Queueable;

    /**
     * Create a new notification instance.
     *
     * @return void
     */
    public function __construct()
    {
        //
    }

    /**
     * Get the notification's delivery channels.
     *
     * @param  mixed  $notifiable
     * @return array
     */
    public function via($notifiable)
    {
        return ['mail'];
    }

    /**
     * Get the mail representation of the notification.
     *
     * @param  mixed  $notifiable
     * @return \Illuminate\Notifications\Messages\MailMessage
     */
    public function toMail($notifiable)
    {
        return (new MailMessage)
                    ->line('The introduction to the notification.')
                    ->action('Notification Action', url('/'))
                    ->line('Thank you for using our application!');
    }

    /**
     * Get the array representation of the notification.
     *
     * @param  mixed  $notifiable
     * @return array
     */
    public function toArray($notifiable)
    {
        return [
            //
        ];
    }
}
これを改変して
<?php

namespace App\Notifications;

use Illuminate\Bus\Queueable;
use Illuminate\Contracts\Queue\ShouldQueue;
use Illuminate\Notifications\Notification;
use NotificationChannels\Discord\DiscordChannel;
use NotificationChannels\Discord\DiscordMessage;
use App\Models\Song;

class LyricsNotification extends Notification
{
    use Queueable;

    private $song_id;
    /**
     * Create a new notification instance.
     *
     * @return void
     */
    public function __construct($song_id)
    {
        $this->song_id = $song_id;
    }

    /**
     * Get the notification's delivery channels.
     *
     * @param  mixed  $notifiable
     * @return array
     */
    public function via($notifiable)
    {
        return [DiscordChannel::class];
    }

    public function toDiscord($notifiable)
    {
        return DiscordMessage::create($this->getLyrics());
    }

    private function getLyrics() {
        $data = Song::find($this->song_id);
        return $data->lyrics;
    }
}
こんな感じに。song_idというキーをコンストラクタで受け取ったら、Songテーブルから該当データをとってきて返却という形にする。
で、今回は特定のチャンネルにだけメッセージを送信したいので、チャンネルIDを格納しておくテーブルを作成。
<?php

namespace App\Models;

use Illuminate\Database\Eloquent\Factories\HasFactory;
use Illuminate\Database\Eloquent\Model;
use Illuminate\Notifications\Notifiable;

class Channel extends Model
{
    use HasFactory,Notifiable;

    public function routeNotificationForDiscord()
    {
        return $this->channel_id;
    }
}
チャンネル管理するときはrouteNotificationForDiscord()を実装しないと行けないらしい。言われるがままメソッド実装。channel_idはチャンネルIDを格納しているカラム名。
Controllerのindexメソッドも変更
    /**
     * Display a listing of the resource.
     *
     * @return \Illuminate\Http\Response
     */
    public function index(Request $request)
    {
        $song_id = $request->query('song');
        $chanel = Channel::findOrFail(1);
        $chanel->notify(new LyricsNotification($song_id));
    }
今は自分しか使うき無いので、Channel::findOrFail(1)とハードコーディング。
チャンネル管理DBからデータをとってきて、notifyで通知を発行。
ここまでできたらもう通知の最低限のことはできているはず。
APIを叩いてみる。

HTTPステータス200!そしてDiscordは…

しゃべったーーーーーーーーー!!!!!!!!
あとはDBに歌詞っぽいなにかを格納しておけば・・・・!!完成!?
#3 ちょっとまてバカ
これ、作りたかったものと全然違うな?
確かに、Botが喋ってくれる状態にはなったけど、やりたかったことは、APIを叩いたらなんて特定条件ではない。
テキストチャットを読み取って実行がやりたかった。
つまり今のままではくダメダメな状態である。
とはいえ発信まではできたので、あとは何らかの方法でテキストを読み取ればいいわけだ。
別の手法を模索してみた。
#4 DiscordPHPを使ってみる
チャンネルのメッセージ読み取りはDiscordPHPを使ったら楽らしい。
ドキュメントではLaravelとの組み合わせなんて書いてないので、適当に考える。
要するにcomposer で入れたDiscordPHPを$discord->run()みたいなコマンドラインで実行できれば、Laravelでも使えるんでしょ
で、コマンドラインでの実行は流石にエンドポイントでやるわけにはいかないので、artisanコマンドを作ります
<?php

namespace App\Console\Commands;

use Illuminate\Console\Command;

use Discord\Discord;
use Discord\Parts\Channel\Message;
use Psr\Http\Message\ResponseInterface;
use React\Http\Browser;
use App\Http\Controllers\SongBotNotificationController;

class ReadyDiscord extends Command
{
    /**
     * The name and signature of the console command.
     *
     * @var string
     */
    protected $signature = 'discord:ready';

    /**
     * The console command description.
     *
     * @var string
     */
    protected $description = 'ディスコードBotを起動します';

    /**
     * Create a new command instance.
     *
     * @return void
     */
    public function __construct()
    {
        parent::__construct();
    }

    /**
     * Execute the console command.
     *
     * @return int
     */
    public function handle()
    {
        $discord = new Discord([
            'token' => env('DISCORD_API_TOKEN'),
        ]);
        $discord->on('ready', function ($discord) {
            echo "Bot is ready!";
            $discord->on('message', function ($message, $discord) {
                if ($message->author->bot) return;
                SongBotNotificationController::receiveMessage($message);
            });
        });
        $discord->run();
        return 0;
    }
}
最初 if ($message->author->bot) return;を入れ忘れてて、Botで反応したチャットにBotが反応して無限ループした。忘れずに入れよう。
で、SongBotNotificationControllerに新しくreceiveMessageメソッドを作ります。絶対コントローラーの使い方違うと思うけどええんや。
    /**
     * Display a listing of the resource.
     *
     * @return \Illuminate\Http\Response
     */
    public function receiveMessage(Message $message)
    {
        $content = $message->content;
        $song_id = "0";
        if(substr($content, 0, 6) === "!song "){
            $song_id = substr($content, 6);
            $chanel = Channel::findOrFail(1);
            $chanel->notify(new LyricsNotification($song_id));
        };
    }
ここで!songのチャットがアレばその後ろの文字をSongIDであるとしました。あとは前半で作った通知メソッドをそのまま使用。
早速作ったBotの起動コマンドを叩いてみる

なんか動き出した。
早速チャットを打ち込んで見る。

こんにちはという文字は!songコマンドではないので、もちろんBotは何も反応しない

次にコマンドを打ってみる

すると・・・・

きーーーーーーーーたああああああああああああああ!
できました。
ということで、あとはこのLaravelアプリを外サーバーに置いて、DBの中身さえ揃えれば行ける!!!!
っとその前に。このままだとチャットで改行をして表示してくれないので、embed(Botからだけできるリッチな埋め込みテキスト機能?)を利用して改行できるようにしておく。
    /**
     * Get the notification's delivery channels.
     *
     * @param  mixed  $notifiable
     * @return array
     */
    public function via($notifiable)
    {
        return [DiscordChannel::class];
    }

    public function toDiscord($notifiable)
    {
        $lyrics_arr = $this->getLyrics();
        $lyrics = "";
        foreach ($lyrics_arr as $index => $lyric)
        {
            if ($index === array_key_last($lyrics_arr)) {
                $lyrics = $lyrics.$lyric;
            } else {
                $lyrics = $lyrics.$lyric."\n";
            }
        }
        return DiscordMessage::create("\n",
        ["description"=> $lyrics]);
    }

    private function getLyrics() {
        $data = Song::find($this->song_id);
        $lyrics_arr = [];
        if(isset($data))
        {
            return explode('\n',$data->lyrics);
        }
        return ["そんな歌ないよ"];
    }
ロジック雑いのは許してね。。ということでこれで、完成。あとはデプロイとかしてみる。
本筋じゃないので省く。
これにて完成しました。

#5 感想
discordのボット作成の記事を色々みたけど、どれもDiscord.jsがかなり主流ぽかった。
PHP+Laravel+Notifiction+DiscordPHPみたいなことやってる先駆者全然いなくてワロタ ワロタ・・・
今度はボタンの出力とか、リアクションボタンでの反応とかもやってみたい。
見てくださりありがとうございました。
クラバト頑張るぞー。
