
laravel11のqueueとjob (1) 基礎編

この説明見てもあんまわからんよなって話。
基本的にやはりwebから操作しないと掴み辛い人が多いだろうから前に書いたCrud Generatorで適当に作ったPost のCRUDを元に解説してみる。
【事前準備】 Post CRUDの作成
何でもいいけどサクっとCRUDが欲しいのでこれを使った
artisan make:migration create_posts_tableここで定義を以下のようにする。statusに
pending
processing
completed
error
など適当なものをenumで詰めた
Schema::create('posts', function (Blueprint $table) {
    $table->id();
    $table->string('title');
    $table->text('content');
    $table->enum('status', ['pending', 'processing', 'completed', 'error'])->default('pending');
    $table->timestamps();
});
ibex/crud-generator パッケージを入れて
composer require ibex/crud-generator --devmigrationして
artisan migrate:fresh --seedmake:crud。引数にtailwindを付けている
artisan make:crud posts tailwindもっかいrun build
npm run buildrouteを追加
<?php

use App\Http\Controllers\ProfileController;
use App\Http\Controllers\PostController;
use Illuminate\Support\Facades\Route;

Route::get('/', function () {
    return view('welcome');
});

Route::get('/dashboard', function () {
    return view('dashboard');
})->middleware(['auth', 'verified'])->name('dashboard');

Route::middleware('auth')->group(function () {
    Route::get('/profile', [ProfileController::class, 'edit'])->name('profile.edit');
    Route::patch('/profile', [ProfileController::class, 'update'])->name('profile.update');
    Route::delete('/profile', [ProfileController::class, 'destroy'])->name('profile.destroy');
    Route::resource('posts', PostController::class);
});

require __DIR__.'/auth.php';
そうすると
とかなるから、Statusを削除する
    {{--
    <div>
        <x-input-label for="status" :value="__('Status')"/>
        <x-text-input id="status" name="status" type="text" class="mt-1 block w-full" :value="old('status', $post?->status)" autocomplete="status" placeholder="Status"/>
        <x-input-error class="mt-2" :messages="$errors->get('status')"/>
    </div>
    --}}

    <div class="flex items-center gap-4">
        <x-primary-button>Submit</x-primary-button>
    </div>
</div>
リクエストからもrequiredとか削除 app/Http/Requests/PostRequest.php
    public function rules(): array
    {
        return [
            'title' => 'required|string',
            'content' => 'required|string',
            // 'status' => 'required',
        ];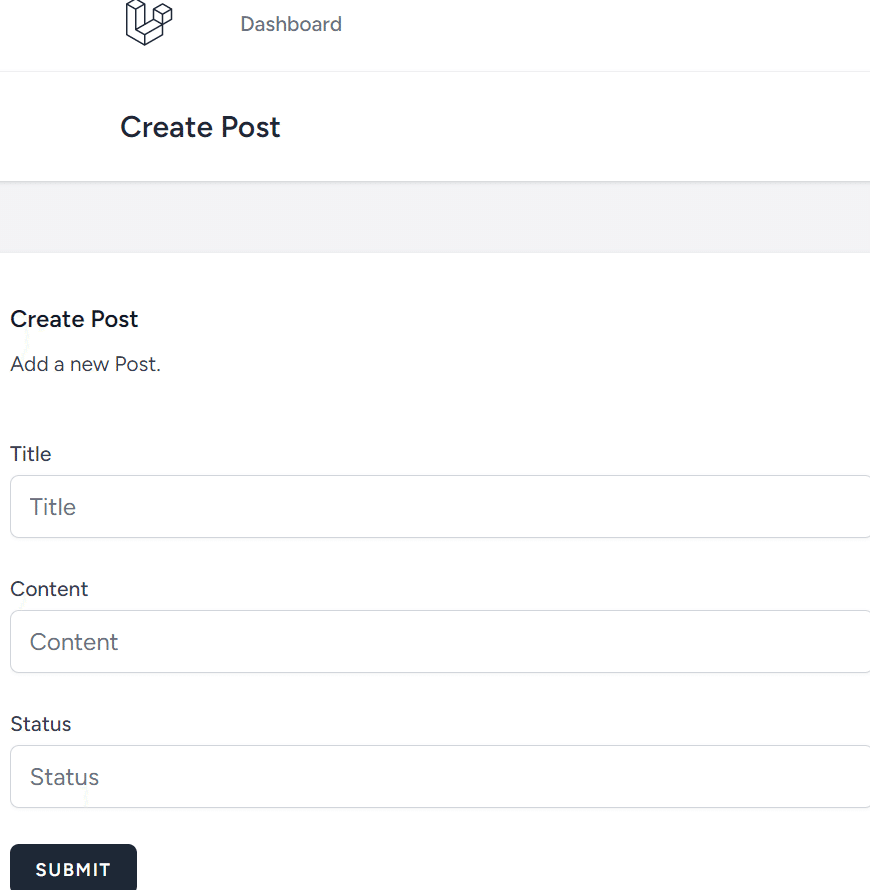
}まあ他の機能はさておいて、こんな感じで何も考えずに作成した場合、defaultで指定したpending になっていればよい

シナリオ: AI解析ボタンを押したら長い事時間がかかって最終的に解析完了になる。
AI解析ボタンの設置
resources/views/post/index.blade.php
@csrf
@method('DELETE')
<a href="{{ route('posts.destroy', $post->id) }}" class="text-red-600 font-bold hover:text-red-900" onclick="event.preventDefault(); confirm('Are you sure to delete?') ? this.closest('form').submit() : false;">{{ __('Delete') }}</a>

<!-- 解析ボタン -->
<a href="{{ route('posts.analyze', $post->id) }}" class="text-blue-600 font-bold hover:text-blue-900 mr-2">{{ __('Analyze') }}</a>
どこでもいいけどdeleteの下に配置した
routes/web.php
Route::get('/posts/{post}/analyze', [PostController::class, 'analyze'])->name('posts.analyze');とかしておくと、とりあえず解析ボタンが出るだろう
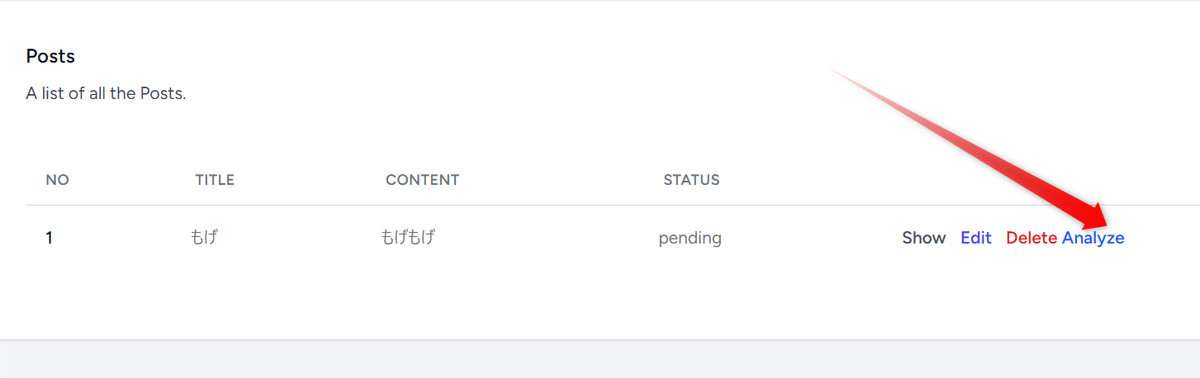
ここで実際に解析は行わないんだけれども、このボタンを押すと数秒かかるという処理である事が想像できると思う。このような場合、controllerでがっつり掴んでしまうと処理が終わるまでこのリンクを押したあと戻ってこられなくなるので、とりあえずqueueのjobをぶん投げて後で処理するという方法がある。この時に本稿の主題である「laravel11のqueueとjob」が生きてくる。
とりあえずcontrollerのアクションを作成し、アクションの中でstatusを変更する
今
[PostController::class, 'analyze']を指定したのでanalyeアクションを作成する
    public function analyze(Post $post): RedirectResponse
    {
        dd($post);
    }
さて、この段階でPostに処理していくわけだが、要するにこうなって欲しいわけ。これでボタンを押すと5秒まってstatusがcompletedになるはずだ
jobを作る
で、この「5秒待つ」がクライアントのブラウザ的にしんどいので、これをbackgroundに送る
jobはartisanコマンドで作る。この辺のコマンドはちょっとマニアックになってくるので使った事ない人も出てくるかも。
php artisan make:job ProcessPostJobそうすると app/Jobs/ProcessPostJob.php ってのが出来る。中身はこんな感じ
<?php

namespace App\Jobs;

use Illuminate\Bus\Queueable;
use Illuminate\Contracts\Queue\ShouldQueue;
use Illuminate\Foundation\Bus\Dispatchable;
use Illuminate\Queue\InteractsWithQueue;
use Illuminate\Queue\SerializesModels;

class ProcessPostJob implements ShouldQueue
{
    use Dispatchable, InteractsWithQueue, Queueable, SerializesModels;

    /**
     * Create a new job instance.
     */
    public function __construct()
    {
        //
    }

    /**
     * Execute the job.
     */
    public function handle(): void
    {
        //
    }
}
で、呼び出し側はanalyzeから行うわけだがまあ書いてみよう 。
use App\Jobs\ProcessPostJob;

class PostController extends Controller
// <snip>
   public function analyze(Post $post): RedirectResponse
    {
        ProcessPostJob::dispatch($post);
        // sleep(5);
        // $post->update(['status' => 'completed']);

        return Redirect::route('posts.index')
            ->with('success', 'Post analyzed successfully.');
    }                                                                                                           // $post->update(['status' => 'completed']);                                                                                                                                                                                                    return Redirect::route('posts.index')                                                                                       ->with('success', 'Post analyzed successfully.');                                                               }
とまあこんな感じに ProcessPostJob::dispatch($post); に丸投げするというイメージになる
jobを書く
まずコンストラクタで受けてみる
use App\Models\Post;

class ProcessPostJob implements ShouldQueue
{                                                                                                                           use Dispatchable, InteractsWithQueue, Queueable, SerializesModels;
// <snip>
    public function __construct(Post $post)
    {
        dd($post);
    }
ここでddできたなら、自身のpropertyに格納し
class ProcessPostJob implements ShouldQueue
{                                                                                                                           use Dispatchable, InteractsWithQueue, Queueable, SerializesModels;
                                                                                                                            protected $post;                                                                                                                                                                                                                                /**
     * Create a new job instance.
     */
    public function __construct(Post $post)
    {
        $this->post = $post;                                                                                                }                                                                                                                                                                                                                                               /**
     * Execute the job.
     */
    public function handle(): void
    {
        dump($this->post);
}こっちはdd()ではなくdump()を使っているが、さて、ここでalanlyzeボタンを押してもdump()されないですぐ終わってしまう。これはjobが文字通りdispatchされただけになっているからだ。
設定の確認
ここで.envを見る。defaultでやっていると過程するとこのような設定になっているんじゃないかな?
QUEUE_CONNECTION=databaseこのようになっているときに、この謎のmigrationが効いてくる
database/migrations/0001_01_01_000002_create_jobs_table.php
これを参考にjobsテーブルをmysqlでみてみると
mysql> select * from jobs\G
*************************** 1. row ***************************
          id: 1
       queue: default
     payload: {"uuid":"e7fcaf27-4de4-499e-960c-1a0c35da41ae","displayName":"App\\Jobs\\ProcessPostJob","job":"Illuminate\\Queue\\CallQueuedHandler@call","maxTries":null,"maxExceptions":null,"failOnTimeout":false,"backoff":null,"timeout":null,"retryUntil":null,"data":{"commandName":"App\\Jobs\\ProcessPostJob","command":"O:23:\"App\\Jobs\\ProcessPostJob\":1:{s:7:\"\u0000*\u0000post\";O:45:\"Illuminate\\Contracts\\Database\\ModelIdentifier\":5:{s:5:\"class\";s:15:\"App\\Models\\Post\";s:2:\"id\";i:1;s:9:\"relations\";a:0:{}s:10:\"connection\";s:5:\"mysql\";s:15:\"collectionClass\";N;}}"}}
    attempts: 0
 reserved_at: NULL
available_at: 1729557416
  created_at: 1729557416
このようにjobが確認されているのがわかる。これを実行するには以下のようにする
% ./vendor/bin/sail artisan queue:work

   INFO  Processing jobs from the [default] queue.

  2024-10-22 00:47:50 App\Jobs\ProcessPostJob ................................................................ RUNNING
App\Models\Post^ {#1755
  #connection: "mysql"
  #table: "posts"
  #primaryKey: "id"
  #keyType: "int"
  +incrementing: true
  #with: []
  #withCount: []
  +preventsLazyLoading: false
  #perPage: 20
  +exists: true
  +wasRecentlyCreated: false
  #escapeWhenCastingToString: false
  #attributes: array:6 [
    "id" => 1
    "title" => "もげ"
    "content" => "もげもげ"
    "status" => "completed"
    "created_at" => "2024-10-21 07:14:06"
    "updated_at" => "2024-10-22 00:08:36"
  ]
  #original: array:6 [
    "id" => 1
    "title" => "もげ"
    "content" => "もげもげ"
    "status" => "completed"
    "created_at" => "2024-10-21 07:14:06"
    "updated_at" => "2024-10-22 00:08:36"
  ]
  #changes: []
  #casts: []
  #classCastCache: []
  #attributeCastCache: []
  #dateFormat: null
  #appends: []
  #dispatchesEvents: []
  #observables: []
  #relations: []
  #touches: []
  +timestamps: true
  +usesUniqueIds: false
  #hidden: []
  #visible: []
  #fillable: array:3 [
    0 => "title"
    1 => "content"
    2 => "status"
  ]
  #guarded: array:1 [
    0 => "*"
  ]
} // app/Jobs/ProcessPostJob.php:31とまあこんな感じでdump()されるわけだ。
実際にdump()しても意味がないのでなんとなくの処理を書く
public function handle(): void
{
echo "Processing... \n";
$this->post->status = 'processing';
$this->post->save();
sleep(5);
echo "Completed... \n";
$this->post->status = 'completed';
$this->post->save();
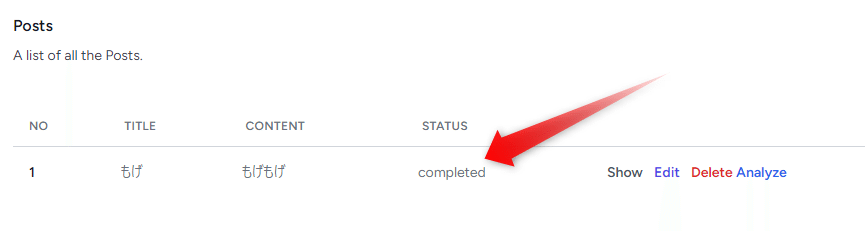
}2つくらいanalyzeをつっこんでqueue workしてみると
% ./vendor/bin/sail artisan queue:work

   INFO  Processing jobs from the [default] queue.

  2024-10-22 01:37:59 App\Jobs\ProcessPostJob ................................................................ RUNNING
Processing...
Completed...
  2024-10-22 01:38:04 App\Jobs\ProcessPostJob ................................................................ 5秒 DONE
  2024-10-22 01:38:04 App\Jobs\ProcessPostJob ................................................................ RUNNING
Processing...
Completed...
  2024-10-22 01:38:09 App\Jobs\ProcessPostJob ................................................................ 5秒 DONE
とまあこのようになるわけ。
でまあこれは標準出力にechoしてるので実際の処理はバッチ化されるということでロギングしておくべきだったりとか処理が例外になったときにこのままではきついとかいろいろあるけど、とりあえずこれがQueueとJobの基本というわけだ。
次回
各種エンジンについて見ていこう。