
Private networkのEC2に接続する(SSH JumpHostやSSM)

## EC2インスタンスの作成
resource "aws_instance" "web" {
  # インスタンスタイプ(ARMアーキテクチャのt4g.microを指定)
  instance_type = "t4g.micro"
  # Debian arm
  ami = "ami-078255fea9b2e6223"
  # サブネットID(ap-northeast-1aのパブリックサブネット)
  subnet_id = values(aws_subnet.public_subnet)[0].id
  key_name  = aws_key_pair.deployer.key_name
  #  # パブリックIPを割り当て
  associate_public_ip_address = true
  # デフォルトセキュリティグループを適用
  vpc_security_group_ids = [aws_vpc.main.default_security_group_id]

  tags = {
    Name = "example webfront" # インスタンスの名前タグ
  }
}
こんな感じのものがあって
subnet_id = values(aws_subnet.public_subnet)[0].idここでパブリックサブネットで起動しているものがあるとする。これは適切なIGWへのルートがあれば接続し放題だ。
ここでプライベートサブネットのEc2をもう1つ起動してみよう。
# プライベート EC2 インスタンス
resource "aws_instance" "private_ec2" {
  ami                         = "ami-078255fea9b2e6223" # ARMアーキテクチャの Debian AMI
  instance_type               = "t4g.micro"
  subnet_id                   = values(aws_subnet.private_subnet)[0].id # プライベートサブネットを指定
  key_name                    = aws_key_pair.deployer.key_name
  associate_public_ip_address = false                                   # パブリック IP を割り当てない
  vpc_security_group_ids      = [aws_default_security_group.default.id] # デフォルトのセキュリティグループ

  tags = {
    Name = "Private EC2 Instance"
  }
}
リソースマップでいうとこんな感じ
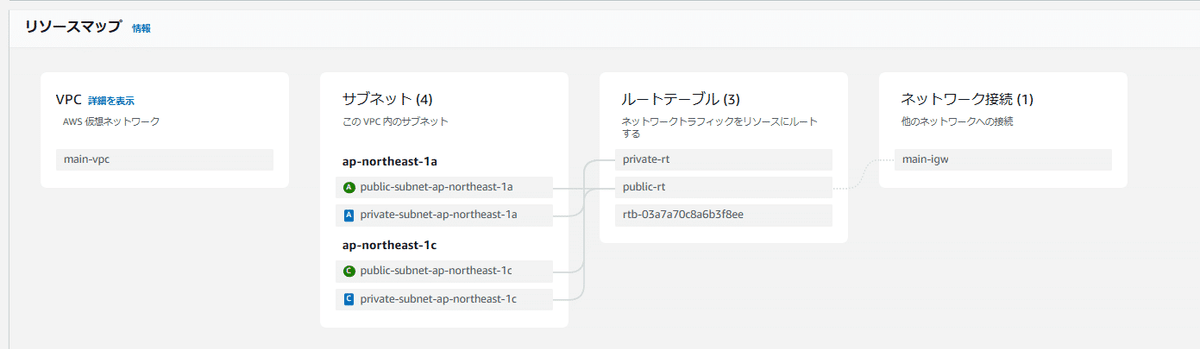
サブネットが2つあるけど1aだけ使ってると思ってください。
つまり、プライベートは、そうすね、自宅の家の中のネットワークみたいな感じね。外から入ってくることはできない。ただ、普通にしている限りサーバーにもなれない。
で、 サブネットに起動されたEC2にsshしたい
手順1: ベタに接続する
ここでパブリックIPのEC2に接続し、プライベートに接続する。ここでパブリックは54.95.6.189であった。プライベートは 10.0.2.139 である
➜  ~ ssh -A admin@54.95.6.189
Linux ip-10-0-0-71 6.1.0-23-cloud-arm64 #1 SMP Debian 6.1.99-1 (2024-07-15) aarch64

The programs included with the Debian GNU/Linux system are free software;
the exact distribution terms for each program are described in the
individual files in /usr/share/doc/*/copyright.

Debian GNU/Linux comes with ABSOLUTELY NO WARRANTY, to the extent
permitted by applicable law.
Last login: Sun Dec 15 21:25:32 2024 from 115.187.79.147
admin@ip-10-0-0-71:~$ ssh admin@10.0.2.139
Linux ip-10-0-2-139 6.1.0-23-cloud-arm64 #1 SMP Debian 6.1.99-1 (2024-07-15) aarch64

The programs included with the Debian GNU/Linux system are free software;
the exact distribution terms for each program are described in the
individual files in /usr/share/doc/*/copyright.

Debian GNU/Linux comes with ABSOLUTELY NO WARRANTY, to the extent
permitted by applicable law.
Last login: Sun Dec 15 21:25:34 2024 from 10.0.0.71
ここで、エージェント転送を行っている。エージェント転送とかいちいち解説しないけど、sshを2つ経由する場合は大抵必要になるので割と必須知識かも。いずれにせよ。ベタな方法はPublic HostAに接続し、Private HostBに接続する方法だろう。
SSHジャンプホスト(ProxyJump)で接続
ssh -J admin@54.95.6.189 admin@10.0.2.139みたいな
➜  ~ ssh -J admin@54.95.6.189 admin@10.0.2.139
Linux ip-10-0-2-139 6.1.0-23-cloud-arm64 #1 SMP Debian 6.1.99-1 (2024-07-15) aarch64

The programs included with the Debian GNU/Linux system are free software;
the exact distribution terms for each program are described in the
individual files in /usr/share/doc/*/copyright.

Debian GNU/Linux comes with ABSOLUTELY NO WARRANTY, to the extent
permitted by applicable law.
Last login: Sun Dec 15 21:27:45 2024 from 10.0.0.71
admin@ip-10-0-2-139:~$
まあ単純にコマンドを2度打つ手間が省けるかもくらいなので実際に使用感はパブリックにいちいちsshするのとそんな変わらない。ただ
scp -J admin@54.95.6.189 localfile admin@10.0.2.139:/path/to/destination
とか
rsync -e "ssh -J admin@54.95.6.189" -avz ./localdir/ admin@10.0.2.139:/remotedir/
みたいなコピー系で威力を発揮するので覚えておくとよい。
SSM
これはEC2で有効にしないといけなくて、debianだとdefaultで起動していないので、プライベートネットに接続しにいくという本件の要件だとちょっとキツい。ただまあNATゲートウェイを配置したとした場合は有効なのでそのようにしてみよう。
NATゲートウェイありのTF
admin@ip-10-0-2-139:~$ sudo apt update
Get:1 file:/etc/apt/mirrors/debian.list Mirrorlist [38 B]
Get:2 file:/etc/apt/mirrors/debian-security.list Mirrorlist [47 B]
Get:3 https://cdn-aws.deb.debian.org/debian bookworm InRelease [151 kB]
Get:4 https://cdn-aws.deb.debian.org/debian bookworm-updates InRelease [55.4 kB]
Get:5 https://cdn-aws.deb.debian.org/debian bookworm-backports InRelease [59.0 kB]
Get:6 https://cdn-aws.deb.debian.org/debian-security bookworm-security InRelease [48.0 kB]
Get:7 https://cdn-aws.deb.debian.org/debian bookworm/main Sources [9494 kB]
Get:8 https://cdn-aws.deb.debian.org/debian bookworm/main arm64 Packages [8688 kB]
Get:9 https://cdn-aws.deb.debian.org/debian bookworm/main Translation-en [6109 kB]
Get:10 https://cdn-aws.deb.debian.org/debian bookworm-updates/main Sources [3120 B]
Get:11 https://cdn-aws.deb.debian.org/debian bookworm-updates/main arm64 Packages [8844 B]
Get:12 https://cdn-aws.deb.debian.org/debian bookworm-updates/main Translation-en [8248 B]
Get:13 https://cdn-aws.deb.debian.org/debian bookworm-backports/main Sources [299 kB]
Get:14 https://cdn-aws.deb.debian.org/debian bookworm-backports/main arm64 Packages [263 kB]
Get:15 https://cdn-aws.deb.debian.org/debian bookworm-backports/main Translation-en [220 kB]
Get:16 https://cdn-aws.deb.debian.org/debian-security bookworm-security/main Sources [130 kB]
Get:17 https://cdn-aws.deb.debian.org/debian-security bookworm-security/main arm64 Packages [213 kB]
Get:18 https://cdn-aws.deb.debian.org/debian-security bookworm-security/main Translation-en [132 kB]
Fetched 25.9 MB in 3s (9332 kB/s)
Reading package lists... Done
Building dependency tree... Done
Reading state information... Done
57 packages can be upgraded. Run 'apt list --upgradable' to see them.
このように接続可能になっている場合、amazon-ssm-agentをinstallする
ただし、これは面倒なのでsnapを使ってしまってもよい。
sudo apt install -y snapd && sudo snap install amazon-ssm-agent --classic実行すると
Processing triggers for man-db (2.11.2-2) ...
Processing triggers for dbus (1.14.10-1~deb12u1) ...
Processing triggers for libc-bin (2.36-9+deb12u7) ...
2024-12-16T04:18:03Z INFO Waiting for automatic snapd restart...
amazon-ssm-agent 3.3.987.0 from Amazon Web Services (aws✓) installed
こんな感じになるので
sudo snap services amazon-ssm-agentで確認しておく。
$ sudo snap services amazon-ssm-agent
Service                            Startup  Current  Notes
amazon-ssm-agent.amazon-ssm-agent  enabled  active   -
ここでログをみると
$ sudo snap logs amazon-ssm-agent
2024-12-16T04:18:21Z amazon-ssm-agent.amazon-ssm-agent[1880]:  <body>
2024-12-16T04:18:21Z amazon-ssm-agent.amazon-ssm-agent[1880]:   <h1>404 - Not Found</h1>
2024-12-16T04:18:21Z amazon-ssm-agent.amazon-ssm-agent[1880]:  </body>
2024-12-16T04:18:21Z amazon-ssm-agent.amazon-ssm-agent[1880]: </html>
2024-12-16T04:18:21Z amazon-ssm-agent.amazon-ssm-agent[1880]:   status code: 404, request id:
2024-12-16T04:18:21Z amazon-ssm-agent.amazon-ssm-agent[1880]: 2024-12-16 04:18:20.2815 ERROR EC2RoleProvider Failed to connect to Systems Manager with SSM role credentials. error calling RequestManagedInstanceRoleToken: AccessDeniedException: Systems Manager's instance management role is not configured for account: 136023370634
2024-12-16T04:18:21Z amazon-ssm-agent.amazon-ssm-agent[1880]:   status code: 400, request id: ca20afa8-c017-4499-89f3-9c808e64cfc8
2024-12-16T04:18:21Z amazon-ssm-agent.amazon-ssm-agent[1880]: 2024-12-16 04:18:20.2815 ERROR [CredentialRefresher] Retrieve credentials produced error: no valid credentials could be retrieved for ec2 identity. Default Host Management Err: error calling RequestManagedInstanceRoleToken: AccessDeniedException: Systems Manager's instance management role is not configured for account: 136023370634
2024-12-16T04:18:21Z amazon-ssm-agent.amazon-ssm-agent[1880]:   status code: 400, request id: ca20afa8-c017-4499-89f3-9c808e64cfc8
2024-12-16T04:18:22Z amazon-ssm-agent.amazon-ssm-agent[1880]: 2024-12-16 04:18:20.2816 INFO [CredentialRefresher] Sleeping for 27m38s before retrying retrieve credentials
このように、エラーになっており、これはEC2にroleが割り当てられていないからだ
ロールの作成
https://us-east-1.console.aws.amazon.com/iam/home?region=ap-northeast-1#/roles/create
とかからサクっと作る、ユースケースはEC2

次の画面では AmazonSSMManagedInstanceCore を探す
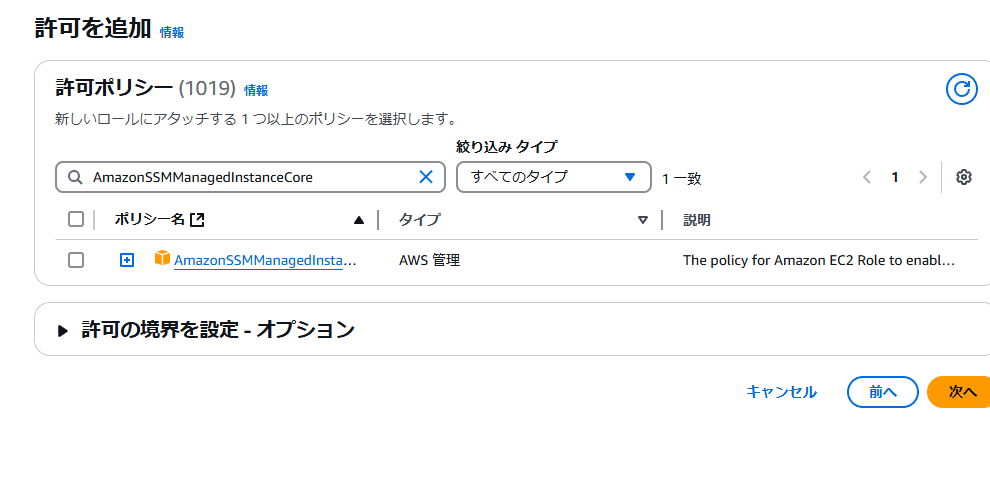
ec2-ssm とか適当な名前を付けて終わり。その後でprivate ec2の画面
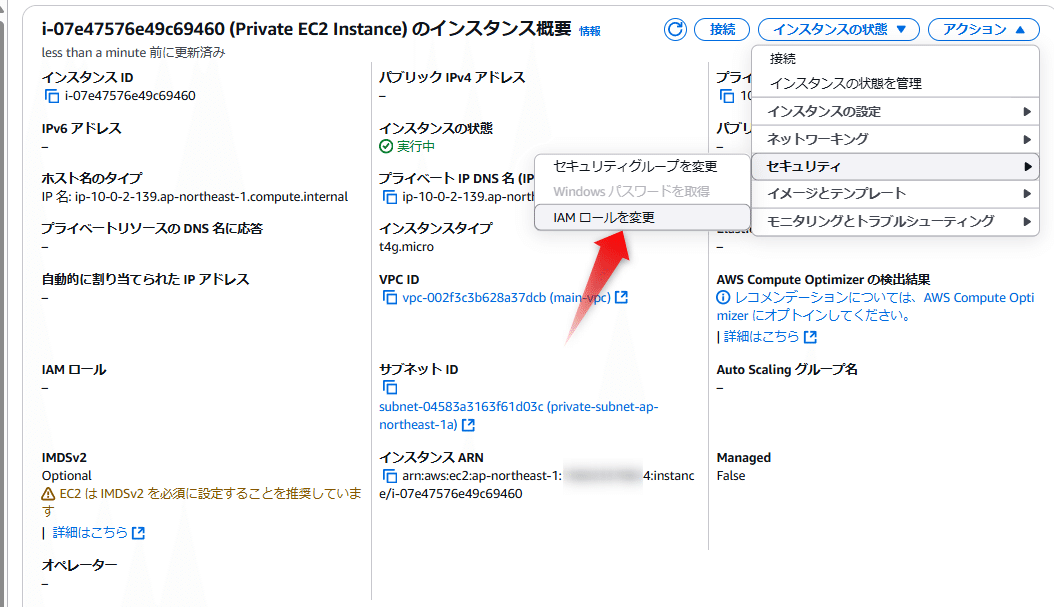
ここでロールを変更する

この時点で、EC2の中のagentを再起動する
sudo snap restart amazon-ssm-agent
ここでログを参照する
$ sudo snap logs amazon-ssm-agent
2024-12-16T04:30:31Z amazon-ssm-agent.amazon-ssm-agent[2309]: 2024-12-16 04:30:31.7938 INFO [EC2Identity] Registration info found for ec2 instance
2024-12-16T04:30:31Z amazon-ssm-agent.amazon-ssm-agent[2309]: 2024-12-16 04:30:31.7938 INFO [amazon-ssm-agent] Registration attempted. Resuming core agent startup.
2024-12-16T04:30:31Z amazon-ssm-agent.amazon-ssm-agent[2309]: 2024-12-16 04:30:31.7938 INFO [CredentialRefresher] credentialRefresher has started
2024-12-16T04:30:31Z amazon-ssm-agent.amazon-ssm-agent[2309]: 2024-12-16 04:30:31.7938 INFO [CredentialRefresher] Starting credentials refresher loop
2024-12-16T04:30:31Z amazon-ssm-agent.amazon-ssm-agent[2309]: 2024-12-16 04:30:31.8379 INFO EC2RoleProvider Successfully connected with instance profile role credentials
2024-12-16T04:30:31Z amazon-ssm-agent.amazon-ssm-agent[2309]: 2024-12-16 04:30:31.8382 INFO [CredentialRefresher] Credentials ready
2024-12-16T04:30:31Z amazon-ssm-agent.amazon-ssm-agent[2309]: 2024-12-16 04:30:31.8387 INFO [CredentialRefresher] Next credential rotation will be in 29.999987238366668 minutes
2024-12-16T04:30:32Z amazon-ssm-agent.amazon-ssm-agent[2309]: 2024-12-16 04:30:32.8483 INFO [amazon-ssm-agent] [LongRunningWorkerContainer] [WorkerProvider] Worker ssm-agent-worker is not running, starting worker process
2024-12-16T04:30:32Z amazon-ssm-agent.amazon-ssm-agent[2309]: 2024-12-16 04:30:32.8505 INFO [amazon-ssm-agent] [LongRunningWorkerContainer] [WorkerProvider] Worker ssm-agent-worker (pid:2345) started
2024-12-16T04:30:33Z amazon-ssm-agent.amazon-ssm-agent[2309]: 2024-12-16 04:30:32.8505 INFO [amazon-ssm-agent] [LongRunningWorkerContainer] Monitor long running worker health every 60 seconds
今度はエラーになっていなそうなので、webコンソールから接続する

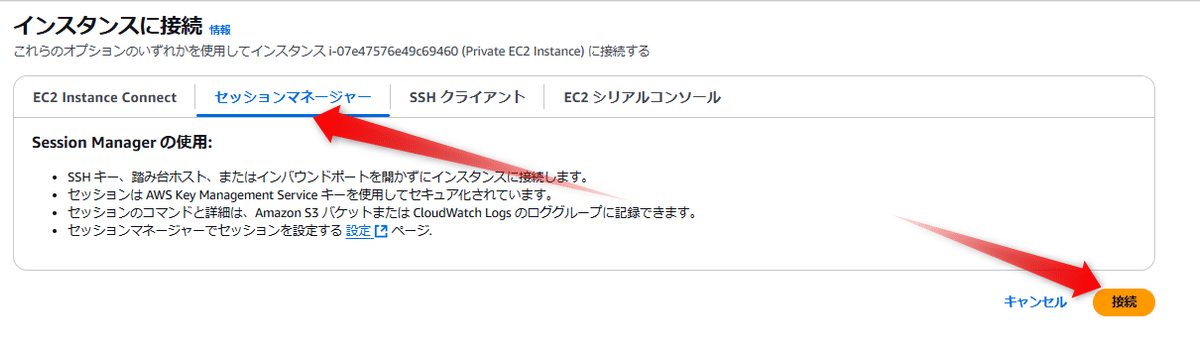
とすると

このように作業ができるというわけ、だ。
インスタンスを終了し、ロールを削除
などしておく、終了時のクリーンアップも手動でやると非常に面倒くさいのである程度自動化したくなるやろ。
terraformでこれを行う
まあ、まずロールを作ろう
# IAMロール
resource "aws_iam_role" "ssm_instance_role" {
  name = "SSMInstanceRole"

  assume_role_policy = jsonencode({
    Version = "2012-10-17",
    Statement = [
      {
        Action = "sts:AssumeRole",
        Effect = "Allow",
        Principal = {
          Service = "ec2.amazonaws.com"
        }
      }
    ]
  })

  tags = {
    Name = "SSM Instance Role"
  }
}

# ポリシーのアタッチ
resource "aws_iam_role_policy_attachment" "ssm_managed_instance_core_attach" {
  role       = aws_iam_role.ssm_instance_role.name
  policy_arn = "arn:aws:iam::aws:policy/AmazonSSMManagedInstanceCore"
}

# インスタンスプロファイル
resource "aws_iam_instance_profile" "ssm_instance_profile" {
  name = "SSMInstanceProfile"
  role = aws_iam_role.ssm_instance_role.name

  tags = {
    Name = "SSM Instance Profile"
  }
}ここでインスタンスプロファイルとかいう謎の概念がでてくるが、これはEC2だけどうしても作らないといけないので、まあこのプロファイルレイヤーを作る作業はそういうもんだと思うしかないな。

これをEC2に割り当てる。privateとpublic、両方当てといていいかも
この部分を何とかする
sudo apt install -y snapd && sudo snap install amazon-ssm-agent --classicまあこれはuserdataかな
resource "aws_instance" "web" {
  # インスタンスタイプ(ARMアーキテクチャのt4g.microを指定)
  instance_type = "t4g.micro"
  # Debian ARM AMI
  ami = "ami-078255fea9b2e6223"
  # サブネットID(パブリックサブネットを指定)
  subnet_id = values(aws_subnet.public_subnet)[0].id
  key_name  = aws_key_pair.deployer.key_name
  # パブリックIPを割り当て
  associate_public_ip_address = true
  # デフォルトセキュリティグループを適用
  vpc_security_group_ids = [aws_default_security_group.default.id]

  # IAMインスタンスプロファイルを指定
  iam_instance_profile = aws_iam_instance_profile.ssm_instance_profile.name

  # UserDataを埋め込み
  user_data = <<-EOF
              #!/bin/bash
              apt-get update -y
              apt-get install -y snapd
              snap install amazon-ssm-agent --classic
              systemctl enable snap.amazon-ssm-agent.amazon-ssm-agent.service
              systemctl start snap.amazon-ssm-agent.amazon-ssm-agent.service
              EOF

  tags = {
    Name = "example webfront"
  }
}
userdataという特性上、EC2の初回起動しかこれは適用されないから運用はよく考えて行う必要がある。まあこの辺はトライ&エラーで
最終的なtf
provider "aws" {
  # リージョンの指定
  region = "ap-northeast-1"
}

variable "TFC_WORKSPACE_NAME" {
  # Terraform Cloud Workspace 名
  type    = string
  default = ""
}

variable "vpc_cidr" {
  # VPC の CIDR ブロック
  description = "CIDR block for the VPC"
  type        = string
  default     = "10.0.0.0/16"
}

variable "public_key" {
  # EC2 インスタンス用の SSH 公開鍵
  description = "The public SSH key to access EC2 instances"
  type        = string
}

resource "aws_key_pair" "deployer" {
  # EC2 用の SSH キーペア
  key_name   = "deployer-key"
  public_key = var.public_key
}

locals {
  # ワークスペース名
  workspace = var.TFC_WORKSPACE_NAME != "" ? trimprefix(var.TFC_WORKSPACE_NAME, "ecs-") : terraform.workspace

  # プライベート DNS ドメイン
  priv_domain = "example.local"
}

data "aws_availability_zones" "available" {
  # 利用可能なアベイラビリティゾーンを取得
}

resource "aws_vpc" "main" {
  # VPC の作成
  cidr_block           = var.vpc_cidr
  enable_dns_support   = true
  enable_dns_hostnames = true

  tags = {
    Name = "main-vpc"
  }
}

resource "aws_internet_gateway" "igw" {
  # インターネットゲートウェイの作成
  vpc_id = aws_vpc.main.id

  tags = {
    Name = "main-igw"
  }
}

resource "aws_route_table" "public_rt" {
  # パブリックルートテーブル
  vpc_id = aws_vpc.main.id

  # デフォルトルートの作成
  route {
    cidr_block = "0.0.0.0/0"
    gateway_id = aws_internet_gateway.igw.id
  }

  tags = {
    Name = "public-rt"
  }
}

resource "aws_route_table_association" "public_rt" {
  # パブリックサブネットとの関連付け
  for_each       = aws_subnet.public_subnet
  subnet_id      = each.value.id
  route_table_id = aws_route_table.public_rt.id
}

resource "aws_subnet" "public_subnet" {
  # パブリックサブネット
  for_each = toset(slice(data.aws_availability_zones.available.names, 0, 2))

  vpc_id                  = aws_vpc.main.id
  availability_zone       = each.key
  cidr_block              = cidrsubnet(var.vpc_cidr, 8, index(slice(data.aws_availability_zones.available.names, 0, 2), each.key))
  map_public_ip_on_launch = true

  tags = {
    Name = "public-subnet-${each.key}"
  }
}
# プライベートサブネット
resource "aws_subnet" "private_subnet" {
  for_each = toset(slice(data.aws_availability_zones.available.names, 0, 2)) # 最初の2つのゾーンを選択

  vpc_id                  = aws_vpc.main.id
  availability_zone       = each.key
  cidr_block              = cidrsubnet(var.vpc_cidr, 8, index(slice(data.aws_availability_zones.available.names, 0, 2), each.key) + 2) # CIDRブロックをずらす
  map_public_ip_on_launch = false
               # パブリックIPを割り当てない

  tags = {
    Name = "private-subnet-${each.key}"
  }
}

# プライベートサブネット用ルートテーブル
resource "aws_route_table" "private_rt" {
  vpc_id = aws_vpc.main.id

  tags = {
    Name = "private-rt"
  }
}

# プライベートサブネットとルートテーブルの関連付け
resource "aws_route_table_association" "private_rt" {
  for_each       = aws_subnet.private_subnet
  subnet_id      = each.value.id
  route_table_id = aws_route_table.private_rt.id
}

resource "aws_vpc_dhcp_options" "privdomain" {
  # DHCP オプションセット
  domain_name         = local.priv_domain
  domain_name_servers = ["AmazonProvidedDNS"]

  tags = {
    Name = "DHCP Options for ${local.priv_domain}"
  }
}

resource "aws_vpc_dhcp_options_association" "dhcpopt" {
  # VPC への DHCP オプションセットの関連付け
  vpc_id          = aws_vpc.main.id
  dhcp_options_id = aws_vpc_dhcp_options.privdomain.id
}

resource "aws_default_security_group" "default" {
  vpc_id = aws_vpc.main.id # 作成したVPCに関連付けるデフォルトのセキュリティグループ

  # pingに応答する
  ingress {
    from_port   = -1
    to_port     = -1
    protocol    = "icmp"
    cidr_blocks = ["0.0.0.0/0"]
  }

  # インバウンド(Ingress)ルール
  ingress {
    from_port = 22
    to_port   = 22
    protocol  = "tcp"
    # 全てのIPアドレスからのアクセスを許可(非常に広範囲なので注意)
    cidr_blocks = ["0.0.0.0/0"]
  }

  # アウトバウンド(Egress)ルール
  egress {
    from_port   = 0
    to_port     = 0
    protocol    = "-1"
    cidr_blocks = ["0.0.0.0/0"]
  }

  tags = {
    Name = "Default SG" # セキュリティグループの名前タグ
  }
}

## Public EC2インスタンスの作成
resource "aws_instance" "web" {
  # インスタンスタイプ(ARMアーキテクチャのt4g.microを指定)
  instance_type = "t4g.micro"
  # Debian ARM AMI
  ami = "ami-078255fea9b2e6223"
  # サブネットID(パブリックサブネットを指定)
  subnet_id = values(aws_subnet.public_subnet)[0].id
  key_name  = aws_key_pair.deployer.key_name
  # パブリックIPを割り当て
  associate_public_ip_address = true
  # デフォルトセキュリティグループを適用
  vpc_security_group_ids = [aws_default_security_group.default.id]

  # IAMインスタンスプロファイルを指定
  iam_instance_profile = aws_iam_instance_profile.ssm_instance_profile.name

  # UserDataを埋め込み
  user_data = <<-EOF
              #!/bin/bash
              apt-get update -y
              apt-get install -y snapd
              snap install amazon-ssm-agent --classic
              systemctl enable snap.amazon-ssm-agent.amazon-ssm-agent.service
              systemctl start snap.amazon-ssm-agent.amazon-ssm-agent.service
              EOF

  tags = {
    Name = "example webfront"
  }
}

# Private EC2 インスタンス
resource "aws_instance" "private_ec2" {
  ami                         = "ami-078255fea9b2e6223" # ARMアーキテクチャの Debian AMI
  instance_type               = "t4g.micro"
  subnet_id                   = values(aws_subnet.private_subnet)[0].id # プライベートサブネットを指定
  key_name                    = aws_key_pair.deployer.key_name
  associate_public_ip_address = false                                   # パブリック IP を割り当てない
  vpc_security_group_ids      = [aws_default_security_group.default.id] # デフォルトのセキュリティグループ

  # IAMインスタンスプロファイル
  iam_instance_profile = aws_iam_instance_profile.ssm_instance_profile.name
  # 依存関係を明示
  depends_on = [
    aws_iam_instance_profile.ssm_instance_profile
  ]
  # UserDataを埋め込み
  user_data = <<-EOF
              #!/bin/bash
              apt-get update -y
              apt-get install -y snapd
              snap install amazon-ssm-agent --classic
              systemctl enable snap.amazon-ssm-agent.amazon-ssm-agent.service
              systemctl start snap.amazon-ssm-agent.amazon-ssm-agent.service
              EOF

  tags = {
    Name = "Private EC2 Instance"
  }
}

# Elastic IPの作成 (NATゲートウェイ用)
resource "aws_eip" "nat_eip" {
  domain = "vpc"

  tags = {
    Name = "NAT EIP"
  }
}

# NATゲートウェイの作成 (パブリックサブネットに配置)
resource "aws_nat_gateway" "nat_gw" {
  allocation_id = aws_eip.nat_eip.id
  subnet_id     = values(aws_subnet.public_subnet)[0].id # パブリックサブネットの1つを指定

  tags = {
    Name = "NAT Gateway"
  }

  depends_on = [aws_internet_gateway.igw]
}

# プライベートサブネット用のルートテーブルにNATゲートウェイのデフォルトルートを追加
resource "aws_route" "private_nat_route" {
  route_table_id         = aws_route_table.private_rt.id
  destination_cidr_block = "0.0.0.0/0" # デフォルトルート
  nat_gateway_id         = aws_nat_gateway.nat_gw.id
}

# IAMロール
resource "aws_iam_role" "ssm_instance_role" {
  name = "SSMInstanceRole"

  assume_role_policy = jsonencode({
    Version = "2012-10-17",
    Statement = [
      {
        Action = "sts:AssumeRole",
        Effect = "Allow",
        Principal = {
          Service = "ec2.amazonaws.com"
        }
      }
    ]
  })

  tags = {
    Name = "SSM Instance Role"
  }
}

# ポリシーのアタッチ
resource "aws_iam_role_policy_attachment" "ssm_managed_instance_core_attach" {
  role       = aws_iam_role.ssm_instance_role.name
  policy_arn = "arn:aws:iam::aws:policy/AmazonSSMManagedInstanceCore"
}

# インスタンスプロファイル
resource "aws_iam_instance_profile" "ssm_instance_profile" {
  name = "SSMInstanceProfile"
  role = aws_iam_role.ssm_instance_role.name

  tags = {
    Name = "SSM Instance Profile"
  }
}


output "workspace_name" {
  # 現在の Terraform Workspace の名前を出力
  value       = local.workspace
  description = "The name of the current Terraform workspace"
}

output "public_subnet_cidr_blocks" {
  # パブリックサブネットの CIDR ブロックを出力
  value       = { for k, v in aws_subnet.public_subnet : k => v.cidr_block }
  description = "CIDR blocks for public subnets"
}

output "private_subnet_cidr_blocks" {
  # プライベートサブネットの CIDR ブロックを出力
  value       = { for k, v in aws_subnet.private_subnet : k => v.cidr_block }
  description = "CIDR blocks for private subnets"
}
プライベートec2に潜りこむって事自体あんま少ないユースケースかもしれんですけどね…
#snap #aws #aws学習 #aws初心者 #terraform