
Vueの基礎

第一回はVueについて紹介しました。振り返として、
1.Vueの優勢
● lightweight(ライトウェイト)
● Separation of UI and logic(UIとロジックの分離)
● Reactive two-way data binding(Reactive双方向データbinding)
● Componentization(コンポネート化)
● Virtual DOM(仮装DOM)
● easy to learn(学習しやすい)
Vue2と比べ、Vue3の優勢
● Responsive System Improvement(レスポンシブ システムの改善)
● more fast(さらに高速)
● Composite API(複合 API)
● Enhanced TypeScript support(強化された TypeScript サポート)
1.文法
1.1コマンド
1.1.1v-bind
1 つまたは複数の属性を動的にバインドします。
<template>
<div class="bg-color container">
<h1>v-bind Example</h1>
<div id="app" class="container">
<!-- 完全な構文 -->
<p v-bind:style="msgStyle">{{msg}}</p>
<!-- 略語 -->
<img :src="imgUrl" alt="">
</div>
</div>
</template>
ここで、src、style は、この要素のsrc 属性を式 imgUrl やmsgStyleの値にバインドします。
<script>
export default {
name: 'App',
data() {
return {
msg:'msg color',
msgStyle:'color:red;',
imgUrl:'https://mba-international.jp/wp-content/themes/self_promote/img/logo/MBA%20international_logo.png'
}
},
}
</script>
出力:

1.1.2 v-on
DOM イベントをlistenするために使用されます。 v-onは「@」と省略され、以下@eventと呼ばれます。
<!-- 完全な構文 -->
<button class="btn btn-primary" v-on:click="addNum">Do</button>
<!-- 略語 -->
<p @click="addNum">{{num}}</p>
1.1.3 v-once
要素とコンポーネントは一度だけレンダリングされます。 その後の再レンダリングでは、要素/コンポーネントとそのすべての子ノードは静的コンテンツと見なされ、スキップされます。
1.1.4 v-html
要素の innerHTML を更新します。
アプリと H5 は v-html をサポートします。
注: プレーンな HTML として挿入されます - Vue テンプレートとしてコンパイルされません 。
<div v-html="rawHtml">
data() {
return {
rawHtml:'<div style="font-size: 32px; color: aqua">v-html</div>'
}
1.2 Data
dataは、初期データ オブジェクトを返す関数のみを受け入れます。(関数内で返されるデータ オブジェクトは、関数外のオブジェクトを直接参照してはならない)
//正しい使い方、関数を使用してオブジェクトを返す
data() {
return {
title: 'Hello'
}
}
//誤った使い方、ページを再度開いたときに最後のデータが表示される
data: {
itle: 'Hello'
}
//誤った使い方、複数のコンポーネント インスタンス オブジェクト データを相互に影響させる
const obj = {
title: 'Hello'
}
data() {
return {
obj
}
}
1.3 ClassとStyle
1.3.1 v-bind:class
:class (v-bind:class ) はclass の動的切り替えを実装します。
複数のclassを動的に切り替えるために、より多くのフィールドをオブジェクトに渡すことができます。 また、v-bind:class は、通常のclassと共存することもできます。
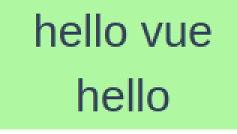
<div class="static" :class="{ active: isActive, 'text-danger': isError }">hello vue</div>
<div class="static" :class="{ active: isActive}">hello</div>
data() {
return {
isActive: true,
isError: false,
}
},
.static{
color: red;
}
.active{
background-color: palegreen;
font-size:30px;
}
.text-danger{
color: orange;
}
出力:
1.3.2 v-bind:class=list
配列を v-bind:class に渡して、クラスのリストを適用します。
<div :class="[activeClass,errorClass]">Example</div>
data() {
return {
activeClass: 'active',
errorClass: 'text-danger'
}
},
.active{
background-color: blue;
}
.text-danger{
font-size:60px;
color:red;
}
出力:

1.3.3 条件付き
条件に基づいてリスト内のクラスを切り替えるには、三項式を使用できます。
<div :class="[isActive ? activeClass : '', errorClass]">Example</div>
常にerrorClass を追加しますが、isActiveが true の場合のみ activeClass を追加します。
複数の条件がある場合、こう書けばより便利になります。
<div class="static" :class="[{ active: isActive }, errorClass]">Example</div>
計算されたプロパティの計算されたメソッドcomputedを使用して、クラスまたはスタイル文字列を生成し、ページに挿入できます。
<div class="container" :class="computedClassStr">Example</div>
<div class="container" :class="{active: isActive}">Example</div>
computed: {
computedClassStr() {
return this.isActive ? 'active' : ''
}
}
1.3.4:styleの命名
:style のオブジェクト構文は CSS に非常によく似ています。しかし、実際には JavaScript オブジェクトです。CSS プロパティ名は camelCaseまたはkebab-case で命名できます。
<template>
<div :style="{ color: activeColor, fontSize: fontSize + 'px' }">Example</div>
</template>
<script>
export default {
data() {
return {
activeColor: 'red',
fontSize: 30
}
}
}
</script>
通常は、styleブジェクトに直接バインドすることをお勧めします。これにより、templateがより明確になります。
<template>
<view :style="styleObject">hello uni-app</view>
</template>
<script>
export default {
data() {
return {
styleObject: {
color: 'red',
fontSize: '13px'
}
}
}
}
</script>
1.3.5 :style=”[list1, list2…]”
:styleオブジェクトは複数のcssオブジェクトを一つの配列に適応されます。
<template>
<div :style="[colorStyle, fontStyle]">Example</div>
</template>
<script>
export default {
name: 'App',
data() {
return {
colorStyle:{
color:'orange'
},
fontStyle:{
fontsize:'50px',
fontWeight:'bold'
}
}
},
}
</script>
:styleは複数の値を含む配列を提供します。多くの場合、複数の接頭辞付きの値(vendor prefixesa)を提供するために使用されます。
1.4 条件付きレンダリング
1.4.1 v-if
v-ifはtureの時のみ、renderします。
<template>
<div v-if="true">You can see me</div>
</template>
1.4.2 v-show
使用方法はほぼ同じです。
<div v-show="true">You can see me</div>
1.4.3 v-ifとv-showの違い
v-if は本当の条件付きレンダリングです。これにより、条件付きブロック内のevent listenerと子コンポーネントが変更中の時、適切に破棄され、再作成されることが保証されます。
v-showは最初のレンダリングで条件が false の場合、何もしません。条件ブロックは、条件が最初に true になるまでレンダリングを開始しません。
v-if をv-for と併用すると、v-if が v-for よりも優先されます。
v-if と v-for を一緒に使用することは非推奨。
1.5 イベント処理
1.5.1 listen event
v-on (多くの場合、@ 記号と省略)は、DOM イベントをlistenし、イベントが起こるときにJavaScript を実行します。
使い方はv-on:click="doAction"または@click="doAction" を使用 します。
1.5.2 複数のイベント処理
<button @click="one($event), two($event)">
Submit
</button>
<script>
methods: {
one(event) {
// first handler logic...
console.log("event1: ",event);
},
two(event) {
// second handler logic...
console.log("event2: ",event);
}
}
</script>
いいなと思ったら応援しよう!