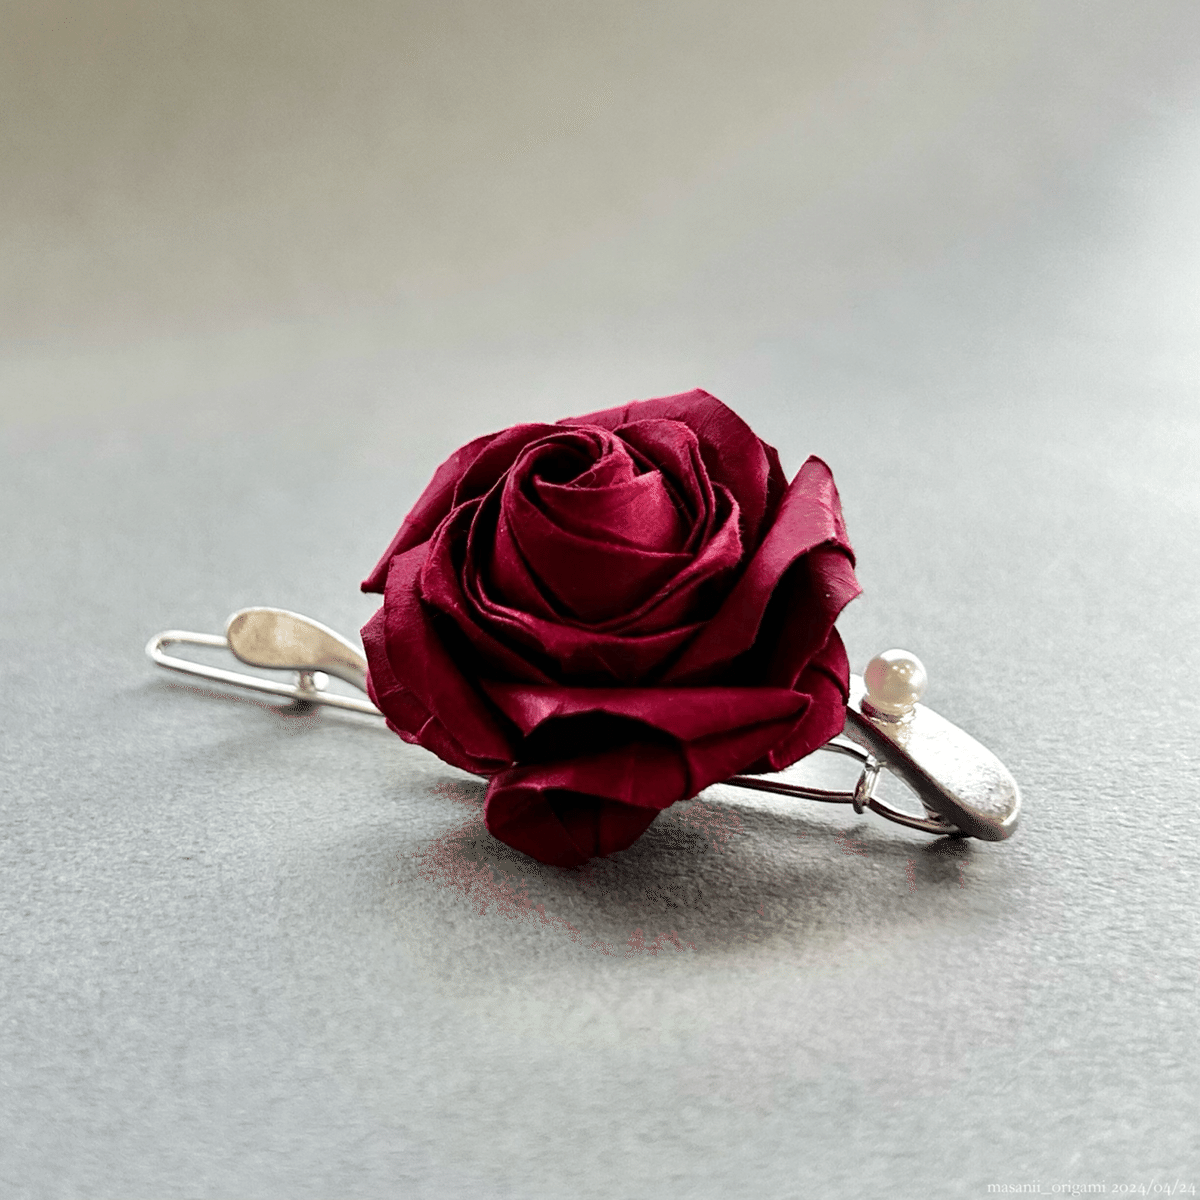
佐藤ローズでブローチ作り〜「かおりんメソッド」に15cmで挑戦〜/Rose brooch with Kaorin's method
アトリエまさにぃへ、ようこそ。
Welcome to Atelier masanii.
前回に引き続き、ハイブリッドティーローズのアレンジ「かおりんメソッド」をお届けします。
今回は15cmのミニサイズからブローチを作ってみました。台座はダイソーの髪留めです。

Continuing to the last post, I'll show you "Kaorin's method".
Today I made a brooch by attaching to DAISO hair clip.
素材はヴィヴァルディのDARK RED。

I used Vivaldi "DARK RED".
サイズがいつもより小さい分、余計に厚みを感じます。
折るのはパワープレー、終盤の加工はもっぱらピンセットです。

It was relatively too thick because of its size.
I folded by force, and used tweezers when finishing.
ふだんの倍近く、およそ1時間かけて奮闘し、そこからアクセサリーまでの加工に40分。
慣れない作業に戸惑いながらも、ようやくお披露目できるクオリティに落ち着きました。
では、レポートいきましょう。

It took for almost one hour to make rose, and processed into brooch for 40minutes.
After I struggled with unfamiliar works, it finished in satisfying quality.
Now let's report!
☘️☘️☘️
ヴィヴァルディの原寸大(64.5cm×49.5cm)からは24.75cm(≒25cm)の正方形が4枚切り出せるのですが、毎回14.8cm×49.5cmの「あまり」が出ます。今回はコレを活用しました。
ほぼ15cmということで、以前15cmの和紙でHTを折ったことがあるから大丈夫だろう…と踏んだわけです。

The original size of Vivaldi(64.5cm×49.5cm) can be cut into four 25cm squares, and there's 14.8cm×49.5cm leftover. I used it.
It's almost 15cm so I thought that I can, because I've made HT with washi paper of same size.
しかし、サイズはもとより「厚み」をナメてました。
いつもの25cmから40%サイズダウンすると、厚みは理論上1.67倍になります。
タントより丈夫でコシのあるヴィヴァルディをまとめ上げるのは「筋トレ」です。
結果的にボリューム感のあるバラに仕上がったので、良しとしましょう。

However I underestimated its thickness.
When the size is 40% smaller, the thickness will be about 1.67 times in theory.
Vivaldi is more durable than Tant paper, so it was hard to fold.
Finally it finished rich, I like it.
折り筋をキッチリ仕込んで、収束を力ずくで乗り切ったら、中心を開いていきます。
で、悲劇は訪れました。貫通です。
だって、なかなか開かないんだもん…

After making creases strongly and assembling by force, open the central petals.
At that time I faced a tragedy. It torn.
Because it didn't open at all...
仕方ないから、裏側から端っこを寄せ集めて穴を隠します。
裏側の穴は完全に塞いでしまうので、コレだけで見えなくなるんですよね。テープで補修する必要はありません。
ちなみにガクを取り付けるだけでも、同様に穴が隠れます。貫通しても途中で捨てず、最後まで完成させてしまいましょう。意外と何とかなります。

I had no choice, so I hid the hole by bringing the surrounding pieces.
The hole will be hidden by only filling the back side with glue, you don't have to use any tapes.
By only attaching calyx, it works.
Even if you tear it, don't trash in the halfway.
外側の折り上げや底の折り込み、花びらの「めくり」。ここはピンセットの出番です。
ピンセットを「道具」と捉えず、あくまでも指先の延長線と考えて動かすのがコツです。指先の機能拡張みたいな感じで。
攻殻機動隊の世界なら、神経細胞まで入れちゃうんでしょうか。

Making petals and the bottom, and finishing the overall shape, tweezers are useful.
They should be handled as extension of my finger, not as a tool, it's like a functional enhancement. If it's in the world of Ghost in the Shell, they puts nerve cells into it, right?
ハイブリッドティーローズが完成したら、かおりんメソッドのハイライト「花びらのカール」を進めます。
通常は丸ペンチを使いますが、それすら入らないので、ここでもピンセットに頼ります。
先の曲がったピンセットは、トリッキーな角度でもグリッと捻ることができるのでオススメです。

After completing Hybrid tea rose, add curls unique to "Kaorin's method".
I usually use pliers, but it can't be inserted because of its smallness. So I used tweezers even this step.
Hook-shaped tweezers are useful to bend twisty tips.
台座への取り付けはグルーガンを使いました。剣咲きのブローチ以来、久しぶりの登場です。
まずは裏側の穴を完全に埋めてしまいます。
台座の位置を決めたら、サイドを補強。
グルーガンをはずす際、先端が糸を引いて尖ってしまうため、なぞる位置や角度を工夫して目立たなくしました。

Attaching to the clip, I used Hot Melt Glue Gun.
First, fill the back side. When fixing the position, reinforce both side.
While removing the Glue Gun, the surface tends to be rough. So I made some ingenuity in position or angle to remove it, and hid the end.
以前に作った剣咲きのブローチは裏側がガタガタだったのですが、今回はそこそこ綺麗にまとまったと思います。かなり丈夫です。

When I made a brooch of "Pointed petal rose" four years ago, the back side was too rough. This time I could make it pretty neat, and it's moderately durable.
もともと曲線を目立たせる本作のスタイルに、ミニサイズ+厚みが加わり…
思いがけず「丸っこく可愛らしいブローチ」のできあがり。
これはクセになりそうですね!しんどいけど。

Originally Kaorin's method makes its curls stand out, and this time adding the smallness & thickness... Unexpectedly round & cute brooch has born. I like it!
完成後は撮影タイム。
グレーの画用紙(タント)を背景に、シックな雰囲気を演出しました。
当時の時刻は15-16時。やや横向きの自然光を取り入れています。

Shooting time.
I brought a gray tant paper for the background, and create a mature mood.
It was 3-4PM, I let horizontal sunlight into the model.
赤色の作品はグレーとの相性が良いんですよね。黒い影+グレー背景の同系2色に、ビビッドな赤色。この組み合わせは、黒だけの背景より作品が引き立つのです。
過去に作った「ローズ・ブーケ」でも、撮影時にこの組み合わせを採用しています。

Red model suits well with gray.
Black shadow & gray background, and vivid red on them. These combination highlights the subject.
I have adopted this method when I made "Rose Bouquet" in the past.
☘️☘️☘️
今日もご覧いただき、ありがとうございました。
普通のハイブリッドティーローズにしておけば良かったのに、なぜ「かおりんメソッド」を選んだのでしょう…15cmヴィヴァルディ初挑戦から、茨の道を選んてしまいました。バラだけに。
でも、苦労した甲斐はありました。

Thank you for watching my post today.
Originally I was going to make a normal HT, I wonder why I decided to make such a tough thing. But it was worth it.
写真では分かりませんが、やはり紙なので、ホコリが付きやすいのが気になるところ。
今後はスプレーニスによるコーティングを検討中です。
ほんとはレジンに興味があるんですけど、それは長期目標ということで。

Of course this is made from a paper, I'm worried it tends to get deteriorated.
I intend to varnish it in the future. Actually I want to use resin, in the future...
それでは、今日はこのへんで!
アトリエまさにぃで、またお会いしましょう。
See you again in Atelier masanii:)
#アトリエまさにぃ
#ateliermasanii
#かおりんメソッド
#ヴィヴァルディ15cm
#佐藤ローズ練習中
#ハイブリッドティーローズ #hybridtearose
#佐藤ローズ #satorose #バラ #rose
#キャンソンヴィヴァルディ #cansonvivaldi
#origamirose #おりがみ #origami #paperwork #折り紙 #折り紙作品 #まさにぃ
この記事をご覧になって「ためになった!」「今後も応援したい」と思った方は、ぜひページ下部から記事をご購入ください。
※ 任意のカンパという位置付けですので、内容の続きではありません
If there is a person who was impressed and can support my works, purchase the article from the form below.
※This means a voluntary donation, there is not a sequel.
ここから先は
¥ 300
この記事が気に入ったらチップで応援してみませんか?
