WSL2でGPUを使う(PyTorch, CuPy, TensorFlow)
Windows 11のWSL2(Ubuntu 22.04)でGPUを使う際にPyTorch, CuPy, TensorFlowを全て使おうと思ったら少し詰まった部分もあったのでメモとして残しておきます。
※以下「WSL2」=「WSL2にインストールしたUbuntu」です
バージョン一覧(2023/7/7時点)
Windows 11 22H2
WSL2
Ubuntu 22.04
Nvidia Driver 536.40
CUDA 11.7.1
cuDNN 8.6.0 (for CUDA 11.x)
Python 3.11.4
PyTorch 2.0.1
CuPy 12.1.0
TensorFlow 2.13.0
Windows 11での設定
それぞれの詳細は省略しますが、以下の設定を行います。
Enable NVIDIA CUDA on WSLが参考になります。
Nvidia Driverのインストール
WSL2のインストール
Ubuntu 22.04のインストール
Windows上で開発しない(WSL2上でのみ開発)する場合はWindowsへのCUDA, cuDNNのインストールは不要です。
そのため、Windowsのシステム環境変数にCUDA_PATHなどが無くても大丈夫です。
WSL2でGPUの確認
以下のように確認することが出来ます(しょぼいGPUですみません)
% nvidia-smi
Fri Jul  7 15:16:37 2023
+---------------------------------------------------------------------------------------+
| NVIDIA-SMI 535.54.06              Driver Version: 536.40       CUDA Version: 12.2     |
|-----------------------------------------+----------------------+----------------------+
| GPU  Name                 Persistence-M | Bus-Id        Disp.A | Volatile Uncorr. ECC |
| Fan  Temp   Perf          Pwr:Usage/Cap |         Memory-Usage | GPU-Util  Compute M. |
|                                         |                      |               MIG M. |
|=========================================+======================+======================|
|   0  NVIDIA GeForce GTX 1050        On  | 00000000:02:00.0 Off |                  N/A |
| N/A   32C    P8              N/A /  N/A |      0MiB /  2048MiB |      0%      Default |
|                                         |                      |                  N/A |
+-----------------------------------------+----------------------+----------------------+

+---------------------------------------------------------------------------------------+
| Processes:                                                                            |
|  GPU   GI   CI        PID   Type   Process name                            GPU Memory |
|        ID   ID                                                             Usage      |
|=======================================================================================|
|  No running processes found                                                           |
+---------------------------------------------------------------------------------------+
「CUDA Version: 12.2」の表示がありますが、対応可能な最大バージョンという意味らしいです(ソース忘れました)
CUDAのインストール(WSL2)
PyTorch, CuPy, TensorFlowそれぞれが対応可能なバージョンを探ってみます。
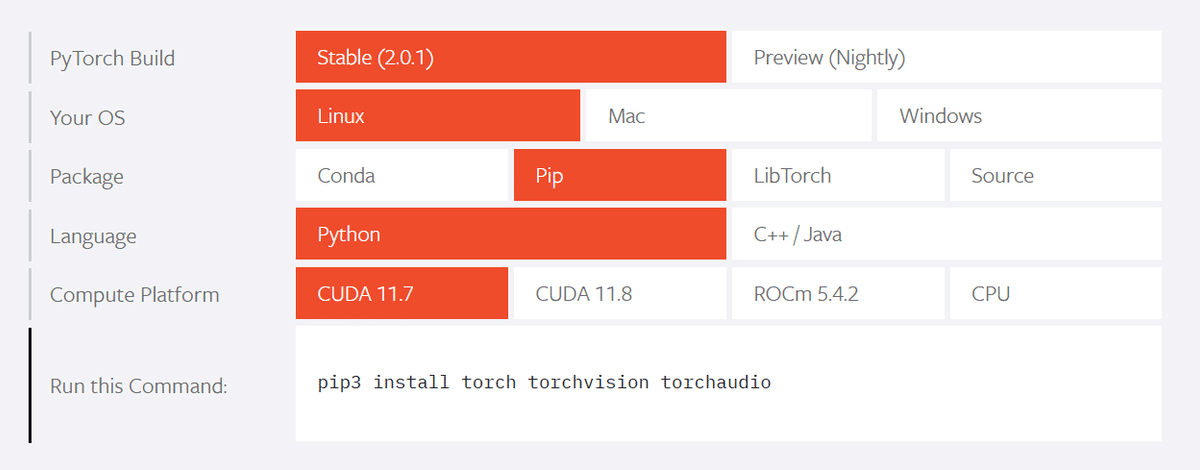
PyTorchはこちらで確認すると、pipでインストールする場合は11.7と11.8が対応しているようです。
CuPyはこちらで確認すると、10.2~12.1まで対応しているようです。
TensorFlow2はこちらで確認(ソースビルドの対応一覧ですが)すると、10.0~11.8まで対応しているようです。
(失敗)先にダメだった部分ですが、11.8で進めた場合にPyTorchのインストールで詰まりました。以下のエラーが解消出来ませんでした。
ERROR: Could not find a version that satisfies the requirement setuptools>=40.8.0 (from versions: none)
ERROR: No matching distribution found for setuptools>=40.8.0(成功)11.7をインストールすることで進めます。
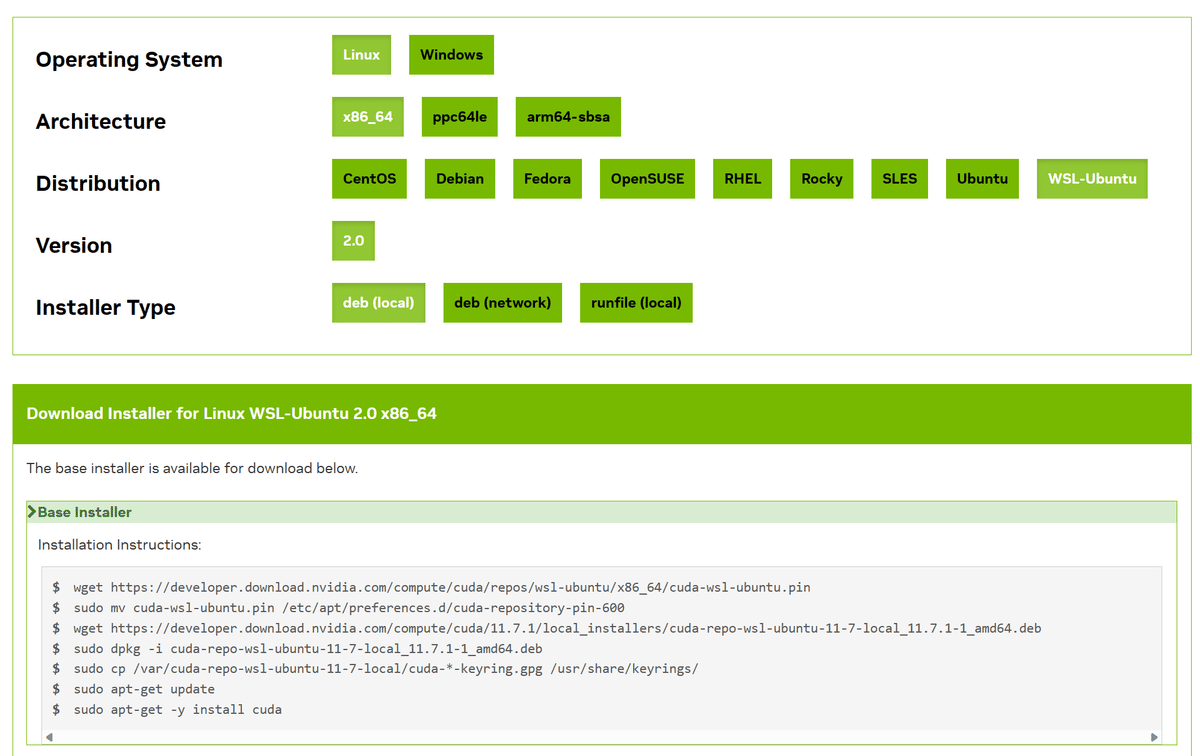
CUDA Toolkit Archiveから「CUDA Toolkit 11.7.1」を選択し、
[Linux] -> [x86_64] -> [WSL-Ubuntu] -> [deb (local)]
を選択するとインストールスクリプトが表示されます。
このスクリプトの通り実行することでCUDAがインストール出来ます。
wget https://developer.download.nvidia.com/compute/cuda/repos/wsl-ubuntu/x86_64/cuda-wsl-ubuntu.pin
sudo mv cuda-wsl-ubuntu.pin /etc/apt/preferences.d/cuda-repository-pin-600
wget https://developer.download.nvidia.com/compute/cuda/11.7.1/local_installers/cuda-repo-wsl-ubuntu-11-7-local_11.7.1-1_amd64.deb
sudo dpkg -i cuda-repo-wsl-ubuntu-11-7-local_11.7.1-1_amd64.deb
sudo cp /var/cuda-repo-wsl-ubuntu-11-7-local/cuda-*-keyring.gpg /usr/share/keyrings/
sudo apt-get update
sudo apt-get -y install cuda
以下でインストール後の確認が出来ます。
% nvcc -V
nvcc: NVIDIA (R) Cuda compiler driver
Copyright (c) 2005-2022 NVIDIA Corporation
Built on Tue_May__3_18:49:52_PDT_2022
Cuda compilation tools, release 11.7, V11.7.64
Build cuda_11.7.r11.7/compiler.31294372_0
cuDNNのインストール(WSL2)
これもPyTorch, CuPy, TensorFlowそれぞれが対応可能なバージョンを探ってみます。
PyTorchの情報は見つかりませんでした。
(実際はpipでインストール時に勝手に依存関係で追加されるぽい)
CuPyはこちらで確認すると、7.6~8.8まで対応しているようです。
TensorFlow2はこちらで確認すると、7.4~8.6まで対応しているようです。
これらにより、8.6をインストールすることで進めます。
Windowsでファイルをダウンロード
cuDNN Archiveから、
「Download cuDNN v8.6.0 (October 3rd, 2022), for CUDA 11.x」
-> 「Local Installer for Ubuntu22.04 x86_64 (Deb)」
を選択しダウンロードします。
デフォルトでは「ダウンロード」フォルダに
「cudnn-local-repo-ubuntu2204-8.6.0.163_1.0-1_amd64.deb」
がダウンロードされるかと思います。これをWSL2から参照します。
WSL2でインストール
まず以下のコマンドでを実行します。
<USERNAME>となっている部分はそれぞれの環境に合わせて要変更です。
sudo dpkg -i /mnt/c/Users/<USERNAME>/Downloads/cudnn-local-repo-ubuntu2204-8.6.0.163_1.0-1_amd64.debここで落とし穴がありました。
手順を説明してくれるサイトでは大体このコマンドまでで止まっていましたが、このコマンドはローカルのAPTリポジトリを設定し、cuDNNに関連するパッケージが /var 配下に展開されるだけというものでした。
なので、以下を行うまでTensorFlowで全くGPUを認識してくれないという状況で何度バージョンを変えたり初期化したりしたものか・・・
ということで、以下のコマンドでcuDNNをインストールします。
sudo apt-get update
sudo apt-get install libcudnn8 libcudnn8-dev
cuDNNがインストールされた後は以下のようにバージョンを確認できます。
% cat /usr/include/cudnn_version.h | grep CUDNN_MAJOR -A 2
#define CUDNN_MAJOR 8
#define CUDNN_MINOR 6
#define CUDNN_PATCHLEVEL 0
--
#define CUDNN_VERSION (CUDNN_MAJOR * 1000 + CUDNN_MINOR * 100 + CUDNN_PATCHLEVEL)

/* cannot use constexpr here since this is a C-only file */
もしくは
% dpkg -l | grep libcudnn
ii  libcudnn8                             8.6.0.163-1+cuda11.8                    amd64        cuDNN runtime libraries
ii  libcudnn8-dev                         8.6.0.163-1+cuda11.8                    amd64        cuDNN development libraries and headers
PyTorch, CuPyのインストール(WSL2)
Python自体のインストールは割愛します。
環境をTensorFlowと分けたいのでvenvでPyTorch, CuPy用の環境を作成します。
# 仮想環境の作成
python -m venv .torch

# 仮想環境に入る
source .torch/bin/activate

# (一応)仮想環境を抜ける場合
deactivate
一応pip, setuptoolsをアップグレードしておきます。
pip install --upgrade pip setuptoolsPyTorchのインストール
安定板のCUDA11.7対応は以下でインストールできます。
pip3 install torch torchvision torchaudio
GPUが認識されているか確認するコード
import torch
print(torch.cuda.is_available())
print(torch.cuda.device_count())
print(torch.cuda.get_device_name(0))
実行結果
% python torch_check_gpu.py
True
1
NVIDIA GeForce GTX 1050
実際にGPUを利用するサンプルコード
タスクマネージャ(GPU)を眺めなら以下のコードを実行すると「専用GPUメモリ使用量」が反応するかと思います。
import torch

# GPUが利用可能かどうか確認
if torch.cuda.is_available():
    # GPUデバイスオブジェクトの取得
    device = torch.device("cuda")
    # 大規模な行列の作成
    x = torch.randn(5000, 5000, device=device)
    y = torch.randn(5000, 5000, device=device)
    # GPU上で行列乗算
    z = torch.matmul(x, y)
    # 結果をCPUに転送して表示
    print(z.to("cpu"))
else:
    print("GPU is not available")
一応ですが、インストールされているパッケージを確認するとcuDNN 8.5.0が入っているようでした(CuPyもインストールした後のリストですが)
% pip list
Package                  Version
------------------------ ----------
certifi                  2023.5.7
charset-normalizer       3.1.0
cmake                    3.26.4
cupy-cuda11x             12.1.0
fastrlock                0.8.1
filelock                 3.12.2
idna                     3.4
Jinja2                   3.1.2
lit                      16.0.6
MarkupSafe               2.1.3
mpmath                   1.3.0
networkx                 3.1
numpy                    1.25.0
nvidia-cublas-cu11       11.10.3.66
nvidia-cuda-cupti-cu11   11.7.101
nvidia-cuda-nvrtc-cu11   11.7.99
nvidia-cuda-runtime-cu11 11.7.99
nvidia-cudnn-cu11        8.5.0.96
nvidia-cufft-cu11        10.9.0.58
nvidia-curand-cu11       10.2.10.91
nvidia-cusolver-cu11     11.4.0.1
nvidia-cusparse-cu11     11.7.4.91
nvidia-nccl-cu11         2.14.3
nvidia-nvtx-cu11         11.7.91
Pillow                   10.0.0
pip                      23.1.2
requests                 2.31.0
setuptools               68.0.0
sympy                    1.12
torch                    2.0.1
torchaudio               2.0.2
torchvision              0.15.2
triton                   2.0.0
typing_extensions        4.7.1
urllib3                  2.0.3
wheel                    0.40.0
試しにnvidia-cudnn-cu11をアンインストールしようとしまいたが、torchに依存しているからダメと怒られました。
CuPyのインストール
これはPyTorchと同じ環境で大丈夫でした。
CUDA 11.7に合わせたインストールなので以下のコマンドです。
pip install cupy-cuda11xGPUが認識されているか確認するコード
import cupy
device = cupy.cuda.Device()
print(device.id)
print(cupy.cuda.runtime.getDeviceCount())

attributes = device.attributes
for key, value in attributes.items():
    print(f"{key}: {value}")
実行結果
% python cupy_check_gpu.py
0
1
AsyncEngineCount: 1
CanFlushRemoteWrites: 0
CanMapHostMemory: 1
CanUseHostPointerForRegisteredMem: 0
ClockRate: 1493000
...割愛
実際にGPUを利用するサンプルコード
import cupy as cp

x = cp.random.random((5000, 5000))
y = cp.random.random((5000, 5000))

z = cp.dot(x, y)
TensorFlowのインストール(WSL2)
環境をPyTorchと分けたいのでvenvでTensorFlow用の環境を作成します。
# 仮想環境の作成
python -m venv .tf

# 仮想環境に入る
source .tf/bin/activate

# (一応)仮想環境を抜ける場合
deactivate
一応pip, setuptoolsをアップグレードしておきます。
pip install --upgrade pip setuptoolsTensorFlowのインストール
pip install tensorflowGPUが認識されているか確認するコード
import tensorflow as tf

print(tf.__version__)

# Check if TensorFlow is built with CUDA support
print("Built with CUDA: ", tf.test.is_built_with_cuda())

# GPUデバイスが利用可能かどうか確認
if tf.config.list_physical_devices('GPU'):
    # GPUデバイスの名前を取得
    print(tf.config.list_physical_devices('GPU'))
else:
    print("GPU is not available")
実行結果(TensorRT, NUMAが無いのはひとまずスルー)
% python tf_check_gpu.py
2023-07-07 16:07:43.246959: I tensorflow/core/platform/cpu_feature_guard.cc:182] This TensorFlow binary is optimized to use available CPU instructions in performance-critical operations.
To enable the following instructions: AVX2 FMA, in other operations, rebuild TensorFlow with the appropriate compiler flags.
2023-07-07 16:07:44.809177: W tensorflow/compiler/tf2tensorrt/utils/py_utils.cc:38] TF-TRT Warning: Could not find TensorRT
2.13.0
Built with CUDA:  True
2023-07-07 16:07:47.113335: I tensorflow/compiler/xla/stream_executor/cuda/cuda_gpu_executor.cc:981] could not open file to read NUMA node: /sys/bus/pci/devices/0000:02:00.0/numa_node
Your kernel may have been built without NUMA support.
2023-07-07 16:07:47.217376: I tensorflow/compiler/xla/stream_executor/cuda/cuda_gpu_executor.cc:981] could not open file to read NUMA node: /sys/bus/pci/devices/0000:02:00.0/numa_node
Your kernel may have been built without NUMA support.
2023-07-07 16:07:47.217481: I tensorflow/compiler/xla/stream_executor/cuda/cuda_gpu_executor.cc:981] could not open file to read NUMA node: /sys/bus/pci/devices/0000:02:00.0/numa_node
Your kernel may have been built without NUMA support.
[PhysicalDevice(name='/physical_device:GPU:0', device_type='GPU')]
実際にGPUを利用するサンプルコード
import tensorflow as tf

# GPUが利用可能かどうか確認
if tf.test.is_gpu_available():
    # 大規模な行列の作成
    x = tf.random.normal((5000, 5000))
    y = tf.random.normal((5000, 5000))
    # GPU上で行列乗算
    z = tf.matmul(x, y)
    # 結果を表示
    print(z)
else:
    print("GPU is not available")
さいごに
Dockerもあったりしますが、ひとまずWSL2でこれらの環境が作れたのでサブマシンとして何か有効活用が出来るかもしれません。
環境やバージョンに依存するものが多いので、一つのコマンドでセットアップ出来ないのが辛みですが、個々の理解は少しだけ深まったのかなと思います(ほんとうに少しだけ・・・)
