
[How to make a world: Advanced vol.3] Let's use the ChatGPT application prompt
With the Vket Cloud update, you can now set a prompt to call ChatGPT!
By setting prompts, you can characterize responses to chatbots called on Vket Cloud, role-play based on settings, play with Shiritori, etc. There is no doubt that the play in the Metaverse will expand!
Here, we will explain how to create a prompt on the prompt setting web page and how to call it with VketCloudSDK.
Review of ChatGPT
What is ChatGPT in the first place? We will explain about it in Vol.1 [ChatGPT introduction basic knowledge]!
In addition to covering various uses of ChatGPT, we will also delve into the basics of prompts that determine responses and behavior.
If you haven't read it yet, please read it!
In addition, Vol.2 [Let's link to ChatGPT introduction world] explains how to use ChatGPT using the tutorial scene attached to VketCloudSDK.
If you want to quickly experience ChatGPT on Vket Cloud, read on.
Introducing how to set up prompts for Vket Cloud
Creating and taming prompts
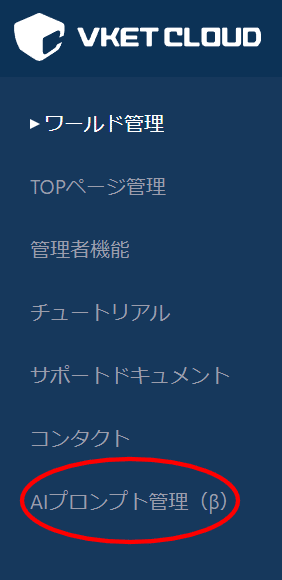
If you want to set a new ChatGPT prompt for Vket Cloud, first log in to the Vket Cloud top page , select "AI prompt management (β)" from the dashboard of My page , and move to the AI prompt management screen.
The AI Prompt Management screen allows you to enter prompts that determine the behavior of your chatbot and test that it behaves correctly on your site.

Here, we will set up to make Vket-chan, who has become a convenience store clerk, as a trial!
To create a new prompt, first select "Register" from the left menu.

On the registration page, enter a name to identify the prompt and a brief description to register.
It is convenient to include information that is easy to understand even after looking at it later.

Pressing "Register" will generate a new prompt in the list.

Since nothing has been set here yet, select the second "Train(調教する)" from the right to build the prompt.
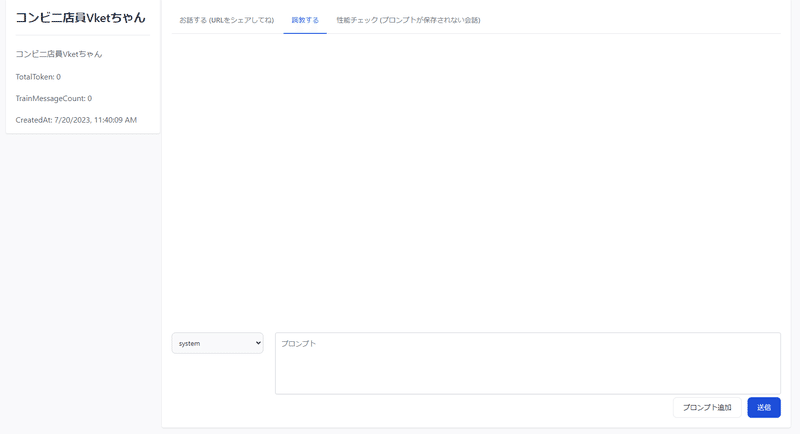
The prompts are divided into three roles, and the behavior of the chatbot changes depending on the information you enter.
A role is a classification that allows a chatbot to read a framework of pre-knowledge, questions, and responses in order to create a model of chat behavior.

In addition, the exact roles of roles are explained in the OpenAI manual as follows.
system : Role for defining responses in the assistant role. Since GPT has no prior knowledge, the system role defines how to respond.
user : This is a model question for deciding what and how the assistant should respond.
assistant : Sets the model response. The assistant infers responses from previously entered interactions, but if you want to pre-define an example response, do so in the assistant role's prompt.
To add a prompt, select a role, fill in the text box, and select Submit .

If you want to put a prompt together like Question->Answer, select "Add Prompt" and enter multiple prompts.

For example, in the case of the convenience store clerk Vket this time, we entered the prompts for system (marked with 🌐), user (marked with the Vket Cloud logo), and assistant (marked with Vket) as follows.
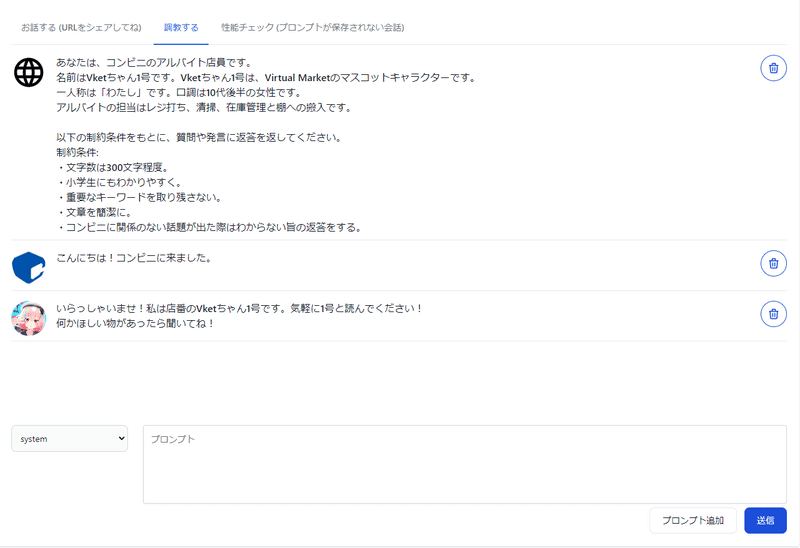
Also, if you want to correct the prompt you added here, select the trash can icon on the right to delete the prompt once.

How to write a prompt is explained in Vol.1 [ChatGPT introduction basic knowledge], so let's refer to it when creating a prompt.
Test the prompt you created
Select ”Talk” to try out a conversation based on the prompt you created .

You can have a conversation here just like ChatGPT official service.
For example, if you ask the following question, Vket, a convenience store clerk, will answer.

Since the conversation here affects the behavior of ChatGPT, select "Performance check" for a test that does not affect the response content.

Integration with VketCloud SDK
After setting prompts that allow sufficient interaction on the AI prompt management screen, configure settings for calling with VketCloudSDK.
In addition, the prompt settings are guaranteed to work with SDK Ver.5.4.3, so if you are using an older version, please refer to the following article to upgrade.
Here, we will explain how to create a world where you can easily check the behavior of ChatGPT.
If you have not installed VketCloudSDK, refer to the following article to build a development environment.
1. Select "Add essential objects for VketCloud" on Hierarchy
After launching a new scene, right click on Hierarchy and select "Add essential objects for VketCloud" .

At this time, in the initial state, Despawn Height overlaps the spawn position, so adjust the height.
Also, since there is no scaffolding, Cube is placed as a temporary scaffolding.
If this operation results in the following arrangement, you are ready to go.

2. Add HEOScript Component to World Object
Add a HEOScript component to the World component .
This component drives a script to call ChatGPT in the world.
First, select World from Hierarchy, select "Add Component" in Inspector, then search for HEOScript and select it.

This action adds the HEOScript to the world.
At this time, another Heliscript may be specified in the initial state, so specify ChatGPTTest in 3. below.

3. Set ChatGPTTest in HeliScript
Select "Select" for HEOScript and select the Heliscript named ChatGPTTest from the window that appears .
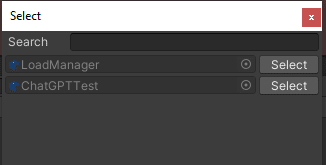
Also, enter ChatGPTTest in the text box next to Component.

Four. Rewrite ChatGPTTest's ID to prompt's
In this scene, the ChatGPT prompt is called using Heliscript called "ChatGPTTest".
To call the prompt set on the AI prompt management screen, rewrite CharacterID and CharaName as follows.
component ChatGPTTest {
	Player	m_MyPlayer;

	int		m_CharacterID;
	string	m_CharaName;

	public ChatGPTTest()
	{
		m_MyPlayer = hsPlayerGet();

		hsAddOnReceiveChatGPT(OnReceiveChatGPT);

		m_CharacterID = 14173748;   //Vket Promptにて設定したID
		m_CharaName = "コンビニ店員Vketちゃん"; //Vket Promptにて設定した名前
	}
  // ~~省略~~
The ID specified here must be the same as the ID set on the AI prompt management screen.
You can check the ID on the list page of the AI prompt management screen.

Also, the prompt ID can be used by other users , so if you come up with an interesting prompt, be sure to share it!
*Only prompts created by you are displayed on the management screen.
This convenience store clerk Vket-chan's ID is for demonstration purposes, so feel free to use it.
If you change the script and build it, you can actually call ChatGPT with the prompt set in the world!
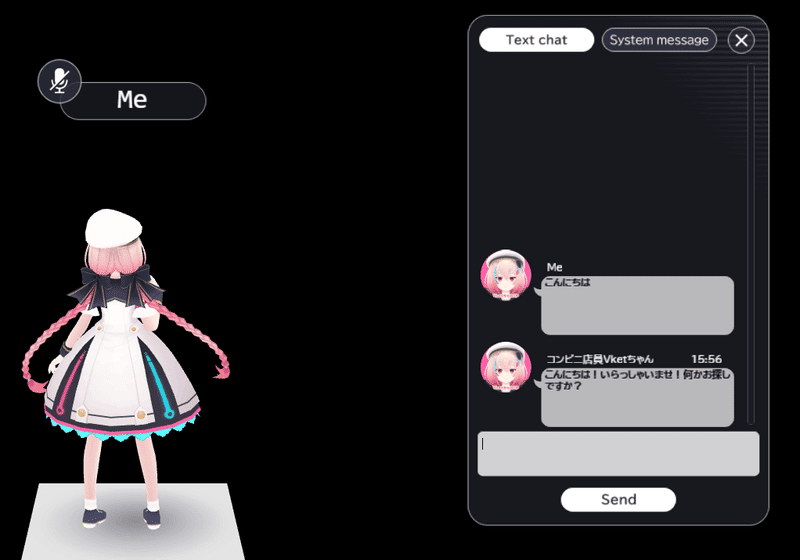
Please set various prompts and design your play!


