
「Lisk Desktop v3」の使い方 その2

こんにちは!万博おじです。
前回の続きです。
今回はアカウント作成などアカウント周りの説明を書いていきますよー!
ということでどうぞよろしく。
前回
マガジン
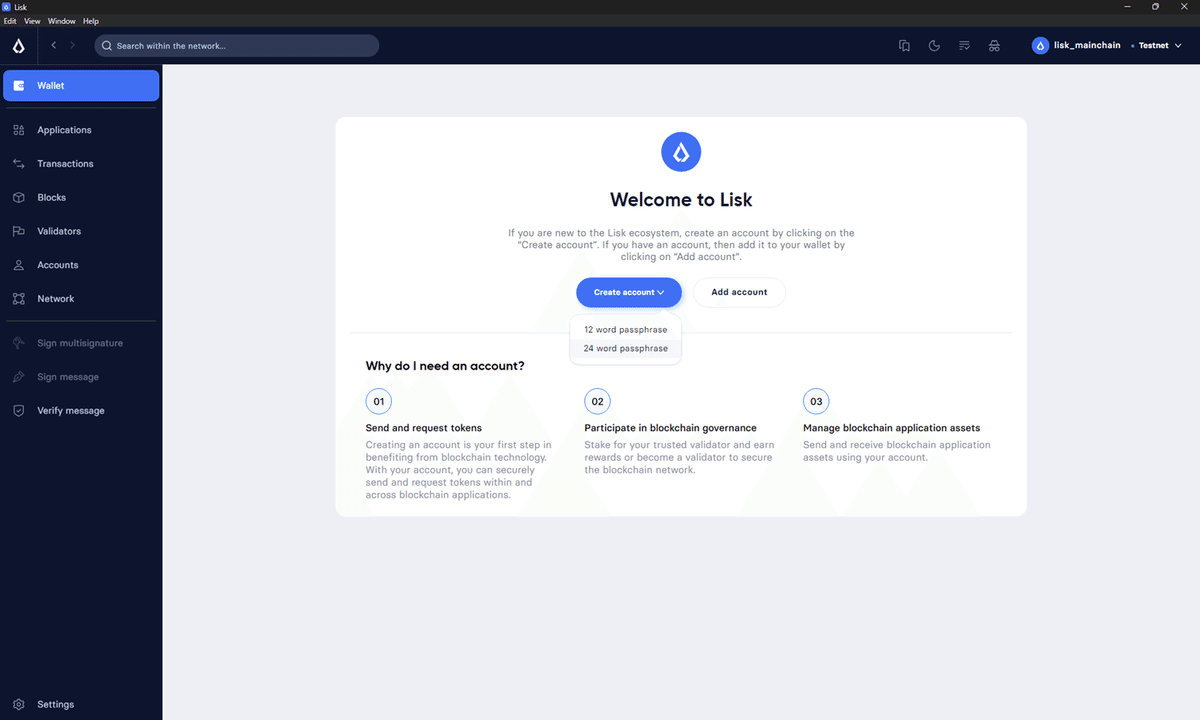
アカウントの新規作成
Lisk v4になってからアカウントを新規で作成する場合は以下の手順で作成してください。
Lisk v3以前のアカウントをLisk Desktopで管理する場合は後述の「アカウントの追加方法:リカバリーフレーズ」をご覧くださいませ。
開始
Lisk Desktopにアカウントが1つもない場合はWallet画面の「Create account」を押します。
1つ以上ある場合は初期画面で「Add another account」または、サブメニューで「Add new account」を押した際に表示される画面で「Create one now」を押します。


リカバリーフレーズの語数選択
「12 word passphrase」か「24 word passphrase」の選択を求められるので好きな方を選びましょう。
せっかく新規に作るなら24 wordにしておくといいかも
アバター選択
好きなアバターを選んだら「Continue」を押します。

リカバリーフレーズの確認
リカバリーフレーズ(パスフレーズ)が表示されるのでメモを取るか、「Download」リンクからPDFファイルをダウンロード後に「I have written them down」を押します。

リカバリーフレーズの入力
抜けているワードを選択後に「Continue to set password」を押します。

パスワードの設定
表示された画面で各項目を入力後に「Save account」を押します。
Password:作成したアカウントにアクセスするためのパスワードを入力(Not リカバリーフレーズ)
Password confirmation:Passwordと同じ値を入力
Account name (Optional):アカウントを管理しやすくするための任意の名前(入力しなくてもOK)
I agree to ~:チェックON
※Passwordは8文字以上で英字大文字、英字小文字、数字、記号をそれぞれ1文字以上含める必要があります。
※Account nameは3文字以上で英数字と一部の記号(「!」、「@」、「$」、「&」、「_」、「.」)のみ使用可能です。
※Account nameはあとからでも変更できます。
※Passwordはあとから変更できないので忘れないようにしましょう。もし変更したい場合はアカウントを削除後に、リカバリーフレーズを使ってアカウントを追加する必要があります。

作成完了
「Continue to wallet」を押します。

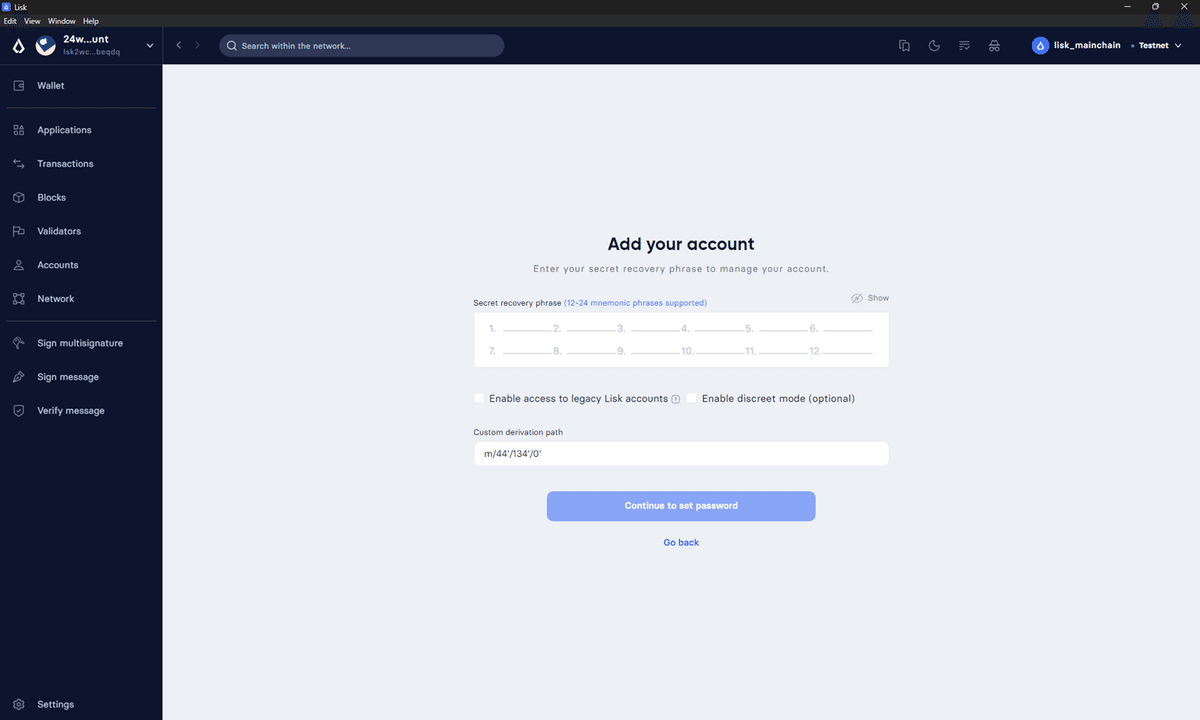
アカウントの追加:リカバリーフレーズ
開始
Lisk Desktopにアカウントが1つもない場合はWallet画面の「Add account」、1つ以上ある場合は初期画面で「Add another account」または、サブメニューで「Add new account」を押した際に表示される画面で「Secret recovery phrase」を押します。

リカバリーフレーズの入力
表示された画面で各項目を入力後に「Continue to set password」を押します。
Secret recovery phrase:追加したいアカウントのリカバリーフレーズ(パスフレーズ)を入力。
Enable access to legacy Lisk accounts:Lisk v3以前のアカウントの場合は必ずチェックON。
Custom derivation path:Lisk v4で作成したアカウントの場合は入力。基本的には変更しなくてOK。
※Custom derivation pathはEnable access to legacy Lisk accountsがチェックされていない場合のみ表示されます。
※Lisk v4で作成したアカウントにも関わらずEnable access to legacy Lisk accountsにチェックしたり、Lisk v3以前のアカウントなのにEnable access to legacy Lisk accountsにチェックしなかったり、Custom derivation pathを作成したアカウントのものと変えた場合は別のアドレスになるので注意してください。
パスワードの設定
表示された画面で各項目を入力後に「Save Account」を押します。
入力内容については「アカウントの新規作成」の「パスワードの設定」を参照

追加完了
「Continue to wallet」を押します。
アカウントのバックアップ用に「Download」リンクからバックアップファイル(JSONファイル)をダウンロードしておくことをお勧めします。

アカウントの追加:バックアップファイル
開始
Lisk Desktopにアカウントが1つもない場合はWallet画面の「Add account」、1つ以上ある場合は初期画面で「Add another account」または、サブメニューで「Add new account」を押した際に表示される画面で「Restore from backup」を押します。
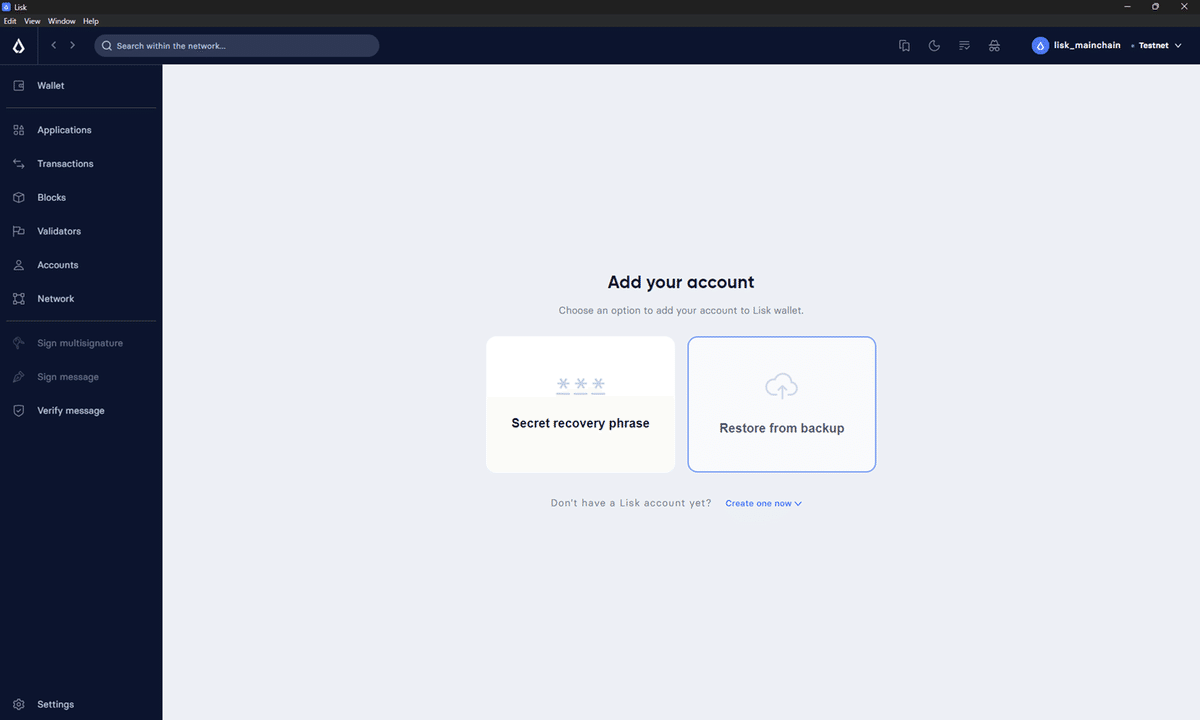
バックアップファイルの選択
「Select account JSON file」リンクを押してバックアップファイル(JSONファイル)を選択するか、バックアップファイルを「Please paste the JSON ~」と書かれたエリアにドラッグアンドドロップします。

バックアップファイルの内容表示
バックアップファイルの内容が表示されたら「Continue」を押します。

パスワードの入力
追加したいアカウントであることを確認後、アカウントを作成・追加した際に設定したパスワードを入力し「Continue」を押します。

追加完了
「Continue to wallet」を押します。
「Download」リンクからバックアップファイル(JSONファイル)がダウンロード出来ますが、この手順で追加しているのであればダウンロードは不要です。

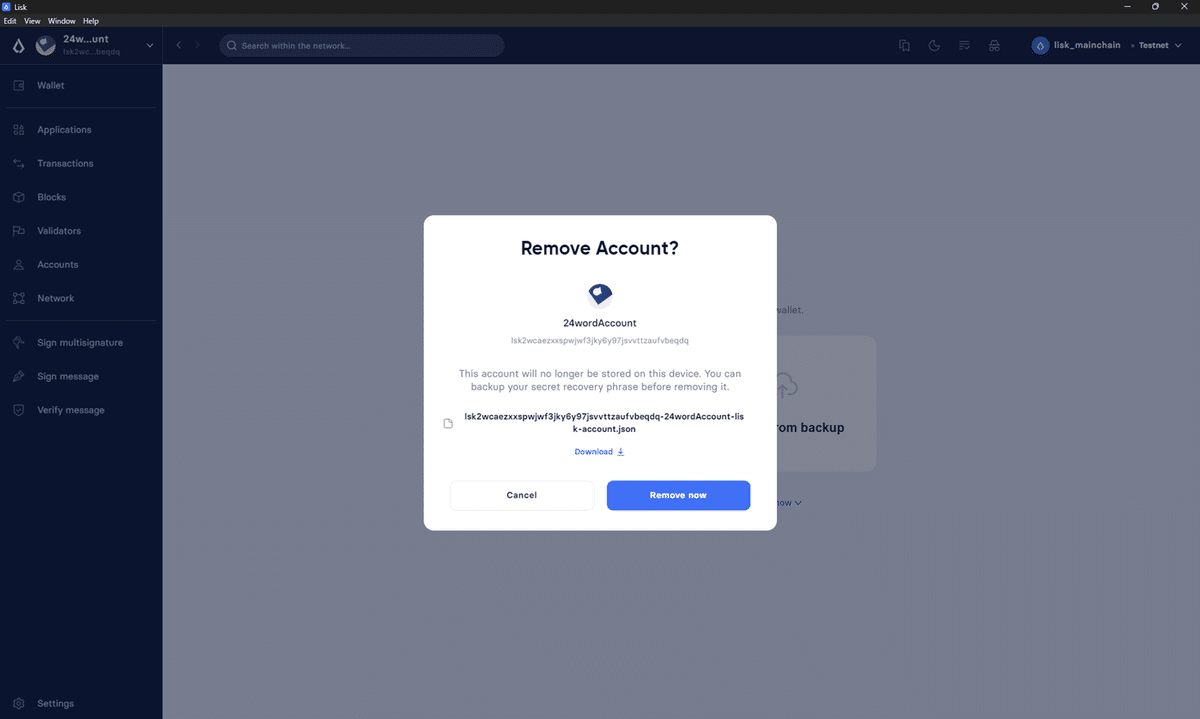
アカウントの削除
Lisk Desktopから削除されるだけで、ブロックチェーン上から削除されるわけではありません。
開始
サブメニューから「Remove account」を選択するか、Lisk Desktopを開いた際に表示される初期画面で「Remove an account」を押すと表示される画面にて削除したいアカウント横のごみ箱アイコンをクリックします。

削除
「Remove now」を押します。
押した時点で削除されます。
復活させる予定がある場合は「Download」リンクを押してバックアップファイル(JSONファイル)をダウンロードしておきましょう。
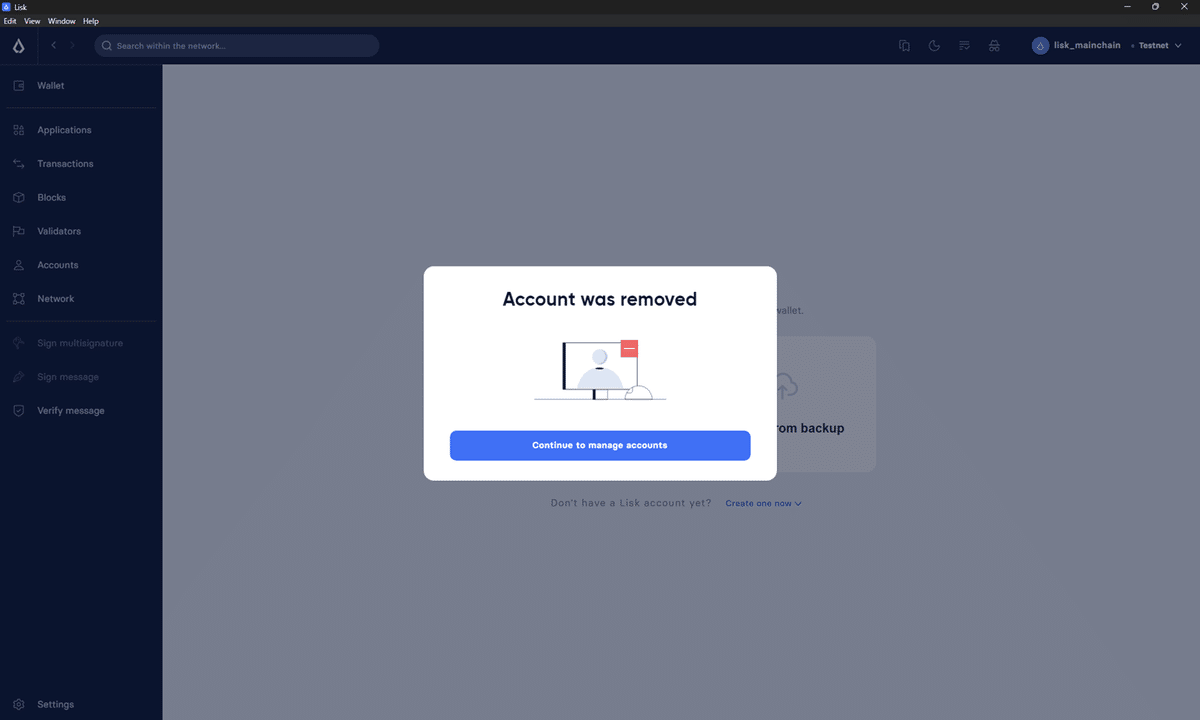
削除完了
「Continue to manage accounts」を押します。
アカウントのバックアップ
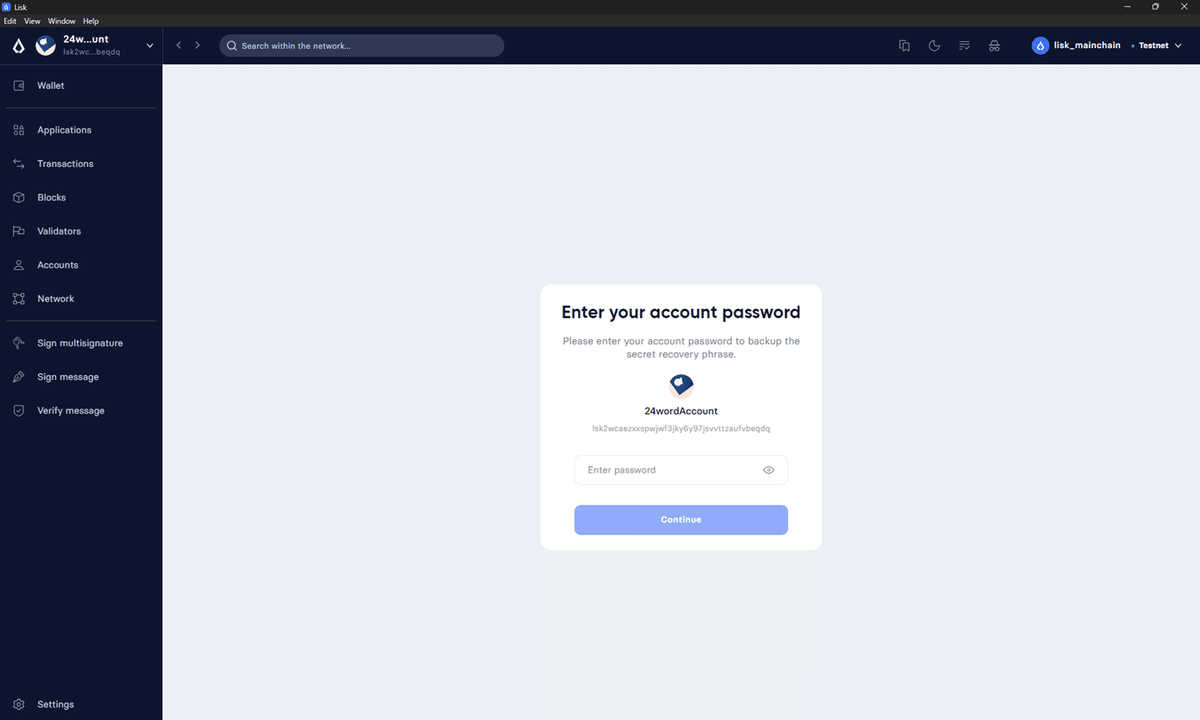
開始
サブメニューから「Backup account」を選択します。

パスワードの入力
アカウントを作成・追加した際に設定したパスワードを入力し「Continue」を押します。
バックアップ
パスフレーズが表示されるのでメモを取ったり、「Download」リンクからバックアップファイル(JSONファイル)をダウンロードしてください。
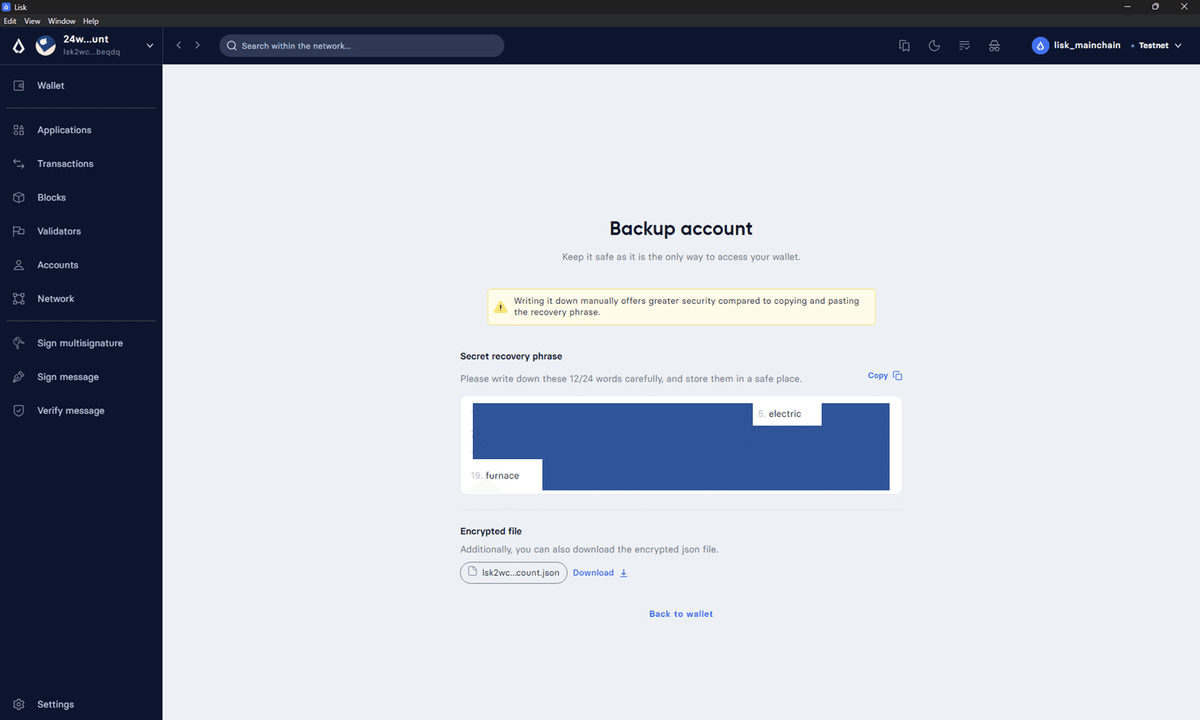
バックアップ完了
満足したら「Back to wallet」リンクを押してもどってください。
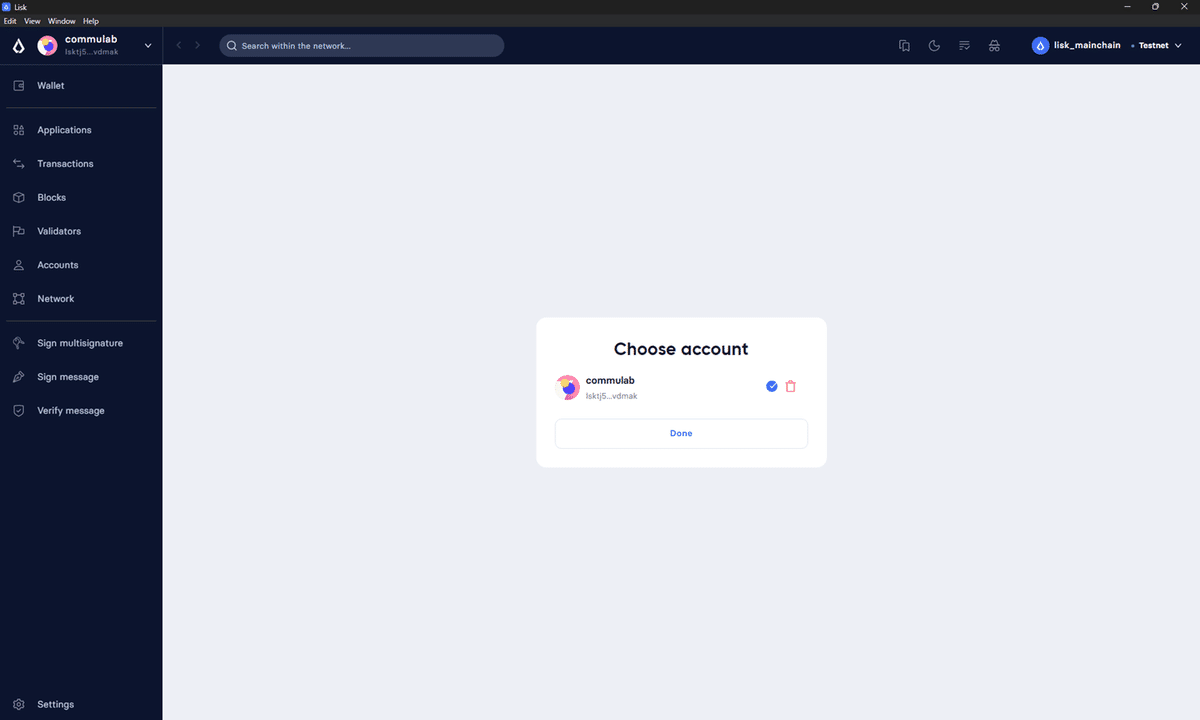
アカウントの切り替え
開始
サブメニューから「Switch account」を選択します

切り替え
切り替えたいアカウントを選択します。
チェックマークがついているものが現在接続中のアカウントです。
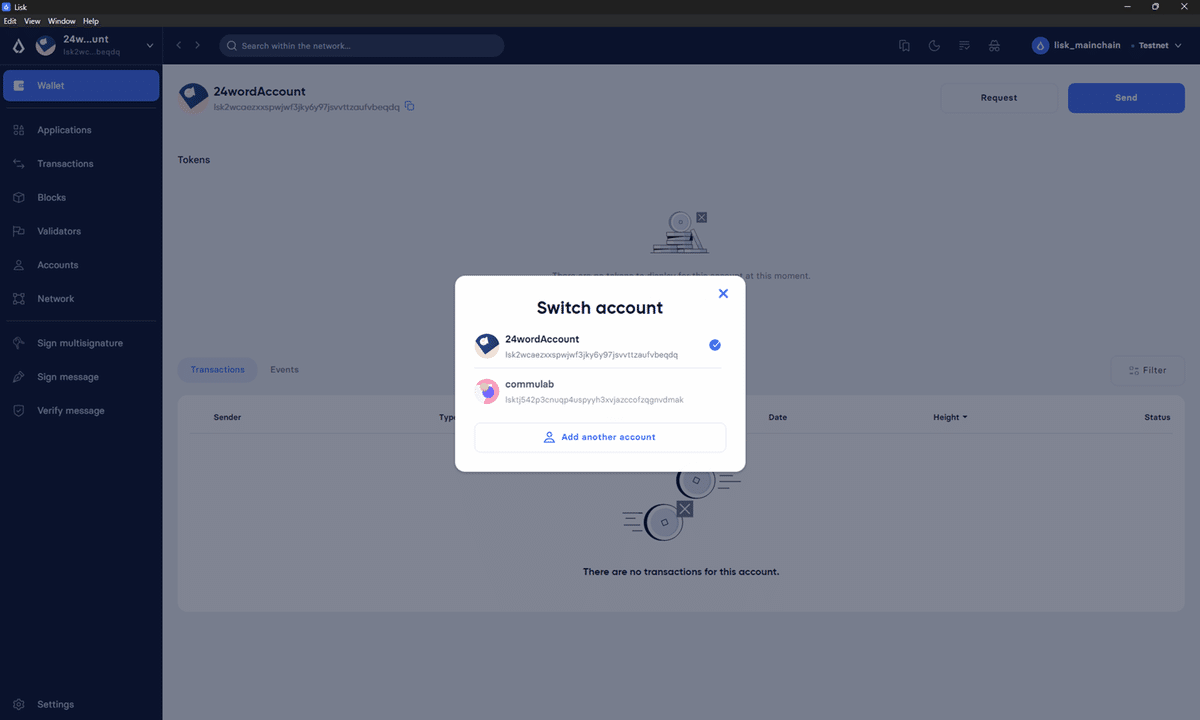
切り替え完了
選択したアカウントが表示されます。

アカウント名の変更
Lisk Desktop上で管理するためのアカウント名(アカウントの作成・追加時に設定した名前)を変更する手順です。
バリデータ登録する際に指定した名前の変更ではありません。(バリデータ名は変更できません)
開始
サブメニューから「Account detailes」を選択します。

アカウント情報の表示
表示されるダイアログのアカウント名横にある鉛筆アイコンをクリックします。
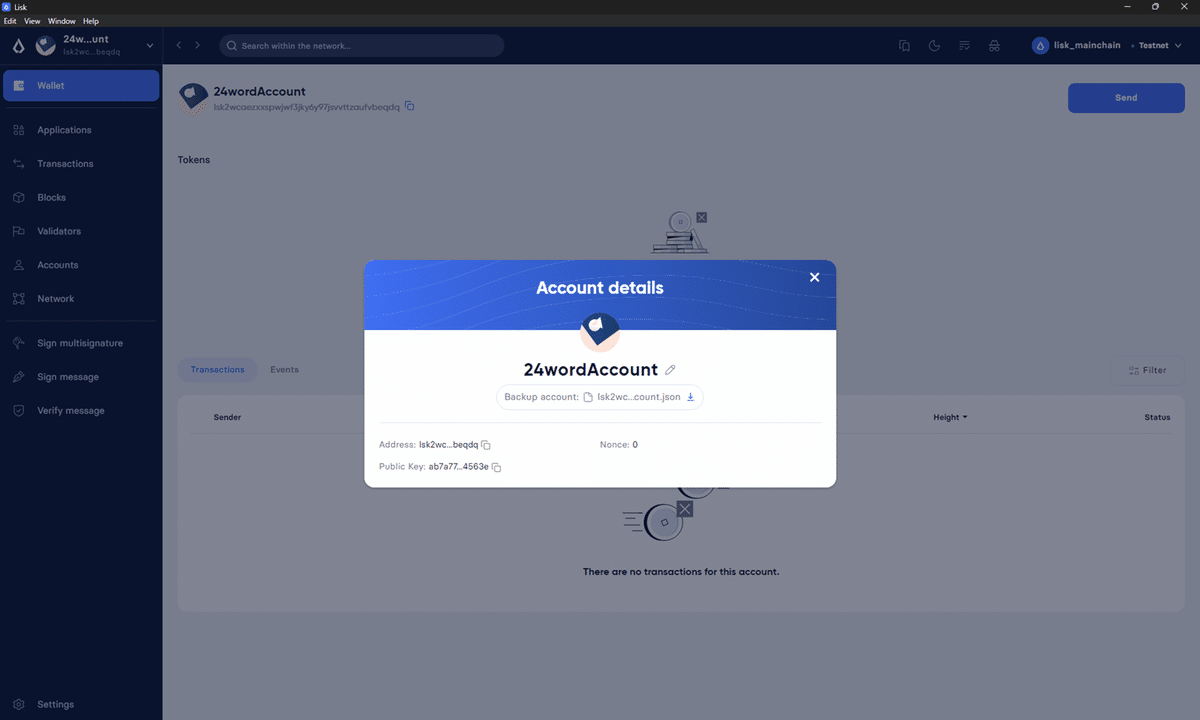
アカウント名の変更
編集できるようになるので、任意の名前に変更後に「Save changes」を押します。

変更完了
おわり

おわりに
今回はアカウント周りの説明でした。
マルチシグネチャアカウント(セカンドパスフレーズ保有者を含む)の人や、アカウントを複数持っている人はLisk Desktopに必要なアカウントを追加しておくことをおススメします!
もちろん、リカバリーフレーズ(パスフレーズ)やLisk Desktopで設定したパスワードは人に教えちゃダメですよ!
次回はトークンの送信や投票周りの説明をする予定です。
読んでいただきありがとうございました!