[GAS] NotionAPIを使って、作成した日報ページの内容を取得しChatworkでメッセージを送信する2
はじめに
前回、GASで、NotionAPIを使用し、前回作成した日報ページから作業内容を取得し、日報を報告するメッセージをChatworkで送信する、という処理を実装しますの1回目として、処理概要とNotionのページ構成の基礎知識についてご紹介しました。
今回は、GASで、Notionの日報ページから箇条書きリストの内容を取得し、Googleスプレッドシートの特定のセルに出力する処理を実装していきます。
実装
実装時に必要になるのは、下記2つになります。
Internal Integration Token
取得するページID
全体の処理は、下記です。
/**
 * Notion 指定ページの箇条書きリストの内容を取得する
 */
function fetchDiaryNotion() {
	const props = PropertiesService.getScriptProperties();
 const token = props.getProperty('NOTION_TOKEN');
  const pageId = props.getProperty('NOTION_PAGE_ID');

  const textLines = getTextBlockChildren_(token, pageId);
  const line = textLines.join('\n');

  const sheet = SpreadsheetApp.getActiveSpreadsheet().getSheetByName(DIARY_TEMPLATE_SHEET_NAME);
}

/**
 * 箇条書きリストを取得し、文字列として取得する
 * @param {string} token - トークン
 * @param {string} blockId - ページID or ブロックID
 * @param {string} prefix - 取得した文字列の先頭に設定する文字列
 * @return {Array.<string>} 取得した文字列の配列
 */
function getTextBlockChildren_(token, blockId, prefix=' ・'){
	const notionApiManager = new NotionApiManager(token);
  const response = notionApiManager.getBlockChildren(blockId);
  const json = response.getContentText();
  const data = JSON.parse(json);

  let textLines = [];
  for ( const result of data.results ){
    if ( result.type === 'bulleted_list_item'){
      textLines.push(prefix + result.bulleted_list_item.rich_text[0].text.content);

      if (result.has_children === true){
        const getBlockId = result.id;
        const blockId = getBlockId.replace(/-/g,'');
        const nextPrefix = '\t' + prefix;

        const childTextLines = getTextBlockChildren_(notionManager, blockId, nextPrefix);
        textLines = textLines.concat(childTextLines);
      }
    }
  }
  return textLines;
}
順に処理を説明します。
①ページID(ブロックID)を指定して、箇条書きリストを取得
getTextBlockChildren_関数で、指定されたページID、もしくはブロックIDの作成するページオブジェクトを作成しています。
APIの詳細は、下記をご参照ください。
指定したIDの子要素を取得するHTTPリクエストを実行し、JSON形式をオブジェクトに変換します。
  const notionApiManager = new NotionApiManager(token);
  const response = notionApiManager.getBlockChildren(blockId);
  const json = response.getContentText();
const data = JSON.parse(json);指定したIDの子要素が、resultsプロパティに配列として格納されているため、順番に確認、取得していきます。
今回は、箇条書きリストのみを対象としているため、typeプロパティを参照し、箇条書きリストのみを処理するようにします。
  for ( const result of data.results ){
if ( result.type === 'bulleted_list_item'){リストに設定されている文字列は、rich_textプロパティの中のtextプロパティから取得します。
textLines.push(prefix + result.bulleted_list_item.rich_text[0].text.content);参照中の要素が、子要素を持つかどうかは、has_childrenプロパティで確認することができです。
has_childrenプロパティがtrueの場合、現在参照中のブロックIDを指定して、現在実行しているgetTextBlockChildren_関数を再帰関数として呼び出します。
      if (result.has_children === true){
        const getBlockId = result.id;
        const blockId = getBlockId.replace(/-/g,'');
        const nextPrefix = '\t' + prefix;

        const childTextLines = getTextBlockChildren_(notionManager, blockId, nextPrefix);
        textLines = textLines.concat(childTextLines);
}getTextBlockChildren_関数の第3引数は、取得した文字列の先頭に設定する文字を指定しています。
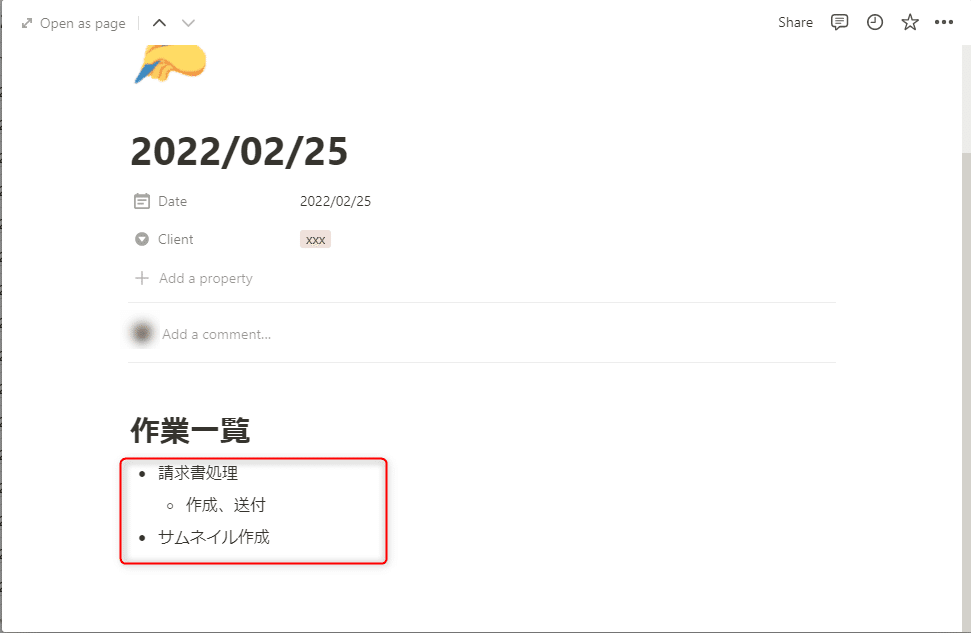
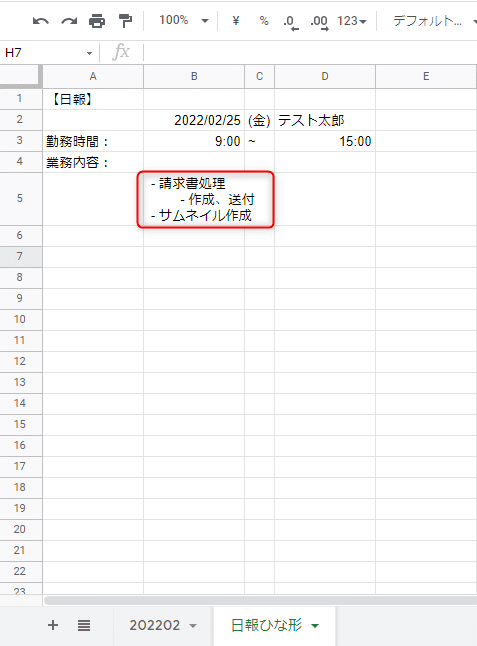
Notionの日報ページに記載されている箇条書きリストと合わせるよう、\t(タブ)と「・」を指定しています。
      if (result.has_children === true){
        const getBlockId = result.id;
        const blockId = getBlockId.replace(/-/g,'');
        const nextPrefix = '\t' + prefix;

        const childTextLines = getTextBlockChildren_(notionManager, blockId, nextPrefix);
        textLines = textLines.concat(childTextLines);
      }
②NotionAPI用のクラスの実装
NotionAPIを呼び出す処理は、下記のように実装しています。
 const notionApiManager = new NotionManager(token);
 const response = notionApiManager.getBlockChildren(blockId);
NotionAPI用のクラスを作成しています。前回ご紹介した実装から、処理を追加しています。
class NotionApiManager{
/**
* Notion APIに関するコンストラクタ
* @constructor
*/
constructor(token){
this._token = token;
this._notionVersion = this._getNotionAPIVersion();
}
/**
* ページを作成するメソッド
* @param {object} payload - ページオブジェクト
* @return {HTTPResponse} fetchのresponse
*/
createPage(payload){
const endpoint = this._getEndpointPage();
const options = this._postOption(payload);
const response = UrlFetchApp.fetch(endpoint, options);
return response;
}
/**
* 指定した要素の子要素を取得するメソッド
* @param {string} blockId- ページ、オブジェクトID
* @return {HTTPResponse} fetchのresponse
*/
getBlockChildren(blockId){
const endpoint = this._getEndpointBlockChildren(blockId);
const options = this._getOption();
const response = UrlFetchApp.fetch(endpoint, options);
    if ( response.getResponseCode() === 200 ){
      // 応答を返すまで、待つ
      Utilities.sleep(1000);
    }
return response;
}
/**
* NotionAPI のVersionを取得するサブメソッド
* @param {string} guestId - アプリの名前
* @return {string} version - NotionAPIのバージョン
*/
_getNotionAPIVersion(){
const url = "https://developers.notion.com/reference/versioning"
const reg = /"default".*?<\/script>/g;
const htmldata = UrlFetchApp.fetch(url).getContentText("utf-8");
const version = htmldata.match(reg)[0].match(/([0-9]{4}-[0-9]{2}-[0-9]{2})/g)[0];
return version;
}
/**
* ページ用エンドポイントを取得するサブメソッド
* @return {string} endpoint - エンドポイント
*/
_getEndpointPage() {
return 'https://api.notion.com/v1/pages/'
}
/**
* ブロックの子要素用エンドポイントを取得する
* @return {string} endpoint - エンドポイント
*/
_getEndpointBlockChildren(blockId) {
return `${this._getEndpointBlock(blockId)}children/`
}
/**
* ブロック用エンドポイントを取得する
* @return {string} endpoint - エンドポイント
*/
_getEndpointBlock(blockId) {
return `https://api.notion.com/v1/blocks/${blockId}/`
}
/**
* GETする時のオプションを作成するサブメソッド
* @return {Object} option - option
*/
_getOption() {
const option = {
method: "get",
headers: {
'Content-Type': 'application/json',
'Notion-Version': this._notionVersion,
'Authorization': "Bearer " + this._token
},
muteHttpExceptions: true
};
return option;
}
/**
* POSTする時のオプションを作成するサブメソッド
* @param {Object} payload - payload
* @return {Object} option - option
*/
_postOption(payload) {
const options = {
method: 'post',
headers: {
'Content-Type': 'application/json',
'Notion-Version': this._notionVersion,
'Authorization': "Bearer " + this._token
},
payload: JSON.stringify(payload)
};
return options;
}
}クラスに追加したメソッドは、getBlockChildrenメソッドになります。
getBlockChildrenメソッドは、ページID、もしくはオブジェクトIDの子要素を取得するのエンドポイント、オプションを指定してHTTPリクエストを実行します。
このgetBlockChildrenメソッドでは、HTTPリクエスト実行後に1000ミリ秒(1秒)間スリープの処理を入れています。
if ( response.getResponseCode() === 200 ){
// 応答を返すまで、待つ
Utilities.sleep(1000);
}NotionAPIでは、一定時間あたりに使用できる回数に制限があるため、連続してHTTPリクエストを送信しないため、スリープ処理を行っています。
処理は以上です!
実行すると、Notionの日報ページの箇条書きリストの内容が、Googleスプレッドシートの特定のセルに書き込まれているのが確認できました。


まとめ
今回は、GASで、Notionの日報ページから箇条書きリストの内容を取得し、Googleスプレッドシートの特定のセルに出力する処理を実装について、まとめました。
次回は、今回取得した日報の内容と出社、退社の時間を合わせて、日報報告としてChatworkに送信する処理の実装について、ご紹介していきます。
