Ciscoエミュレーター cisshgo ~Teratermマクロのローカルテスト環境構築 ~

はじめに
ネットワークのSIをする際に重宝するTeratermマクロですが、コード検証のためにわざわざ実機につないだり、環境を用意するのが面倒だなーと思っていたところ、IOSを簡易的にエミュレートした「cisshgo」なるものがあることを知り、調べながら環境構築をしてました。
必要な環境:
インターネットにつながるWindows11のPC1台
なお、cisshgo自体はIOSをちゃんとエミュレートしているわけではなく、IOSコマンドに対し事前に用意されているテキストファイルの内容を出力するだけのようなので、ネットワーク検証や学習的な使い方にはあまり向いてなさそうです。
Rocky Linux9 の導入
1. WSL2 のインストール
わたしの環境ではインストール済みなので省略。
以下サイトが参考になります。
2. Rocky Linux 9 のインストール
CentOS後継(RedHat系)のRocky Linux9 をインストールします。
こちらのサイトを参考にしました。
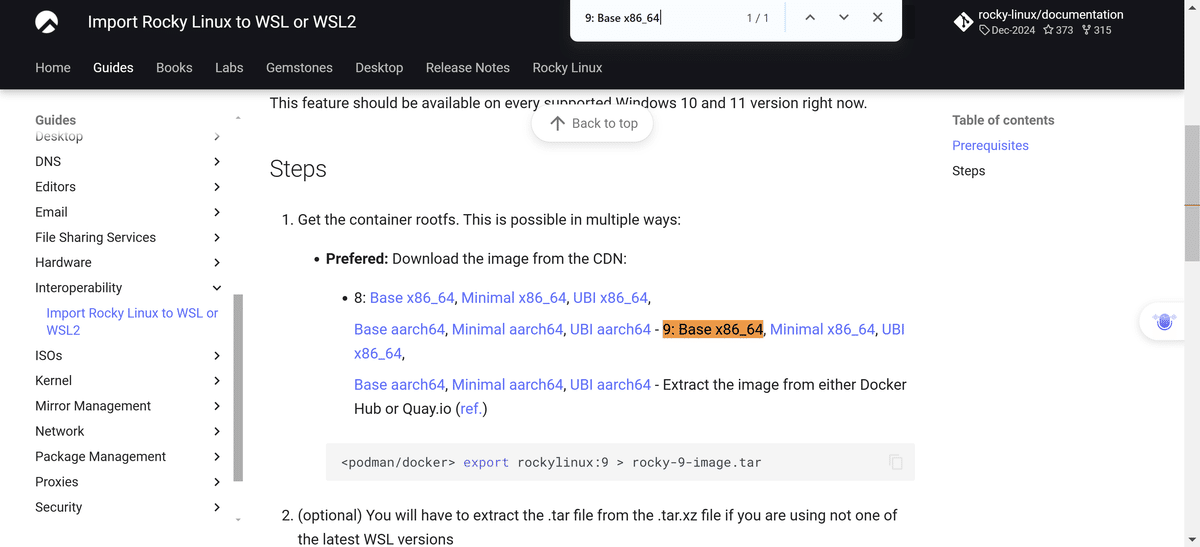
以下サイトからダウンロードします。
「9: Base x86_64」をダウンロード
ダウンロードした「Rocky-9-Container-Base.latest.x86_64.tar.xz」を任意の場所(今回はRocky9フォルダ)へ移動しておく。
PowerShellを管理者権限で起動し、tar.xz ファイルを移動したRocky9フォルダに移動し、以下のコマンドでRocky9をインポートする。
wsl --import <machine-name> <path-to-vm-dir> <path-to/rocky-9-image.tar.xz> --version 2
PS C:\Windows\system32> cd C:\Users\[user]\Rocky9
PS C:\Users\[user]\Rocky9> ls


    ディレクトリ: C:\Users\[user]\Rocky9


Mode                 LastWriteTime         Length Name
----                 -------------         ------ ----
-a----        2024/12/14     10:48       52991368 Rocky-9-Container-Base.latest.x86_64.tar.xz


PS C:\Users\[user]\Rocky9> wsl --import Rocky9 . Rocky-9-Container-Base.latest.x86_64.tar.xz --version 2
インポート中です。この処理には数分かかることがあります。
この操作を正しく終了しました。
PS C:\Users\[user]\Rocky9>
3. Rocky Linux 9 の環境設定
インポートしたRocky9を起動する。
PS C:\Users\[user]\Rocky9> wsl -l -v # Rocky9のインポートを確認
  NAME                   STATE           VERSION
* Ubuntu                 Stopped         2
  Rocky9                 Stopped         2
  docker-desktop-data    Stopped         2
  docker-desktop         Stopped         2
PS C:\Users\[user]\Rocky9> wsl -d ocky9 # Rocky9の起動
[root@pc Rocky9]#
引き続きRocky9にログインした状態で、以下の設定を実施する。
# dnf update -y
# dnf install systemd
# cat << EOF > /etc/wsl.conf
[boot]
systemd=true
EOF
# exit
(参考)実行時の画面
[root@pc Rocky9]# dnf update -y
Rocky Linux 9 - BaseOS                                                                  1.0 MB/s | 2.3 MB     00:02
Rocky Linux 9 - AppStream                                                               3.8 MB/s | 8.3 MB     00:02
Rocky Linux 9 - Extras                                                                  3.6 kB/s |  16 kB     00:04
Dependencies resolved.
========================================================================================================================
 Package                 Architecture               Version                            Repository                  Size
========================================================================================================================
Upgrading:
 pam                     x86_64                     1.5.1-22.el9_5                     baseos                     548 k

Transaction Summary
========================================================================================================================
Upgrade  1 Package

Total download size: 548 k
Downloading Packages:
pam-1.5.1-22.el9_5.x86_64.rpm                                                           1.0 MB/s | 548 kB     00:00

~ <略> ~

Upgraded:
  pam-1.5.1-22.el9_5.x86_64

Complete!
[root@pc Rocky9]# dnf install systemd
Last metadata expiration check: 0:00:17 ago on Sat Dec 14 11:15:54 2024.
Dependencies resolved.
========================================================================================================================
 Package                              Architecture        Version                             Repository           Size
========================================================================================================================
Installing:
 systemd                              x86_64              252-46.el9_5.2.0.1                  baseos              4.0 M
Installing dependencies:
 acl                                  x86_64              2.3.1-4.el9                         baseos               69 k
 dbus                                 x86_64              1:1.12.20-8.el9                     baseos              6.8 k
 dbus-broker                          x86_64              28-7.el9                            baseos              171 k
 dbus-common                          noarch              1:1.12.20-8.el9                     baseos               14 k
 diffutils                            x86_64              3.7-12.el9                          baseos              388 k
 kmod-libs                            x86_64              28-10.el9                           baseos               62 k
 libseccomp                           x86_64              2.5.2-2.el9                         baseos               71 k
 libselinux-utils                     x86_64              3.6-1.el9                           baseos              164 k
 policycoreutils                      x86_64              3.6-2.1.el9                         baseos              208 k
 rpm-plugin-selinux                   x86_64              4.16.1.3-34.el9.0.1                 baseos               16 k
 selinux-policy                       noarch              38.1.45-3.el9_5                     baseos               48 k
 selinux-policy-targeted              noarch              38.1.45-3.el9_5                     baseos              6.5 M
 systemd-pam                          x86_64              252-46.el9_5.2.0.1                  baseos              285 k
 systemd-rpm-macros                   noarch              252-46.el9_5.2.0.1                  baseos               73 k

Transaction Summary
========================================================================================================================
Install  15 Packages

Total download size: 12 M
Installed size: 34 M
Is this ok [y/N]: y
Downloading Packages:
(1/15): acl-2.3.1-4.el9.x86_64.rpm                                                       66 kB/s |  69 kB     00:01
(2/15): selinux-policy-38.1.45-3.el9_5.noarch.rpm                                        45 kB/s |  48 kB     00:01
(3/15): rpm-plugin-selinux-4.16.1.3-34.el9.0.1.x86_64.rpm                               204 kB/s |  16 kB     00:00

~ <略> ~

Complete!
[root@pc Rocky9]# cat /etc/wsl.conf
cat: /etc/wsl.conf: No such file or directory
[root@pc Rocky9]# cat << EOF > /etc/wsl.conf
> [boot]
> systemd=true
> EOF
[root@pc Rocky9]# cat /etc/wsl.conf
[boot]
systemd=true
[root@pc Rocky9]#exit
Rocky9をexitで抜け、PowerShellのプロンプトからRocky9を再起動する。
PS C:\Users\[user]\Rocky9> wsl --shutdown
PS C:\Users\[user]\Rocky9> wsl -d Rocky9
[root@pc Rocky9]#
以下のコマンドでSSHおよびツール類を導入します。
windows機からwsl上のRocky9へsshでログインするためにRocky9上でssh-serverを立ち上げる.その際ついでに基本コマンドを導入する.
コマンドは以下
# dnf install https://dl.fedoraproject.org/pub/epel/epel-release-latest-9.noarch.rpm
# dnf groupinstall "Development Tools" -y
# dnf install openssh* iproute vim passwd wget xterm x11* procps-ng gnuplot -y
(参考)実行時の画面
[root@pc Rocky9]# dnf install https://dl.fedoraproject.org/pub/epel/epel-release-latest-9.noarch.rpm
Last metadata expiration check: 0:20:45 ago on Sat Dec 14 11:15:54 2024.
epel-release-latest-9.noarch.rpm                                                         14 kB/s |  19 kB     00:01
Dependencies resolved.
========================================================================================================================
 Package                              Architecture       Version                         Repository                Size
========================================================================================================================
Installing:
 epel-release                         noarch             9-9.el9                         @commandline              19 k
Installing dependencies:
 dbus-libs                            x86_64             1:1.12.20-8.el9                 baseos                   151 k
 python3-dateutil                     noarch             1:2.8.1-7.el9                   baseos                   287 k
 python3-dbus                         x86_64             1.2.18-2.el9.0.1                baseos                   131 k
 python3-dnf-plugins-core             noarch             4.3.0-16.el9                    baseos                   246 k
 python3-six                          noarch             1.15.0-9.el9                    baseos                    36 k
 python3-systemd                      x86_64             234-19.el9                      baseos                    82 k
Installing weak dependencies:
 dnf-plugins-core                     noarch             4.3.0-16.el9                    baseos                    36 k

Transaction Summary
========================================================================================================================
Install  8 Packages

Total size: 987 k
Total download size: 969 k
Installed size: 2.9 M
Is this ok [y/N]: y
Downloading Packages:
(1/7): dnf-plugins-core-4.3.0-16.el9.noarch.rpm                                         124 kB/s |  36 kB     00:00
(2/7): python3-six-1.15.0-9.el9.noarch.rpm                                               90 kB/s |  36 kB     00:00
(3/7): python3-systemd-234-19.el9.x86_64.rpm                                            891 kB/s |  82 kB     00:00
(4/7): python3-dnf-plugins-core-4.3.0-16.el9.noarch.rpm                                 469 kB/s | 246 kB     00:00
(5/7): python3-dateutil-2.8.1-7.el9.noarch.rpm                                          1.0 MB/s | 287 kB     00:00
(6/7): dbus-libs-1.12.20-8.el9.x86_64.rpm                                               1.6 MB/s | 151 kB     00:00
(7/7): python3-dbus-1.2.18-2.el9.0.1.x86_64.rpm                                         1.2 MB/s | 131 kB     00:00
------------------------------------------------------------------------------------------------------------------------
Total                                                                                   751 kB/s | 969 kB     00:01

~ <略> ~

Complete!
[root@pc Rocky9]# dnf groupinstall "Development Tools" -y
Extra Packages for Enterprise Linux 9 - x86_64                                          3.9 MB/s |  23 MB     00:05
Extra Packages for Enterprise Linux 9 openh264 (From Cisco) - x86_64                    1.8 kB/s | 2.5 kB     00:01
Dependencies resolved.
========================================================================================================================
 Package                                      Arch        Version                                  Repository      Size
========================================================================================================================
Installing group/module packages:
 asciidoc                                     noarch      9.1.0-3.el9                              appstream      238 k

~ <略> ~

Transaction Summary
========================================================================================================================
Install  416 Packages

Total download size: 306 M
Installed size: 1.1 G
Downloading Packages:
(1/416): zip-3.0-35.el9.x86_64.rpm                                                      687 kB/s | 263 kB     00:00
(2/416): efivar-libs-38-3.el9.x86_64.rpm                                                933 kB/s | 120 kB     00:00
(3/416): fonts-filesystem-2.0.5-7.el9.1.noarch.rpm                                      122 kB/s | 9.0 kB     00:00

~ <略> ~

Complete!
[root@pc Rocky9]# dnf install openssh* iproute vim passwd wget xterm x11* procps-ng gnuplot -y
Last metadata expiration check: 0:03:21 ago on Sat Dec 14 11:37:08 2024.
Package openssh-8.7p1-43.el9.x86_64 is already installed.
Package openssh-clients-8.7p1-43.el9.x86_64 is already installed.
Package passwd-0.80-12.el9.x86_64 is already installed.
Dependencies resolved.
========================================================================================================================
 Package                              Architecture  Version                                      Repository        Size
========================================================================================================================
Installing:
 gnuplot                              x86_64        5.4.3-2.el9                                  epel             820 k
 iproute                              x86_64        6.2.0-6.el9_4                                baseos           786 k
 openssh-askpass                      x86_64        8.7p1-43.el9                                 appstream         21 k

~ <略> ~

Total download size: 36 M
Installed size: 107 M
Downloading Packages:
(1/55): libcerf-1.17-2.el9.x86_64.rpm                                                   179 kB/s |  38 kB     00:00
(2/55): libvncserver-0.9.13-11.el9.x86_64.rpm                                           332 kB/s | 296 kB     00:00
(3/55): gnuplot-common-5.4.3-2.el9.x86_64.rpm                                           643 kB/s | 776 kB     00:01

~ <略> ~

Complete!
[root@pc Rocky9]#
ssh接続時のパスワード認証を有効にする。
/etc/ssh/にあるsshd_configのPasswordAuthenticationをyesに
[root@pc Rocky9]# ls -l /etc/ssh
total 584
-rw-r--r-- 1 root root 578094 Nov  5 12:37 moduli
-rw-r--r-- 1 root root   1921 Nov  5 12:37 ssh_config
drwxr-xr-x 2 root root   4096 Dec 14 11:40 ssh_config.d
-rw------- 1 root root   3667 Nov  5 12:37 sshd_config
drwx------ 2 root root   4096 Dec 14 11:40 sshd_config.d
[root@pc Rocky9]# vi /etc/ssh/sshd_config
コメントアウト#を消して有効化します。
PasswordAuthentication yessshdの自動起動設定と起動
[root@pc Rocky9]# systemctl enable sshd
[root@pc Rocky9]# systemctl start sshd.service
rootユーザーのパスワードを設定
[root@pc Rocky9]# passwd
Changing password for user root.
New password:
Retype new password:
passwd: all authentication tokens updated successfully.
[root@pc Rocky9]#
ssh接続用に一般ユーザーの作成とパスワードの設定。
# useradd foo
# passwd foo
参考サイトにはRocky9@WSLの自動起動設定もありますがここは割愛。
4. Dockerのインストール
こちらのサイトを参考にしました。
公式の Docker リポジトリをシステムに追加後、Dockerをインストールします。
dnf config-manager --add-repo=https://download.docker.com/linux/centos/docker-ce.repo
dnf -y install docker-ce docker-ce-cli containerd.io
Docker の起動と自動起動の設定
Docker をインストール後、Docker サービスの開始と Docker サービスをシステム起動時に起動するように設定します。
# systemctl start docker
# systemctl enable docker
実行後、docker が起動していることを確認します。
# systemctl status dockerroot 以外でも docker を使用できるように、docker グループへユーザーを追加します。
# usermod -aG docker [ユーザー名]正しくインストールされているかを確認するため、hello-worldイメージを使って Docker が正しく動作するかテストします。
一度、ターミナルを閉じて再度ログインした後、以下を実行します。
# docker run hello-world最後のコマンド後に以下のような出力がでると成功です。
[root@pc Rocky9]# docker run hello-world
Unable to find image 'hello-world:latest' locally
latest: Pulling from library/hello-world
c1ec31eb5944: Pull complete
Digest: sha256:5b3cc85e16e3058003c13b7821318369dad01dac3dbb877aac3c28182255c724
Status: Downloaded newer image for hello-world:latest

Hello from Docker!
This message shows that your installation appears to be working correctly.

To generate this message, Docker took the following steps:
 1. The Docker client contacted the Docker daemon.
 2. The Docker daemon pulled the "hello-world" image from the Docker Hub.
    (amd64)
 3. The Docker daemon created a new container from that image which runs the
    executable that produces the output you are currently reading.
 4. The Docker daemon streamed that output to the Docker client, which sent it
    to your terminal.

To try something more ambitious, you can run an Ubuntu container with:
 $ docker run -it ubuntu bash

Share images, automate workflows, and more with a free Docker ID:
 https://hub.docker.com/

For more examples and ideas, visit:
 https://docs.docker.com/get-started/

[root@pc Rocky9]#
Docker Compose のインストール
補足:参考サイトの手順でインストールを行いましたが、dockerコマンドのオプションとなっているので、「docker compose version」でバージョン確認を行っています。
最新のリリースをダウンロードバイナリを直接ダウンロードして使用します。最新バージョンをGitHub リリースページから確認してダウンロードし、実行権を付与します。
この時点で最新の2.32.0をダウンロード
# curl -L "https://github.com/docker/compose/releases/download/v2.32.0/docker-compose-linux-x86_64" -o /usr/local/bin/docker-compose chmod +x /usr/local/bin/docker-composeバージョンの確認方法(docker-composeのバージョンとは異なった)
# docker compose version
Docker Compose version v2.31.0
5. Gitのインストール
以下のサイトを参考にしました。
Gitをデフォルトリポジトリからインストールします。
[root@pc Rocky9]# dnf install git
Last metadata expiration check: 0:34:06 ago on Sat Dec 14 12:41:34 2024.
Package git-2.43.5-1.el9_4.x86_64 is already installed.
Dependencies resolved.
Nothing to do.
Complete!
[root@pc Rocky9]# git -v
git version 2.43.5
[root@pc Rocky9]#
cisshgoの導入
以下サイトを参考にしました。
1. Rocky LinuxへSSH接続
PowerShellのコンソールからRocky Linuxに入った状態で、IPアドレスを確認します。
[root@pc Rocky9]# ip -a address
1: lo: <LOOPBACK,UP,LOWER_UP> mtu 65536 qdisc noqueue state UNKNOWN group default qlen 1000
    link/loopback 00:00:00:00:00:00 brd 00:00:00:00:00:00
    inet 127.0.0.1/8 scope host lo
       valid_lft forever preferred_lft forever
    inet 10.255.255.254/32 brd 10.255.255.254 scope global lo
       valid_lft forever preferred_lft forever
    inet6 ::1/128 scope host
       valid_lft forever preferred_lft forever
2: eth0: <BROADCAST,MULTICAST,UP,LOWER_UP> mtu 1440 qdisc mq state UP group default qlen 1000
    link/ether xx:xx:xx:xx:xx:xx brd ff:ff:ff:ff:ff:ff
    inet 172.22.xxx.xxx/20 brd 172.22.xxx.xxx scope global eth0
       valid_lft forever preferred_lft forever
    inet6 fe80::xxx:xxxx:xxxx:xxxx/64 scope link
       valid_lft forever preferred_lft forever
[root@pc Rocky9]#
TeratermでSSH接続します。(rootでは接続できないので一般ユーザー)

2. cisshgoのインストール
任意のディレクトリでgit cloneを実行します。
[foo@pc ~]$ pwd
/home/foo
[foo@pc ~]$ git clone https://github.com/tbotnz/cisshgo.git
Cloning into 'cisshgo'...
remote: Enumerating objects: 1270, done.
remote: Counting objects: 100% (695/695), done.
remote: Compressing objects: 100% (464/464), done.
remote: Total 1270 (delta 325), reused 457 (delta 223), pack-reused 575 (from 1
Receiving objects: 100% (1270/1270), 2.42 MiB | 3.05 MiB/s, done.
Resolving deltas: 100% (523/523), done.
[foo@pc ~]$
3. transcript_map.yamlの編集
「cisshgo/transcripts」に移動して「transcript_map.yaml」を編集します。
[foo@pc ~]$ cd cisshgo/transcripts/
[foo@pc transcripts]$ vi transcript_map.yaml
---
platforms:
- csr1000v:
vendor: "cisco"
hostname: "cisshgo1000v"
password: "admin"
command_transcripts:
"show ip interface brief": "transcripts/cisco/csr1000v/show_ip_interface_brief.txt"
"show running-config": "transcripts/cisco/csr1000v/show_running-config.txt"
"show version": "transcripts/cisco/csr1000v/show_version.txt"
"terminal length 0": "transcripts/generic_empty_return.txt"
"terminal width 511": "transcripts/generic_empty_return.txt"
"write mem": "transcripts/cisco/csr1000v/write_mem.txt"
# 追記ここから
"password ios123" : "transcripts/generic_empty_return.txt"
"login" : "transcripts/generic_empty_return.txt"
# 追記ここまで
context_hierarchy:
# 追記ここから
"(config-line)#": "(config)#"
# 追記ここまで
"(config)#": "#"
"#": ">"
">": "exit"
context_search:
# 追記ここから
"line console 0": "(config-line)#"
# 追記ここまで
"configure terminal": "(config)#"
"enable": "#"
"base": ">"
4. Dockerfileの編集
ディレクトリ cisshgo 配下にある Dockerfile を編集します。
(「CMD go run cissh.go -listeners 1」が編集する部分)
[foo@pc transcripts]$ cd ..
[foo@pc cisshgo]$ pwd
/home/foo/cisshgo
[foo@pc cisshgo]$ ls -l Dockerfile
-rw-r--r-- 1 foo foo 108 Dec 14 13:30 Dockerfile
[foo@pc cisshgo]$ vi Dockerfile
FROM golang:1.15.0-buster
ADD . /app
WORKDIR /app
ENV GO111MODULE=on
RUN go mod download
CMD go run cissh.go -listeners 1
5. Dockerイメージの作成
Dockerfileを元にDockerイメージを作成します。
docker build . -t cisshgo:latest6. Dockerコンテナの生成と起動
Dockerイメージを元にDockerコンテナを生成し、バックグラウンドで起動します。
Windows側からアクセスするために、 「0.0.0.0:222:10000」で(すべてのアドレスからの port 222 へのアクセスをコンテナの port 10000へ)ポートバインディングする。
docker run --name [コンテナ名] -d -p 0.0.0.0:222:10000 [Dockerイメージ名]:[DockerイメージTAG名] なお、docker imageとコンテナ名が紐づけられることで、2回目以降は以下のようにコンテナ名とポートバインドの指定のみで立ち上げる。
wsl -d Rocky9 # powershellからwslでRocky Linuxにログイン
docker run -p 0.0.0.0:222:10000 -d cisshgo
(参考)実際の画面
[foo@pc cisshgo]$ docker images
REPOSITORY    TAG       IMAGE ID       CREATED         SIZE
cisshgo       latest    032099ab53fe   2 minutes ago   905MB
hello-world   latest    d2c94e258dcb   19 months ago   13.3kB
[foo@pc cisshgo]$ docker run --name cisshgo -d -p 0.0.0.0:222:10000 cisshgo:latest
a107ccd5e8c4ff298ac4efb8c2409b2489a580ab06bbc5c2afecdf37225a7784
[foo@ps cisshgo]$ docker ps
CONTAINER ID   IMAGE            COMMAND                  CREATED         STATUS         PORTS                    NAMES
a107ccd5e8c4   cisshgo:latest   "/bin/sh -c 'go run …"   6 seconds ago   Up 6 seconds   0.0.0.0:222->10000/tcp   cisshgo
[foo@ko-pc cisshgo]$
補足:cisshgoのSHA1問題
「cisshgo」が対応しているSSH暗号鍵方式が「SHA1」という古いもののようで、「Rocky Linux 9」からSSHを試すとログインに失敗します。
「WSLのRocky Linux上からSSH接続」する場合の話で、今回やりたい「WSLの外(Windows)からのTeraterm接続」するには問題ないのでここでは割愛します。
cisshgoへのSSH接続確認
WindowsのTeratermからSSH接続します。
IPアドレス:Rocky LinuxのIP
ポート番号:222
ユーザ:admin
パスワード:admin
cisshgo1000v>en
cisshgo1000v#
cisshgo1000v#show run
Building configuration...

Current configuration : 2114 bytes
!
version 12.4
service timestamps debug datetime msec
service timestamps log datetime msec
no service password-encryption
!
hostname cisshgo1000v
!
boot-start-marker
boot-end-marker
!
!
no aaa new-model
memory-size iomem 5
no ip icmp rate-limit unreachable
ip cef
!
!
!
!
no ip domain lookup
ip domain name test
ip auth-proxy max-nodata-conns 3
ip admission max-nodata-conns 3
!
!
!
!
!
!
!
!
!
!
!
!
!
!
!
username admin privilege 15 secret 5 $1$M1ce$SKeVGg2lUCPrsLkJMIdWf.
!
!
ip tcp synwait-time 5
ip ssh version 2
ip scp server enable
!
!
!
!
!
interface FastEthernet0/0
 description netpalm
 ip address 10.0.2.27 255.255.255.0
 duplex auto
 speed auto
!
interface Serial0/0
 no ip address
 shutdown
 clock rate 2000000
!
interface FastEthernet0/1
 no ip address
 shutdown
 duplex auto
 speed auto
!
interface Serial0/1
 no ip address
 shutdown
 clock rate 2000000
!
interface FastEthernet1/0
 no ip address
 shutdown
 duplex auto
 speed auto
!
interface FastEthernet2/0
 no ip address
 shutdown
 duplex auto
 speed auto
!
interface FastEthernet3/0
!
interface FastEthernet3/1
!
interface FastEthernet3/2
!
interface FastEthernet3/3
!
interface FastEthernet3/4
!
interface FastEthernet3/5
!
interface FastEthernet3/6
!
interface FastEthernet3/7
!
interface FastEthernet3/8
!
interface FastEthernet3/9
!
interface FastEthernet3/10
!
interface FastEthernet3/11
!
interface FastEthernet3/12
!
interface FastEthernet3/13
!
interface FastEthernet3/14
!
interface FastEthernet3/15
!
interface Vlan1
 no ip address
!
ip forward-protocol nd
!
!
no ip http server
no ip http secure-server
!
ip access-list standard bob
ip access-list standard yip
!
snmp-server community test RO
snmp-server community location RO yip
snmp-server community contact RO bob
no cdp log mismatch duplex
!
!
!
control-plane
!
!
!
!
!
!
!
!
!
!
line con 0
 exec-timeout 0 0
 privilege level 15
 logging synchronous
line aux 0
 exec-timeout 0 0
 privilege level 15
 logging synchronous
line vty 0 4
 privilege level 15
 login local
 transport input ssh
line vty 5 15
 privilege level 15
 login local
 transport input ssh
!
!
end
cisshgo1000v#
以上でTeratermマクロをWindows上だけでテストする環境が出来ました。