ラビットチャレンジ_深層学習day2
Section1:勾配消失問題
1-1:要点
・誤差逆伝播法が下位層に進んでいくに連れて、勾配がどんどん緩やかいになっていく。そのため、勾配降下法による、更新では下位層のパラメータはほとんど変わらず、訓練は最適値に収束しなくなる。
下記図の左が失敗例

・活性化関数の微分結果が0~1の範囲になるためかけ合わせていくと値が限りなく0になってしまうため勾配消失が発生する
・勾配消失問題が起きる活性化関数の例
・シグモイド関数


※d_sigmoid = (1 - sigmoid) * sigmoid
・勾配消失問題の対策
・活性化関数の選択
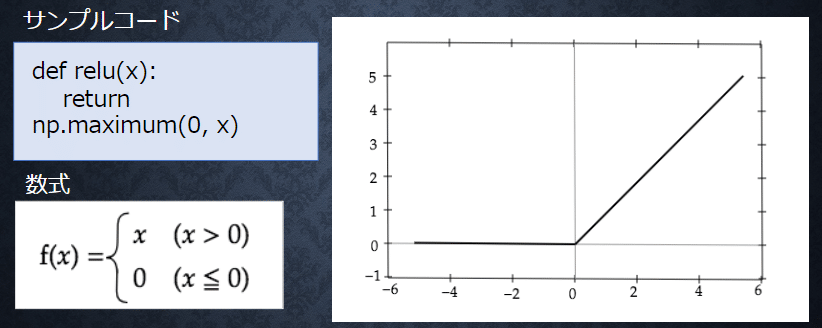
シグモイド関数以外にReLU関数を使用する
ReLU関数が今最も使われている活性化関数
勾配消失問題とスパース化に貢献することで良い結果を出している
・重みの初期値設定
Xavier:重みの要素を前の層のノード数の平方根で除算した値で
重みを設定する
⇒シグモイド関数、双曲線正接関数(s字カーブの関数)
を使用している場合に使用する
# Xavierの初期値
   network['W1'] = np.random.randn(input_layer_size, hidden_layer_1_size) / (np.sqrt(input_layer_size))
   network['W2'] = np.random.randn(hidden_layer_1_size, hidden_layer_2_size) / (np.sqrt(hidden_layer_1_size))
   network['W3'] = np.random.randn(hidden_layer_2_size, output_layer_size) / (np.sqrt(hidden_layer_2_size))
He:重みの要素を前の層のノード数の平方根で除算した値に対し
√2を掛け合わせた値で重みを設定する
⇒ReLU関数を使用している場合に使用する
# Heの初期値
   network['W1'] = np.random.randn(input_layer_size, hidden_layer_1_size) / np.sqrt(input_layer_size) * np.sqrt(2)
   network['W2'] = np.random.randn(hidden_layer_1_size, hidden_layer_2_size) / np.sqrt(hidden_layer_1_size) * np.sqrt(2)
   network['W3'] = np.random.randn(hidden_layer_2_size, output_layer_size) / np.sqrt(hidden_layer_2_size) * np.sqrt(2)
・バッチ正規化
ミニバッチ単位で、入力値のデータの偏りを抑制する手法
※ミニバッチ単位:画像の場合GPUなら1~64枚 TPUなら1~256枚
メリット:学習が安定しモデルの学習スピードがあがる
過学習を抑えることができる
1-2:実装演習
・シグモイド関数に対してガウス分布に基づいた重み初期化
import numpy as np
from common import layers
from collections import OrderedDict
from common import functions
from data.mnist import load_mnist
import matplotlib.pyplot as plt

# mnistをロード
(x_train, d_train), (x_test, d_test) = load_mnist(normalize=True, one_hot_label=True)
train_size = len(x_train)

print("データ読み込み完了")

# 重み初期値補正係数
wieght_init = 0.01
#入力層サイズ
input_layer_size = 784
#中間層サイズ
hidden_layer_1_size = 40
hidden_layer_2_size = 20

#出力層サイズ
output_layer_size = 10
# 繰り返し数
iters_num = 2000
# ミニバッチサイズ
batch_size = 100
# 学習率
learning_rate = 0.1
# 描写頻度
plot_interval=10

# 初期設定
def init_network():
   network = {}
   #重みの初期化-------------------------
   network['W1'] = wieght_init * np.random.randn(input_layer_size, hidden_layer_1_size)
   network['W2'] = wieght_init * np.random.randn(hidden_layer_1_size, hidden_layer_2_size)
   network['W3'] = wieght_init * np.random.randn(hidden_layer_2_size, output_layer_size)
   #-----------------------------------

   network['b1'] = np.zeros(hidden_layer_1_size)
   network['b2'] = np.zeros(hidden_layer_2_size)
   network['b3'] = np.zeros(output_layer_size)

   return network

# 順伝播
def forward(network, x):
   W1, W2, W3 = network['W1'], network['W2'], network['W3']
   b1, b2, b3 = network['b1'], network['b2'], network['b3']
   hidden_f = functions.sigmoid

   u1 =  np.dot(x, W1) + b1
   z1 = hidden_f(u1)
   u2 =  np.dot(z1, W2) + b2
   z2 = hidden_f(u2)
   u3 =  np.dot(z2, W3) + b3
   y = functions.softmax(u3)

   return z1, z2, y

# 誤差逆伝播
def backward(x, d, z1, z2, y):
   grad = {}

   W1, W2, W3 = network['W1'], network['W2'], network['W3']
   b1, b2, b3 = network['b1'], network['b2'], network['b3']
   hidden_d_f = functions.d_sigmoid
   last_d_f = functions.d_softmax_with_loss


   # 出力層でのデルタ
   delta3 = last_d_f(d, y)
   # b3の勾配
   grad['b3'] = np.sum(delta3, axis=0)
   # W3の勾配
   grad['W3'] = np.dot(z2.T, delta3)
   # 2層でのデルタ
   delta2 = np.dot(delta3, W3.T) * hidden_d_f(z2)
   # b2の勾配
   grad['b2'] = np.sum(delta2, axis=0)
   # W2の勾配
   grad['W2'] = np.dot(z1.T, delta2)
   # 1層でのデルタ
   delta1 = np.dot(delta2, W2.T) * hidden_d_f(z1)
   # b1の勾配
   grad['b1'] = np.sum(delta1, axis=0)
   # W1の勾配
   grad['W1'] = np.dot(x.T, delta1)

   return grad

# パラメータの初期化
network = init_network()

accuracies_train = []
accuracies_test = []

# 正答率
def accuracy(x, d):
   z1, z2, y = forward(network, x)
   y = np.argmax(y, axis=1)
   if d.ndim != 1 : d = np.argmax(d, axis=1)
   accuracy = np.sum(y == d) / float(x.shape[0])
   return accuracy

for i in range(iters_num):
   # ランダムにバッチを取得
   batch_mask = np.random.choice(train_size, batch_size)
   # ミニバッチに対応する教師訓練画像データを取得
   x_batch = x_train[batch_mask]
   # ミニバッチに対応する訓練正解ラベルデータを取得する
   d_batch = d_train[batch_mask]


   z1, z2, y = forward(network, x_batch)
   grad = backward(x_batch, d_batch, z1, z2, y)

   if (i+1)%plot_interval==0:
       accr_test = accuracy(x_test, d_test)
       accuracies_test.append(accr_test)

       accr_train = accuracy(x_batch, d_batch)
       accuracies_train.append(accr_train)

       print('Generation: ' + str(i+1) + '. 正答率(トレーニング) = ' + str(accr_train))
       print('                : ' + str(i+1) + '. 正答率(テスト) = ' + str(accr_test))

   # パラメータに勾配適用
   for key in ('W1', 'W2', 'W3', 'b1', 'b2', 'b3'):
       network[key]  -= learning_rate * grad[key]


lists = range(0, iters_num, plot_interval)
plt.plot(lists, accuracies_train, label="training set")
plt.plot(lists, accuracies_test,  label="test set")
plt.legend(loc="lower right")
plt.title("accuracy")
plt.xlabel("count")
plt.ylabel("accuracy")
plt.ylim(0, 1.0)
# グラフの表示
plt.show()
⇒学習が全くできていないことが分かる
・ReLU関数に対してガウス分布に基づいた重み初期化
import numpy as np
from data.mnist import load_mnist
from PIL import Image
import pickle
from common import functions
import matplotlib.pyplot as plt

# mnistをロード
(x_train, d_train), (x_test, d_test) = load_mnist(normalize=True, one_hot_label=True)
train_size = len(x_train)

print("データ読み込み完了")

# 重み初期値補正係数
wieght_init = 0.01
#入力層サイズ
input_layer_size = 784
#中間層サイズ
hidden_layer_1_size = 40
hidden_layer_2_size = 20

#出力層サイズ
output_layer_size = 10
# 繰り返し数
iters_num = 2000
# ミニバッチサイズ
batch_size = 100
# 学習率
learning_rate = 0.1
# 描写頻度
plot_interval=10

# 初期設定
def init_network():
   network = {}

   network['W1'] = wieght_init * np.random.randn(input_layer_size, hidden_layer_1_size)
   network['W2'] = wieght_init * np.random.randn(hidden_layer_1_size, hidden_layer_2_size)
   network['W3'] = wieght_init * np.random.randn(hidden_layer_2_size, output_layer_size)

   network['b1'] = np.zeros(hidden_layer_1_size)
   network['b2'] = np.zeros(hidden_layer_2_size)
   network['b3'] = np.zeros(output_layer_size)

   return network

# 順伝播
def forward(network, x):
   W1, W2, W3 = network['W1'], network['W2'], network['W3']
   b1, b2, b3 = network['b1'], network['b2'], network['b3']

   ###########  変更箇所  ##############

   hidden_f = functions.relu

   #################################

   u1 =  np.dot(x, W1) + b1
   z1 = hidden_f(u1)
   u2 =  np.dot(z1, W2) + b2
   z2 = hidden_f(u2)
   u3 =  np.dot(z2, W3) + b3
   y = functions.softmax(u3)

   return z1, z2, y

# 誤差逆伝播
def backward(x, d, z1, z2, y):
   grad = {}

   W1, W2, W3 = network['W1'], network['W2'], network['W3']
   b1, b2, b3 = network['b1'], network['b2'], network['b3']

   ###########  変更箇所  ##############

   hidden_d_f = functions.d_relu

   #################################


   # 出力層でのデルタ
   delta3 = functions.d_softmax_with_loss(d, y)
   # b3の勾配
   grad['b3'] = np.sum(delta3, axis=0)
   # W3の勾配
   grad['W3'] = np.dot(z2.T, delta3)
   # 2層でのデルタ
   delta2 = np.dot(delta3, W3.T) * hidden_d_f(z2)
   # b2の勾配
   grad['b2'] = np.sum(delta2, axis=0)
   # W2の勾配
   grad['W2'] = np.dot(z1.T, delta2)
   # 1層でのデルタ
   delta1 = np.dot(delta2, W2.T) * hidden_d_f(z1)
   # b1の勾配
   grad['b1'] = np.sum(delta1, axis=0)
   # W1の勾配
   grad['W1'] = np.dot(x.T, delta1)

   return grad

# パラメータの初期化
network = init_network()

accuracies_train = []
accuracies_test = []

# 正答率
def accuracy(x, d):
   z1, z2, y = forward(network, x)
   y = np.argmax(y, axis=1)
   if d.ndim != 1 : d = np.argmax(d, axis=1)
   accuracy = np.sum(y == d) / float(x.shape[0])
   return accuracy

for i in range(iters_num):
   # ランダムにバッチを取得
   batch_mask = np.random.choice(train_size, batch_size)
   # ミニバッチに対応する教師訓練画像データを取得
   x_batch = x_train[batch_mask]
   # ミニバッチに対応する訓練正解ラベルデータを取得する
   d_batch = d_train[batch_mask]


   z1, z2, y = forward(network, x_batch)
   grad = backward(x_batch, d_batch, z1, z2, y)

   if (i+1)%plot_interval==0:
       accr_test = accuracy(x_test, d_test)
       accuracies_test.append(accr_test)

       accr_train = accuracy(x_batch, d_batch)
       accuracies_train.append(accr_train)

       print('Generation: ' + str(i+1) + '. 正答率(トレーニング) = ' + str(accr_train))
       print('                : ' + str(i+1) + '. 正答率(テスト) = ' + str(accr_test))

   # パラメータに勾配適用
   for key in ('W1', 'W2', 'W3', 'b1', 'b2', 'b3'):
       network[key]  -= learning_rate * grad[key]


lists = range(0, iters_num, plot_interval)
plt.plot(lists, accuracies_train, label="training set")
plt.plot(lists, accuracies_test,  label="test set")
plt.legend(loc="lower right")
plt.title("accuracy")
plt.xlabel("count")
plt.ylabel("accuracy")
plt.ylim(0, 1.0)
# グラフの表示
plt.show()
⇒途中まで全く学習できていないが途中からは学習ができている
最初に学習ができていないためモデルの最適化に時間がかかる
・シグモイド関数に対してXavierに基づいた重み初期化
import numpy as np
from data.mnist import load_mnist
from PIL import Image
import pickle
from common import functions
import matplotlib.pyplot as plt

# mnistをロード
(x_train, d_train), (x_test, d_test) = load_mnist(normalize=True, one_hot_label=True)
train_size = len(x_train)

print("データ読み込み完了")

#入力層サイズ
input_layer_size = 784
#中間層サイズ
hidden_layer_1_size = 40
hidden_layer_2_size = 20
#出力層サイズ
output_layer_size = 10
# 繰り返し数
iters_num = 2000
# ミニバッチサイズ
batch_size = 100
# 学習率
learning_rate = 0.1
# 描写頻度
plot_interval=10

# 初期設定
def init_network():
   network = {}

   ###########  変更箇所  ##############

   # Xavierの初期値
   network['W1'] = np.random.randn(input_layer_size, hidden_layer_1_size) / (np.sqrt(input_layer_size))
   network['W2'] = np.random.randn(hidden_layer_1_size, hidden_layer_2_size) / (np.sqrt(hidden_layer_1_size))
   network['W3'] = np.random.randn(hidden_layer_2_size, output_layer_size) / (np.sqrt(hidden_layer_2_size))

   #################################

   network['b1'] = np.zeros(hidden_layer_1_size)
   network['b2'] = np.zeros(hidden_layer_2_size)
   network['b3'] = np.zeros(output_layer_size)

   return network

# 順伝播
def forward(network, x):
   W1, W2, W3 = network['W1'], network['W2'], network['W3']
   b1, b2, b3 = network['b1'], network['b2'], network['b3']
   hidden_f = functions.sigmoid

   u1 =  np.dot(x, W1) + b1
   z1 = hidden_f(u1)
   u2 =  np.dot(z1, W2) + b2
   z2 = hidden_f(u2)
   u3 =  np.dot(z2, W3) + b3
   y = functions.softmax(u3)

   return z1, z2, y

# 誤差逆伝播
def backward(x, d, z1, z2, y):
   grad = {}

   W1, W2, W3 = network['W1'], network['W2'], network['W3']
   b1, b2, b3 = network['b1'], network['b2'], network['b3']
   hidden_d_f = functions.d_sigmoid

   # 出力層でのデルタ
   delta3 = functions.d_softmax_with_loss(d, y)
   # b3の勾配
   grad['b3'] = np.sum(delta3, axis=0)
   # W3の勾配
   grad['W3'] = np.dot(z2.T, delta3)
   # 2層でのデルタ
   delta2 = np.dot(delta3, W3.T) * hidden_d_f(z2)
   # b2の勾配
   grad['b2'] = np.sum(delta2, axis=0)
   # W2の勾配
   grad['W2'] = np.dot(z1.T, delta2)
   # 1層でのデルタ
   delta1 = np.dot(delta2, W2.T) * hidden_d_f(z1)
   # b1の勾配
   grad['b1'] = np.sum(delta1, axis=0)
   # W1の勾配
   grad['W1'] = np.dot(x.T, delta1)

   return grad

# パラメータの初期化
network = init_network()

accuracies_train = []
accuracies_test = []

# 正答率
def accuracy(x, d):
   z1, z2, y = forward(network, x)
   y = np.argmax(y, axis=1)
   if d.ndim != 1 : d = np.argmax(d, axis=1)
   accuracy = np.sum(y == d) / float(x.shape[0])
   return accuracy

for i in range(iters_num):
   # ランダムにバッチを取得
   batch_mask = np.random.choice(train_size, batch_size)
   # ミニバッチに対応する教師訓練画像データを取得
   x_batch = x_train[batch_mask]
   # ミニバッチに対応する訓練正解ラベルデータを取得する
   d_batch = d_train[batch_mask]


   z1, z2, y = forward(network, x_batch)
   grad = backward(x_batch, d_batch, z1, z2, y)

   if (i+1)%plot_interval==0:
       accr_test = accuracy(x_test, d_test)
       accuracies_test.append(accr_test)

       accr_train = accuracy(x_batch, d_batch)
       accuracies_train.append(accr_train)

       print('Generation: ' + str(i+1) + '. 正答率(トレーニング) = ' + str(accr_train))
       print('                : ' + str(i+1) + '. 正答率(テスト) = ' + str(accr_test))

   # パラメータに勾配適用
   for key in ('W1', 'W2', 'W3', 'b1', 'b2', 'b3'):
       network[key]  -= learning_rate * grad[key]


lists = range(0, iters_num, plot_interval)
plt.plot(lists, accuracies_train, label="training set")
plt.plot(lists, accuracies_test,  label="test set")
plt.legend(loc="lower right")
plt.title("accuracy")
plt.xlabel("count")
plt.ylabel("accuracy")
plt.ylim(0, 1.0)
# グラフの表示
plt.show()
⇒初めから徐々に学習が進んでいることが分かる
・ReLU関数に対してHeに基づいた重み初期化
import numpy as np
from data.mnist import load_mnist
from PIL import Image
import pickle
from common import functions
import matplotlib.pyplot as plt

# mnistをロード
(x_train, d_train), (x_test, d_test) = load_mnist(normalize=True, one_hot_label=True)
train_size = len(x_train)

print("データ読み込み完了")

# 重み初期値補正係数
wieght_init = 0.01
#入力層サイズ
input_layer_size = 784
#中間層サイズ
hidden_layer_1_size = 40
hidden_layer_2_size = 20

#出力層サイズ
output_layer_size = 10
# 繰り返し数
iters_num = 2000
# ミニバッチサイズ
batch_size = 100
# 学習率
learning_rate = 0.1
# 描写頻度
plot_interval=10

# 初期設定
def init_network():
   network = {}

   ###########  変更箇所  ##############

   # Heの初期値
   network['W1'] = np.random.randn(input_layer_size, hidden_layer_1_size) / np.sqrt(input_layer_size) * np.sqrt(2)
   network['W2'] = np.random.randn(hidden_layer_1_size, hidden_layer_2_size) / np.sqrt(hidden_layer_1_size) * np.sqrt(2)
   network['W3'] = np.random.randn(hidden_layer_2_size, output_layer_size) / np.sqrt(hidden_layer_2_size) * np.sqrt(2)

   #################################

   network['b1'] = np.zeros(hidden_layer_1_size)
   network['b2'] = np.zeros(hidden_layer_2_size)
   network['b3'] = np.zeros(output_layer_size)

   return network

# 順伝播
def forward(network, x):
   W1, W2, W3 = network['W1'], network['W2'], network['W3']
   b1, b2, b3 = network['b1'], network['b2'], network['b3']

   ###########  変更箇所  ##############

   hidden_f = functions.relu

   #################################

   u1 =  np.dot(x, W1) + b1
   z1 = hidden_f(u1)
   u2 =  np.dot(z1, W2) + b2
   z2 = hidden_f(u2)
   u3 =  np.dot(z2, W3) + b3
   y = functions.softmax(u3)

   return z1, z2, y

# 誤差逆伝播
def backward(x, d, z1, z2, y):
   grad = {}

   W1, W2, W3 = network['W1'], network['W2'], network['W3']
   b1, b2, b3 = network['b1'], network['b2'], network['b3']

   ###########  変更箇所  ##############

   hidden_d_f = functions.d_relu

   #################################

   # 出力層でのデルタ
   delta3 = functions.d_softmax_with_loss(d, y)
   # b3の勾配
   grad['b3'] = np.sum(delta3, axis=0)
   # W3の勾配
   grad['W3'] = np.dot(z2.T, delta3)
   # 2層でのデルタ
   delta2 = np.dot(delta3, W3.T) * hidden_d_f(z2)
   # b2の勾配
   grad['b2'] = np.sum(delta2, axis=0)
   # W2の勾配
   grad['W2'] = np.dot(z1.T, delta2)
   # 1層でのデルタ
   delta1 = np.dot(delta2, W2.T) * hidden_d_f(z1)
   # b1の勾配
   grad['b1'] = np.sum(delta1, axis=0)
   # W1の勾配
   grad['W1'] = np.dot(x.T, delta1)

   return grad

# パラメータの初期化
network = init_network()

accuracies_train = []
accuracies_test = []

# 正答率
def accuracy(x, d):
   z1, z2, y = forward(network, x)
   y = np.argmax(y, axis=1)
   if d.ndim != 1 : d = np.argmax(d, axis=1)
   accuracy = np.sum(y == d) / float(x.shape[0])
   return accuracy

for i in range(iters_num):
   # ランダムにバッチを取得
   batch_mask = np.random.choice(train_size, batch_size)
   # ミニバッチに対応する教師訓練画像データを取得
   x_batch = x_train[batch_mask]
   # ミニバッチに対応する訓練正解ラベルデータを取得する
   d_batch = d_train[batch_mask]


   z1, z2, y = forward(network, x_batch)
   grad = backward(x_batch, d_batch, z1, z2, y)

   if (i+1)%plot_interval==0:
       accr_test = accuracy(x_test, d_test)
       accuracies_test.append(accr_test)

       accr_train = accuracy(x_batch, d_batch)
       accuracies_train.append(accr_train)

       print('Generation: ' + str(i+1) + '. 正答率(トレーニング) = ' + str(accr_train))
       print('                : ' + str(i+1) + '. 正答率(テスト) = ' + str(accr_test))

   # パラメータに勾配適用
   for key in ('W1', 'W2', 'W3', 'b1', 'b2', 'b3'):
       network[key]  -= learning_rate * grad[key]


lists = range(0, iters_num, plot_interval)
plt.plot(lists, accuracies_train, label="training set")
plt.plot(lists, accuracies_test,  label="test set")
plt.legend(loc="lower right")
plt.title("accuracy")
plt.xlabel("count")
plt.ylabel("accuracy")
plt.ylim(0, 1.0)
# グラフの表示
plt.show()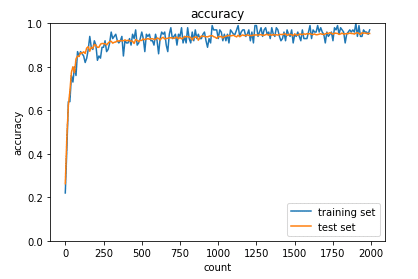
⇒学習がガウス分布と比較して速く終わっていることが分かる
・バッチ正規化の計算
def forward(self, x, train_flg=True):
       if self.running_mean is None:
           N, D = x.shape
           self.running_mean = np.zeros(D)
           self.running_var = np.zeros(D)

       if train_flg:
           mu = x.mean(axis=0) # 平均
           xc = x - mu # xをセンタリング
           var = np.mean(xc**2, axis=0) # 分散
           std = np.sqrt(var + 10e-7) # スケーリング
           xn = xc / std

           self.batch_size = x.shape[0]
           self.xc = xc
           self.xn = xn
           self.std = std
           self.running_mean = self.momentum * self.running_mean + (1-self.momentum) * mu # 平均値の加重平均
           self.running_var = self.momentum * self.running_var + (1-self.momentum) * var #分散値の加重平均
       else:
           xc = x - self.running_mean
           xn = xc / ((np.sqrt(self.running_var + 10e-7)))

       out = self.gamma * xn + self.beta

       return out

⇒1枚目の実行結果はバッチ正規化あり 2枚目がなし
⇒バッチ正規化した場合は学習できていることが分かる
1-3:確認テスト
・1,


・2,

A.(2)
・3,

全ての重みの値が均一に更新されるため正しい学習ができない。
るまり、重みを複数もつ意味もなくなってしまう。
・4,

1. 学習が安定しモデルの学習スピードがあがる
2.過学習を抑えることができる
Section2:学習率最適化手法
2-1:要点
・勾配降下法でパラメータを最適化する際に、学習率の値が学習効率に大きく影響を与える
⇒最適な学習率を見つけたい!
最適な学習率を求める4つの方法を書きに示す
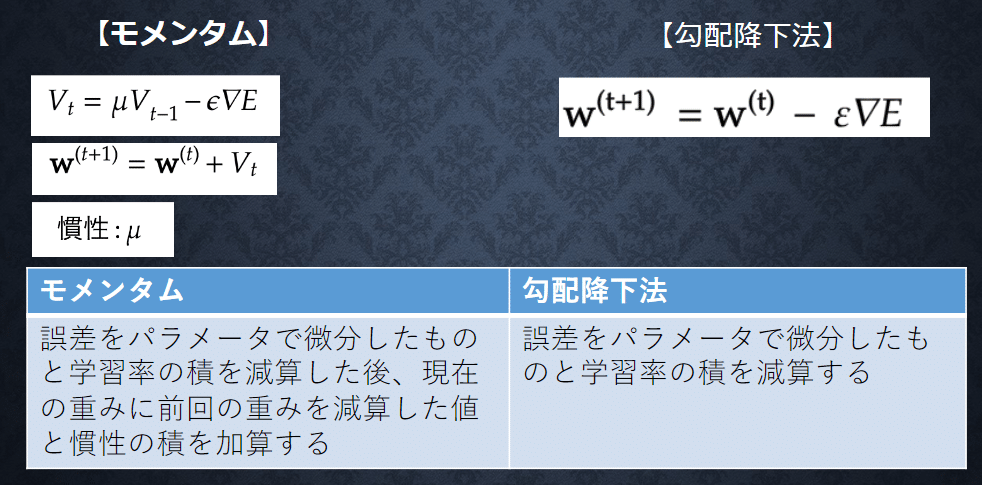
・モメンタム
メリット:局所的最適解にはならず、大域的最適解となる
谷間についてから最も低い位置にいくまでの時間が早い
イメージ:移動平均のような感じで収束していく
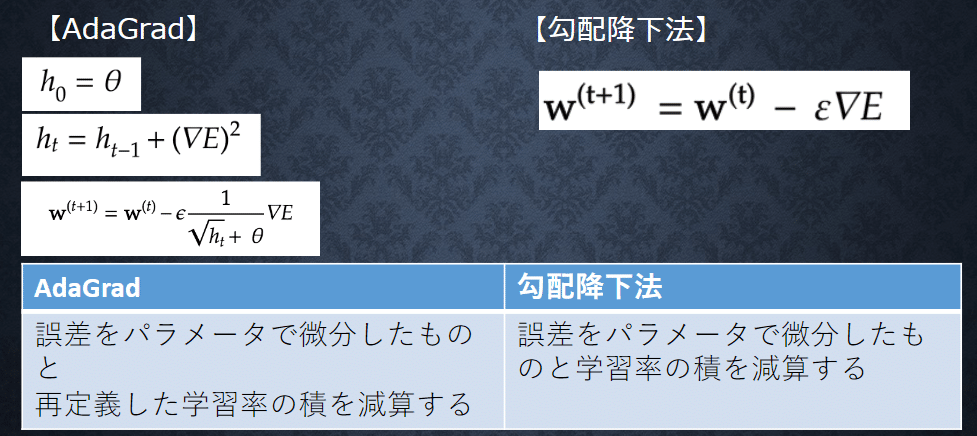
・AdaGrad
メリット:勾配の緩やかな斜面(誤差関数が深くない場合)に対して、
最適値に近づける
デメリット:鞍点問題を引き起こすことがある
・RMSProp
メリット:AdaGradにあった鞍点問題を解決できる
ハイパーパラメータの調整が必要な場合が少ない
デメリット:AdaGradの進化系のためAdaGradのように鞍点問題が発生することもある⇒鞍点問題を解決しようとしたが完璧ではなかった...

・Adam ★★★
メリット:モメンタムとRMSPropのメリットを合わせ持っている
鞍点に陥りにくいかつ収束もしやすい
2-2:実装演習
同じデータを使ってSGD、Momentum、AdaGrad、RMSprop、Adamの5つで学習の過程を見てみる
・SGD
import numpy as np
from collections import OrderedDict
from common import layers
from data.mnist import load_mnist
import matplotlib.pyplot as plt
from multi_layer_net import MultiLayerNet


# データの読み込み
(x_train, d_train), (x_test, d_test) = load_mnist(normalize=True, one_hot_label=True)

print("データ読み込み完了")

# batch_normalizationの設定 =======================
# use_batchnorm = True
use_batchnorm = False
# ====================================================


network = MultiLayerNet(input_size=784, hidden_size_list=[40, 20], output_size=10, activation='sigmoid', weight_init_std=0.01,
                      use_batchnorm=use_batchnorm)

iters_num = 1000
train_size = x_train.shape[0]
batch_size = 100
learning_rate = 0.01

train_loss_list = []
accuracies_train = []
accuracies_test = []

plot_interval=10

for i in range(iters_num):
   batch_mask = np.random.choice(train_size, batch_size)
   x_batch = x_train[batch_mask]
   d_batch = d_train[batch_mask]

   # 勾配
   grad = network.gradient(x_batch, d_batch)

   for key in ('W1', 'W2', 'W3', 'b1', 'b2', 'b3'):
       network.params[key] -= learning_rate * grad[key]

       loss = network.loss(x_batch, d_batch)
       train_loss_list.append(loss)


   if (i + 1) % plot_interval == 0:
       accr_test = network.accuracy(x_test, d_test)
       accuracies_test.append(accr_test)
       accr_train = network.accuracy(x_batch, d_batch)
       accuracies_train.append(accr_train)

       print('Generation: ' + str(i+1) + '. 正答率(トレーニング) = ' + str(accr_train))
       print('                : ' + str(i+1) + '. 正答率(テスト) = ' + str(accr_test))


lists = range(0, iters_num, plot_interval)
plt.plot(lists, accuracies_train, label="training set")
plt.plot(lists, accuracies_test,  label="test set")
plt.legend(loc="lower right")
plt.title("accuracy")
plt.xlabel("count")
plt.ylabel("accuracy")
plt.ylim(0, 1.0)
# グラフの表示
plt.show()
結果:学習できていない

・Momentum
# データの読み込み
(x_train, d_train), (x_test, d_test) = load_mnist(normalize=True, one_hot_label=True)

print("データ読み込み完了")

# batch_normalizationの設定 =======================
# use_batchnorm = True
use_batchnorm = False
# ====================================================

network = MultiLayerNet(input_size=784, hidden_size_list=[40, 20], output_size=10, activation='sigmoid', weight_init_std=0.01,
                      use_batchnorm=use_batchnorm)

iters_num = 1000
train_size = x_train.shape[0]
batch_size = 100
learning_rate = 0.3
# 慣性
momentum = 0.9

train_loss_list = []
accuracies_train = []
accuracies_test = []

plot_interval=10

for i in range(iters_num):
   batch_mask = np.random.choice(train_size, batch_size)
   x_batch = x_train[batch_mask]
   d_batch = d_train[batch_mask]

   # 勾配
   grad = network.gradient(x_batch, d_batch)
   if i == 0:
       v = {}
   for key in ('W1', 'W2', 'W3', 'b1', 'b2', 'b3'):
       if i == 0:
           v[key] = np.zeros_like(network.params[key])
       v[key] = momentum * v[key] - learning_rate * grad[key]
       network.params[key] += v[key]

       loss = network.loss(x_batch, d_batch)
       train_loss_list.append(loss)

   if (i + 1) % plot_interval == 0:
       accr_test = network.accuracy(x_test, d_test)
       accuracies_test.append(accr_test)
       accr_train = network.accuracy(x_batch, d_batch)
       accuracies_train.append(accr_train)

       print('Generation: ' + str(i+1) + '. 正答率(トレーニング) = ' + str(accr_train))
       print('                : ' + str(i+1) + '. 正答率(テスト) = ' + str(accr_test))


lists = range(0, iters_num, plot_interval)
plt.plot(lists, accuracies_train, label="training set")
plt.plot(lists, accuracies_test,  label="test set")
plt.legend(loc="lower right")
plt.title("accuracy")
plt.xlabel("count")
plt.ylabel("accuracy")
plt.ylim(0, 1.0)
# グラフの表示
plt.show()
結果:学習できている

・AdaGrad
# データの読み込み
(x_train, d_train), (x_test, d_test) = load_mnist(normalize=True, one_hot_label=True)

print("データ読み込み完了")

# batch_normalizationの設定 =======================
# use_batchnorm = True
use_batchnorm = False
# ====================================================

network = MultiLayerNet(input_size=784, hidden_size_list=[40, 20], output_size=10, activation='sigmoid', weight_init_std=0.01,
                      use_batchnorm=use_batchnorm)

iters_num = 1000
train_size = x_train.shape[0]
batch_size = 100
learning_rate = 0.1

train_loss_list = []
accuracies_train = []
accuracies_test = []

plot_interval=10

for i in range(iters_num):
   batch_mask = np.random.choice(train_size, batch_size)
   x_batch = x_train[batch_mask]
   d_batch = d_train[batch_mask]

   # 勾配
   grad = network.gradient(x_batch, d_batch)
   if i == 0:
       h = {}
   for key in ('W1', 'W2', 'W3', 'b1', 'b2', 'b3'):
       if i == 0:
           h[key] = np.full_like(network.params[key], 1e-4)
       else:
           h[key] += np.square(grad[key])
       network.params[key] -= learning_rate * grad[key] / (np.sqrt(h[key]))

       loss = network.loss(x_batch, d_batch)
       train_loss_list.append(loss)


   if (i + 1) % plot_interval == 0:
       accr_test = network.accuracy(x_test, d_test)
       accuracies_test.append(accr_test)
       accr_train = network.accuracy(x_batch, d_batch)
       accuracies_train.append(accr_train)

       print('Generation: ' + str(i+1) + '. 正答率(トレーニング) = ' + str(accr_train))
       print('                : ' + str(i+1) + '. 正答率(テスト) = ' + str(accr_test))


lists = range(0, iters_num, plot_interval)
plt.plot(lists, accuracies_train, label="training set")
plt.plot(lists, accuracies_test,  label="test set")
plt.legend(loc="lower right")
plt.title("accuracy")
plt.xlabel("count")
plt.ylabel("accuracy")
plt.ylim(0, 1.0)
# グラフの表示
plt.show()
結果:Momentumと比較すると緩やかに学習が進んでいる

・RMSprop
# データの読み込み
(x_train, d_train), (x_test, d_test) = load_mnist(normalize=True, one_hot_label=True)

print("データ読み込み完了")

# batch_normalizationの設定 =======================
# use_batchnorm = True
use_batchnorm = False
# ====================================================

network = MultiLayerNet(input_size=784, hidden_size_list=[40, 20], output_size=10, activation='sigmoid', weight_init_std=0.01,
                      use_batchnorm=use_batchnorm)

iters_num = 1000
train_size = x_train.shape[0]
batch_size = 100
learning_rate = 0.01
decay_rate = 0.99

train_loss_list = []
accuracies_train = []
accuracies_test = []

plot_interval=10

for i in range(iters_num):
   batch_mask = np.random.choice(train_size, batch_size)
   x_batch = x_train[batch_mask]
   d_batch = d_train[batch_mask]

   # 勾配
   grad = network.gradient(x_batch, d_batch)
   if i == 0:
       h = {}
   for key in ('W1', 'W2', 'W3', 'b1', 'b2', 'b3'):
       if i == 0:
           h[key] = np.zeros_like(network.params[key])
       h[key] *= decay_rate
       h[key] += (1 - decay_rate) * np.square(grad[key])
       network.params[key] -= learning_rate * grad[key] / (np.sqrt(h[key]) + 1e-7)

       loss = network.loss(x_batch, d_batch)
       train_loss_list.append(loss)

   if (i + 1) % plot_interval == 0:
       accr_test = network.accuracy(x_test, d_test)
       accuracies_test.append(accr_test)
       accr_train = network.accuracy(x_batch, d_batch)
       accuracies_train.append(accr_train)

       print('Generation: ' + str(i+1) + '. 正答率(トレーニング) = ' + str(accr_train))
       print('                : ' + str(i+1) + '. 正答率(テスト) = ' + str(accr_test))


lists = range(0, iters_num, plot_interval)
plt.plot(lists, accuracies_train, label="training set")
plt.plot(lists, accuracies_test,  label="test set")
plt.legend(loc="lower right")
plt.title("accuracy")
plt.xlabel("count")
plt.ylabel("accuracy")
plt.ylim(0, 1.0)
# グラフの表示
plt.show()
結果:AdaGradよりも早く学習が進んでいる

・Adam
# データの読み込み
(x_train, d_train), (x_test, d_test) = load_mnist(normalize=True, one_hot_label=True)

print("データ読み込み完了")

# batch_normalizationの設定 =======================
# use_batchnorm = True
use_batchnorm = False
# ====================================================

network = MultiLayerNet(input_size=784, hidden_size_list=[40, 20], output_size=10, activation='sigmoid', weight_init_std=0.01,
                      use_batchnorm=use_batchnorm)

iters_num = 1000
train_size = x_train.shape[0]
batch_size = 100
learning_rate = 0.01
beta1 = 0.9
beta2 = 0.999

train_loss_list = []
accuracies_train = []
accuracies_test = []

plot_interval=10

for i in range(iters_num):
   batch_mask = np.random.choice(train_size, batch_size)
   x_batch = x_train[batch_mask]
   d_batch = d_train[batch_mask]

   # 勾配
   grad = network.gradient(x_batch, d_batch)
   if i == 0:
       m = {}
       v = {}
   learning_rate_t  = learning_rate * np.sqrt(1.0 - beta2 ** (i + 1)) / (1.0 - beta1 ** (i + 1))
   for key in ('W1', 'W2', 'W3', 'b1', 'b2', 'b3'):
       if i == 0:
           m[key] = np.zeros_like(network.params[key])
           v[key] = np.zeros_like(network.params[key])

       m[key] += (1 - beta1) * (grad[key] - m[key])
       v[key] += (1 - beta2) * (grad[key] ** 2 - v[key])
       network.params[key] -= learning_rate_t * m[key] / (np.sqrt(v[key]) + 1e-7)

       loss = network.loss(x_batch, d_batch)
       train_loss_list.append(loss)

   if (i + 1) % plot_interval == 0:
       accr_test = network.accuracy(x_test, d_test)
       accuracies_test.append(accr_test)
       accr_train = network.accuracy(x_batch, d_batch)
       accuracies_train.append(accr_train)

       print('Generation: ' + str(i+1) + '. 正答率(トレーニング) = ' + str(accr_train))
       print('                : ' + str(i+1) + '. 正答率(テスト) = ' + str(accr_test))


lists = range(0, iters_num, plot_interval)
plt.plot(lists, accuracies_train, label="training set")
plt.plot(lists, accuracies_test,  label="test set")
plt.legend(loc="lower right")
plt.title("accuracy")
plt.xlabel("count")
plt.ylabel("accuracy")
plt.ylim(0, 1.0)
# グラフの表示
plt.show()
結果:今回の場合RMSpropとあまり変わらない

補足:Adamのプログラムをミニバッチに変更した結果
どのPGMよりも急速に学習ができている
⇒オンラインよりもミニバッチの方がいいことが分かる

補足:Adamのプログラムの重みの初期化をHeに変更した結果
学習の始まりが良くなっていることが分かる
⇒色々な最適化手法を合わせてモデルを作成することで学習の速度を上げることができると分かる

2-3:確認テスト

モメンタムは、大域的最適解に滑らかに収束する。学習の開始時は学習スピードが遅い。
AdaGradは、勾配が緩やかな際に最適解に収束したすいが、鞍点に陥る可能性が高い。
RMSPropは、AdaGradの鞍点に陥りやすい問題を改良したもの。しかし、鞍点に陥ることもある。
Section3:過学習
3-1:要点
・過学習:ネットワークの自由度が高いと発生する
⇒解決策
・正則化:ネットワークの自由度を制約する方法
・L1正則化、L2正則化

・ドロップアウト
・過学習が発生する原因の「ノード数が多い」ことの対策として、
ランダムにノードを削除して学習を行う
3-2:実装演習
正則化をしないPGMを実行した結果

⇒training setに対して正解率が1.0になっておりtest setでは0.7程度のため少し過学習が起きていることが分かる
正則化(L1)を加えてみる
(x_train, d_train), (x_test, d_test) = load_mnist(normalize=True)

print("データ読み込み完了")

# 過学習を再現するために、学習データを削減
x_train = x_train[:300]
d_train = d_train[:300]

network = MultiLayerNet(input_size=784, hidden_size_list=[100, 100, 100, 100, 100, 100], output_size=10)


iters_num = 1000
train_size = x_train.shape[0]
batch_size = 100
learning_rate=0.1

train_loss_list = []
accuracies_train = []
accuracies_test = []

plot_interval=10
hidden_layer_num = network.hidden_layer_num

# 正則化強度設定 ======================================
weight_decay_lambda = 0.005
# =================================================

for i in range(iters_num):
   batch_mask = np.random.choice(train_size, batch_size)
   x_batch = x_train[batch_mask]
   d_batch = d_train[batch_mask]

   grad = network.gradient(x_batch, d_batch)
   weight_decay = 0

   for idx in range(1, hidden_layer_num+1):
       grad['W' + str(idx)] = network.layers['Affine' + str(idx)].dW + weight_decay_lambda * np.sign(network.params['W' + str(idx)])
       grad['b' + str(idx)] = network.layers['Affine' + str(idx)].db
       network.params['W' + str(idx)] -= learning_rate * grad['W' + str(idx)]
       network.params['b' + str(idx)] -= learning_rate * grad['b' + str(idx)]
       #--------------------------------
       weight_decay += weight_decay_lambda * np.sum(np.abs(network.params['W' + str(idx)])) / 2
       #-------------------------------
   loss = network.loss(x_batch, d_batch) + weight_decay
   train_loss_list.append(loss)

   if (i+1) % plot_interval == 0:
       accr_train = network.accuracy(x_train, d_train)
       accr_test = network.accuracy(x_test, d_test)
       accuracies_train.append(accr_train)
       accuracies_test.append(accr_test)

       print('Generation: ' + str(i+1) + '. 正答率(トレーニング) = ' + str(accr_train))
       print('                : ' + str(i+1) + '. 正答率(テスト) = ' + str(accr_test))

lists = range(0, iters_num, plot_interval)
plt.plot(lists, accuracies_train, label="training set")
plt.plot(lists, accuracies_test,  label="test set")
plt.legend(loc="lower right")
plt.title("accuracy")
plt.xlabel("count")
plt.ylabel("accuracy")
plt.ylim(0, 1.0)
# グラフの表示
plt.show()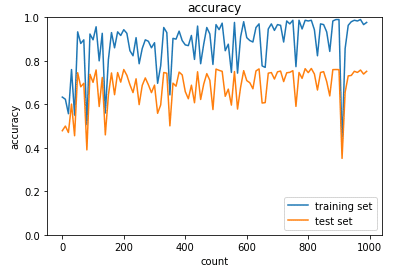
⇒うまく学習はできていないが、過学習はおきていない
補足:
・L2に変更してみた結果

⇒少し形は変わったが微妙...
・λ(ハイパーパラメータ)の値を0.95にしてみた結果(L2)

⇒重みの特徴が限りなく0に近づき学習できなくなっていることが分かる
・λ(ハイパーパラメータ)の値を0.00005にしてみた結果(L1)

⇒ハイパーパラメータは小さすぎてもダメ
⇒ハイパーパラメータを決めるのが難しいことが分かる
・ドロップアウトした場合の結果

⇒学習が遅いが徐々に学習が進んでいることが分かる
⇒この場合もう少し学習用、テスト用のデータが欲しいと考えられる
3-3:確認テスト
1.Q

1.A a
⇒Ridge(L2ノルム利用)は重みを0に近づける特徴がある
2.Q
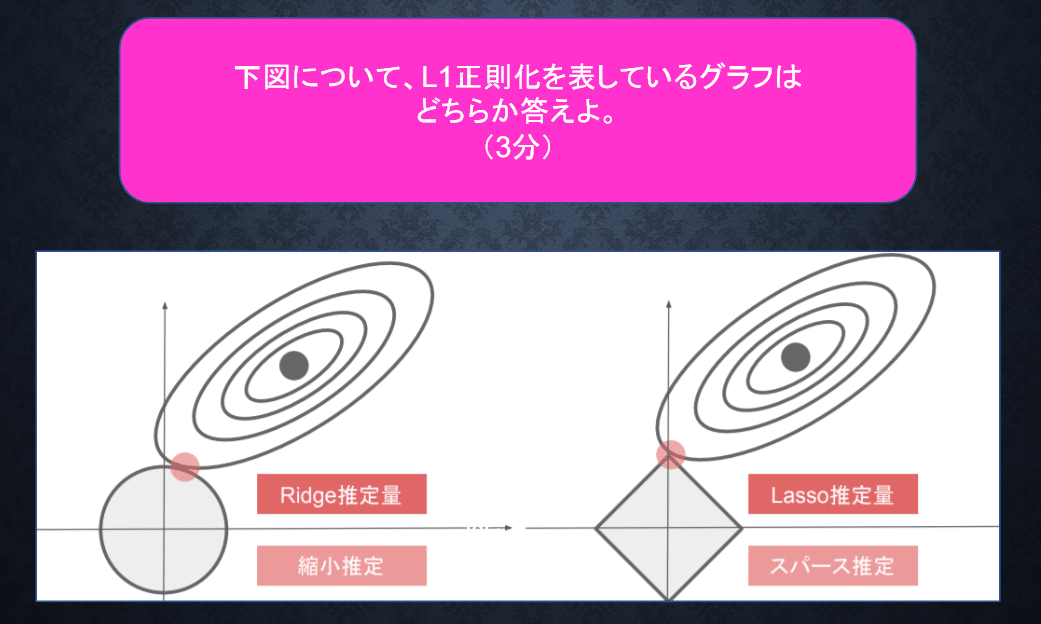
2.A 右図
Section4:畳み込みニューラルネットワーク
4-1:要点
・画像データなどを扱うニューラルネットワーク

・畳み込み層:フィルタを用いて画像の特徴を抽出する操作を行う
⇒画像とフィルタの値をそれぞれかけ合わせて総和をとっていく処理
・パディング:フィルタを通すと画像が小さくなるため画像の周りに数値(0もOK)を加えて画像サイズを大きくする
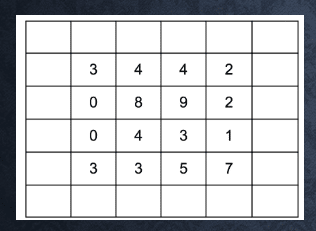
・ストライド:フィルタを動かす際の移動数(2の場合は右に2マス進む)

・チャンネル:フィルタの数を増やすこと
(イメージは何人かの人で画像の特徴を探してもらう)
・プーリング層:画像を決められたルールに従って小さくする
ルールの例:最大値(Max Pooling)、平均値(Avg Pooling)
4-2:実装演習
畳み込みニューラルネットワークのレイヤ部分
# レイヤの生成
       self.layers = OrderedDict()
       self.layers['Conv1'] = layers.Convolution(self.params['W1'], self.params['b1'], conv_param['stride'], conv_param['pad'])
       self.layers['Relu1'] = layers.Relu()
       self.layers['Pool1'] = layers.Pooling(pool_h=2, pool_w=2, stride=2)
       self.layers['Affine1'] = layers.Affine(self.params['W2'], self.params['b2'])
       self.layers['Relu2'] = layers.Relu()
       self.layers['Affine2'] = layers.Affine(self.params['W3'], self.params['b3'])
畳み込み部分
class Convolution:
   # W: フィルター, b: バイアス
   def __init__(self, W, b, stride=1, pad=0):
       self.W = W
       self.b = b
       self.stride = stride
       self.pad = pad

       # 中間データ(backward時に使用)
       self.x = None
       self.col = None
       self.col_W = None

       # フィルター・バイアスパラメータの勾配
       self.dW = None
       self.db = None

   def forward(self, x):
       # FN: filter_number, C: channel, FH: filter_height, FW: filter_width
       FN, C, FH, FW = self.W.shape
       N, C, H, W = x.shape
       # 出力値のheight, width
       out_h = 1 + int((H + 2 * self.pad - FH) / self.stride)
       out_w = 1 + int((W + 2 * self.pad - FW) / self.stride)

       # xを行列に変換
       col = im2col(x, FH, FW, self.stride, self.pad)
       # フィルターをxに合わせた行列に変換
       col_W = self.W.reshape(FN, -1).T

       out = np.dot(col, col_W) + self.b
       # 計算のために変えた形式を戻す
       out = out.reshape(N, out_h, out_w, -1).transpose(0, 3, 1, 2)

       self.x = x
       self.col = col
       self.col_W = col_W

       return out

   def backward(self, dout):
       FN, C, FH, FW = self.W.shape
       dout = dout.transpose(0, 2, 3, 1).reshape(-1, FN)

       self.db = np.sum(dout, axis=0)
       self.dW = np.dot(self.col.T, dout)
       self.dW = self.dW.transpose(1, 0).reshape(FN, C, FH, FW)

       dcol = np.dot(dout, self.col_W.T)
       # dcolを画像データに変換
       dx = col2im(dcol, self.x.shape, FH, FW, self.stride, self.pad)

       return dx
プーリング層
class Pooling:
   def __init__(self, pool_h, pool_w, stride=1, pad=0):
       self.pool_h = pool_h
       self.pool_w = pool_w
       self.stride = stride
       self.pad = pad

       self.x = None
       self.arg_max = None

   def forward(self, x):
       N, C, H, W = x.shape
       out_h = int(1 + (H - self.pool_h) / self.stride)
       out_w = int(1 + (W - self.pool_w) / self.stride)

       # xを行列に変換
       col = im2col(x, self.pool_h, self.pool_w, self.stride, self.pad)
       # プーリングのサイズに合わせてリサイズ
       col = col.reshape(-1, self.pool_h*self.pool_w)

       #maxプーリング
       arg_max = np.argmax(col, axis=1)
       out = np.max(col, axis=1)
       out = out.reshape(N, out_h, out_w, C).transpose(0, 3, 1, 2)

       self.x = x
       self.arg_max = arg_max

       return out

   def backward(self, dout):
       dout = dout.transpose(0, 2, 3, 1)

       pool_size = self.pool_h * self.pool_w
       dmax = np.zeros((dout.size, pool_size))
       dmax[np.arange(self.arg_max.size), self.arg_max.flatten()] = dout.flatten()
       dmax = dmax.reshape(dout.shape + (pool_size,))

       dcol = dmax.reshape(dmax.shape[0] * dmax.shape[1] * dmax.shape[2], -1)
       dx = col2im(dcol, self.x.shape, self.pool_h, self.pool_w, self.stride, self.pad)

       return dx
※PGM上では計算をしやすい形に変換してから畳み込みを行う
import pickle
import numpy as np
from collections import OrderedDict
from common import layers
from common import optimizer
from data.mnist import load_mnist
import matplotlib.pyplot as plt

# 画像データを2次元配列に変換
'''
input_data: 入力値
filter_h: フィルターの高さ
filter_w: フィルターの横幅
stride: ストライド
pad: パディング
'''
def im2col(input_data, filter_h, filter_w, stride=1, pad=0):
   # N: number, C: channel, H: height, W: width
   N, C, H, W = input_data.shape
   # 切り捨て除算
   out_h = (H + 2 * pad - filter_h)//stride + 1
   out_w = (W + 2 * pad - filter_w)//stride + 1

   img = np.pad(input_data, [(0,0), (0,0), (pad, pad), (pad, pad)], 'constant')
   col = np.zeros((N, C, filter_h, filter_w, out_h, out_w))

   for y in range(filter_h):
       y_max = y + stride * out_h
       for x in range(filter_w):
           x_max = x + stride * out_w
           col[:, :, y, x, :, :] = img[:, :, y:y_max:stride, x:x_max:stride]

   col = col.transpose(0, 4, 5, 1, 2, 3) # (N, C, filter_h, filter_w, out_h, out_w) -> (N, filter_w, out_h, out_w, C, filter_h)

   col = col.reshape(N * out_h * out_w, -1)
   return col
⇒この形に変換することで単純なドット積で計算が可能になる
4-3:確認テスト

Q. 7×7
公式:高さ=(画像の高さ+2×パディング高さ-フィルタ高さ/ストライド)+1
幅 =(画像の幅 + 2×パディング幅 - フィルタ幅 / ストライド) + 1
Section5:最新のCNN
5-1:要点
・AlexNet:畳み込み層とプーリング層を繰り返し積層して深くしていく方法として発表された最初のCNN
・全結合層では特徴を2次元から1次元に変換する必要がある
⇒近年では、Global Average Poolingが主に使われている

・2012年にILSVRCで圧倒的な精度で優勝している
・AlexNet以降、VGG、GooGLeNet、ResNetなどが発表されどんどん精度が上がっている
