無料版ColabでPhotoMakerを使う

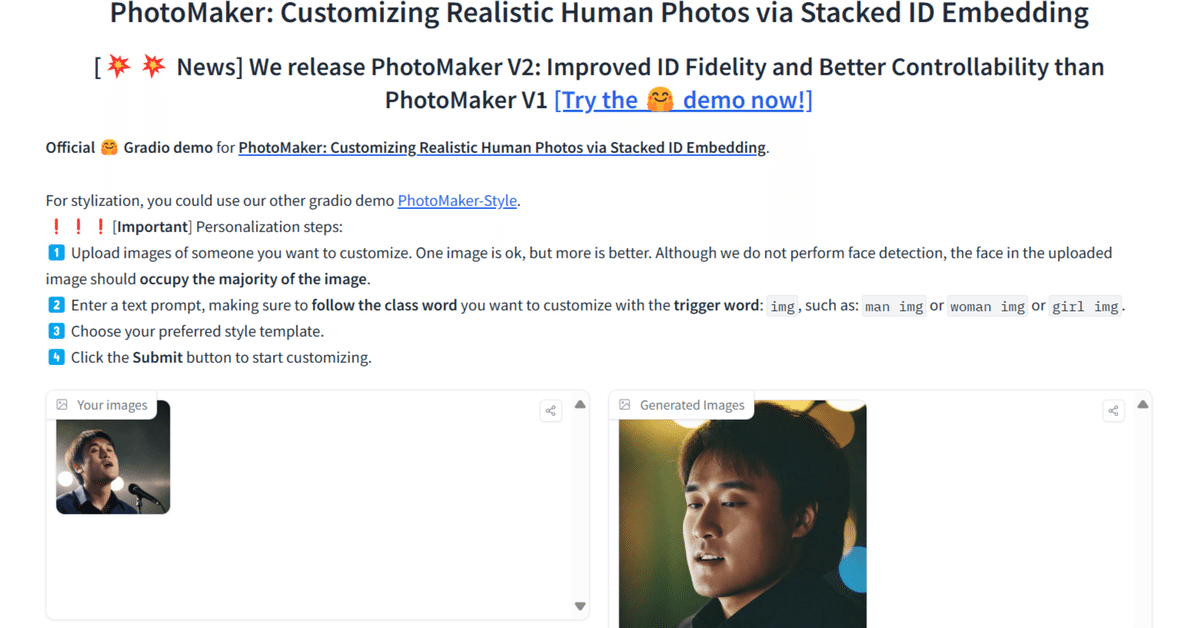
PhotoMakerとは、中国のTencentという企業の開発した生成AIモデルです。Twitterでも紹介しましたが、1枚、あるいは複数枚の顔写真から、その人そっくりの画像をプロンプトの指示に従って生成することができます。
非常に便利ですが、貧乏な私はGPUを持っていませんし、huggingfacにもGPUの使用時間に制限があり、なかなか気軽には使えません。私(の協力者)は野暮用でこのモデルを無制限に使いたいらしく、Google Colabでの利用を試みました。Googleアカウントならば3つくらい持っていますし、実質やりたい放題できます。しかし、このモデルはA100GPU用に開発されているのでなかり苦戦しました。
やっと安定して生成できるに至ったので、コード等を公開し、皆さんにも利用してもらえるようにしたいと思います。
注意:この記事は2025年2月23日の動作確認に基づいて書かれています。
PhotoMakerとは
私が偽理系の所為で前文がとてつもなくなってしまったのでここは簡単に。
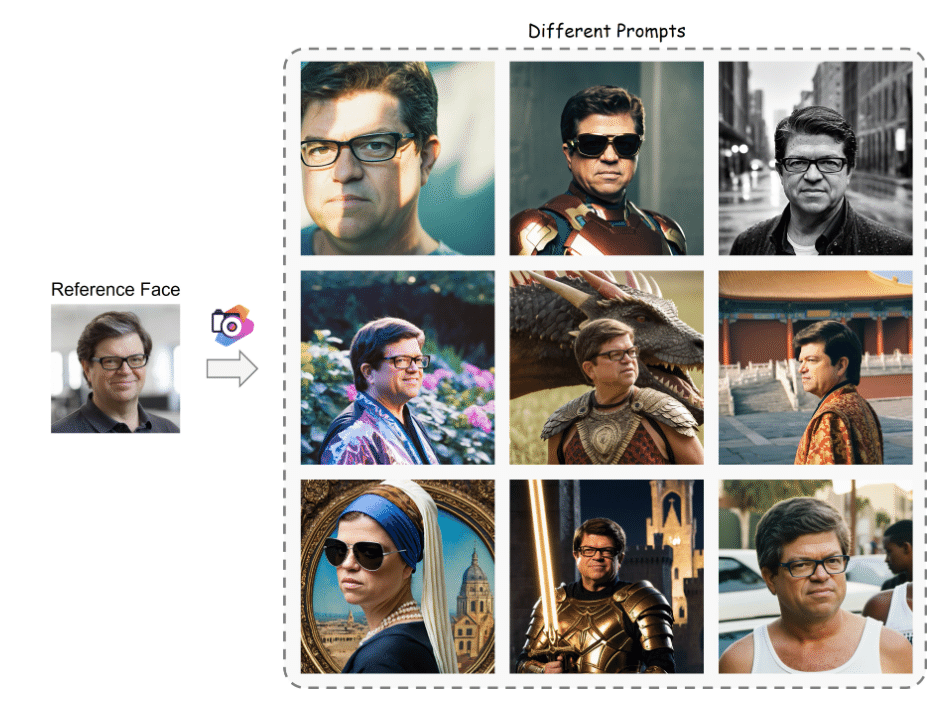
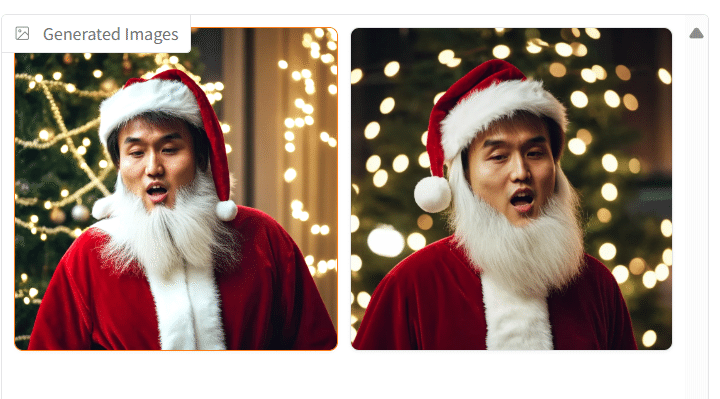
画像左のように1枚(複数も可)の画像を入力して、プロンプトを入力すれば、それに従って右のように様々な画像が生成されるということです。
Colabの仕組み
先述のとおり今回はこのPhotoMakerを無料版Google Colabで動かします。
公式GitHubによると、PhotoMakerは11GBのGPUメモリーを使用するようです。しかし、Gradioを動かすなどなどで実際は20GB以上必要になります。一方で、無料版Colabの方はT4GPUというメモリーが15GBしかありません。更に実際には13GBくらいしか使ってくれません。
まあ、つまり、本当はもっとメモリーが必要なわけです。それでも無制限という言葉には代えられません(笑)。必要最低限の機能ということになりそうですが、私が使うには十分なのでそちらの方法を解説します。
インストール
Google Colabにログインし、新しいノートブックを作成します。
コードには以下のコードをコピペしてください。
!git clone https://github.com/TencentARC/PhotoMaker.git
%cd PhotoMaker
!pip install -r requirements.txt
!pip install git+https://github.com/TencentARC/PhotoMaker.git
実行してしばらくするとセッションの再起動を求められますが、しばらく待ちます。再起動を促すタブが出てきますが、セルの実行が完全に終わってから指示に従って再起動をします。
プログラムの書き換え
フォルダーを確認して、/content/PhotoMaker/gradio_demo/app_v2.pyというファイルを探します。ダブルクリックするとコードの内容が編集できるタブが右に開かれるので、中身を下記のように書き換えて下さい。
import torch
import torchvision.transforms.functional as TF
import numpy as np
import random
import os
import sys
from diffusers.utils import load_image
from diffusers import EulerDiscreteScheduler, T2IAdapter
from huggingface_hub import hf_hub_download
import spaces
import gradio as gr
from photomaker import PhotoMakerStableDiffusionXLAdapterPipeline
from photomaker import FaceAnalysis2, analyze_faces
from style_template import styles
from aspect_ratio_template import aspect_ratios
# global variable
base_model_path = 'SG161222/RealVisXL_V4.0'
face_detector = FaceAnalysis2(providers=['CUDAExecutionProvider'], allowed_modules=['detection', 'recognition'])
face_detector.prepare(ctx_id=0, det_size=(640, 640))
try:
if torch.cuda.is_available():
device = "cuda"
elif sys.platform == "darwin" and torch.backends.mps.is_available():
device = "mps"
else:
device = "cpu"
except:
device = "cpu"
MAX_SEED = np.iinfo(np.int32).max
STYLE_NAMES = list(styles.keys())
DEFAULT_STYLE_NAME = "Photographic (Default)"
ASPECT_RATIO_LABELS = list(aspect_ratios)
DEFAULT_ASPECT_RATIO = ASPECT_RATIO_LABELS[0]
enable_doodle_arg = False
photomaker_ckpt = hf_hub_download(repo_id="TencentARC/PhotoMaker-V2", filename="photomaker-v2.bin", repo_type="model")
torch_dtype = torch.float16 if torch.cuda.is_bf16_supported() else torch.float16
if device == "mps":
torch_dtype = torch.float16
# load adapter
adapter = T2IAdapter.from_pretrained(
"TencentARC/t2i-adapter-sketch-sdxl-1.0", torch_dtype=torch_dtype, variant="fp16"
).to(device)
pipe = PhotoMakerStableDiffusionXLAdapterPipeline.from_pretrained(
base_model_path,
adapter=adapter,
torch_dtype=torch_dtype,
use_safetensors=True,
variant="fp16",
).to(device)
pipe.load_photomaker_adapter(
os.path.dirname(photomaker_ckpt),
subfolder="",
weight_name=os.path.basename(photomaker_ckpt),
trigger_word="img",
pm_version="v2",
)
pipe.id_encoder.to(device)
pipe.scheduler = EulerDiscreteScheduler.from_config(pipe.scheduler.config)
# pipe.set_adapters(["photomaker"], adapter_weights=[1.0])
pipe.fuse_lora()
pipe.to(device)
@spaces.GPU
def generate_image(
upload_images,
prompt,
negative_prompt,
aspect_ratio_name,
style_name,
num_steps,
style_strength_ratio,
num_outputs,
guidance_scale,
seed,
use_doodle,
sketch_image,
adapter_conditioning_scale,
adapter_conditioning_factor,
progress=gr.Progress(track_tqdm=True)
):
if use_doodle:
sketch_image = sketch_image["composite"]
r, g, b, a = sketch_image.split()
sketch_image = a.convert("RGB")
sketch_image = TF.to_tensor(sketch_image) > 0.5 # Inversion
sketch_image = TF.to_pil_image(sketch_image.to(torch.float32))
adapter_conditioning_scale = adapter_conditioning_scale
adapter_conditioning_factor = adapter_conditioning_factor
else:
adapter_conditioning_scale = 0.
adapter_conditioning_factor = 0.
sketch_image = None
# check the trigger word
image_token_id = pipe.tokenizer.convert_tokens_to_ids(pipe.trigger_word)
input_ids = pipe.tokenizer.encode(prompt)
if image_token_id not in input_ids:
raise gr.Error(f"Cannot find the trigger word '{pipe.trigger_word}' in text prompt! Please refer to step 2️⃣")
if input_ids.count(image_token_id) > 1:
raise gr.Error(f"Cannot use multiple trigger words '{pipe.trigger_word}' in text prompt!")
# determine output dimensions by the aspect ratio
output_w, output_h = aspect_ratios[aspect_ratio_name]
print(f"[Debug] Generate image using aspect ratio [{aspect_ratio_name}] => {output_w} x {output_h}")
# apply the style template
prompt, negative_prompt = apply_style(style_name, prompt, negative_prompt)
if upload_images is None:
raise gr.Error(f"Cannot find any input face image! Please refer to step 1️⃣")
input_id_images = []
for img in upload_images:
input_id_images.append(load_image(img))
id_embed_list = []
for img in input_id_images:
img = np.array(img)
img = img[:, :, ::-1]
faces = analyze_faces(face_detector, img)
if len(faces) > 0:
id_embed_list.append(torch.from_numpy((faces[0]['embedding'])))
if len(id_embed_list) == 0:
raise gr.Error(f"No face detected, please update the input face image(s)")
id_embeds = torch.stack(id_embed_list)
generator = torch.Generator(device=device).manual_seed(seed)
print("Start inference...")
print(f"[Debug] Seed: {seed}")
print(f"[Debug] Prompt: {prompt}, \n[Debug] Neg Prompt: {negative_prompt}")
start_merge_step = int(float(style_strength_ratio) / 100 * num_steps)
if start_merge_step > 30:
start_merge_step = 30
print(start_merge_step)
images = pipe(
prompt=prompt,
width=output_w,
height=output_h,
input_id_images=input_id_images,
negative_prompt=negative_prompt,
num_images_per_prompt=num_outputs,
num_inference_steps=num_steps,
start_merge_step=start_merge_step,
generator=generator,
guidance_scale=guidance_scale,
id_embeds=id_embeds,
image=sketch_image,
adapter_conditioning_scale=adapter_conditioning_scale,
adapter_conditioning_factor=adapter_conditioning_factor,
).images
return images, gr.update(visible=True)
def swap_to_gallery(images):
return gr.update(value=images, visible=True), gr.update(visible=True), gr.update(visible=False)
def upload_example_to_gallery(images, prompt, style, negative_prompt):
return gr.update(value=images, visible=True), gr.update(visible=True), gr.update(visible=False)
def remove_back_to_files():
return gr.update(visible=False), gr.update(visible=False), gr.update(visible=True)
def change_doodle_space(use_doodle):
if use_doodle:
return gr.update(visible=True)
else:
return gr.update(visible=False)
def remove_tips():
return gr.update(visible=False)
def randomize_seed_fn(seed: int, randomize_seed: bool) -> int:
if randomize_seed:
seed = random.randint(0, MAX_SEED)
return seed
def apply_style(style_name: str, positive: str, negative: str = "") -> tuple[str, str]:
p, n = styles.get(style_name, styles[DEFAULT_STYLE_NAME])
return p.replace("{prompt}", positive), n + ' ' + negative
def get_image_path_list(folder_name):
image_basename_list = os.listdir(folder_name)
image_path_list = sorted([os.path.join(folder_name, basename) for basename in image_basename_list])
return image_path_list
def get_example():
case = [
[
get_image_path_list('/content/PhotoMaker/examples/scarletthead_woman'),
"instagram photo, portrait photo of a woman img, colorful, perfect face, natural skin, hard shadows, film grain",
"(No style)",
"(asymmetry, worst quality, low quality, illustration, 3d, 2d, painting, cartoons, sketch), open mouth",
],
[
get_image_path_list('/content/PhotoMaker/examples/newton_man'),
"sci-fi, closeup portrait photo of a man img wearing the sunglasses in Iron man suit, face, slim body, high quality, film grain",
"(No style)",
"(asymmetry, worst quality, low quality, illustration, 3d, 2d, painting, cartoons, sketch), open mouth",
],
]
return case
### Description and style
logo = r"""
<center><img src='https://photo-maker.github.io/assets/logo.png' alt='PhotoMaker logo' style="width:80px; margin-bottom:10px"></center>
"""
title = r"""
<h1 align="center">PhotoMaker V2: Improved ID Fidelity and Better Controllability than PhotoMaker V1</h1>
"""
description = r"""
<b>Official 🤗 Gradio demo</b> for <a href='https://github.com/TencentARC/PhotoMaker' target='_blank'><b>PhotoMaker: Customizing Realistic Human Photos via Stacked ID Embedding</b></a>.<br>
The details of PhotoMaker V2 can be found in
<br>
<br>
For previous version of PhotoMaker, you could use our original gradio demos [PhotoMaker](https://huggingface.co/spaces/TencentARC/PhotoMaker) and [PhotoMaker-Style](https://huggingface.co/spaces/TencentARC/PhotoMaker-Style).
<br>
❗️❗️❗️[<b>Important</b>] Personalization steps:<br>
1️⃣ Upload images of someone you want to customize. One image is ok, but more is better. Although we do not perform face detection, the face in the uploaded image should <b>occupy the majority of the image</b>.<br>
2️⃣ Enter a text prompt, making sure to <b>follow the class word</b> you want to customize with the <b>trigger word</b>: `img`, such as: `man img` or `woman img` or `girl img`.<br>
3️⃣ Choose your preferred style template.<br>
4️⃣ <b>(Optional: but new feature)</b> Select the ‘Enable Drawing Doodle...’ option and draw on the canvas<br>
5️⃣ Click the <b>Submit</b> button to start customizing.
"""
article = r"""
If PhotoMaker V2 is helpful, please help to ⭐ the <a href='https://github.com/TencentARC/PhotoMaker' target='_blank'>Github Repo</a>. Thanks!
[](https://github.com/TencentARC/PhotoMaker)
---
📝 **Citation**
<br>
If our work is useful for your research, please consider citing:
```bibtex
@article{li2023photomaker,
title={PhotoMaker: Customizing Realistic Human Photos via Stacked ID Embedding},
author={Li, Zhen and Cao, Mingdeng and Wang, Xintao and Qi, Zhongang and Cheng, Ming-Ming and Shan, Ying},
booktitle={IEEE Conference on Computer Vision and Pattern Recognition (CVPR)},
year={2024}
}
```
📋 **License**
<br>
Apache-2.0 LICENSE. Please refer to the [LICENSE file](https://huggingface.co/TencentARC/PhotoMaker/blob/main/LICENSE) for details.
📧 **Contact**
<br>
If you have any questions, please feel free to reach me out at <b>zhenli1031@gmail.com</b>.
"""
tips = r"""
### Usage tips of PhotoMaker
1. Upload **more photos**of the person to be customized to **improve ID fidelty**.
2. If you find that the image quality is poor when using doodle for control, you can reduce the conditioning scale and factor of the adapter.
Besides, you could enlarge the ratio for more consistency of your doodle. <br>
If you have any issues, leave the issue in the discussion page of the space. For a more stable (queue-free) experience, you can duplicate the space.
"""
# We have provided some generate examples and comparisons at: [this website]().
css = '''
.gradio-container {width: 85% !important}
'''
with gr.Blocks(css=css) as demo:
gr.Markdown(logo)
gr.Markdown(title)
gr.Markdown(description)
# gr.DuplicateButton(
# value="Duplicate Space for private use ",
# elem_id="duplicate-button",
# visible=os.getenv("SHOW_DUPLICATE_BUTTON") == "1",
# )
with gr.Row():
with gr.Column():
files = gr.Files(
label="Drag (Select) 1 or more photos of your face",
file_types=["image"]
)
uploaded_files = gr.Gallery(label="Your images", visible=False, columns=5, rows=1, height=200)
with gr.Column(visible=False) as clear_button:
remove_and_reupload = gr.ClearButton(value="Remove and upload new ones", components=files, size="sm")
prompt = gr.Textbox(label="Prompt",
info="Try something like 'a photo of a man/woman img', 'img' is the trigger word.",
placeholder="A photo of a [man/woman img]...")
style = gr.Dropdown(label="Style template", choices=STYLE_NAMES, value=DEFAULT_STYLE_NAME)
aspect_ratio = gr.Dropdown(label="Output aspect ratio", choices=ASPECT_RATIO_LABELS, value=DEFAULT_ASPECT_RATIO)
submit = gr.Button("Submit")
enable_doodle = gr.Checkbox(
label="Enable Drawing Doodle for Control", value=enable_doodle_arg,
info="After enabling this option, PhotoMaker will generate content based on your doodle on the canvas, driven by the T2I-Adapter (Quality may be decreased)",
)
with gr.Accordion("T2I-Adapter-Doodle (Optional)", visible=False) as doodle_space:
with gr.Row():
sketch_image = gr.Sketchpad(
label="Canvas",
type="pil",
crop_size=[1024,1024],
layers=False,
canvas_size=(350, 350),
brush=gr.Brush(default_size=5, colors=["#000000"], color_mode="fixed")
)
with gr.Group():
adapter_conditioning_scale = gr.Slider(
label="Adapter conditioning scale",
minimum=0.5,
maximum=1,
step=0.1,
value=0.7,
)
adapter_conditioning_factor = gr.Slider(
label="Adapter conditioning factor",
info="Fraction of timesteps for which adapter should be applied",
minimum=0.5,
maximum=1,
step=0.1,
value=0.8,
)
with gr.Accordion(open=False, label="Advanced Options"):
negative_prompt = gr.Textbox(
label="Negative Prompt",
placeholder="low quality",
value="nsfw, lowres, bad anatomy, bad hands, text, error, missing fingers, extra digit, fewer digits, cropped, worst quality, low quality, normal quality, jpeg artifacts, signature, watermark, username, blurry",
)
num_steps = gr.Slider(
label="Number of sample steps",
minimum=20,
maximum=100,
step=1,
value=50,
)
style_strength_ratio = gr.Slider(
label="Style strength (%)",
minimum=15,
maximum=50,
step=1,
value=20,
)
num_outputs = gr.Slider(
label="Number of output images",
minimum=1,
maximum=4,
step=1,
value=2,
)
guidance_scale = gr.Slider(
label="Guidance scale",
minimum=0.1,
maximum=10.0,
step=0.1,
value=5,
)
seed = gr.Slider(
label="Seed",
minimum=0,
maximum=MAX_SEED,
step=1,
value=0,
)
randomize_seed = gr.Checkbox(label="Randomize seed", value=True)
with gr.Column():
gallery = gr.Gallery(label="Generated Images")
usage_tips = gr.Markdown(label="Usage tips of PhotoMaker", value=tips ,visible=False)
files.upload(fn=swap_to_gallery, inputs=files, outputs=[uploaded_files, clear_button, files])
remove_and_reupload.click(fn=remove_back_to_files, outputs=[uploaded_files, clear_button, files])
enable_doodle.select(fn=change_doodle_space, inputs=enable_doodle, outputs=doodle_space)
input_list = [
files,
prompt,
negative_prompt,
aspect_ratio,
style,
num_steps,
style_strength_ratio,
num_outputs,
guidance_scale,
seed,
enable_doodle,
sketch_image,
adapter_conditioning_scale,
adapter_conditioning_factor
]
submit.click(
fn=remove_tips,
outputs=usage_tips,
).then(
fn=randomize_seed_fn,
inputs=[seed, randomize_seed],
outputs=seed,
queue=False,
api_name=False,
).then(
fn=generate_image,
inputs=input_list,
outputs=[gallery, usage_tips]
)
gr.Examples(
examples=get_example(),
inputs=[files, prompt, style, negative_prompt],
run_on_click=True,
fn=upload_example_to_gallery,
outputs=[uploaded_files, clear_button, files],
)
gr.Markdown(article)
demo.launch()このコード変更は、T4GPUでの利用を目的に私が独自に行ったものです。私が2日間様々な文献を読み漁ってやっとたどり着いたものとなっております。
他にもColabの仕様変更の所為か、パスの指定方法が変わったため、コードを修正しました。
app_v2.pyを書き換えた後、変更が保存されるとコードのタブの上部の名前についていた「*」が消えますので、それを目安にタブを閉じて下さい。
関連ファイルの導入
このまま実行してもなぜかエラーが出ます。ですので、必要なファイルを導入しましょう。
!pip install onnxruntime --upgrade!pip install diffusers==0.29.1上の2つのコードを実行してください。どちらも10秒くらいで終わります。
起動
ここまで来るとようやくエラーなしで起動できます。
下記のコードを入力、実行します。
!python /content/PhotoMaker/gradio_demo/app_v2.py大量のログが出ますが、気にせずに。モデルをダウンロードするので結構時間がかかりますが気長に待ちましょう。5GBくらいのモデルをダウンロードするのは初回のみです。それでも2回目以降も起動に1分くらいかかりました。
プログラム書き換え
プログラム実行後、
To create a public link, set `share=True` in `launch()`.というログが出たら一旦セルを停止します。
ログにはrunning URlが出力されていますが、ブラウザかネットワークの設定上アクセス拒否されます。ですのでプログラムを書き換えてインターネット経由のrunning URlを取得できるようにします。
先ほど開いたapp_v2.pyのファイルをもう一度開きます。最後の行が
demo.launch()となっていますから、
demo.launch(share=True)に変更します。のち、再度セルを実行すると利用可能なURlが表示されます。
使ってみる
* Running on public URL: https://<この部分は変動します>.liveをクリックするとGradioが新しいタブで開かれます。
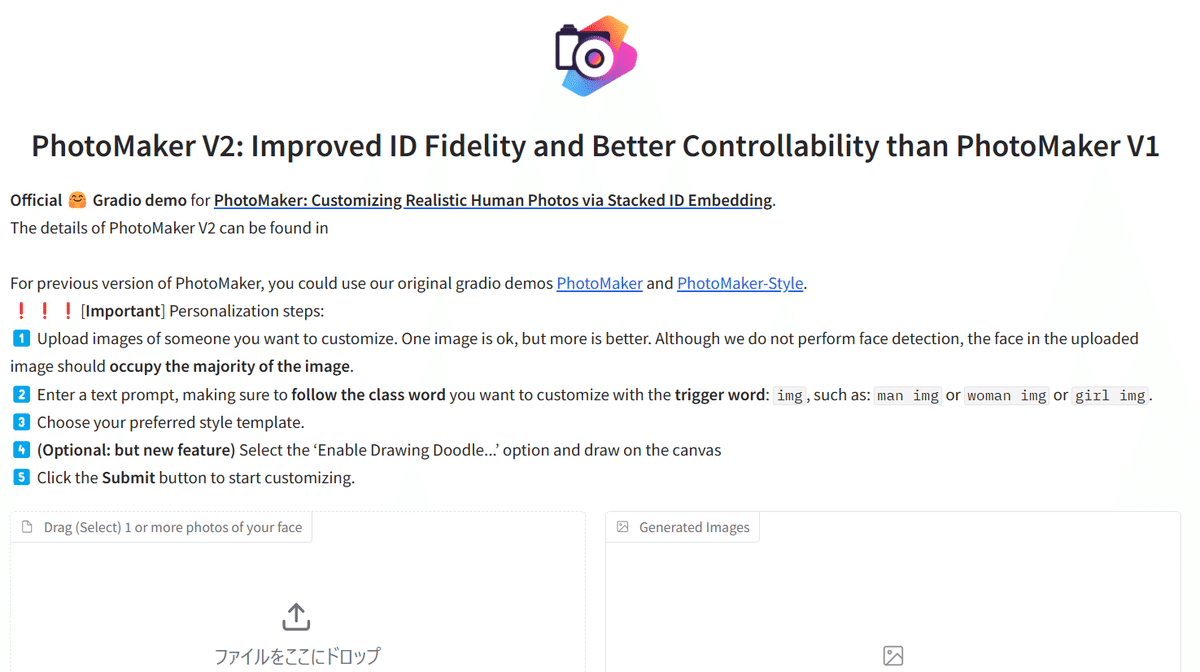
画像の入力
上の画像の左下、「ファイルをここにドロップ」の部分で画像を指定します。画像サイズは400×400を目安にしてください。サイズが大きすぎるとGPUメモリーが不足してエラーとなります。ツール等で写真サイズを変更して下さい。ただし、多少画質が落ちてもAIは顔の特徴をピックアップしますのであまり気にしなくても大丈夫です。もし、サイズの大きな画像を使いたいのなら、huggingfaceのデモ版を使いましょう。
プロンプトの書き方
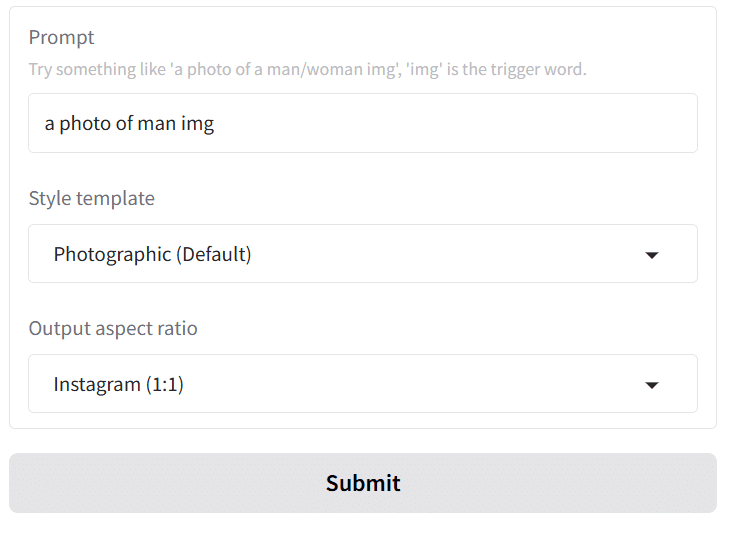
プロンプトは画像のテキスト入力部分に入力します。
始めに
a photo of man imgと入力します。対象が女性の場合はwomanにして下さい。
このままでも生成できますが、動作を指定したい場合は
a photo of man img, he is singingのようにカンマの後に現在進行形で動作を入力しましょう。ただし、あまり難しすぎると内容を理解してもらえない場合があります。
各種設定
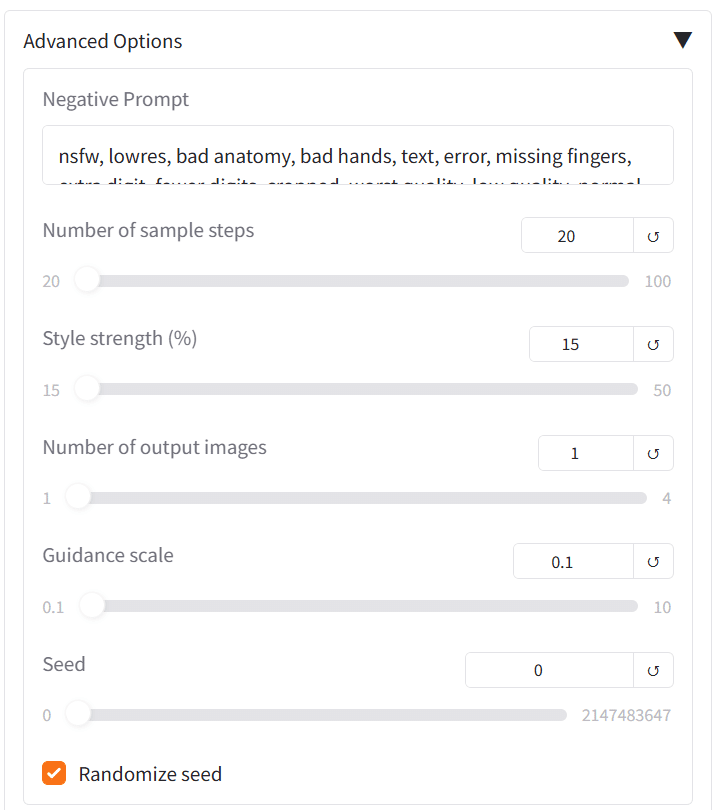
Advanced Optionsという項目があるので上の画像のようにしてください。Number of sample stepsに関しては多少値を大きくしても問題ありません。(2月24日修正、詳しくは追記をご覧ください)
ここでは生成にあたっての執行回数等が決められます。ここで大きな値を選択するとまたもやGPUエラーが発生してしまいます。最善値は私もまだ把握しきれていないのでいろいろ試してみてください。
設定が悪かった場合はcolabのログにOutOfMemoryErrorと表示されますから、セルを再度実行して下さい。先ほども言いましたが、実行には1分ほどかかり面倒なのでなるべくエラーさせないようにしましょう。
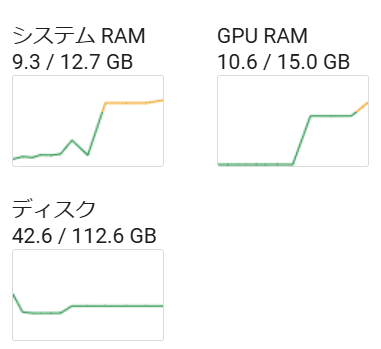
実行
Submitをクリックすると生成が開始されます。生成中のメモリー消費は画像のとおりです。
出力
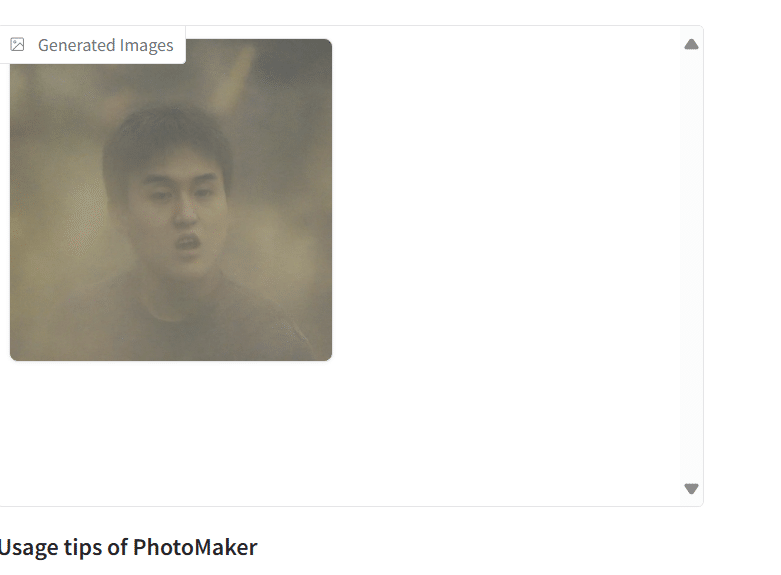
しばらくしてちゃんと画像が出力されました。
これにてT4GPUでも動くPhotoMakerが利用できるようになりました。
長かったですが、読んでいただきありがとうございます。
追記
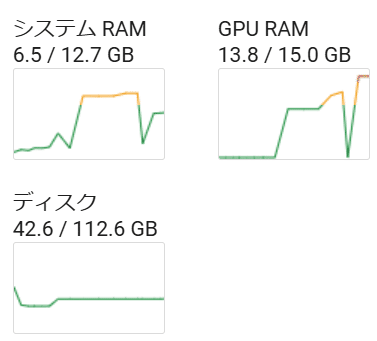
GPUの使用量ですが、結局はほぼMax値となりました。
2月24日更新
記事中では詳細設定をいじっていましたが、初期設定のままでも利用できることが確認できました。ただし、かなり時間がかかります。
ただし、高確率でGPUエラーが出ます。3回連続で初期値設定で動作させるとほぼ確実にエラーが出ます。
当方で確実に生成させる方法を模索したところ、はじめに最小設定で実行してから好みの設定を試みるというのが一番成功確率が上がりました。
皆さんも色々試してみてください。
以上