
『Android』 - Fragmentの静的ロードの基本的な使い方(静的)

概要
FragmentはAndroidにおける画面分割や動的なUI管理を可能にする重要なコンポーネントです。Activityに依存するため、Activityのライフサイクルと連動しつつ、個別のライフサイクルも持っています。
2025年現在、FragmentはAndroidXを活用することが推奨されており、Jetpackライブラリを使用することでさらなる効率化が図れます。
以下では、最新のAPIや機能を用いた「静的Fragment」の基本的な使い方を解説します。
Fragmentのライフサイクル
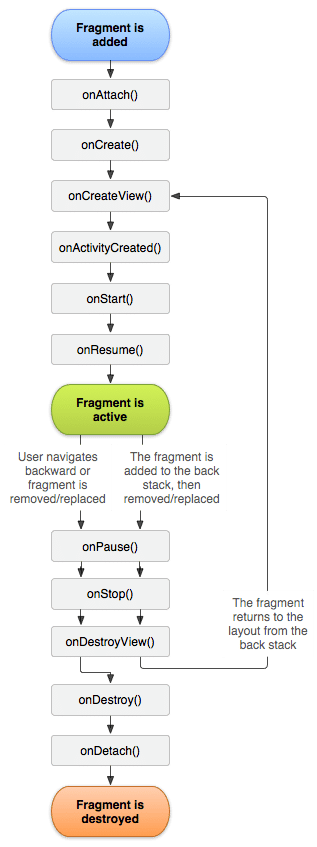
Fragmentのライフサイクルは以下の通りです:
onAttach - FragmentがActivityに追加される直前に呼び出されます。
onCreate - Fragmentが作成されるときに呼び出されます。
onCreateView - UIの初期化時に呼び出されます。
onViewCreated - Viewが作成された後に呼び出されます(onActivityCreatedは非推奨)。
onStart - Fragmentが画面に表示されるタイミングで呼び出されます。
onResume - Fragmentがフォアグラウンドになったときに呼び出されます。
onPause - Fragmentがバックグラウンドに移行する直前に呼び出されます。
onDestroyView - FragmentのViewが破棄されるときに呼び出されます。
静的Fragmentの宣言方法
MainActivity.java
最新のAndroidXを使用してAppCompatActivityを継承します。
package com.example;

import android.os.Bundle;
import androidx.appcompat.app.AppCompatActivity;

public class MainActivity extends AppCompatActivity {
    @Override
    protected void onCreate(Bundle savedInstanceState) {
        super.onCreate(savedInstanceState);
        setContentView(R.layout.activity_main);
    }
}
XMLレイアウト (静的Fragmentの宣言)
<fragment>タグを使用して、レイアウト内にFragmentを直接宣言します。2025年現在、推奨される方法はFragmentContainerViewを使用することです。
<LinearLayout xmlns:android="http://schemas.android.com/apk/res/android"
    android:layout_width="match_parent"
    android:layout_height="match_parent"
    android:orientation="vertical">

    <androidx.fragment.app.FragmentContainerView
        android:id="@+id/fragment_container"
        android:name="com.example.ExampleFragment"
        android:layout_width="match_parent"
        android:layout_height="match_parent" />
</LinearLayout>
ExampleFragment.java
以下はExampleFragmentの最新実装です。
AndroidXのFragmentを継承し、onViewCreatedを使用してUIコンポーネントを初期化します。
package com.example;

import android.os.Bundle;
import android.view.LayoutInflater;
import android.view.View;
import android.view.ViewGroup;
import android.widget.TextView;
import androidx.annotation.NonNull;
import androidx.annotation.Nullable;
import androidx.fragment.app.Fragment;

public class ExampleFragment extends Fragment {
    private TextView mTextView;

    @Nullable
    @Override
    public View onCreateView(@NonNull LayoutInflater inflater, @Nullable ViewGroup container, @Nullable Bundle savedInstanceState) {
        return inflater.inflate(R.layout.fragment_example, container, false);
    }

    @Override
    public void onViewCreated(@NonNull View view, @Nullable Bundle savedInstanceState) {
        super.onViewCreated(view, savedInstanceState);
        mTextView = view.findViewById(R.id.txtR);
        mTextView.setText("最新の静的Fragmentの例");
    }
}
Fragmentのレイアウト (fragment_example.xml)
<LinearLayout xmlns:android="http://schemas.android.com/apk/res/android"
    android:layout_width="match_parent"
    android:layout_height="match_parent"
    android:orientation="vertical">

    <TextView
        android:id="@+id/txtR"
        android:layout_width="wrap_content"
        android:layout_height="wrap_content"
        android:text="静的Fragmentの例"
        android:textSize="18sp"
        android:padding="16dp" />
</LinearLayout>
主な変更点(2015年版からの更新)
AndroidXとJetpackの採用:
android.app.Fragmentは非推奨となり、androidx.fragment.app.Fragmentが標準になりました。
レイアウトにはFragmentContainerViewを使用します。
ライフサイクルメソッドの最適化:
onActivityCreatedは廃止され、onViewCreatedが推奨されます。
UI初期化の改善:
最新のfindViewByIdやViewBindingを活用できます。
設計の簡素化:
最新APIにより、冗長なコードが削減されました。
まとめ
最新のFragment APIを使用することで、保守性と柔軟性が大幅に向上します。静的Fragmentはレイアウトファイルに直接宣言できるため、シンプルで効率的な画面構築が可能です。
次回は、動的にFragmentを操作する方法について解説します。