
【VRChat】アイテムのWorld固定方法②

前回の記事
前回はWorld固定の基本的な設定をおこないました。
内容は前回からの続きとなりますので、まだ読んでない方は以下からどうぞ。
Animationの作成
前回作成したWorld固定の仕組みをExpressionメニューで動作するようにする為、Animationの作成とON/OFFによる切り替え処理を作成していきたいと思います。
作業の順番は、自分の癖でAnimatorのLayer作成後に、Animationファイルを作成していますが、どちらが先でも大丈夫です。
正直、Animationファイルを先に作った方が効率は良いかと。
1.AnimatorにParameterを追加
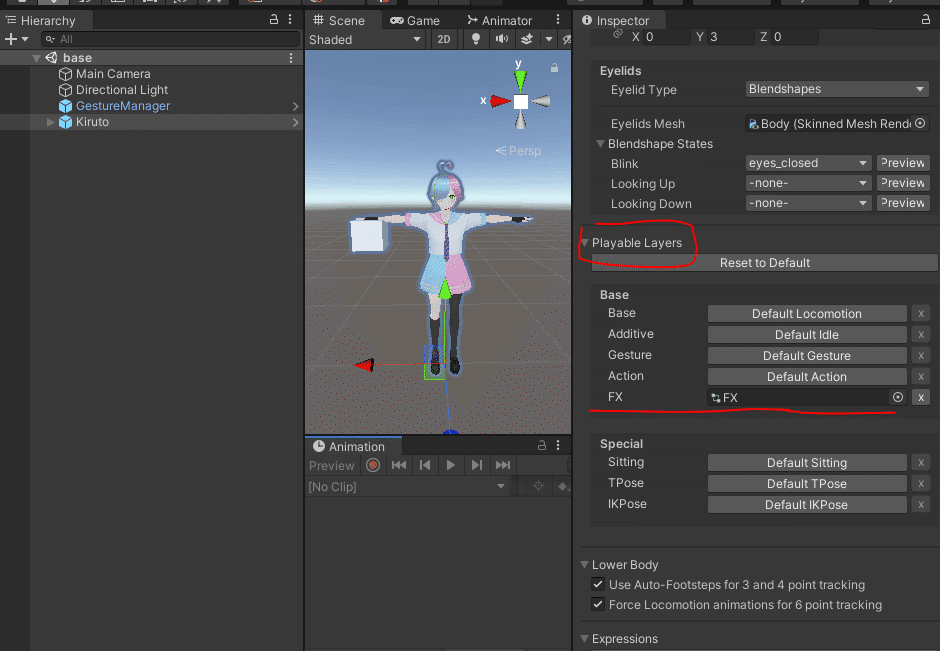
FXLayerを開きます。
FXLayerは、アバターオブジェクトに設定されている「VRC AvatorDescriptor」の「Playable Layers」にある「FX」のファイルをダブルクリックすれば、フォルダのどこにあるかわかると思います。
VRMからの変換であれば、「アバター名(VRChat).VRChat」フォルダ内に、購入アバターであれば、アバターフォルダの中にあるかと。
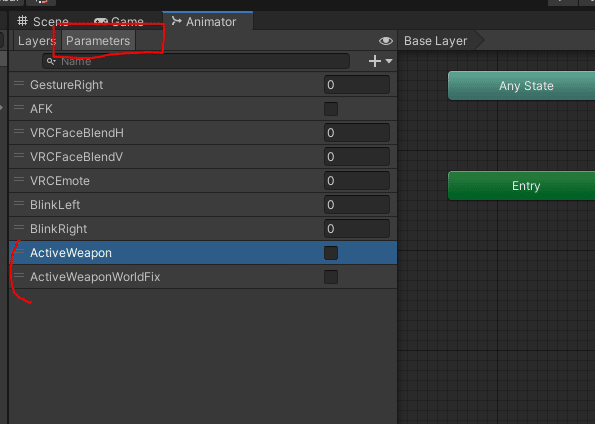
AnimatorタブのParameterにWeaponの表示とWorld固定用のParameterを追加します。
ここでは、「ActiveWeapon」「ActiveWeaponWorldFix」としておきます。
2.Layersの追加
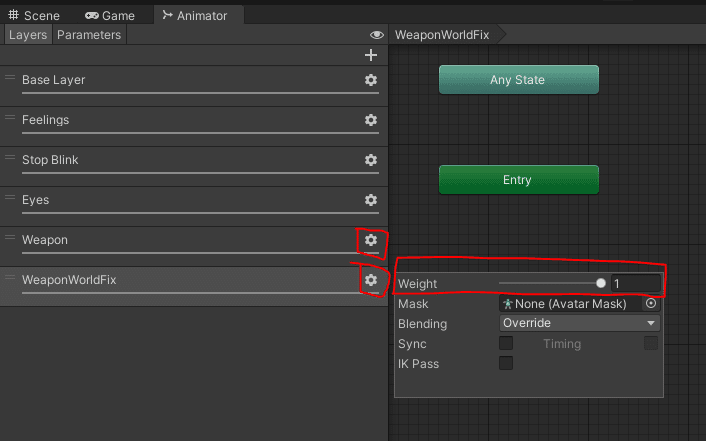
続けてLayersタブに切り替えて、Weaponの表示とWorld固定用のLayerを追加します。
ここでは、ここでは、「Weapon」「WeaponWorldFix」としておきます。
Layer名は日本語でも大丈夫っぽいので、自分が見てわかりやすい名前にしておきましょう。
追加した2つのLayerの右の歯車マークをそれぞれクリックして、Weightを「1」にします。
これで、このLayerが有効化されます。
3.Stateを追加する
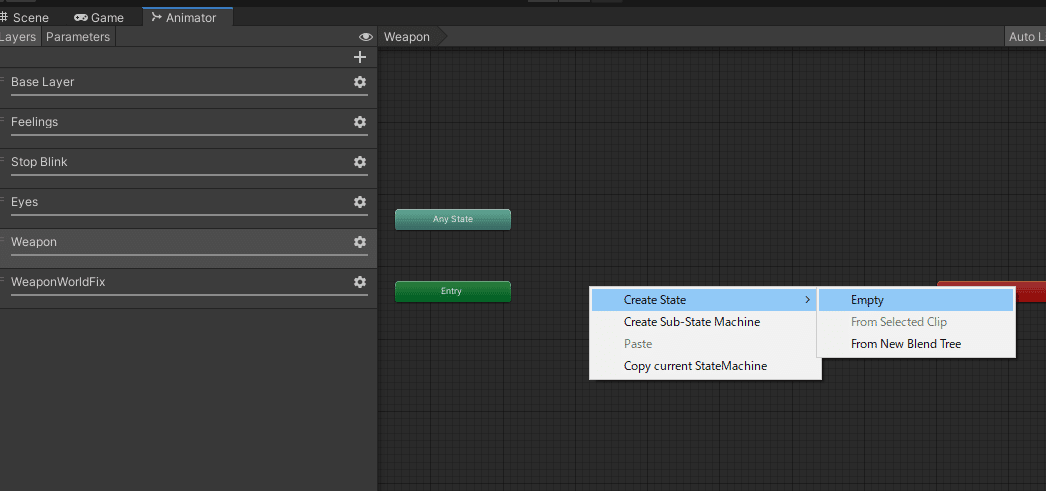
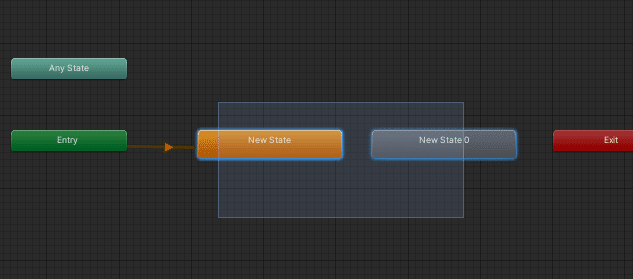
まずは「Weapon」のLayerをクリックし、Create State>Emptyをクリックします。
黄色いStateが追加されたら、続けてもうひとつ作成します。
もうひとつのStateはグレーです。
4.Write Defaultの解除
追加した黄色とグレートのStateをドラッグ(もしくは、Shiftを押しながら順番にクリック)して、選択状態にします。
続けて、右のInspectorから「Write Defaults」のチェックを外します。

5.Stateの名前を変更
Layer内の適当な箇所をクリックして、選択状態を解除します。
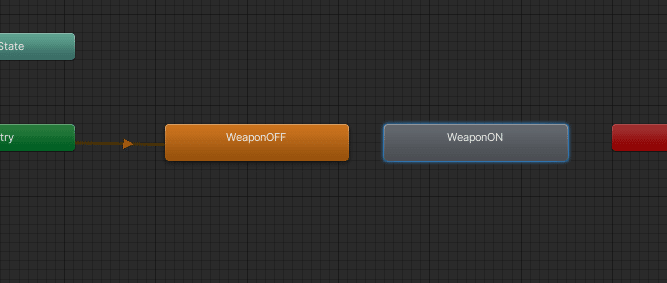
次に黄色のStateをクリックし、Inspectorの一番上のテキストボックスで、Stateの名前を変更します。
グレーのStateについても同様に名前を変更します。
ここでは、黄色Stateを「WeaponOFF」、グレーのStateを「WeaponON」としました。
Stateの名前もLayer名と同じく日本語でも大丈夫なので、自分で見てわかりやすい名前にしてOKです。
6.Transitionの作成
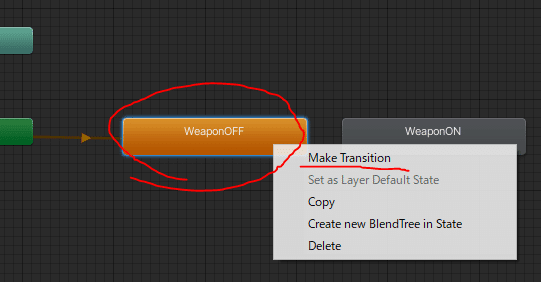
「WeaponOFF」のStateを選択し、右クリック>「Make Transition」を選択します。
矢印が表示されるので、その状態のまま、右の「WeaponON」をクリックします。
7.Transitionの詳細設定
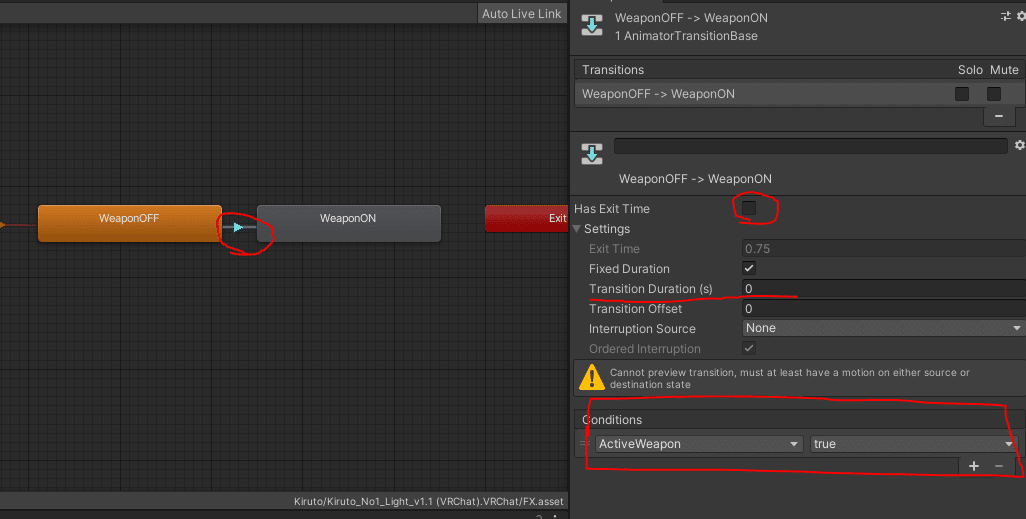
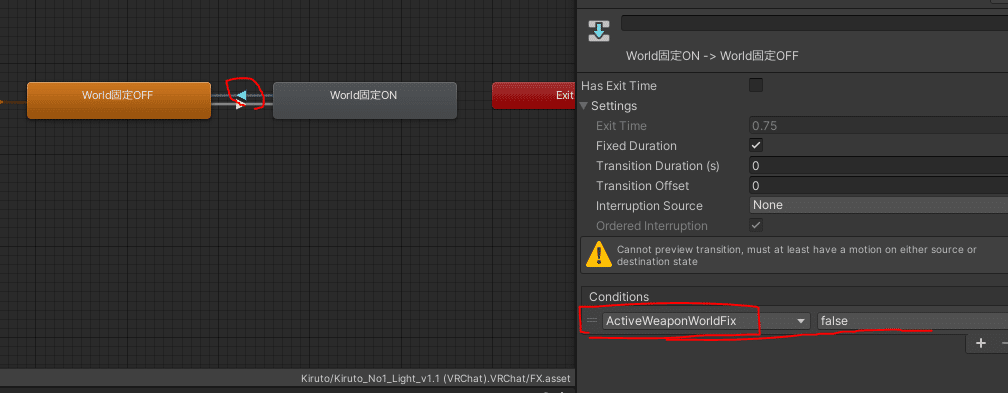
作成したTransitionの矢印を選択し、Inspectorに表示されている内容を図のように設定してください。
・Has Exit Timeのチェックを外す
・Transition Duration(s)を「0」にする
・Conditionsの設定を「ActiveWeapon:true」にする
これで、ActiveWeapon Parameterがtrue(つまりON)になった時に、WeaponOFF→WeaponONに遷移するようになります。
後ほど説明するExpressionメニューからWeaponをONにした際に、ここの遷移が連動します。
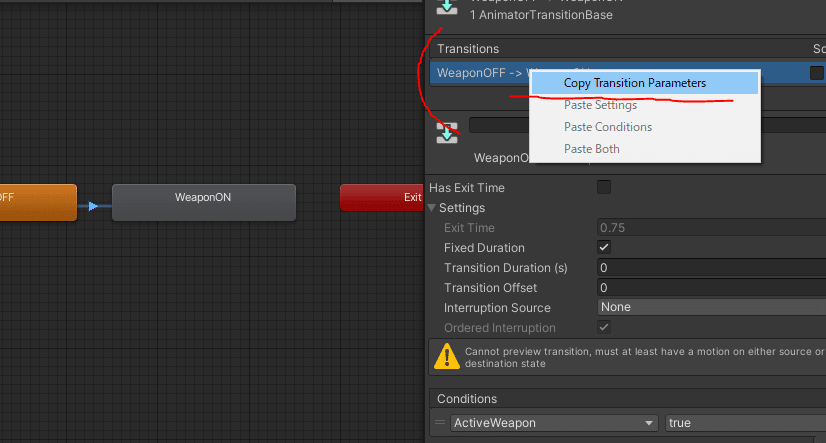
8.小技:Transition設定コピー
今度は、逆にWeaponOFF→WeaponONへのTransitionの設定をしますが、ここで小技の紹介です。
Transition設定は、コピーペーストする事が出来るので利用しましょう。
Inspectorの「Transitions」のところで、右クリックし「Copy Transition Parameter」を選択してください。
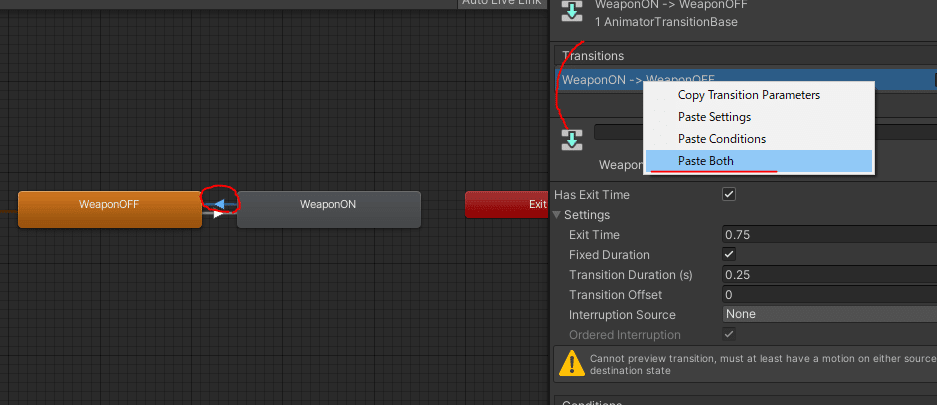
9.WeaponOFF→WeaponONへのTransition設定
コピーした状態を保持しつつ、
まずは先程と同じように、今度はWeaponON→WeaponOFFにTransitionを作成してください。
「WeaponON」のStateを選択し、右クリック>「Make Transition」です。
そして、作成したTransitionを選択し、InspectorからPaste Bothを選択すると、設定がコピーされます。
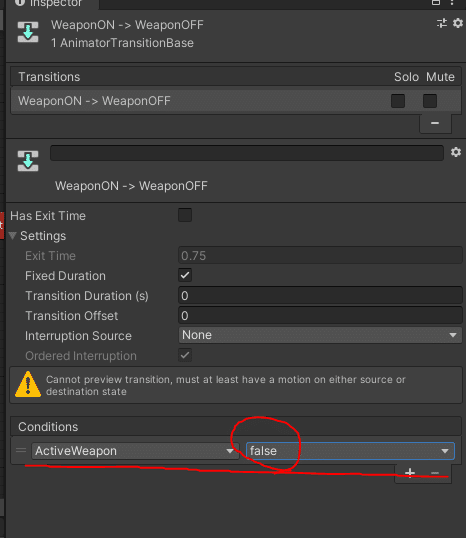
10.ペーストしたTransition設定の修正
ペーストしただけだと、WeaponOFF→ONと条件が同じになってしまうため、Conditionsだけ変更します。
・「ActiveWeapon:false」にする
このLayerは一旦これでOKです。
Animationファイルの指定は、のちほど説明します。
先にAnimationファイルを作っている場合は、このタイミングでセットしてOKです。
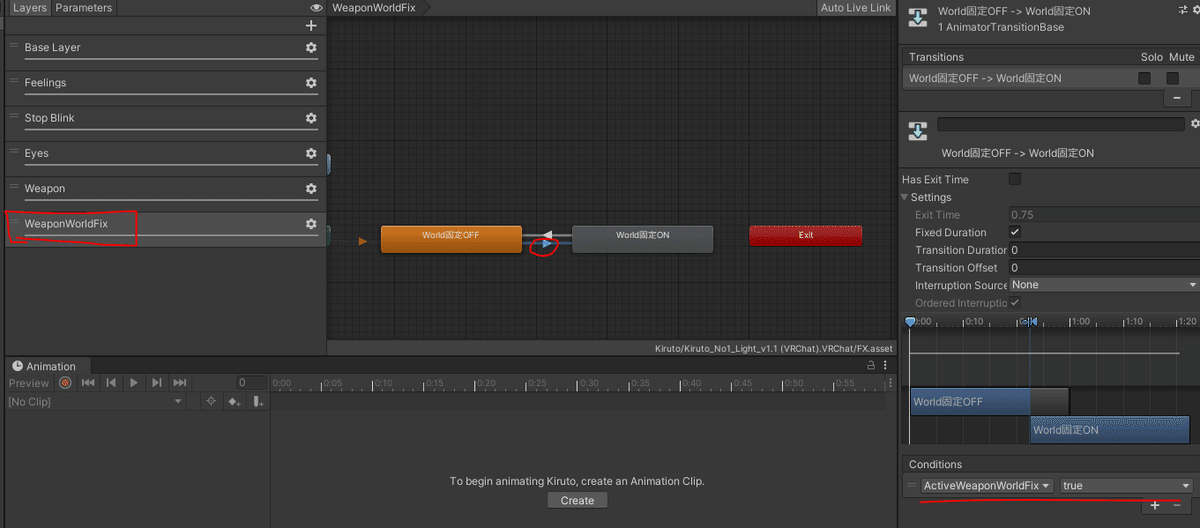
11.World固定用のLayer設定
今度はWorld固定用のLayerを設定します。
手順としては、WeaponのLayerと同じですので、詳細は省略します。
今回は、黄色Stateを「World固定OFF」、グレーのStateを「World固定ON」としました。
すでに記載した通り、Stateの名前は自分でわかりやすい名前にしてOKです。
注意として、Conditionsの利用Parameterが異なる事に注意です。
World固定のLayerには、「ActiveWorldWeaponFix」を使います。
・「ActiveWorldWeaponFix:true」にする
12.World固定ON→OFFのTransition設定
World固定ONの設定は下記です。
・「ActiveWorldWeaponFix:false」にする
13.Animationファイルの作成
ようやくAnimationのファイルの作成です。
とはいえ、Layer作成よりは簡単です。
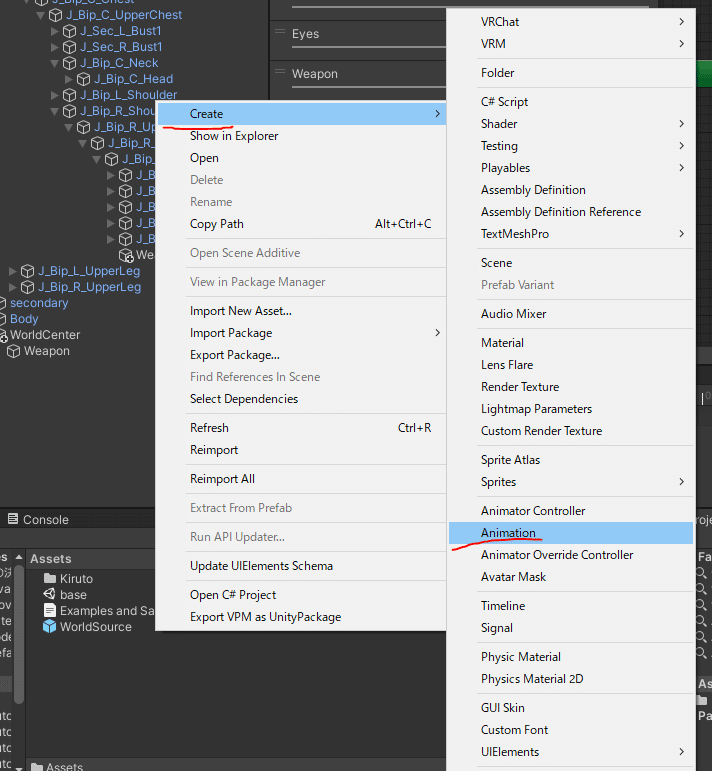
Projectタブの空いてる所(ファイルを置きたいフォルダ内)で右クリック>Create>Animationを選択してください。
作成されたAnimationファイル名は、ここでは「WeaponON」としておきます。
14.Animationの中身を定義する
Animationの定義をする際、やり方はいくつかありますが、個人的に簡単だと思ってる方法を紹介します。
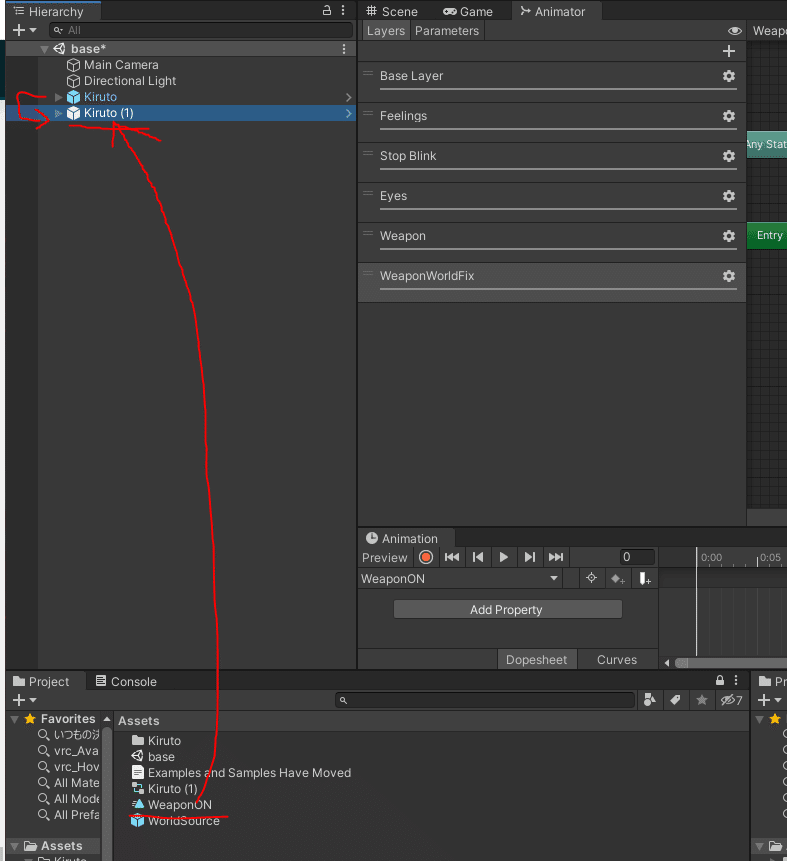
まずは、Hierarchyからアバターをコピーします。
Windowsの場合は、アバターを選択して「Ctl + D」です。
基本的には、「アバター(1)」とかになるかと。
そして、先程作成した「WeaponON」Animationファイルをコピー作成したアバターにドラッグ&ドロップします。
画像だと、Kiruto(1)ですね。
15.Animationの録画
では、Animationを録画(中身を設定)します。
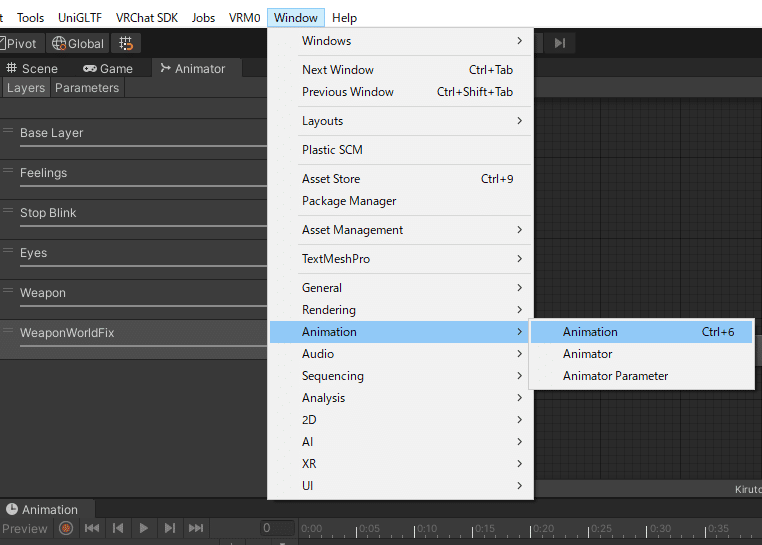
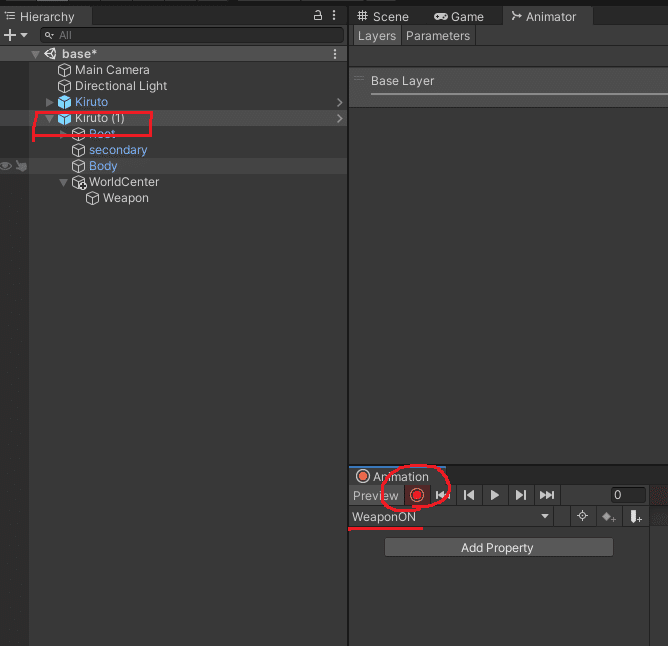
※Animationタブが表示されていない場合は、メニューのWindow>Animation>Animationで表示できます(下記画像①)。
次に、コピーしたアバターを選択した状態、Animationタブの表示が「WeaponON」になっている事を確認したら、赤丸ボタン(録画ボタン)をクリックします。
すると、赤いボタンが光り、録画状態になります。
この録画状態で操作した内容がAnimationとして定義される、という事です。
16.Weaponを表示するAnimationを録画
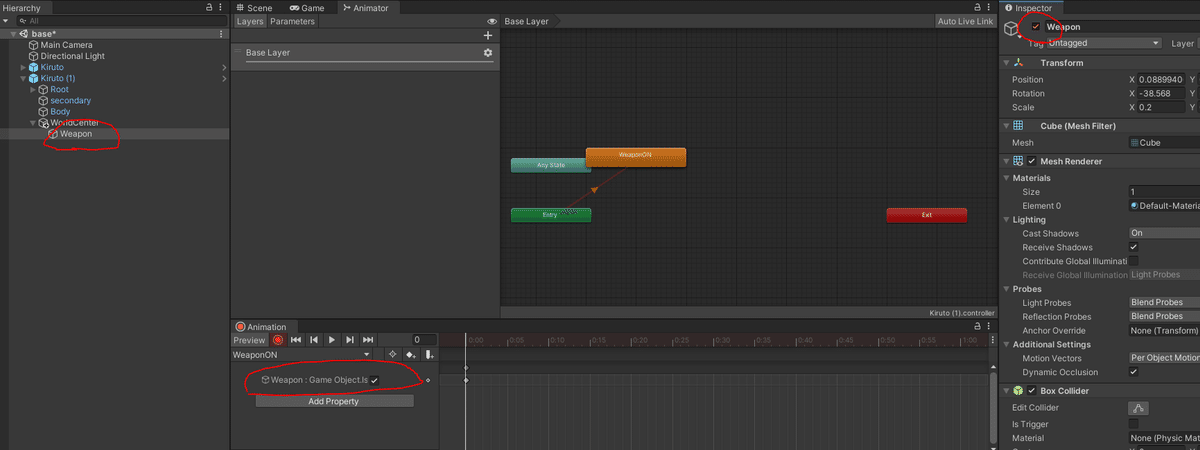
録画が始まりましたので、WeaponをON(表示)する処理をおこないます。
Weaponオブジェクトを選択し、Inspectorの名前の左にあるチェックボックスを2回クリックします。
一旦OFFにして、再度ONにする、という感じです。
すると、Animationに「Weapon:Game Object~」というキーが追加されているので、録画は完了です。
赤いボタンを再度クリックし、録画を終了します。
17.WeaponのOFFのAnimationを作成
次に、WeaponのOFF(非表示)のAnimationを作成します。
同じように録画する手もありますが、非常に面倒です。
なので作ったWeaponONのAnimationをコピーして、値だけ変える方法で楽をしましょう。
WeaponONのAnimationファイルを選択し、「Ctl + D」でコピーします。
名前は「WeaponOFF」としておきます。
続けて「WeaponOFF」ファイルをダブルクリックし、Animationタブに表示されたキー部分の値を「0」に変更します。
チェック表示だったり、数字だったりで分かりづらいですが、整理すると下記です(オブジェクトの表示/非表示に関して);。
・「チェックあり」=「1」=「Active」=「表示する」
・「チェックなし」=「0」=「NonActive」=「表示しない」
これで、「WeaponOFF」のAnimation設定も完了です。

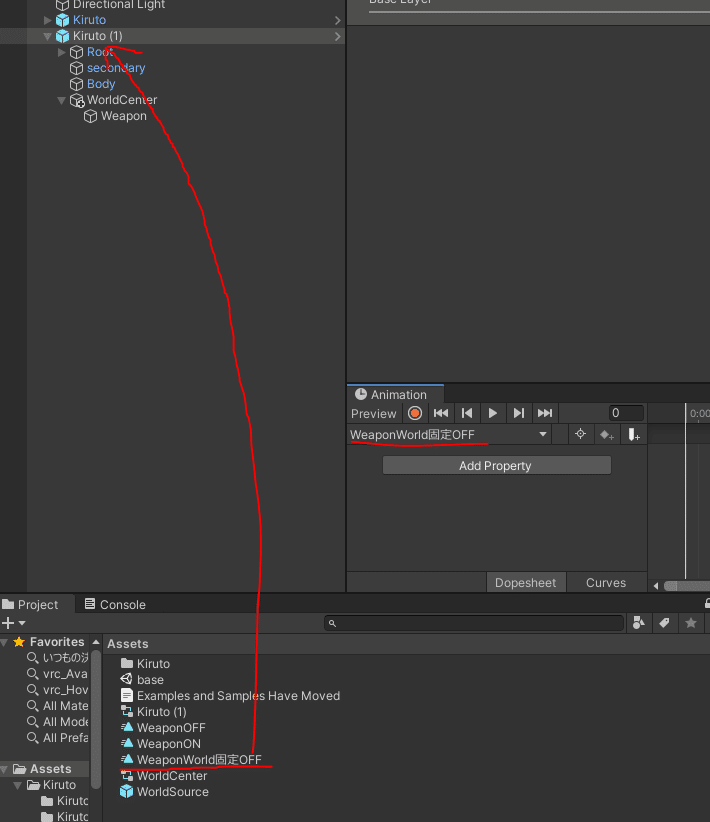
18.World固定用のAnimation作成
次にWorld固定用のAnimationを作成していきます。
手順としては、WeaponのON/OFF Animation作成と同じです。
今回は、OFFから作成します。
Animationファイル名は、ここでは「WeaponWorld固定OFF」としておきます。
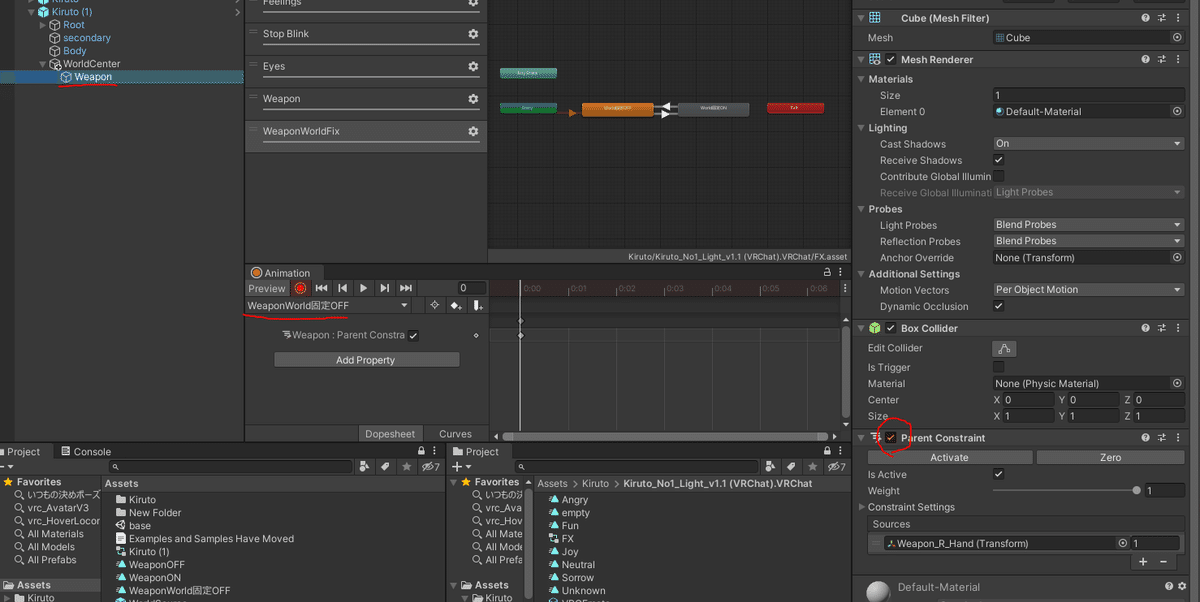
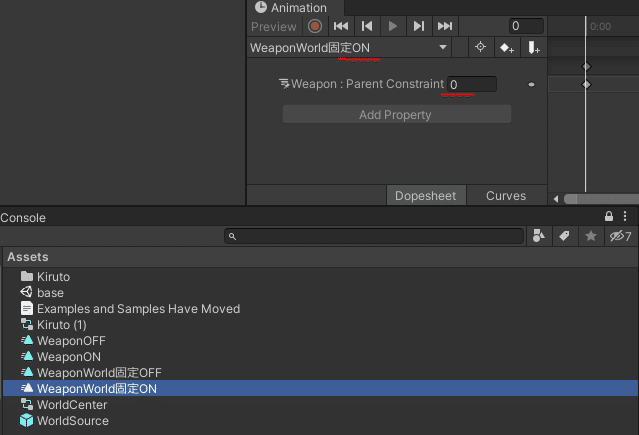
19.Weapon固定をOFFにするAnimationを録画
Animationタブの表示が「World固定OFF」になっている事を確認し、録画ボタンをクリックします。
録画が始まったら、アバター>WorldCenter>Weaponの「Parent Constraint」を2回クリックします。
Animationにキーが登録されたれ、録画を終了します。
20.World固定をONにするAnimationの作成
こちらもWeaponの表示OFFを作った時と同じ、Animationファイルをコピーして作成します。
「World固定OFF」Animationを「Ctl + D」でコピーします。
名前は「World固定ON」としておきます。
ファイルをダブルクリックして、値を「0」にします。
World固定の場合は、下記となります(Weapon表示ON/OFFと数値が逆になります。)
・「チェックあり」=「1」=「Parent Constraint:ON」=「World固定しない(右手に追随)」
・「チェックなし」=「0」=「Parent Constraint:OFF」=「World固定する」
Animationの作成はこれで終わりです。
複製したアバターは削除して大丈夫です。
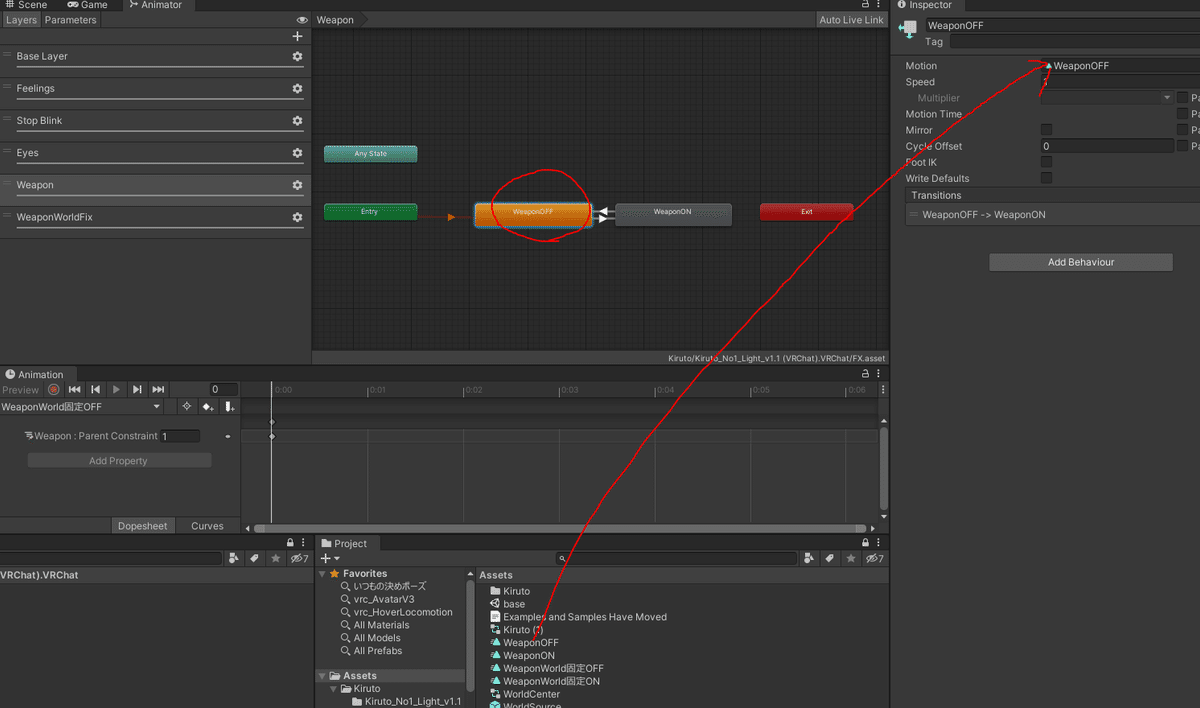
21.Animator LayerにWeaponON/OFF Animationを設定する
Animator Layerから「Weapon」Layerを開きます。
「WeaponOFF」Stateをクリックし、InspectorのMotionに作成した「WeaponOFF」Animationをドラッグ&ドロップします。
次に「WeaponON」Stateをクリックし、「WeaponOFF」Animationをドラッグ&ドロップします。
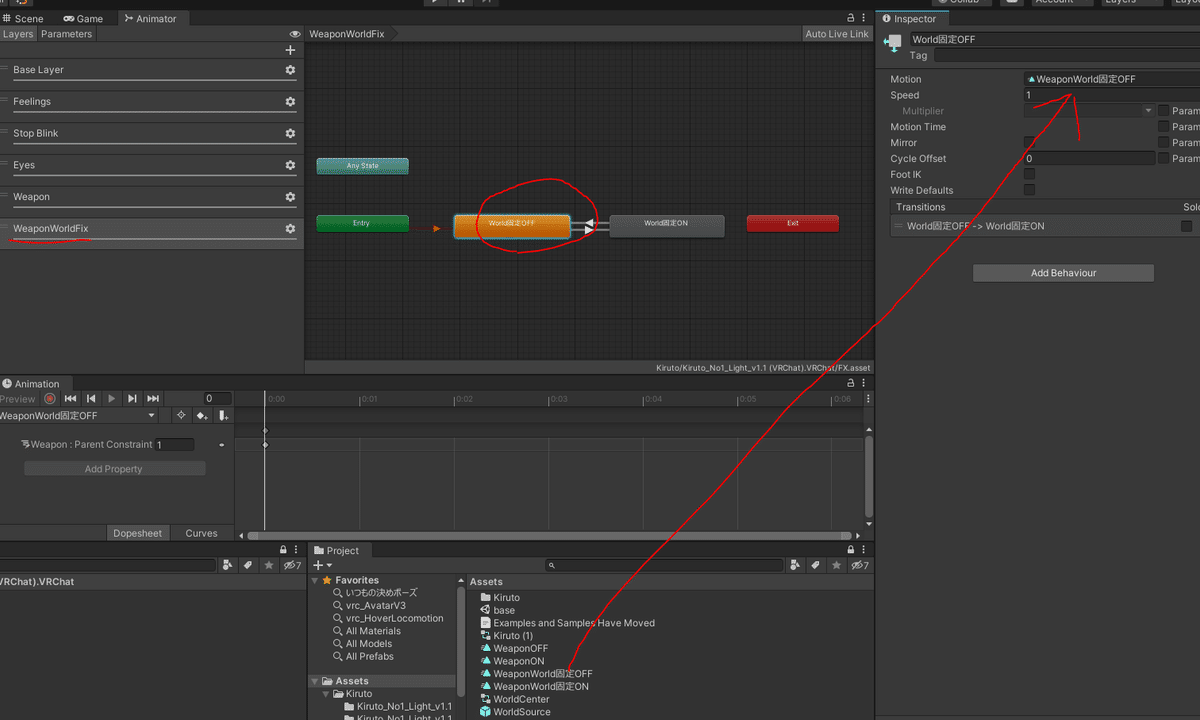
22.WeaponWorld固定ON/OFF Animationを設定する
続けて、World固定のLayerにAnimationを設定します。
WeaponON/OFFと同様に、それぞれのStateにAnimationファイルをドラッグ&ドロップします。
4つのStateにそれぞれ対応したAnimationが設定されている事を書くにしたらAnimatorのLayer設定は完了です。
次回はExpressionメニューの作成
次回は、今回作成したWeapon ON/OFFとWorld固定 ON/OFFをExpressionメニューに追記する方法を説明していきます。