ECRコンテナイメージのセキュリティスキャンとSlack通知を自動化したよ

こんにちは、すずきです。最近はハリソン山中の喋り方で日常生活を送っています。
ECS on Fargate環境を導入する際、最初にCIへTrivyやDockleによるコンテナイメージの脆弱性スキャンを組み込んだのですが、次にリリース間のセキュリティリスクも考えて、ECRのイメージを定期的にスキャンしてその結果をSlackで通知する仕組みをつくりました。
Lambda、EventBridge、S3、IAMロールというAWSの基本リソースを使用して、誰でも簡単にこの仕組みを構築できる方法をご紹介します。Terraformのコードも掲載するのでぜひご活用ください。
また、CIへのTrivyとDockleの組み込みについては以前日本語と英語で記事を書いたので、こちらについても時間があったらご覧ください。
実装
ECRにはイメージプッシュ時にセキュリティスキャンをおこなう機能があるのですが、これをLambda + EventBridgeで週に一度(毎週月曜日 10:00)自動スキャンをおこなうようにします。
また、今回はLambdaにアタッチするIAMロールと、LambdaのZIPデプロイのために.zipアーカイブを保管するS3も作成します。
Dockerデプロイ(ECR使用)とZIPデプロイ(S3使用)のどちらを利用するかで迷ったのですが、S3の方が安価なため今回はZIPデプロイをおこないました。
Terraformの構成
以下が今回のTerraform構成です。
.
├── environments
│   └── dev
│       ├── main.tf       # Dev環境のメイン設定ファイル
│       └── backend.tf    # Terraformのバックエンド設定
└── modules
    ├── s3
    │   ├── main.tf       # S3バケット設定
    │   ├── outputs.tf    # S3モジュールの出力定義
    │   └── provider.tf   # S3モジュールのプロバイダ設定
    ├── iam_roles
    │   ├── main.tf       # IAMロール設定
    │   ├── outputs.tf    # IAMロールモジュールの出力定義
    │   └── provider.tf   # IAMロールモジュールのプロバイダ設定
    ├── eventbridge
    │   ├── main.tf       # EventBridge設定
    │   └── provider.tf   # EventBridgeモジュールのプロバイダ設定
    └── lambda
        ├── main.tf       # Lambda設定
        ├── outputs.tf    # Lambdaモジュールの出力定義
        ├── provider.tf   # Lambdaモジュールのプロバイダ設定
        ├── variables.tf  # Lambdaモジュールの変数定義
        └── ecr_weekly_security_scan
            ├── app.py          # Lambda関数のPythonスクリプト
            ├── Dockerfile      # Dockerfile for Lambda環境
            ├── requirements.txt # Python依存関係リスト
            └── build.sh        # DockerイメージのビルドとZIPアーカイブ作成スクリプト
Lambda
以下がLambda関数の全容です。
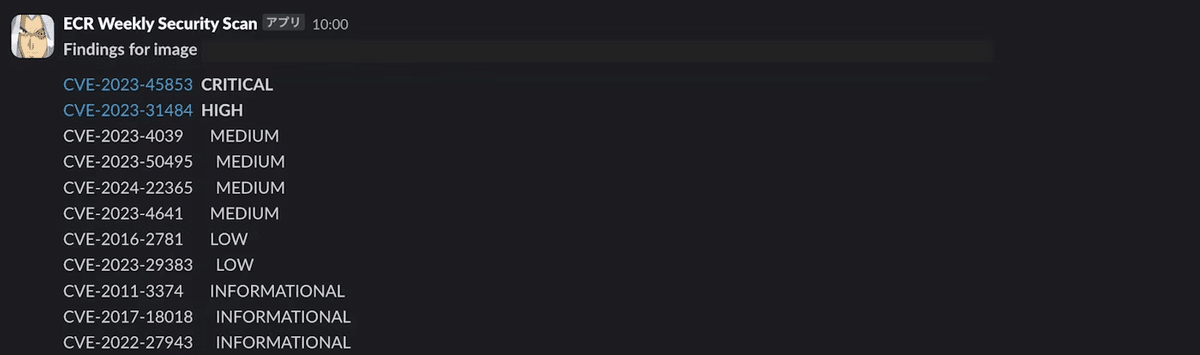
boto3でECRの最新イメージのセキュリティスキャンを行い、その結果をSlackに通知します。また、CRITICALかHIGHが検出されたらcve_urlでリンクをつけ、Slack上からアクセスできるようにしています。
import os
import boto3
import requests
from botocore.exceptions import ClientError


def lambda_handler(event, context):
    ecr_client = boto3.client('ecr')
    repository_name = os.environ['REPOSITORY_NAME']
    slack_webhook_url = os.environ['SLACK_WEBHOOK_URL_ECR_WEEKLY_SECURITY_SCAN']

    # 最新のイメージを取得
    try:
        response = ecr_client.describe_images(
            repositoryName=repository_name,
            filter={'tagStatus': 'TAGGED'}
        )
    except ClientError as e:
        print(f"Error retrieving images: {e}")
        raise e

    images = response.get('imageDetails', [])
    if not images:
        print("No images found.")
        return {
            'statusCode': 200,
            'body': 'No images found.'
        }

    latest_image = max(images, key=lambda x: x['imagePushedAt'])
    image_digest = latest_image['imageDigest']

    # スキャン結果を取得
    try:
        scan_results = ecr_client.describe_image_scan_findings(
            repositoryName=repository_name,
            imageId={'imageDigest': image_digest}
        )
    except ClientError as e:
        print(f"Error retrieving scan findings: {e}")
        raise e

    findings = scan_results['imageScanFindings']['findings']

    # メッセージのフォーマット
    if not findings:
        message = f"No findings for image {repository_name}@{image_digest}"
    else:
        message = f"*Findings for image {repository_name}@{image_digest}:*\n\n"
        max_len_cve_id = max(len(finding['name']) for finding in findings) + 2
        max_len_severity = max(len(finding['severity'])
                               for finding in findings) + 2

        for finding in findings:
            cve_id = finding['name']
            severity = finding['severity']
            if severity in ['CRITICAL', 'HIGH']:
                cve_id = f"<{cve_url(cve_id)}|{cve_id}>"
                severity = f"*{severity}*"
            message += f"{cve_id.ljust(max_len_cve_id)}  {severity.ljust(max_len_severity)}\n"

    # Slackにメッセージを送信
    response = requests.post(slack_webhook_url, json={"text": message})
    if response.status_code != 200:
        raise ValueError(
            f"Request to Slack returned an error {response.status_code}, the response is:\n{response.text}")

    return {
        'statusCode': 200,
        'body': 'Security scan completed successfully'
    }


def cve_url(cve_id):
    return f"https://nvd.nist.gov/vuln/detail/{cve_id}"
ZIPアーカイブの自動作成
以下のスクリプトは、Lambda関数のコードと依存関係を含むDockerコンテナをビルドし、その内容をZIPファイルとしてアーカイブします。
作成されたアーカイブecr-weekly-security-scan.zipは後述のS3バケットにアップロードします。
#!/bin/bash

# Build the Docker image
docker build -t ecr-weekly-security-scan-build .

# Create a container from the image
container_id=$(docker create ecr-weekly-security-scan-build)

# Copy the contents of the container to a local directory
docker cp $container_id:/var/task ./package

# Clean up
docker rm $container_id

# Zip the contents of the local directory
cd package
zip -r ../ecr-weekly-security-scan.zip .
cd ..

# Clean up
rm -rf package
requirements.txtやDockerfileは以下のようになります。
boto3
requests
FROM public.ecr.aws/lambda/python:3.12
# Install Python dependencies
COPY requirements.txt /var/task/
RUN pip install -r /var/task/requirements.txt --target /var/task
# Copy the Lambda function code
COPY app.py /var/task/
# Set the working directory
WORKDIR /var/task
# Set the CMD to your handler
CMD ["app.lambda_handler"]関数のデプロイ
このTerraformコードは、作成したZIPアーカイブを使用してLambda関数をAWSにデプロイします。環境変数はTerraformからLambdaに渡され、関数の実行時に使用されます。
resource "aws_lambda_function" "ecr_weekly_security_scan" {
  function_name    = "ecr-weekly-security-scan"
  s3_bucket        = var.s3_bucket_lambda_functions_storage_bucket
  s3_key           = "ecr-weekly-security-scan.zip"
  handler          = "app.lambda_handler"
  runtime          = "python3.12"
  role             = var.iam_role_ecr_weekly_security_scan_lambda_exec_role_arn
  timeout          = 300 # 5 minutes
  environment {
    variables = {
      REPOSITORY_NAME                            = "example-ecr-dev"
      SLACK_WEBHOOK_URL_ECR_WEEKLY_SECURITY_SCAN = var.slack_webhook_url_ecr_weekly_security_scan
    }
  }
}
変数定義(variables.tf)と出力定義(outputs.tf)
プロジェクトの設定を管理するvariables.tfとoutputs.tfは以下のようになります。
variable "s3_bucket_lambda_functions_storage_bucket" {
  description = "The S3 bucket containing the Lambda function code"
  type        = string
}

variable "iam_role_ecr_weekly_security_scan_lambda_exec_role_arn" {
  description = "The ARN of the Lambda execution role"
  type        = string
}

variable "slack_webhook_url_ecr_weekly_security_scan" {
  description = "The URL of the Slack webhook to post messages to"
  type        = string
  sensitive   = true
}
output "lambda_function_ecr_weekly_security_scan_arn" {
value = aws_lambda_function.ecr_weekly_security_scan.arn
}
output "lambda_function_ecr_weekly_security_scan_name" {
value = aws_lambda_function.ecr_weekly_security_scan.function_name
}
output "lambda_function_ecs_task_scheduler_arn" {
value = aws_lambda_function.ecs_task_scheduler.arn
}
output "lambda_function_ecs_task_scheduler_name" {
value = aws_lambda_function.ecs_task_scheduler.function_name
}S3の作成
Lambda関数のZIPアーカイブを保存するS3バケットを作成します。バケット名はグローバルに一意でなければならないので、適切な名前に変更します。
resource "aws_s3_bucket" "lambda_functions_storage" {
  bucket = "lambda-functions-storage"
}
出力定義(outputs.tf)
Lambda関数のmain.tfからバケット名を参照するために、outputs.tfを以下のように定義します。
output "s3_bucket_lambda_functions_storage_bucket" {
  value = aws_s3_bucket.lambda_functions_storage.bucket
}
IAMロール
Lambda関数がECRにアクセスするための実行ロールを作成します。今回は、ECRのイメージとスキャン結果の詳細を取得するために、ecr:DescribeImagesとecr:DescribeImageScanFindingsのポリシーをアタッチします。
resource "aws_iam_role" "ecr_weekly_security_scan_lambda_exec_role" {
  name = "ecr_weekly_security_scan_lambda_exec_role"
  assume_role_policy = jsonencode({
    Version = "2012-10-17"
    Statement = [{
      Action = "sts:AssumeRole"
      Effect = "Allow"
      Principal = {
        Service = "lambda.amazonaws.com"
      }
    }]
  })
}

resource "aws_iam_role_policy_attachment" "ecr_weekly_security_scan_lambda_basic_execution" {
  role       = aws_iam_role.ecr_weekly_security_scan_lambda_exec_role.name
  policy_arn = "arn:aws:iam::aws:policy/service-role/AWSLambdaBasicExecutionRole"
}

resource "aws_iam_policy" "ecr_weekly_security_scan_ecr_policy" {
  name        = "ecr_weekly_security_scan_ecr_policy"
  description = "Policy for accessing ECR"
  policy      = jsonencode({
    Version = "2012-10-17"
    Statement = [
      {
        Effect   = "Allow"
        Action   = [
          "ecr:DescribeImages",
          "ecr:DescribeImageScanFindings"
        ]
        Resource = "*"
      }
    ]
  })
}

resource "aws_iam_role_policy_attachment" "ecr_weekly_security_scan_lambda_ecr_policy" {
  role       = aws_iam_role.ecr_weekly_security_scan_lambda_exec_role.name
  policy_arn = aws_iam_policy.ecr_weekly_security_scan_ecr_policy.arn
}
出力定義(outputs.tf)
IAMロールのARNを出力として設定し、Lambdaのmain.tfから参照できるようにします。
output "iam_role_ecr_weekly_security_scan_lambda_exec_role_arn" {
  value = aws_iam_role.ecr_weekly_security_scan_lambda_exec_role.arn
}
EventBridgeの設定
EventBridgeを使用して、ECRのコンテナイメージを定期的にスキャンするためのスケジュールを設定します。スケジュールはUTC時間で設定されるため、日本時間での設定には時間差を考慮する必要があります。
EventBridgeルールの設定
スケジュール式を使用して、毎週月曜日のUTC午前1時(日本時間の午前10時)にLambda関数をトリガーするルールを設定します。
resource "aws_cloudwatch_event_rule" "ecr_weekly_security_scan_schedule" {
  name                = "ECRWeeklySecurityScanSchedule"
  schedule_expression = "cron(0 1 ? * MON *)" # UTCの午前1時、日本時間の午前10時
}
EventBridgeターゲットの設定
作成したスケジュールルールに基づいてLambda関数をターゲットとして登録します。
resource "aws_cloudwatch_event_target" "ecr_weekly_security_scan_target" {
  rule      = aws_cloudwatch_event_rule.ecr_weekly_security_scan_schedule.name
  target_id = "ecrWeeklySecurityScan"
  arn       = var.lambda_function_ecr_weekly_security_scan_arn
}
Lambda関数への呼び出し権限の付与
EventBridgeからLambda関数を安全に呼び出すために必要な権限を設定します。この設定は、EventBridgeがLambda関数を直接トリガーできるようにするため必要です。
resource "aws_lambda_permission" "ecr_weekly_security_scan_allow_eventbridge" {
statement_id = "AllowExecutionFromEventBridge"
action = "lambda:InvokeFunction"
function_name = var.lambda_function_ecr_weekly_security_scan_name
principal = "events.amazonaws.com"
source_arn = aws_cloudwatch_event_rule.ecr_weekly_security_scan_schedule.arn
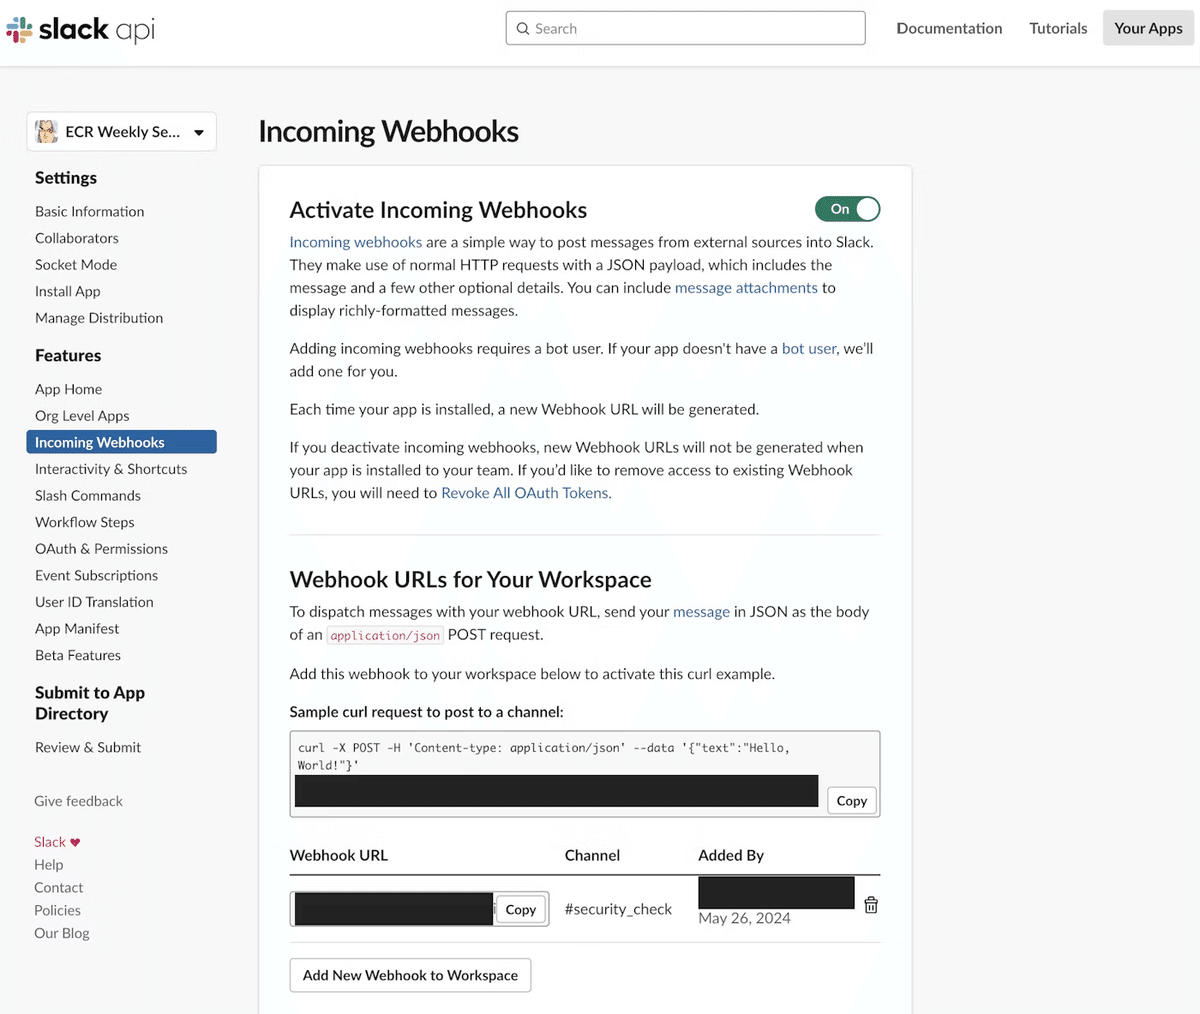
}補足: Slack Webhook URLの参照先
Slackで自動通知を設定するには、Slack APIを通じてアプリケーションを作成し、Incoming Webhooksを有効にする必要があります。Webhook URLは、Slackのアプリ設定ページのIncoming Webhooksセクションで確認できます。このURLは、Lambda関数で使用され、スキャン結果を指定されたSlackチャンネルに送信するために使用します。