Agent AI時代の到来:LangChain, LlamaIndex, AWS, Gemini, AutoGen, CrewAI, Agent protocol それぞれのAIエージェントの実装方法の紹介
LangChain, LlamaIndex, AWS, Gemini, AutoGen, CrewAI, Agent protocol それぞれのAIエージェントの実装方法の紹介
<aside> 💡 元記事:The Future of Generative AI is Agentic: What You Need to Know: Han HELOIR, Ph.D. ☕️
1. Agent Acceleratorのあるエージェント
AIエージェントの構築方法にはすでにいくつかよく知られている手法があります。以下のセクションでは、主要な技術スタックとそれらの実装方法について紹介していきます。
1.1 LangChainでのエージェント
計画と実行のためのAgentExecutor:
LangChainでは、AgentExecutorが実行レベルで使用され、エージェントの推理脳として機能し、言語モデルとそのツールを単一のランタイム環境に統合します。
エージェントは行動を決定し、AgentExecutorがそれを実装します。この決定と実行の分離は、保守性と拡張性を向上させる良好なソフトウェア設計の実践です。
LangChainでのエージェントツールの作成:
エージェントツールの開発はLangChainの重要な特徴です。Wikipediaの検索、YouTube、Yahooの検索、Google Scholarなど、60以上のツールが統合されており、あなたのAIアプリケーションで利用できます。
統合ツールと並行して、自分の製品カタログにアクセスするための運用データベースからの取得ツールなど、自分自身のツールを作成することもできます。
メモリの統合:
LangChainはエージェントのメモリの問題に対処します。ベータ版であるにもかかわらず、チャット履歴を含める仕組みがあり、エージェントが前のインタラクションを覚えて、それを基に築き上げることができます。これは、会話やタスクの連続性とコンテキストを維持するために重要であり、より自然なユーザーインタラクションにつながります。
エージェントの種類:
LangChainは、モデルの種類、チャット履歴のサポート能力、複数の入力ツールを処理する能力、並列関数呼び出しを行う能力に基づいてエージェントの種類を分類します。例としては、ReAct Agent、Self Ask with Search Agent、tool calling agentなどが挙げられます。
エージェントの種類は、モデルの能力とタスクの複雑さに適合するべきです。
Langchainでエージェントを作成する実用例:
このコードは、タスクを実行し、複数のインタラクションにわたって会話の状態を維持することができるカスタムエージェントを作成します。ツールバインディング、プロンプトテンプレート、メモリ管理、実行ロジックを含み、OpenAIのAPIを使用した会話型AIモデルのための包括的なセットアップを作成します。この例は、特定のユースケースのためのより高度なエージェントを開発するベースとなります。(LangChainが提供する最新のコードについては、このリンクを参照してください。)
from langchain_openai import ChatOpenAI
from langchain.agents import tool

llm = ChatOpenAI(model="gpt-3.5-turbo", temperature=0)

@tool
def get\\_word\\_length(word: str) -> int:
    """Returns the length of a word."""
    return len(word)

get\\_word\\_length.invoke("abc")

tools = \\[get\\_word\\_length\\]

from langchain_core.prompts import ChatPromptTemplate, MessagesPlaceholder

prompt = ChatPromptTemplate.from_messages(
    \\[
        ("system", "You are very powerful assistant, but don't know current events"),
        ("user", "{input}"),
        MessagesPlaceholder(variable_name="agent_scratchpad"),
    \\]
)

llm\\_with\\_tools = llm.bind_tools(tools)

from langchain.agents.format\\_scratchpad.openai\\_tools import format\\_to\\_openai\\_tool\\_messages
from langchain.agents.output\\_parsers.openai\\_tools import OpenAIToolsAgentOutputParser

agent = (
    {
        "input": lambda x: x\\["input"\\],
        "agent_scratchpad": lambda x: format\\_to\\_openai\\_tool\\_messages(
            x\\["intermediate_steps"\\]
        ),
    }
    | prompt
    | llm\\_with\\_tools
    | OpenAIToolsAgentOutputParser()
)

from langchain.agents import AgentExecutor

agent_executor = AgentExecutor(agent=agent, tools=tools, verbose=True)

print(list(agent_executor.stream({"input": "How many letters in the word educa"})))

MEMORY_KEY = "chat_history"
prompt = ChatPromptTemplate.from_messages(
    \\[
        ("system", "You are very powerful assistant, but bad at calculating lengths of words."),
        MessagesPlaceholder(variable\\_name=MEMORY\\_KEY),
        ("user", "{input}"),
        MessagesPlaceholder(variable_name="agent_scratchpad"),
    \\]
)

from langchain_core.messages import AIMessage, HumanMessage

chat_history = \\[\\]

agent = (
    {
        "input": lambda x: x\\["input"\\],
        "agent_scratchpad": lambda x: format\\_to\\_openai\\_tool\\_messages(
            x\\["intermediate_steps"\\]
        ),
        "chat_history": lambda x: x\\["chat_history"\\],
    }
    | prompt
    | llm\\_with\\_tools
    | OpenAIToolsAgentOutputParser()
)
agent_executor = AgentExecutor(agent=agent, tools=tools, verbose=True)

input1 = "how many letters in the word educa?"
result = agent_executor.invoke({"input": input1, "chat_history": chat_history})
chat_history.extend(
    \\[
        HumanMessage(content=input1),
        AIMessage(content=result\\["output"\\]),
    \\]
)
agent_executor.invoke({"input": "is that a real word?", "chat_history": chat_history})
1.2 LlamaIndexを使用したエージェント
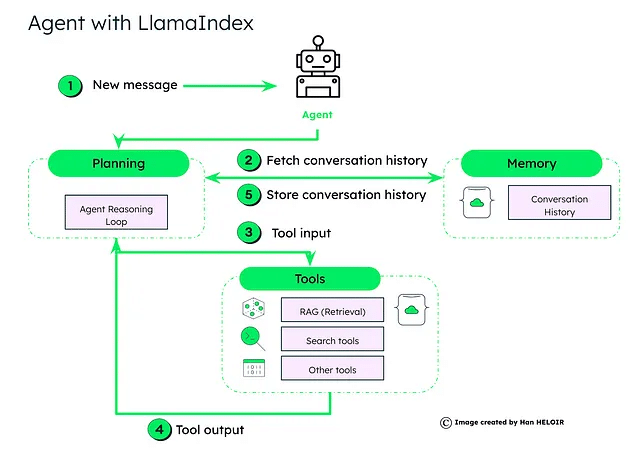
LlamaIndexを活用し、LLM(Large Language Models)によって強化されたデータエージェントは、セクション2で概説した概念に密接に似ています。それらは主に三つの主要なコンポーネントで構成されています:

LlamaIndexエージェントフレームワークの解説
計画:
ここでは「エージェント推論ループ」が鍵となります。新しいユーザーメッセージが入ってくると、このループは歴史的なメモリを取得する必要があるかどうか、どのツールを使用するか、それらをどの順序で使用するか、各ツール呼び出しのパラメータを決定します。
推論ループはエージェントの操作の中心であり、様々なタイプのエージェントをサポートしています:
関数呼び出しエージェント: 関数呼び出しLLMsとよく動作します。
ReActエージェント: チャット/テキスト完成エンドポイントに最適です。
高度なエージェント: 例えば、LLMCompiler、Chain-of-Abstraction、Language Agent Tree Searchなど。
ツール:
エージェントには選択するツールキットがあります。現在のクエリと会話履歴に基づいて必要なツールを選択します。これは情報検索のためのRAG、特定の検索ツール、またはカスタム関数などが考えられます。
選択されたツールは入力を処理し、出力を生成します。出力はデータ検索結果、計算値、または取るべき行動などが考えられます。
メモリ:
ージェントは連続性とコンテキストを保つためにメモリから会話履歴を引き出します。処理後、エージェントはメモリ内の会話履歴を更新し、対話フローを維持します。
LlamaIndexのデータエージェントは次のことができます:
高レベルのインターフェースを介してユーザークエリをエンドツーエンドで処理します。
ステップバイステップの実行のための低レベルAPIを提供し、タスクの進行と分析を精密に制御します。
データエージェントは、一連のツールから始めて、提供された使用パターンに従って作成および操作することができます。たとえば、ReActエージェントは、チャットとクエリ機能をサポートするためのさまざまなツールを設定することができます。これらのエージェントはまたChatEngineとQueryEngineから継承し、必要な機能を提供することができます。
LlamaIndexでのデータエージェントの実装方法
このクックブックは、PythonでカスタムOpenAIエージェントを構築する例を示しています。OpenAI APIの関数呼び出し機能を使用します。例では、ツールの作成、エージェントの設定、会話内でのエージェントとの対話をカバーしています。
import json
from typing import Sequence, List
from llama_index.llms.openai import OpenAI
from llama_index.core.llms import ChatMessage
from llama_index.core.tools import BaseTool, FunctionTool
from openai.types.chat import ChatCompletionMessageToolCall
import nest_asyncio

nest_asyncio.apply()

def multiply(a: int, b: int) -\\> int:
    """Multiply two integers and return the result"""
    return a * b

def add(a: int, b: int) -\\> int:
    """Add two integers and return the result"""
    return a + b

multiply\\_tool = FunctionTool.from\\_defaults(fn=multiply)
add\\_tool = FunctionTool.from\\_defaults(fn=add)

class YourOpenAIAgent:
    def \\_\\_init\\_\\_(self, tools: Sequence\\[BaseTool\\] = \\[\\], llm: OpenAI = OpenAI(temperature=0, model="gpt-3.5-turbo-0613"), chat_history: List\\[ChatMessage\\] = \\[\\]) -\\> None:
        self._llm = llm
        self._tools = {tool.metadata.name: tool for tool in tools}
        self.\\_chat\\_history = chat_history

    def reset(self) -\\> None:
        """Reset the conversation history"""
        self.\\_chat\\_history = \\[\\]

    def chat(self, message: str) -\\> str:
        """Process a message through the agent, managing tool invocations and responses"""
        self.\\_chat\\_history.append(ChatMessage(role="user", content=message))
        tools = \\[tool.metadata.to\\_openai\\_tool() for _, tool in self._tools.items()\\]
        ai\\_message = self.\\_llm.chat(self.\\_chat\\_history, tools=tools).message
        self.\\_chat\\_history.append(ai_message)

        tool\\_calls = ai\\_message.additional_kwargs.get("tool_calls", \\[\\])
        for tool_call in tool_calls:
            function\\_message = self.\\_call\\_function(tool\\_call)
            self.\\_chat\\_history.append(function_message)
            ai\\_message = self.\\_llm.chat(self.\\_chat\\_history).message
            self.\\_chat\\_history.append(ai_message)

        return ai_message.content

    def \\_call\\_function(self, tool_call: ChatCompletionMessageToolCall) -\\> ChatMessage:
        """Invoke a function based on a tool call"""
        tool = self.\\_tools\\[tool\\_call.function.name\\]
        output = tool(**json.loads(tool_call.function.arguments))
        return ChatMessage(name=tool_call.function.name, content=str(output), role="tool", additional_kwargs={"tool\\_call\\_id": tool_call.id, "name": tool_call.function.name})

agent = YourOpenAIAgent(tools=\\[multiply\\_tool, add\\_tool\\])
print(agent.chat("Hi"))
print(agent.chat("What is 2123 * 215123"))
1.3 AWS Bedrockのエージェント
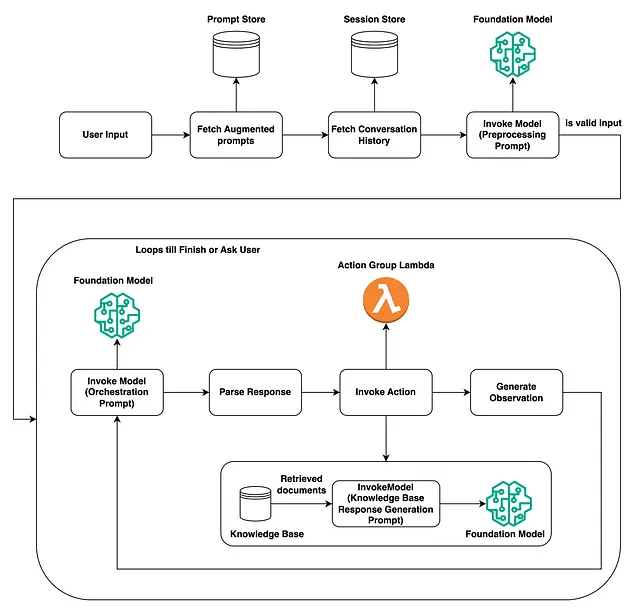
これはAWS Bedrockで動作するエージェントの手順です。手順は初期ユーザー入力の処理と主なアクションサイクルの2つの主要なセクションに分けられています:

AWSブログからの図表「エージェントの構築方法」
ユーザー入力の処理:
エージェントは、ユーザー入力を受け取ると、Prompt Storeから増強されたプロンプトとSession Storeからの会話履歴を取得します。
Large Language ModelなどのFoundation Modelは、プロンプトを前処理してその有効性をチェックし、ユーザーが何を求めているのかを理解します。
メインアクションサイクル:
Foundation Modelは再度使用され、以前に収集されたプロンプトと履歴を使用してプロンプトを整理したり、アクションプランを作成したりします。
エージェントは解析した応答を調査し、アクションを実行するか、またはその応答のためにKnowledge Baseからさらにドキュメントを取得するかを決定します。
アクションが選択された場合、Action Group Lambda関数が起動されてアクションを実行し、観察を行い、可能性によってはドキュメントの取得につながります。
モデルの呼び出し、応答の調査、アクションの実行、観察の作成というサイクルは、エージェントがタスクを終了するか、ユーザーからさらに情報が必要になるまで続きます。
AWSでエージェントを作成する
AWS Bedrockでエージェントを設定するには、以下のコンポーネントを使用する必要があります:
*Foundation Model(FM):**これはユーザーの入力を管理し、応答プロセスを制御するAIモデルです。
*指示と高度なプロンプト:**これらはエージェントの行動と意思決定のステップをガイドする特定の指示です。
*アクショングループ:**これらはOpenAPIスキーマとAWS Lambda関数からなるオプションの要素です。エージェントがタスクを完了するために使用できるAPI操作を決定します。
*知識ベース:**これらはエージェントにとってオプションです。彼らはエージェントの応答を改善するためのコンテキストを提供する複数のベクトルデータベースで構成されています。OpenSearch、Redis、Pinecone、Amazon Auroraを含みます。
AWSでこれらのコンポーネントを作成するための視覚的なガイドについては、添付の画像を参照してください。
1.4 Geminiとのエージェントビルダー
Googleは2024年4月に、Vertex AIエージェントビルダーを導入しました。このツールは、GCP上のAIエージェントの開発をスピードアップさせます。
ユーザーインターフェースでは、エージェントとその目標を簡単に定義し、指示を提供し、会話の例を共有することができます。
エージェントビルダーは、GCPに格納された企業データを使用してモデルを情報提供することも可能です。ユーザータスクを実行するための関数を呼び出したり、アプリケーションに接続したりすることができます。
2. マルチエージェントフレームワーク
AIエージェントの分野はまだ発展途上です。各フレームワークや開発スタックは、スタンドアロンのエージェントを構築するための独自の方法を持っています。しかし、複数のエージェントが協力して働くと、その機能性が向上し、アプリケーションの範囲が拡大することが証明されています。この協力は、二つの主な課題を提起します:
複数のエージェントが関与するワークフローの管理
よく異なるインターフェースを持つエージェント間の通信を可能にする課題
2.1 マイクロソフト AutoGen
マイクロソフトは、エージェントオーケストレーションの問題に対処するために、2023年10月にAutoGenフレームワークを立ち上げました。AutoGenは、特にLLMエージェントのオーケストレーションを簡素化するマルチエージェントアプリケーションの作成を容易にします。
AutoGenは、高レベルの抽象化を提供するマルチエージェント会話フレームワークです。これは、複数のエージェントが関与する高度なLLMアプリケーションの開発を可能にするオープンソースのライブラリです。
AutoGenを使用すると、異なるLarge Language Modelsを使用するエージェントを開発することができます。コードの生成と実行のためのエージェント、人間のフィードバックと参加を得るための別のエージェントなど、さまざまなタイプのエージェントを作成することができます。
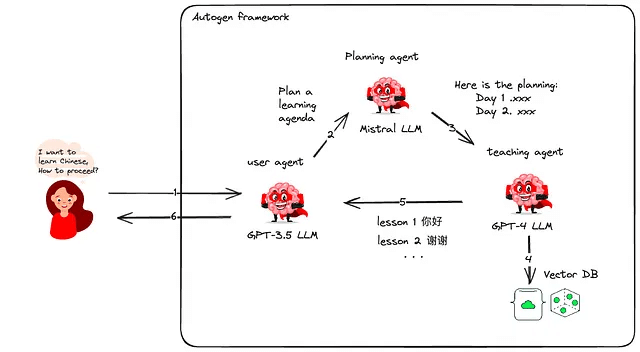
例えば、中国語を学びたいユーザーを考えてみましょう。私たちはAutogenを使用して3つのエージェントをデプロイします。1つはユーザーと対話し、もう1つはコースを計画し、3つ目はコースコンテンツを提案します。ユーザーはユーザープロキシエージェントと通信し、コースプランを承認することができます。教育エージェントは、vectorDBから学習資料を引き出し、ユーザーの好みに基づいた日々のコースを作成します。

以前の記事をご覧いただくと、AutoGenについての詳細な情報が得られます: **AutoGen 深掘りでもシンプルとNo Code GenAI Agents Workflow Orchestration: AutoGen Studio with Local Mistral AI model.**
2.2 crewAI
CrewAIは、人間のチームワークのダイナミクスと協力を模倣するシステムです。各エージェントは、共通の目標に到達するために、独自のスキルと属性を使用します。これにより、AIがパワーを供給するタスクに効率性と構造がもたらされます。
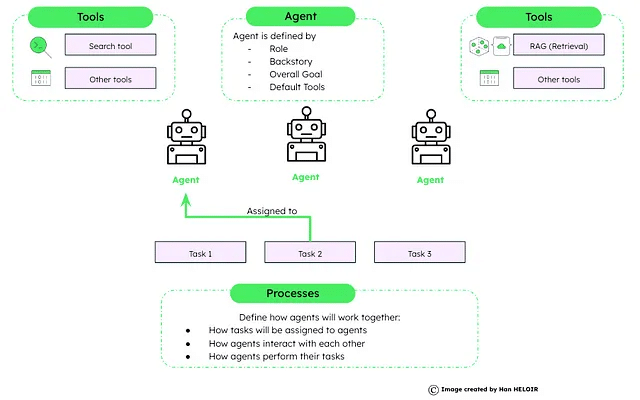
CrewAIフレームワークは以下のように設定されています:
エージェント: これらは特定の属性と能力で設定されます。
タスク: これらは目標と予想結果の詳細な説明です。
ツール: これらはエージェントのツールボックスを構成し、様々な行動を効果的に行うのを助けます。
プロセス: これらは、クルーがタスクに取り組み、それを完了する方法を指導する戦略的なワークフローです。

crewAIを使った実装例
まず、必要なcrewAIパッケージとツールをインストールします。
!pip install crewai
!pip install 'crewai\\[tools\\]'
この例では、](https://docs.crewai.com/how-to/Creating-a-Crew-and-kick-it-off/#conclusion) 4つのステップがあります:
**エージェント定義:**リサーチャーとライターの2つのエージェントが設定されています。それぞれに特定の役割、詳細モード、メモリ、バックストーリーがあります。
**タスク定義:**エージェントのタスクが概説されます。これには彼らの目標、期待される出力、非同期実行や出力ファイルの仕様などの他の設定が含まれます。
**クルーフォーメーション:**エージェントがクルーに組み合わされます。このクルーにはプロセス、メモリ使用量、タスク共有があります。
**実行:**プロセスが開始されます。入力変数がシステムにフィードされ、パーソナライズされたアプローチが可能になります。その後、クルーの共同努力の結果が印刷されます。
import os
from crewai import Agent, Task, Crew, Process
from crewai_tools import SerperDevTool

os.environ\\["SERPER\\_API\\_KEY"\\] = "Your Key"
os.environ\\["OPENAI\\_API\\_KEY"\\] = "Your Key"

search_tool = SerperDevTool()

researcher = Agent(
    role='Senior Researcher',
    goal='Uncover groundbreaking technologies in {topic}',
    verbose=True,
    memory=True,
    backstory=("Driven by curiosity, you're at the forefront of innovation, eager to explore and share knowledge that could change the world."),
    tools=\\[search_tool\\],
    allow_delegation=True
)

writer = Agent(
    role='Writer',
    goal='Narrate compelling tech stories about {topic}',
    verbose=True,
    memory=True,
    backstory=("With a flair for simplifying complex topics, you craft engaging narratives that captivate and educate, bringing new discoveries to light in an accessible manner."),
    tools=\\[search_tool\\],
    allow_delegation=False
)

research_task = Task(
    description=("Identify the next big trend in {topic}. Focus on identifying pros and cons and the overall narrative. Your final report should clearly articulate the key points, its market opportunities, and potential risks."),
    expected_output='A comprehensive 3 paragraphs long report on the latest AI trends.',
    tools=\\[search_tool\\],
    agent=researcher,
)

write_task = Task(
    description=("Compose an insightful article on {topic}. Focus on the latest trends and how it's impacting the industry. This article should be easy to understand, engaging, and positive."),
    expected_output='A 4 paragraph article on {topic} advancements formatted as markdown.',
    tools=\\[search_tool\\],
    agent=writer,
    async_execution=False,
    output_file='new-blog-post.md'
)

crew = Crew(
    agents=\\[researcher, writer\\],
    tasks=\\[research\\_task, write\\_task\\],
    process=Process.sequential,
    memory=True,
    cache=True,
    max_rpm=100,
    share_crew=True
)

result = crew.kickoff(inputs={'topic': 'AI in healthcare'})
print(result)
2.3 Agent Protocol
Agent Protocolは、異なるエージェントとの通信に使用される一般的なインターフェースです。これは、マルチエージェントシステムが直面する主要な課題の一つに対処します。
どのエージェント開発者でもこのプロトコルを使用できます。これはAPI仕様であり、エージェントが予め決定されたレスポンスモデルで公開する必要があるエンドポイントのセットです。プロトコルは特定の技術スタックに依存していません。セクション3で概説されているように、どのエージェントもこのプロトコルを使用できます。
プロトコルはどのように機能しますか?
現在、プロトコルはREST API(OpenAPI仕様を経由)であり、エージェントとの対話のための主要なルートが2つあります:
POST /ap/v1/agent/tasks エージェントに新しいタスクを作成する(例えば、エージェントに目的を与える)
POST /ap/v1/agent/tasks/{task_id}/steps 指定されたタスクの一部を実行する
また、タスク、ステップのリスト化やアーティファクトの管理のための追加のルートもあります。
Agent Protocolについての詳細は、その GitHub ページで見つけることができます。
3. まとめ
生成AIは有望な未来を持っています。計画、異なるツールの使用、記憶の維持などの能力は、LLMと組み合わせたときに、エージェントをより効果的にするでしょう。LangChain、LlamaIndex、AWS、Gemini、Microsoft AutoGen、crewAIのようなシステムからのエージェントが技術の境界を押し広げています。
これらの技術を採用することで、AIがともに'手と脳'として機能し、私たちの日常活動の貴重なパートナーとなる未来を創造するのに役立ちます。
