
3DChameleonのアップグレード方法を紹介 (Mk3→Mk4/Pro)

FFF式3Dプリンタ向けの自動カラーチェンジャー"3DChameleon"の最新バージョンMk4/Mk4 Proが公開され、Mk3からのアップグレード手順やファームウェア情報などをフォーラム上で参照できる。しかし情報が分散しており、ユーザー自身で順序を整理する必要がある。また公式情報はWindowsのみで限定的である。本記事ではmacOSでのアップグレード (Mk3→ Mk4 Pro) を一連の流れに沿って解説する(ただしPro版は一部機能のみ追加)。
1. はじめに:3DChameleon Mk4/Pro公開
FFF式3Dプリンタのマルチカラーユニットである3DChameleonの新バージョン:Mk4 / Mk4 Proが公表された。前バージョンのMk3では3種類の操作モードが搭載されていたが、Mk4では動作が安定的でユーザーに調整する余地があるモード3のみに限定している。その一方、Mk4バージョンのファームウェアでは4種類の拡張機能(OLED Display、Filament Runout Sensor、Automatic Filament Cutter、Extruder Position Sensor)が追加されている。付属品はユーザーがキットとは別で購入する必要があり、これらを揃えるとMk4 Proになる。
今回のアップグレードはMk3バージョンと比べると充実して魅力的である。Mk4 / Mk4 Proの特長や拡張機能などは下記リンク先で触れられている。
≫ 3DChameleon Mk4 Gcode Generator (ページ下部に操作方法)
≫ 3DChameleon Mk4 Pro フライヤー(スレッドにPDF添付)
Mk4 Proバージョンのシステムの全体像は下記の動画がわかりやすい。
≫ From RMRRF 2024: 3D Chameleon (West3D Printing) - YouTube
そこで今回2023年5月頃に購入した3DChameleon Mk3を使って、ファームウェアをMk4に更新してみる。また、OLEDを追加してMk4 Proの機能の一部を体験してみる。なお公式情報ではWindowsを使った更新方法が
画像とともに説明されているが、そのほかのOSでの解説は無いためフォーラム内の情報を自身で収集・整理するしかない。そこで本記事ではmacOS環境を想定して一連の更新手順を順序立てて説明する。
2. ファームウェアを更新する前に
2.1. 公式HPの手順や公開ファイルを参照
ファームウェアを更新する上で、下記のフォーラムの投稿を参照した。前者はMk4のファームウェア (*.hex) とWindowsでのアップグレード手順、後者はMk4 Proの部品情報やOLED・サーボモータの配線などが紹介されている。
2.2. 実施環境
Macbook Air (M1, 2020) / macOS Sonoma バージョン14.5
Arduino IDE 1.8.19
2.3. 使用物品
3DChameleon Mk3
0.96インチOLEDモジュール12864 128x64 (青&黄)
Arduino UNO R3 (AliExpressで買ったクローン品)
USB-Bケーブル(Arduinoの付属品)
ジャンプワイヤ
電線(線径AWG24OLED用ケーブルの作成)
XHコネクタ / ハウジング 3ピン 各2個
QIコネクタ 4ピン 1個(XHコネクタ 4ピンでも代用可能)
工具(はんだごて、圧着工具、ワイヤストリッパーなど)
OLEDモジュールは四隅の穴位置が購入先によって異なる場合があり、注意が必要である。フォーラムの情報をもとに同じ寸法のものを探し、リンク先より購入した。使用上特に問題なかった。
ファームウェアの書き込みにはArduino UNOが必要である。今回は過去AliExpressで買った手持ちのクローンボードを使った。Amazonで安く早く入手するなら、ELEGOOのボードがおすすめ。
コネクタ / ハウジングはOLEDを3DChameleonのメインボードに接続するのに必要で、公式情報だとMolexのKKコネクタを挙げている。ただコネクタ形状は重要ではなく他のものでも問題ない。私は今回XHとQI(デュポン)を併用しており、それぞれ詰め合わせセットを購入した。
3. Mk3→Mk4 Proへのアップグレード手順
前章でまとめた3DChameleonの公式情報と物品を用いて、アップグレードの手順を紹介する。ただしMk4 Proの拡張機能は4つのうちOLEDの1つだけ追加する
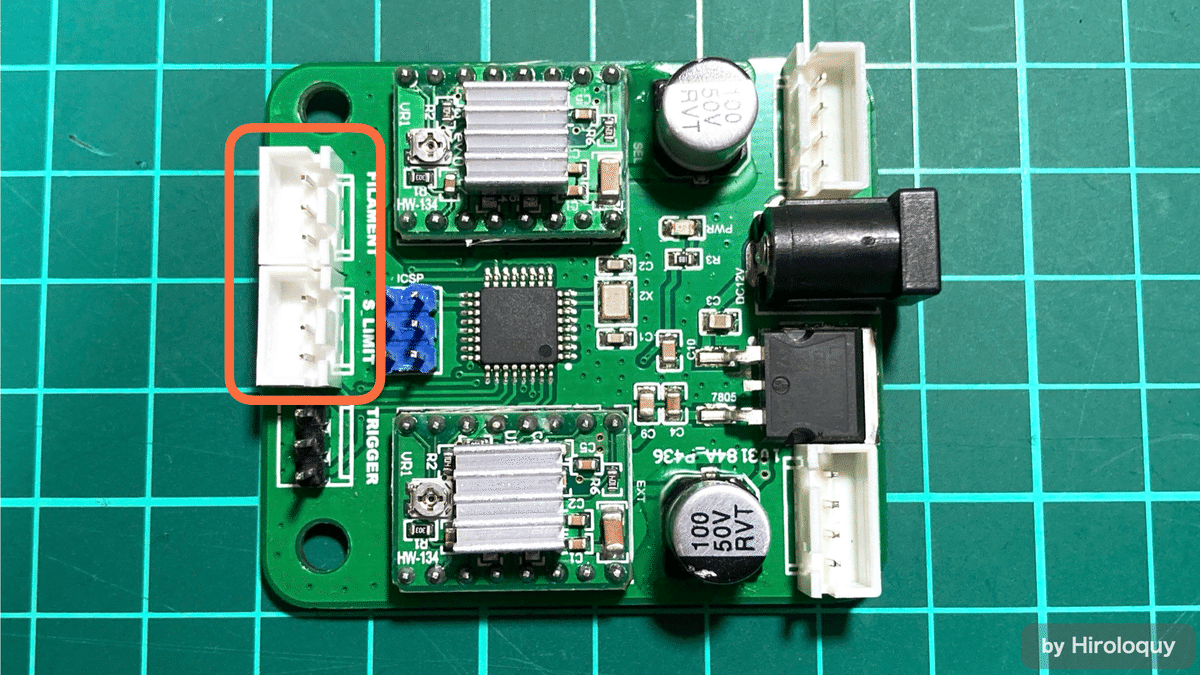
3.1. 基板にハウジングをはんだ付け
まずはOLEDと3DChameleonのメインボードをつなげるために、 基板側にハウジングを2ヶ所追加する。今回XHハウジング 3ピンを2個用意して画像の向きではんだ付けを行った。
3.2. ケーブル2種類の用意
ケーブルは2種類用意する必要がある。1つ目は3DChameleon - OLED間のケーブル。前工程で追加したXHハウジング2ヶ所とOLEDのピンヘッダを繋ぐため、XHコネクタ3pin ×2、QIコネクタ4pin ×1を使った。ピンの対応関係や配線イメージは以下の画像を参照。

2つ目は3DChameleon - Arduino間の書込用ケーブル。このケーブルはカメレオンの基板上のICSP端子とArduinoの特定のピンを接続するためのもので、ピン配置は下記画像を参照。ピンヘッダ / ピンソケットにつなぐためジャンプワイヤを使うと楽。ピンの対応関係は開発者Bill氏のGoogleドキュメントを参照。
≫ AVR clean up and install (Google Docs)

3.3. ファームウェアのダウンロード
フォーラムよりSelectorFirmwareMk4.zipをダウンロード・解凍すると4つのhexファイルが確認できる。今回はフィラメントカッターとして機能するサーボモータは追加しないため、SelectorFirmwareMk4.ino.hexを使用する。
のちにターミナル上でhexファイルのパスを指定するため、パスが長くならないようDesktopや、Downloadsなどのフォルダに移動させると楽。今回はDesktopフォルダに置いた。

3.4. Arduino IDEでスケッチ&ブートローダー書込
2022年9月14日にArduino IDE 2.0.0が公開され、それ以降2.xの更新が進んでいるが、今回はver. 1.8.19を使用する。以下のリンク先の"Legacy IDE (1.8.X)"よりダウンロード可能:https://www.arduino.cc/en/software
インストール後IDEを開いたらUSB-BケーブルでUNOをPCに接続し、File > Examples > 11.ArduinoISP > ArduinoISPの順に選択して、スケッチ"ArduinoISP.ino"をArduino UNOに書き込む。

つづいて、Tools > Programmer: "xxx" > Arduino as ISPの順に選択した上で、Tools > Burn Bootloaderを実行する。
※ブートローダーの書き込みはMk4ファームのクロック周波数の関係で必要な作業。この手順を省くとOLEDの表示やステッピングモータの挙動がすごく遅くなったのでご注意を…。

3.5. ターミナル上でコマンド実行
Mac標準アプリのTerminal.appを開き、PC→Arduino→3DChameleonが繋がった状態で下記コマンドを実行する。
cd ~/library/arduino15/packages/arduino/tools/avrdude/6.3.0-arduino17/bin
./avrdude -P /dev/cu.usbserial-110 -b 19200 -c avrisp -p m328p -v -C ~/Library/arduino15/packages/arduino/tools/avrdude/6.3.0-arduino17/etc/avrdude.conf
"-P /dev/cu.usbserial-110"はArduino UNOのシリアルポートで、Arduino IDEのTools > Portから確認できる。または以下のコマンドを実行しても確認できる。もし複数候補出てきてどれがArduino UNOか分からない場合はUSBを抜いて消えたポートがどれかを探る必要がある。
ls /dev/cu.usbserial*前述の3つのコマンドをそれぞれ入力したときの出力結果は以下のとおり。Readingのプログレスバーやデバイス情報が表示される。Device signatureの項目が0x00ff00以外の値であれば問題ないが、もし"Device signature = 0x00ff00"の場合は3DChameleonのメインボードを認識できていないため、ジャンプワイヤの接触不良や配線ミスがないか確認する。
Hiro-Mac:~ hiro$ cd ~/library/arduino15/packages/arduino/tools/avrdude/6.3.0-arduino17/bin
Hiro-Mac:bin hiro$ ls /dev/cu.usbserial*
/dev/cu.usbserial-110
Hiro-Mac:bin hiro$ ./avrdude -P /dev/cu.usbserial-110 -b 19200 -c avrisp -p m328p -v -C ~/Library/arduino15/packages/arduino/tools/avrdude/6.3.0-arduino17/etc/avrdude.conf

avrdude: Version 6.3-20190619
         Copyright (c) 2000-2005 Brian Dean, http://www.bdmicro.com/
         Copyright (c) 2007-2014 Joerg Wunsch

         System wide configuration file is "/Users/hiro/Library/arduino15/packages/arduino/tools/avrdude/6.3.0-arduino17/etc/avrdude.conf"
         User configuration file is "/Users/hiro/.avrduderc"
         User configuration file does not exist or is not a regular file, skipping

         Using Port                    : /dev/cu.usbserial-110
         Using Programmer              : avrisp
         Overriding Baud Rate          : 19200
         AVR Part                      : ATmega328P
         Chip Erase delay              : 9000 us
         PAGEL                         : PD7
         BS2                           : PC2
         RESET disposition             : dedicated
         RETRY pulse                   : SCK
         serial program mode           : yes
         parallel program mode         : yes
         Timeout                       : 200
         StabDelay                     : 100
         CmdexeDelay                   : 25
         SyncLoops                     : 32
         ByteDelay                     : 0
         PollIndex                     : 3
         PollValue                     : 0x53
         Memory Detail                 :

                                  Block Poll               Page                       Polled
           Memory Type Mode Delay Size  Indx Paged  Size   Size #Pages MinW  MaxW   ReadBack
           ----------- ---- ----- ----- ---- ------ ------ ---- ------ ----- ----- ---------
           eeprom        65    20     4    0 no       1024    4      0  3600  3600 0xff 0xff
           flash         65     6   128    0 yes     32768  128    256  4500  4500 0xff 0xff
           lfuse          0     0     0    0 no          1    0      0  4500  4500 0x00 0x00
           hfuse          0     0     0    0 no          1    0      0  4500  4500 0x00 0x00
           efuse          0     0     0    0 no          1    0      0  4500  4500 0x00 0x00
           lock           0     0     0    0 no          1    0      0  4500  4500 0x00 0x00
           calibration    0     0     0    0 no          1    0      0     0     0 0x00 0x00
           signature      0     0     0    0 no          3    0      0     0     0 0x00 0x00

         Programmer Type : STK500
         Description     : Atmel AVR ISP
         Hardware Version: 2
         Firmware Version: 1.18
         Topcard         : Unknown
         Vtarget         : 0.0 V
         Varef           : 0.0 V
         Oscillator      : Off
         SCK period      : 0.1 us

avrdude: AVR device initialized and ready to accept instructions

Reading | ################################################## | 100% 0.02s

avrdude: Device signature = 0x1e950f (probably m328p)
avrdude: safemode: lfuse reads as FF
avrdude: safemode: hfuse reads as DE
avrdude: safemode: efuse reads as FD

avrdude: safemode: lfuse reads as FF
avrdude: safemode: hfuse reads as DE
avrdude: safemode: efuse reads as FD
avrdude: safemode: Fuses OK (E:FD, H:DE, L:FF)

avrdude done.  Thank you.
前述の出力結果を見て問題なければ、下記コマンドでファームウェアを更新してみる。シリアルポート (-P) の調べ方は前述のとおり。hexファイルのパスに含まれる[Username]には自身のPCのユーザー名を入力する。もしDesktopフォルダ以外に保存する場合は各自パスを調べて"/Users/ … .hex"を書き換える。
./avrdude -v -p m328p -P /dev/cu.usbserial-110 -b 19200 -c avrisp -U flash:w:/Users/[Username]/Desktop/SelectorFirmwareMk4.ino.hex:i -C ~/Library/arduino15/packages/arduino/tools/avrdude/6.3.0-arduino17/etc/avrdude.conf下記のようにReadingとWritingが実行される。エラーメッセージが出なければ一旦先に進む。
Hiro-Mac:bin hiro$ ./avrdude -v -p m328p -P /dev/cu.usbserial-110 -b 19200 -c avrisp -U flash:w:/Users/hiro/Desktop/SelectorFirmwareMk4.ino.hex:i -C ~/Library/arduino15/packages/arduino/tools/avrdude/6.3.0-arduino17/etc/avrdude.conf

avrdude: Version 6.3-20190619
         Copyright (c) 2000-2005 Brian Dean, http://www.bdmicro.com/
         Copyright (c) 2007-2014 Joerg Wunsch

         System wide configuration file is "/Users/hiro/Library/arduino15/packages/arduino/tools/avrdude/6.3.0-arduino17/etc/avrdude.conf"
         User configuration file is "/Users/hiro/.avrduderc"
         User configuration file does not exist or is not a regular file, skipping

         Using Port                    : /dev/cu.usbserial-110
         Using Programmer              : avrisp
         Overriding Baud Rate          : 19200
         AVR Part                      : ATmega328P
         Chip Erase delay              : 9000 us
         PAGEL                         : PD7
         BS2                           : PC2
         RESET disposition             : dedicated
         RETRY pulse                   : SCK
         serial program mode           : yes
         parallel program mode         : yes
         Timeout                       : 200
         StabDelay                     : 100
         CmdexeDelay                   : 25
         SyncLoops                     : 32
         ByteDelay                     : 0
         PollIndex                     : 3
         PollValue                     : 0x53
         Memory Detail                 :

                                  Block Poll               Page                       Polled
           Memory Type Mode Delay Size  Indx Paged  Size   Size #Pages MinW  MaxW   ReadBack
           ----------- ---- ----- ----- ---- ------ ------ ---- ------ ----- ----- ---------
           eeprom        65    20     4    0 no       1024    4      0  3600  3600 0xff 0xff
           flash         65     6   128    0 yes     32768  128    256  4500  4500 0xff 0xff
           lfuse          0     0     0    0 no          1    0      0  4500  4500 0x00 0x00
           hfuse          0     0     0    0 no          1    0      0  4500  4500 0x00 0x00
           efuse          0     0     0    0 no          1    0      0  4500  4500 0x00 0x00
           lock           0     0     0    0 no          1    0      0  4500  4500 0x00 0x00
           calibration    0     0     0    0 no          1    0      0     0     0 0x00 0x00
           signature      0     0     0    0 no          3    0      0     0     0 0x00 0x00

         Programmer Type : STK500
         Description     : Atmel AVR ISP
         Hardware Version: 2
         Firmware Version: 1.18
         Topcard         : Unknown
         Vtarget         : 0.0 V
         Varef           : 0.0 V
         Oscillator      : Off
         SCK period      : 0.1 us

avrdude: AVR device initialized and ready to accept instructions

Reading | ################################################## | 100% 0.02s

avrdude: Device signature = 0x1e950f (probably m328p)
avrdude: safemode: lfuse reads as FF
avrdude: safemode: hfuse reads as DE
avrdude: safemode: efuse reads as FD
avrdude: NOTE: "flash" memory has been specified, an erase cycle will be performed
         To disable this feature, specify the -D option.
avrdude: erasing chip
avrdude: reading input file "/Users/hiro/Desktop/SelectorFirmwareMk4.ino.hex"
avrdude: writing flash (12426 bytes):

Writing | ################################################## | 100% 14.59s

avrdude: 12426 bytes of flash written
avrdude: verifying flash memory against /Users/hiro/Desktop/SelectorFirmwareMk4.ino.hex:
avrdude: load data flash data from input file /Users/hiro/Desktop/SelectorFirmwareMk4.ino.hex:
avrdude: input file /Users/hiro/Desktop/SelectorFirmwareMk4.ino.hex contains 12426 bytes
avrdude: reading on-chip flash data:

Reading | ################################################## | 100% 7.71s

avrdude: verifying ...
avrdude: 12426 bytes of flash verified

avrdude: safemode: lfuse reads as FF
avrdude: safemode: hfuse reads as DE
avrdude: safemode: efuse reads as FD
avrdude: safemode: Fuses OK (E:FD, H:DE, L:FF)

avrdude done.  Thank you.
3.6. 動作確認
Arduino UNOとメインボードが接続済みであればファームウェア更新後に勝手に電源が入る。またはArduinoとのケーブルを外し、ACアダプタを基板に接続して電源を入れる。そのとき画面上に、"Welcome! 3DChameleon Mk4 Pro"と表示され、約3秒後に"Ready!"の画面に遷移すれば更新成功!

リミットスイッチによる操作方法はMk4 Gcode Generatorのページ下部で説明されているので、このとおりの挙動を示すか確認できれば動作確認完了。OLEDのおかげで実行コマンドの名称や、現在ローディングしているフィラメントの番号が表示されるのはかなり便利なのでおすすめ。
While the button is pressed, each half of a second, the selector motor will vibrate, indicating the pointer to the next command.
The commands are as follows.
1st Pulse - Unload current and load T0 (or Extruder 1)
2nd Pulse - Unload current and load T1 (or Extruder 2)
3rd Pulse - Unload current and load T2 (or Extruder 3)
4th Pulse - Unload current and load T3 (or Extruder 4)
5th Pulse - Home and load T0 - can be used in Start GCode to load the first filament
6th Pulse - Unload current and Home - can be used in the End GCode to unload the last used filament
7th Pulse - Home Only (no filament movements)
8th Pulse - Move to "Next" Filament
9th Pulse - Move to "Random" Filament
No additional commands are supported.
もし画面の動きが遅かったり、スイッチを長押しするも0.5秒ごとにステッピングモータが振動しなければブートローダーの書込みを忘れている可能性がある。
なお、3DChameleonはDCジャックで電源を入れるが、オンオフのスイッチがケーブルまたは基板側に無く、DCジャックの抜き差しがオンオフの切替となる。そのためスイッチ付きの延長ケーブルを追加すると断線リスクが低くなってかなり便利。配線次第ではL型の変換コネクタの併用もおすすめ。
3.7. 3DP部品の換装
Mk3→Mk4のアップグレードはファームウェアだけでなく、キット本体側も必要。STLデータは開発者のPrintablesやTinkercadに公開されているので、それを自身で印刷すれば換装できる。そのほか、3DChameleonはいろんなFFF機種の専用マウントが開発者またはユーザーにより公開されており、PrintablesやThingiverseなどで入手可能。
≫ 3DChameleon Mk4 Upgrade Parts with PTFE Grip (by wjsteele) - Printables.com
≫ 3D design Mk4 Pro Add-On Components (by wjsteele) - Tinkercad
なお自身の環境ではメタルラックにキットを取り付けたく、専用マウントを自作してみた。下記リンク先で公開しているので興味ある方は使ってみてください。
≫ 3DChameleon Mk4 Pro mount for a metal rack by Hiroloquy

自作パーツの使用フィラメントはこちら。印刷しやすく表面の仕上がりが良い。耐熱性やクリープについては未検証のため今後使って調べてみる。
4. まとめ
本記事では3DChameleonをMk3→Mk4 Pro (OLEDのみ) にアップグレードし、その手順について紹介しました。3DChameleon Mk3のユーザーや、3DChameleonが気になる方の参考になれば幸いです。
もしお役に立ちましたら、サポートしていただけると大変嬉しいです!
また、記事内のAmazonリンクはアフィリエイトリンクです。これらを通して購入すると売上の一部が還元され、今後の活動の励みになります!
いいなと思ったら応援しよう!
