初めてのCore Bluetooth iPadでmicro:bit温度サービス接続アプリを作成
Core Bluetooth初心者です。 iPadのSwift Playgroundsでmicro:bitの温度サービスに接続して読み書きできるようになりました。作成体験を通じて理解した接続の手順を紹介します。
iPad Swift Playgroundsの活用方法は以前の投稿をご覧ください。
1 接続し読み書きできるまでのステップまとめ
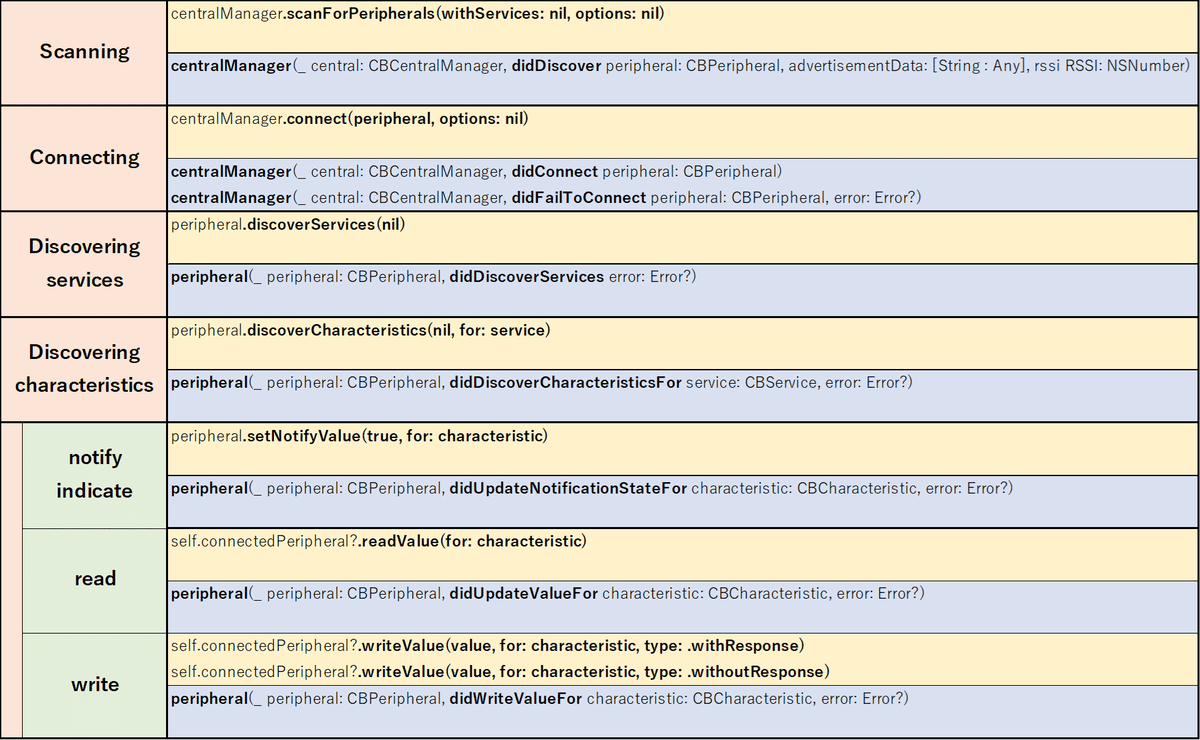
ステップの全体を1枚にまとめたのが下の表です。
スクロールを何回しても終わらないこのページを参考にしました。

左端のステップを上から下に進めます。
各ステップの上段の関数を呼ぶことでアクションが開始されます。
その結果、下段の関数が呼ばれるので次のアクションを書いておきます。
(次のアクションとは、次のステップの上段の内容です。)
これを繋げていくことで接続して読み書きできるようになりました。コードが複数の関数に分散されるので全体を把握しづらいです。1枚で見通せることが初心者には必要でした。
2 アプリUI仕様
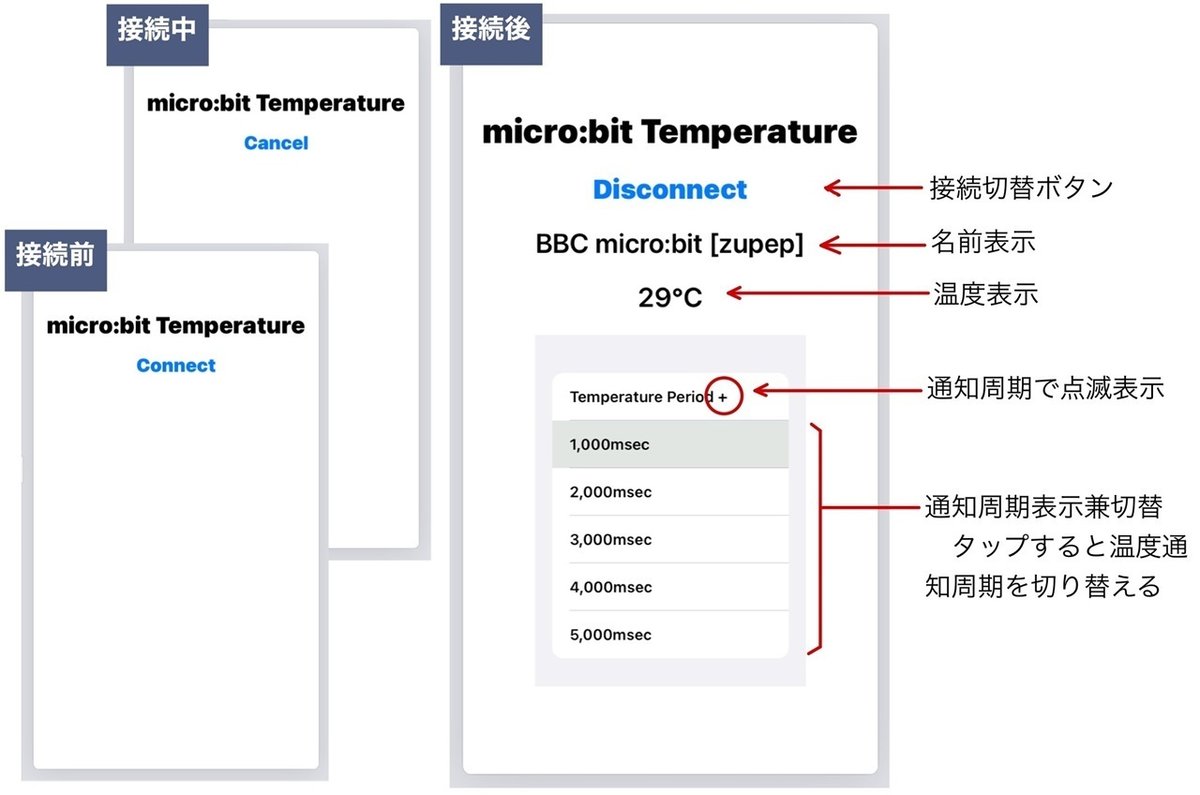
接続してNotify、Read、Writeを実験する目的のアプリ仕様です。温度を知りたいだけなら不要な、接続ボタンと通知周期切り替え機能が付いています。


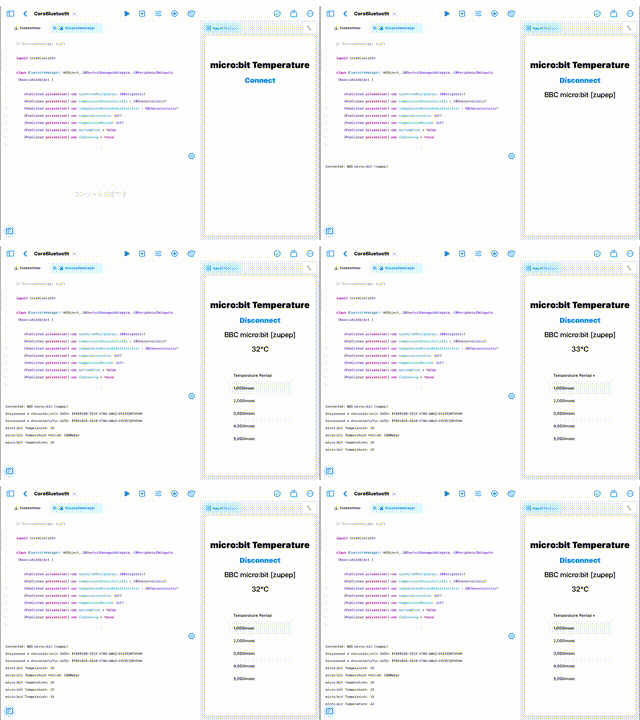
(リブート繰り返しではありません、接続ボタンをタップ後の6秒間の繰り返しです。)
3 ペリフェラル micro:bit
3.1 温度サービス仕様

・温度
℃の単位、符号あり8bitでNotifyとReadが可能です。
・温度更新周期
mSecの単位、符号なし16bitでReadとWriteが可能です。
3.2 温度サービスプログラム
下のリンクを開いて、画面右上の編集ボタンでMakeCodeを開きます。それをmicro:bitに書き込むと準備完了です。

4 セントラル Core Bluetooth プログラム作成手順
4.1 ベースファイルを作成する
下の内容のファイルを準備します。
centralManagerDidUpdateState()を書いておかないとエラーになります。中身は何もしていない、やっている振りのコードです。
このファイルに、これから紹介する手順でコードを追加していけば完成です。作成した コード全体は後ろに掲載しています。
// BleutoothManager.swift

import CoreBluetooth

class BluetoothManager: NSObject, CBCentralManagerDelegate, CBPeripheralDelegate, ObservableObject {

    private var centralManager: CBCentralManager!

    override init() {
        super.init()
        centralManager = CBCentralManager(delegate: self, queue: nil)
    }

    func centralManagerDidUpdateState(_ central: CBCentralManager) {
        if central.state == .poweredOn {
            //centralManager.scanForPeripherals(withServices: nil, options: nil)
        }
    }

}
最終的に読み書きするときにはPeripheralとCharacteristicを指定する必要があります。手順の中でそれを保存しますので、変数を準備しておきます。
    @Published private(set) var connectedPeripheral: CBPeripheral?
    @Published private(set) var temperatureCharacteristic : CBCharacteristic?
    @Published private(set) var temperaturePeriodCharacteristic : CBCharacteristic?
4.2 スキャンを開始する
    func startScan() {
        if centralManager.state == .poweredOn {
            centralManager.scanForPeripherals(withServices: nil, options: nil)
        }
    }
centralManagerDidUpdateState()を手抜きしていますので、Bluetoothが使える状態かpoweredOnを確認してスキャンを開始します。
スキャンを開始するコードです。
centralManager.scanForPeripherals(withServices: nil, options: nil)4.3 [didDiscover]発見されたペリフェラルを選別して保存、接続する
    @Published private(set) var connectedPeripheral: CBPeripheral?
    @Published private(set) var isScanning = false
    let MICROBIT_PREFIX = "BBC micro:bit"

    func centralManager(_ central: CBCentralManager, didDiscover peripheral: CBPeripheral, advertisementData: [String : Any], rssi RSSI: NSNumber) {
        if let name = peripheral.name {
            if name.hasPrefix(MICROBIT_PREFIX) {
                self.centralManager.stopScan()
                self.isScanning = false
                self.connectedPeripheral = peripheral
                self.centralManager.connect(peripheral, options: nil)
            }
        }
    }
上のコードは"BBC micro:bit"が名前に含まれていることで接続対象を判定しています。micro:bitが2台あった場合は先に発見されたものに接続します。
別の方法でperipheral.identifierと目的のUUIDとを比較して、より限定した選別をする方法があります。こちらに例と説明が載っていました。新型コロナウイルス接触確認アプリは、peripheral.identifierとdidDiscoverの引数にあるrssiを監視していたのだろうなと素人は推測しています。
重要な接続先情報peripheralはconnectedPeripheralに保存しておきます。
isScanningはUIの為にスキャン中であることを示す情報です。
接続を開始するコードです。
self.centralManager.connect(peripheral, options: nil)4.4 [didConnect]接続したらサービスを探す
    func centralManager(_ central: CBCentralManager, didConnect peripheral: CBPeripheral) {
        if let name = peripheral.name {
            print("Connected: \(name)")
        }
        self.connectedPeripheral?.discoverServices(nil)
        self.connectedPeripheral?.delegate = self
    }
次のコードでサービス探しを開始します。サービスのUUID情報を配列に入れて指定することもできます。今回の実装は指定しない方法です。
self.connectedPeripheral?.discoverServices(nil)4.5 [didDiscoverServices]発見されたサービスのCharacteristicを探す
    func peripheral(_ peripheral: CBPeripheral, didDiscoverServices error: Error?) {
        if let services = peripheral.services {
            for service in services {
                peripheral.discoverCharacteristics(nil, for: service)
            }
        }
    }
Characteristicを探すコードです
peripheral.discoverCharacteristics(nil, for: service)4.6 [didDiscoverCharacteristicsFor]発見されたCharacteristicを保存する
    let TEMPERATURE_CHARACTERISTIC = CBUUID(string: "E95D9250-251D-470A-A062-FA1922DFA9A8")
    let TEMPERATURE_PERIOD_CHARACTERISTIC = CBUUID(string: "E95D1B25-251D-470A-A062-FA1922DFA9A8")

    func peripheral(_ peripheral: CBPeripheral, didDiscoverCharacteristicsFor service: CBService, error: Error?) {
        for charac in service.characteristics! {
            if charac.uuid == TEMPERATURE_CHARACTERISTIC {
                self.temperatureCharacteristic = charac
                print("Discovered a characteristic UUID: \(TEMPERATURE_CHARACTERISTIC)")
                self.connectedPeripheral?.setNotifyValue(true, for: charac)
                self.connectedPeripheral?.readValue(for: charac)
            }
            if charac.uuid == TEMPERATURE_PERIOD_CHARACTERISTIC {
                self.temperaturePeriodCharacteristic = charac
                print("Discovered a characteristic UUID: \(TEMPERATURE_PERIOD_CHARACTERISTIC)")
                self.connectedPeripheral?.readValue(for: charac)
            }
        }
}各Characteristicを保存します。Notify、Read、Writeをするときに必要です。temperatureCharacteristic(温度)
temperaturePeriodCharacteristic(温度周期)
上のコードでは、characteristicが温度の時はNotifyの設定とReadを実行しています。characteristicが温度周期の場合はReadを実行しています。
4.7 Notifyを設定する
4.6で既に登場していますが、Notifyの設定は次のコードです。
self.connectedPeripheral!.setNotifyValue(true, for: characteristic)4.8 Readを要求する
4.6で既に登場していますが、Readは次のコードです。
self.connectedPeripheral!.readValue(for: characteristic)4.8 [didUpdateValueFor]Notify更新内容、Read結果を読み取る
Notify設定による定期更新通知もRead結果も、全てここに集まって来ます。uuidを確認して目的に合うように振り分ける必要があります。
    @Published private(set) var temperatureValue: Int?
    @Published private(set) var temperaturePeriod: Int?
    @Published private(set) var periodBlink = false

    func peripheral(_ peripheral: CBPeripheral, didUpdateValueFor characteristic: CBCharacteristic, error: Error?) {
        if let error = error {
            print(error)
            return
        }
        guard let data = characteristic.value else {
            return
        }
        if characteristic.uuid == TEMPERATURE_CHARACTERISTIC {
            let value = Int(Int8(data[0]))
            print("micro:bit Temperature: \(String(describing: value))")
            self.temperatureValue = value
            self.periodBlink.toggle()
        }
        if characteristic.uuid == TEMPERATURE_PERIOD_CHARACTERISTIC {
            let bytes = [UInt8](data)
            let value = Int(bytes[1]) * 256 + Int(bytes[0])
            print("micro:bit Temperature Period: \(String(describing: value))mSec")
            self.temperaturePeriod = value
        }
}温度データを読み取った場合は、UIへ伝える温度値temperatureValueを設定し、更新周期確認用の点滅情報periodBlinkを反転させています。
温度更新周期データの読み取りは、UInt8の配列を結合して扱いやすいIntに戻しています。この扱い方はこちらを参考にしました。temperaturePeriodに保存しUIに伝えます。
4.9 Writeを要求する
    func writeTemperaturePeriod(period: Int) {
        let value16 = UInt16(period)
        let values = [UInt8(value16 & 0xff), UInt8((value16 >> 8) & 0xff)]
        let data = Data(values)
        if let charac = self.temperaturePeriodCharacteristic {
            self.connectedPeripheral?.writeValue(data, for: charac, type: .withResponse)
        }
}温度更新周期データはUInt16で、これを書き込み関数に渡す方法に悩みましたが、こちらを参考にしました。UInt16を上位8ビットと下位8ビットに分けて、UInt8の配列にしてData()でまとめてから引き渡しています。
Writeは2種類あります。書き込み後の確認をしない場合
self.connectedPeripheral?.writeValue(value, for: characteristic, type: .withoutResponse)書き込み後に確認を必要とする場合
self.connectedPeripheral?.writeValue(value, for: characteristic, type: .withResponse).withResponseの時のみ、次の4.10が呼び出されます。
4.10 [didWriteValueFor]書き込み終了を確認する場合
    func peripheral(_ peripheral: CBPeripheral, didWriteValueFor characteristic: CBCharacteristic, error: Error?) {
        if let error = error {
            print(error)
            return
        }
        if characteristic.uuid == TEMPERATURE_PERIOD_CHARACTERISTIC {
            if let charac = self.temperaturePeriodCharacteristic {
                self.connectedPeripheral?.readValue(for: charac)
            }
        }
    }
この実装では、温度更新周期を書き込んだ後に、書き込んだ結果を確認するReadを行っています。
5 コード全体
5.1 BleutoothManager.swift
// BleutoothManager.swift

import CoreBluetooth

class BluetoothManager: NSObject, CBCentralManagerDelegate, CBPeripheralDelegate, ObservableObject {

    @Published private(set) var connectedPeripheral: CBPeripheral?
    @Published private(set) var temperatureCharacteristic : CBCharacteristic?
    @Published private(set) var temperaturePeriodCharacteristic : CBCharacteristic?
    @Published private(set) var temperatureValue: Int?
    @Published private(set) var temperaturePeriod: Int?
    @Published private(set) var periodBlink = false
    @Published private(set) var isScanning = false

    let TEMPERATURE_CHARACTERISTIC = CBUUID(string: "E95D9250-251D-470A-A062-FA1922DFA9A8")
    let TEMPERATURE_PERIOD_CHARACTERISTIC = CBUUID(string: "E95D1B25-251D-470A-A062-FA1922DFA9A8")
    let MICROBIT_PREFIX = "BBC micro:bit"

    private var centralManager: CBCentralManager!

    override init() {
        super.init()
        centralManager = CBCentralManager(delegate: self, queue: nil)
    }

    func centralManagerDidUpdateState(_ central: CBCentralManager) {
        if central.state == .poweredOn {
            //centralManager.scanForPeripherals(withServices: nil, options: nil)
        }
    }

    func startScan() {
        if centralManager.state == .poweredOn {
            centralManager.scanForPeripherals(withServices: nil, options: nil)
        }
    }

    func centralManager(_ central: CBCentralManager, didDiscover peripheral: CBPeripheral, advertisementData: [String : Any], rssi RSSI: NSNumber) {
        if let name = peripheral.name {
            if name.hasPrefix(MICROBIT_PREFIX) {
                self.centralManager.stopScan()
                self.isScanning = false
                self.connectedPeripheral = peripheral
                self.centralManager.connect(peripheral, options: nil)
            }
        }
    }

    func centralManager(_ central: CBCentralManager, didConnect peripheral: CBPeripheral) {
        if let name = peripheral.name {
            print("Connected: \(name)")
        }
        self.connectedPeripheral?.discoverServices(nil)
        self.connectedPeripheral?.delegate = self
    }

    func peripheral(_ peripheral: CBPeripheral, didDiscoverServices error: Error?) {
        if let services = peripheral.services {
            for service in services {
                peripheral.discoverCharacteristics(nil, for: service)
            }
        }
    }

    func peripheral(_ peripheral: CBPeripheral, didDiscoverCharacteristicsFor service: CBService, error: Error?) {
        for charac in service.characteristics! {
            if charac.uuid == TEMPERATURE_CHARACTERISTIC {
                self.temperatureCharacteristic = charac
                print("Discovered a characteristic UUID: \(TEMPERATURE_CHARACTERISTIC)")
                self.connectedPeripheral?.setNotifyValue(true, for: charac)
                self.connectedPeripheral?.readValue(for: charac)
            }
            if charac.uuid == TEMPERATURE_PERIOD_CHARACTERISTIC {
                self.temperaturePeriodCharacteristic = charac
                print("Discovered a characteristic UUID: \(TEMPERATURE_PERIOD_CHARACTERISTIC)")
                self.connectedPeripheral?.readValue(for: charac)
            }
        }
    }

    func peripheral(_ peripheral: CBPeripheral, didUpdateValueFor characteristic: CBCharacteristic, error: Error?) {
        if let error = error {
            print(error)
            return
        }
        guard let data = characteristic.value else {
            return
        }
        if characteristic.uuid == TEMPERATURE_CHARACTERISTIC {
            let value = Int(Int8(data[0]))
            print("micro:bit Temperature: \(String(describing: value))")
            self.temperatureValue = value
            self.periodBlink.toggle()
        }
        if characteristic.uuid == TEMPERATURE_PERIOD_CHARACTERISTIC {
            let bytes = [UInt8](data)
            let value = Int(bytes[1]) * 256 + Int(bytes[0])
            print("micro:bit Temperature Period: \(String(describing: value))mSec")
            self.temperaturePeriod = value
        }
    }

    func writeTemperaturePeriod(period: Int) {
        let value16 = UInt16(period)
        let values = [UInt8(value16 & 0xff), UInt8((value16 >> 8) & 0xff)]
        let data = Data(values)
        if let charac = self.temperaturePeriodCharacteristic {
            self.connectedPeripheral?.writeValue(data, for: charac, type: .withResponse)
        }
    }

    func peripheral(_ peripheral: CBPeripheral, didWriteValueFor characteristic: CBCharacteristic, error: Error?) {
        if let error = error {
            print(error)
            return
        }
        if characteristic.uuid == TEMPERATURE_PERIOD_CHARACTERISTIC {
            if let charac = self.temperaturePeriodCharacteristic {
                self.connectedPeripheral?.readValue(for: charac)
            }
        }
    }

    func connect() {
        if centralManager.state == .poweredOn {
            self.connectedPeripheral = nil
            self.temperatureValue = nil
            self.temperaturePeriod = nil
            startScan()
            self.isScanning = true
        }
    }

    func disconnect() {
        if let peripheral = self.connectedPeripheral {
            self.connectedPeripheral = nil
            self.temperatureValue = nil
            self.temperaturePeriod = nil
            self.centralManager.cancelPeripheralConnection(peripheral)
        }
    }

    func cancel() {
        disconnect()
        self.centralManager.stopScan()
        self.isScanning = false
    }

}
5.2 ContentView.swift
// ContentView.swift

import SwiftUI

struct ContentView: View {

    @StateObject var bluetoothManager = BluetoothManager()

    var body: some View {
        VStack(spacing: 20) {
            Text("micro:bit Temperature").font(.largeTitle).fontWeight(.black)
            if bluetoothManager.isScanning {
                Button("Cancel") {
                    bluetoothManager.cancel()
                }.font(.title).fontWeight(.black).foregroundColor(.blue)
                Text(" ").font(.title)
                Text(" ").font(.title)
            } else {
                if let name = bluetoothManager.connectedPeripheral?.name {
                    Button("Disconnect") {
                        bluetoothManager.disconnect()
                    }.font(.title).fontWeight(.black).foregroundColor(.blue)
                    Text(name).font(.title)
                    if let value = bluetoothManager.temperatureValue {
                        Text("\(String(value))℃").font(.title)
                    } else {
                        Text(" ").font(.title)
                    }
                } else {
                    Button("Connect") {
                        bluetoothManager.connect()
                    }.font(.title).fontWeight(.black).foregroundColor(.blue)
                    Text(" ").font(.title)
                    Text(" ").font(.title)
                }
            }

            List {
                bluetoothManager.periodBlink ? Text("Temperature Period +") : Text("Temperature Period")
                ForEach(0..<5, id: \.self) { index in
                    let valuePeriod = (index + 1) * 1000
                    HStack {
                        Text("\(valuePeriod)msec")
                        Spacer()
                    }
                    .listRowBackground(bluetoothManager.temperaturePeriod == valuePeriod ? Color(red: 0.3, green: 0.5, blue: 0.2,opacity:0.1) : Color.white)
                    .contentShape(Rectangle())
                    .onTapGesture {
                        bluetoothManager.writeTemperaturePeriod(period: valuePeriod)
                    }
                }
            }
            .frame(width: 250, height: 325)
            .opacity(bluetoothManager.temperaturePeriod == nil ? 0 : 1)

        }
    }
}
5.3 MyApp.swift
// MyApp.swift

import SwiftUI

@main
struct MyApp: App {
    var body: some Scene {
        WindowGroup {
            ContentView()
        }
    }
}
以上をGitHubにアップしています。
6 参考にした資料
6.1 [Medium] SwiftUI & Core Bluetooth
ここに掲載されているコード2ファイルをiPadのSwift Playgroundsにそのまま読み込ませてデバイススキャンが動いたときに、これをベースに進められると思いました。
6.2 [Medium] BLE(Bluetooth Low Energy) with iOS Swift
デバイススキャン、接続、読み取りの具体的コードを示しながらの説明が大変参考になりました。
6.3 [PunchThrough]The Ultimate Guide to Apple’s Core Bluetooth
全体の説明が行き届いており、6.2の具体例に無い部分はここの記事で何が必要なのかを把握して、具体例を他で探しました。
6.4 [github] microbit-swift-controller
ソースをそのまま取り込んで動作させることはできませんでしたが、read/writeでmicro:bitとのデータの受け渡し方法は、ここを参考にさせていただきました。
