Lumina Image2.0:公式に近い設定にする方法@ComfyUI
Comfui images vs Offical demo about Lumina-Image 2.0 · Issue #6741 · comfyanonymous/ComfyUI
ここのIssueに、Lumina Image2.0の作成に関わっている方が「なんかデフォrで作成したのと違う感じなんですけど!」といった感じのコメントをされていました。
ChinChyiさんですね。


プロンプトをつけて例を提示されていました。

たしかに違いますね。
ここに、comfyanonymousさん(ComfyUIのメインの方)が、「ノイズ足りないんじゃね?」のような返答をされています。
実際に試してみました。
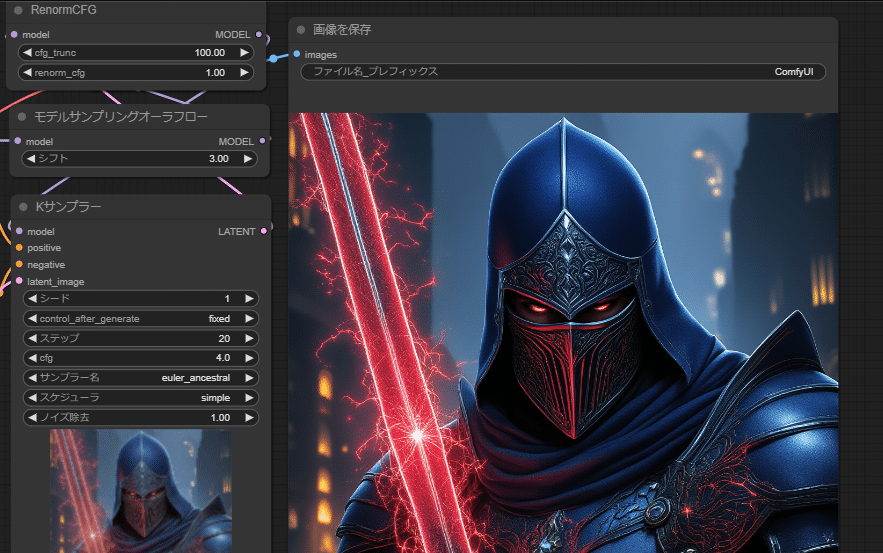
シード1で以下のような感じでした。背景が暗いことが分かります。

Eular aにしてみた感じです。ステップごとにノイズが追加されるサンプラーなのですが、若干明るくなる程度。

後述する、設定調整に関連した内容として、フローシフトを上げることで画面が明るくなります。

Lumina2にはCFGRenormというコードがデフォルトのリポジトリには含まれており、それを使ったRenormCFGノード作ったので、これで行けるという議論もありました。以下がその部分のコードです。

class RenormCFG:
    @classmethod
    def INPUT_TYPES(s):
        return {"required": { "model": ("MODEL",),
                              "cfg_trunc": ("FLOAT", {"default": 100, "min": 0.0, "max": 100.0, "step": 0.01}),
                              "renorm_cfg": ("FLOAT", {"default": 1.0, "min": 0.0, "max": 100.0, "step": 0.01}),
                              }}
    RETURN_TYPES = ("MODEL",)
    FUNCTION = "patch"

    CATEGORY = "advanced/model"

    def patch(self, model, cfg_trunc, renorm_cfg):
        def renorm_cfg_func(args):
            cond_denoised = args["cond_denoised"]
            uncond_denoised = args["uncond_denoised"]
            cond_scale = args["cond_scale"]
            timestep = args["timestep"]
            x_orig = args["input"]
            in_channels = model.model.diffusion_model.in_channels

            if timestep[0] < cfg_trunc:
                cond_eps, uncond_eps = cond_denoised[:, :in_channels], uncond_denoised[:, :in_channels]
                cond_rest, uncond_rest = cond_denoised[:, in_channels:], uncond_denoised[:, in_channels:]
                half_eps = uncond_eps + cond_scale * (cond_eps - uncond_eps)
                half_rest = cond_rest

                if float(renorm_cfg) > 0.0:
                    ori_pos_norm = torch.linalg.vector_norm(cond_eps
                            , dim=tuple(range(1, len(cond_eps.shape))), keepdim=True
                    )
                    max_new_norm = ori_pos_norm * float(renorm_cfg)
                    new_pos_norm = torch.linalg.vector_norm(
                            half_eps, dim=tuple(range(1, len(half_eps.shape))), keepdim=True
                        )
                    if new_pos_norm >= max_new_norm:
                        half_eps = half_eps * (max_new_norm / new_pos_norm)
            else:
                cond_eps, uncond_eps = cond_denoised[:, :in_channels], uncond_denoised[:, :in_channels]
                cond_rest, uncond_rest = cond_denoised[:, in_channels:], uncond_denoised[:, in_channels:]
                half_eps = cond_eps
                half_rest = cond_rest

            cfg_result = torch.cat([half_eps, half_rest], dim=1)

            # cfg_result = uncond_denoised + (cond_denoised - uncond_denoised) * cond_scale

            return x_orig - cfg_result

        m = model.clone()
        m.set_model_sampler_cfg_function(renorm_cfg_func)
        return (m, )
以下はカスタムノードのフォルダに配置すると追加するスクリプトです。
これを適用すると改善する傾向があるようです。


フローシフトによる変化は小さくなります。3か6か若干の差になりました。
ただ、その後、「設定を調整すれば近いものにはなる」というコメントもありました。これだと、フローシフトを6に上げて、ステップを35に増やし、サンプラーをres_multistepにするという方法です。

CFGがらみの調整をすると、よりLumina2に近い画像になるということのようです。

