DP.15_2:Reciver、Invokerを使う場合 - Commandパターン2 -【Python】
【1】はじめに
今回は「Receiver」と「Invoker」を使った「Commandパターン」の作り方についてまとめていく。
ざっくりいうと
・「Commandオブジェクト」内の実際の処理を「Receiverオブジェクト」へ分離する
・「Invokerオブジェクト」でコマンドをグループ化したり実行したりする
という書き方。
【2】Receiverオブジェクト
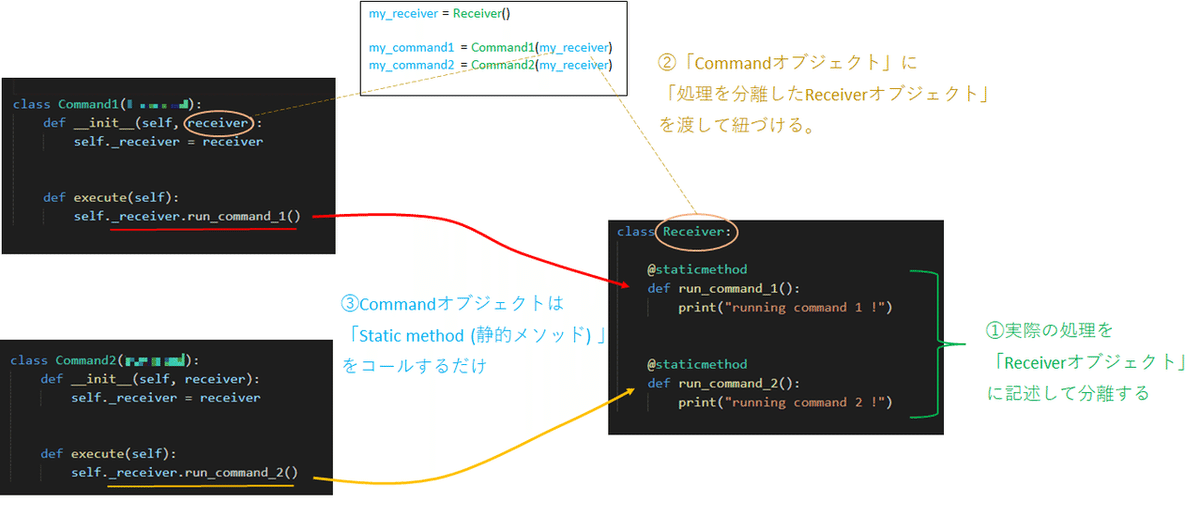
作り方としては『Commandオブジェクトから紐づけた「Receiver」が保有する「Static method」をコールする構造』にしていく。
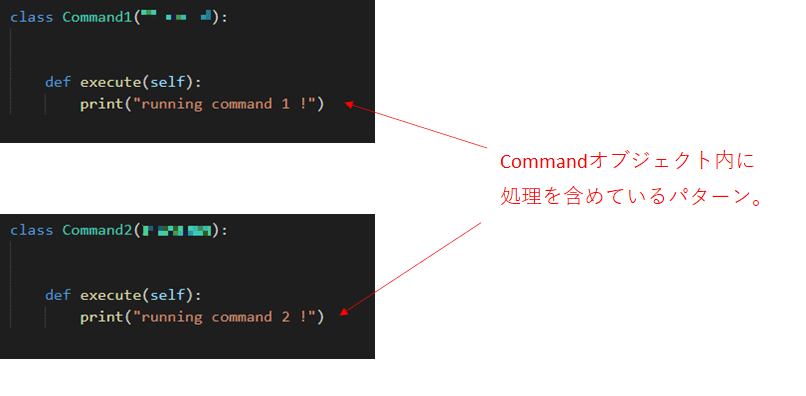
■Receiverオブジェクトへの分離「前」のプログラムイメージ

■Receiverオブジェクトへの分離「後」のプログラムイメージ

■プログラム例1:Command1、Command2の処理をReceiverへ分離
from abc import ABCMeta, abstractmethod

####### Receiver関連:実際の各種コマンドを起動する
# command_1とcommand_2をコマンドパターンに使えるようにする
class Receiver:

   # Command1オブジェクトの実際の処理
   @staticmethod
   def run_command_1():
       print("running command 1 !")


   # Command2オブジェクトの実際の処理
   @staticmethod
   def run_command_2():
       print("running command 2 !")


####### コマンドオブジェクト関連
# コマンドオブジェクト側の実装漏れを防ぐためにABCを用意
class ICommand(metaclass=ABCMeta):
   @staticmethod
   @abstractmethod
   def execute():
       pass


# 具体的なコマンドオブジェクトその1
class Command1(ICommand):
   def __init__(self, receiver):
       self._receiver = receiver

   # コマンドオブジェクトのexecuteは実処理を持つreceiverをコールするだけ
   def execute(self):
       self._receiver.run_command_1()


# 具体的なコマンドオブジェクトその2
class Command2(ICommand):
   def __init__(self, receiver):
       self._receiver = receiver

   # コマンドオブジェクトのexecuteは実処理を持つreceiverをコールするだけ
   def execute(self):
self._receiver.run_command_2()▲この例ではCommandオブジェクト側で「execute()」の実装漏れがないように「abc」を使用している。
【3】Invokerオブジェクト
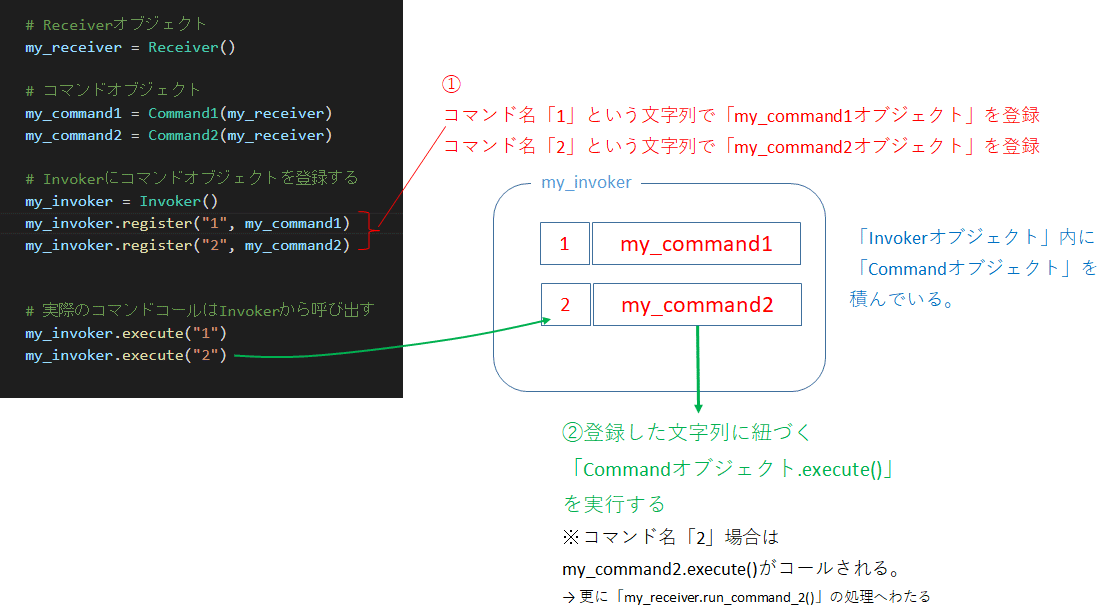
Invokerオブジェクトに生成したCommandオブジェクトを登録しておき、必要な時にコールできるようにする。
■Invokerオブジェクトの使い方イメージ

上記使い方を踏まえて、例えば次のような書き方ができる。
■Invokerの実装例
class Invoker:
   def __init__(self):
       self._commands = {} # 登録するコマンドを積んでいく(dictオブジェクト)


   # 与えられた文字列(command_name)を添え時にしてcommandオブジェクトを紐づける
   def register(self, command_name, command_object):
       self._commands[command_name] = command_object


   # ユーザが指定したコマンド(文字列)に紐づくオブジェクトを実行する
   def execute(self,command_name):

       if command_name in self._commands.keys(): # 登録済みのコマンド(dict)を検索
           self._commands[command_name].execute()
       else:
print(f"{command_name} is not recognised !")「Commandオブジェクト」を積んでいく部分に今回は「dictオブジェクト」を使った。
※dictオブジェクトの詳細は以下参照。
【4】全体コード
まとめると全体コードは次のような感じになる
# Receiver、Invokerを導入するCommandパターン

from abc import ABCMeta, abstractmethod

####### Receiverオブジェクト ############
class Receiver:

   @staticmethod
   def run_command_1():
       print("running command 1 !")


   @staticmethod
   def run_command_2():
       print("running command 2 !")


####### コマンドオブジェクト ############
# コマンドオブジェクト側の実装漏れを防ぐためにABCを用意
class ICommand(metaclass=ABCMeta):
   @staticmethod
   @abstractmethod
   def execute():
       pass


# 具体的なコマンドオブジェクトその1
class Command1(ICommand):
   def __init__(self, receiver):
       self._receiver = receiver

   # コマンドオブジェクトのexecuteは実処理を持つreceiverをコールするだけ
   def execute(self):
       self._receiver.run_command_1()


# 具体的なコマンドオブジェクトその2
class Command2(ICommand):
   def __init__(self, receiver):
       self._receiver = receiver

   # コマンドオブジェクトのexecuteは実処理を持つreceiverをコールするだけ
   def execute(self):
       self._receiver.run_command_2()


####### Invoker関連:コマンドオブジェクトをつんでいく+実行していく ####
class Invoker:
   def __init__(self):
       self._commands = {} # 登録するコマンドを積んでいく(dictオブジェクト)


   # 与えられた文字列(command_name)を添え時にしてcommandオブジェクトを紐づける
   def register(self, command_name, command_object):
       self._commands[command_name] = command_object


   # ユーザが指定したコマンド(文字列)に紐づくオブジェクトを実行する
   def execute(self,command_name):

       if command_name in self._commands.keys(): # 登録済みのコマンド(dict)を検索
           self._commands[command_name].execute()
       else:
           print(f"{command_name} is not recognised !")


####### 動作確認

def main():

   # Receiverオブジェクトを1つ作成する
   my_receiver = Receiver() # command1,command2の処理実体を保持するオブジェクト

   # 実行したいコマンドのオブジェクトを生成
   my_command1 = Command1(my_receiver) # command 1 or 2 をもつreceiverをコマンドオブジェクトに与える
   my_command2 = Command2(my_receiver)

   # Invokerにコマンドオブジェクトを登録する
   my_invoker = Invoker()
   my_invoker.register("1", my_command1) # 文字列:"1"をコマンド名として、my_command1オブジェクトを登録
   my_invoker.register("2", my_command2) # 文字列:"1"をコマンド名として、my_command1オブジェクトを登録


   # 実際のコマンドコールはInvokerから呼び出す
   my_invoker.execute("1") # コマンド名「"1"」の中身はわからんがコールできる → 中身を差し替えやすくなる
   my_invoker.execute("2")


if __name__ == '__main__':
   main()
# 実行結果
running command 1 !
running command 2 !
▲文字列コマンド名を登録しておくことで、「登録したコマンド名に対応する実際の処理の中身を差し替えやすくなる」など、「分離したことによるメリット」が生まれている。
【5】おまけ:照明演出(照明ON/OFF)プログラム
先ほどの例では、Receiver、Invokerというオブジェクト名をそのまま使ってサンプルコード(コンセプトコード)を示した。
もう少し具体的な例として「舞台・演劇・ライブなどの照明演出(照明ON/OFF)を登録・実行・部分再生(直近n個分を再実行)するプログラム」を「Commandパターン」で作成してみる。
【5-1】Receiverオブジェクト
「Receiverオブジェクト」は「実際の処理を行うStatic methodを持つオブジェクト」。つまり、「照明のON/OFF動作を実際に行う部分」になる。
例えば「Light」というオブジェクト名にして次のような書き方ができる
■Receiverオブジェクト:Lightクラスの作成
####### Receiver関連:「実際の」各種コマンドを起動する
class Light:
   @staticmethod
   def turn_on():
       print("light turned ON !")

   @staticmethod
   def turn_off():
print("light turned OFF")▲今回は2つのコマンド「turn_on()」と「turn_off()」を用意した。
↓
この2つに対して「Commandオブジェクト」をそれぞれ作る。
■Commandオブジェクト(turn_on、turn_offの2つ分)の作成
from abc import ABCMeta, abstractmethod


# 実装漏れを防ぐためにabcを使用する
class ISwitch(metaclass = ABCMeta):
   @staticmethod
   @abstractmethod
   def execute():
       pass


# Command Object:SwitchOn
class SwitchOnCommand(ISwitch):

   # Command Objectはreceiverを受け取っておく
   def __init__(self, receiver:Light):
       self._receiver = receiver

   # executeでreceiver内の特定の関数をコールする
   def execute(self):
       self._receiver.turn_on()


# Command Object:SwitchOff
class SwitchOffCommand(ISwitch):

   def __init__(self, receiver:Light):
       self._receiver = receiver

   def execute(self):
self._receiver.turn_off()▲(別に書かなくても構わないが、)今回は何のオブジェクトか把握しやすくするために、「__init__()」の[引数:receiver]に[型ヒント:Light]を入れている。
詳細は以下参照。
【5-2】Invokerオブジェクト
「Invokerオブジェクト」では「生成したCommandオブジェクトを登録する、必要なタイミングでコマンドをコールする」。
今回は更に、
『実行したコマンドを記憶しておき、部分再生(直近n個分を再実行)する』
というコマンド履歴を保持するようにする。
※Invokerの使い方のイメージ
# Receiverオブジェクト作成
my_light = Light()

# Commandオブジェクト作成
switch_on_cmd = SwitchOnCommand(my_light)
switch_off_cmd = SwitchOffCommand(my_light)


# Invokerオブジェクト
my_switch = Switch()

# InvokerへのCommandオブジェクトの登録
my_switch.register("ON",switch_on_cmd)
my_switch.register("OFF",switch_off_cmd)

# 登録したコマンドの実行(裏で実行履歴を取っておく)
my_switch.execute("ON")
my_switch.execute("OFF")
my_switch.execute("ON")
my_switch.execute("OFF")
my_switch.execute("ON")
my_switch.execute("ON")

# 直近3個のコマンドを再実行する
my_switch.replay_last(3)
# 想定結果
light turned ON
light turned OFF
light turned ON
light turned OFF
light turned ON
light turned ON
--- replay ---
light turned OFF
light turned ON
light turned ON
■Invokerオブジェクトの作成
import time


class Switch:

   def __init__(self):
       self._commands = {} # 登録するコマンドを積む「dictオブジェクト」
       self._history = [] # 実行コマンドの履歴を積む(時間, コマンド名)のtupleオブジェクトを積んでいく想定

   # コマンド名とコマンドオブジェクト登録
   def register(self, command_name, command_object):
       self._commands[command_name] = command_object


   # 指定のコマンド名に対応するコマンドオブジェクトのメソッドをコールする
   def execute(self, command_name):
       if command_name in self._commands.keys():
           self._commands[command_name].execute()
           self._history.append((time.time(), command_name)) # タイムスタンプと共にコマンド名を履歴保存(tuple型で時間とコマンド保存)
       else:
           print(f"{command_name} not recognised !")


   # 直近N個のコマンドを再実行
   def replay_last(self, number_of_commands):

       commands = self._history[-number_of_commands:] # 配列要素を逆から取り出す
       for command in commands:
           self._commands[command[1]].execute() # 「添え字1:コマンド名」を取り出して実行
           # この実行をさらに履歴に積むなら
#self.execute(command[1])※今回コマンド実行履歴は、「クラス変数:self._historyのlist」 に「(時間、コマンド名:文字列) 」の「tupleオブジェクト」で積んでいる。
※「list」や「tuple」は以下参照
また、「直近n個分を再実行」の実現には、「スライス」と「負のインデックス」を利用している。
※詳細は以下の「3.1.2. 文字列型 (string)」内の記述参照。
【5-3】全体コード
from abc import ABCMeta, abstractmethod
import time

####### Receiver関連:「実際の」各種コマンドを起動する
class Light:
   @staticmethod
   def turn_on():
       print("light turned ON")

   @staticmethod
   def turn_off():
       print("light turned OFF")

####### Command Object 関連

# 実装漏れを防ぐIF
class ISwitch(metaclass = ABCMeta):
   @staticmethod
   @abstractmethod
   def execute():
       pass


# Command Object:SwitchOn
class SwitchOnCommand(ISwitch):

   # Command Objectはreceiverを受け取っておく
   def __init__(self, receiver:Light):
       self._receiver = receiver

   # executeでreceiver内の特定の関数をコールする
   def execute(self):
       self._receiver.turn_on()


# Command Object:SwitchOff
class SwitchOffCommand(ISwitch):

   def __init__(self, receiver:Light):
       self._receiver = receiver

   def execute(self):
       self._receiver.turn_off()

####### Invoker関連
class Switch:

   def __init__(self):
       self._commands = {} # 登録するコマンドを積む「dictオブジェクト」
       self._history = [] # 実行コマンドの履歴を積む(時間, コマンド名)のtupleオブジェクトを積んでいく想定

   # コマンド名とコマンドオブジェクト登録
   def register(self, command_name, command_object):
       self._commands[command_name] = command_object


   # 指定のコマンド名に対応するコマンドオブジェクトのメソッドをコールする
   def execute(self, command_name):
       if command_name in self._commands.keys():
           self._commands[command_name].execute()
           self._history.append((time.time(), command_name)) # タイムスタンプと共にコマンド名を履歴保存(tuple型で時間とコマンド保存)
       else:
           print(f"{command_name} not recognised !")


   # 直近N個のコマンドを再実行
   def replay_last(self, number_of_commands):

       commands = self._history[-number_of_commands:] # 配列要素を逆から取り出す
       for command in commands:
           self._commands[command[1]].execute() # 「添え字1:コマンド名」を取り出して実行
           # この実行をさらに履歴に積むなら
           #self.execute(command[1])


####### 動作確認
def main():
   my_light = Light() # Receiverオブジェクト作成

   # コマンドオブジェクトを作成
   switch_on_cmd = SwitchOnCommand(my_light)
   switch_off_cmd = SwitchOffCommand(my_light)


   # Invokerにコマンド登録(ある種コールバック関数登録みたいな感じ)
   my_switch = Switch()
   my_switch.register("ON",switch_on_cmd)
   my_switch.register("OFF",switch_off_cmd)


   # 実際のコマンドコールはInvokerから行う
   my_switch.execute("ON")
   my_switch.execute("OFF")

   my_switch.execute("ON")
   my_switch.execute("OFF")
   my_switch.execute("ON")
   my_switch.execute("ON")

   print("--- replay ---")
   my_switch.replay_last(3) # 直近N個のコマンドを再実行

if __name__ == '__main__':
   main()
# 実行結果(想定結果と同じ)
light turned ON
light turned OFF
light turned ON
light turned OFF
light turned ON
light turned ON
--- replay ---
light turned OFF
light turned ON
light turned ON
【5-4】補足:タイムスタンプの処理
例では実行したコマンドは「Invokerオブジェクト」の「クラス変数:self._history」に履歴が積まれていくようにした。
この時、タイムスタンプの記録に「time.time()」を使っている。
▲ここに記載がある通り「time()は時刻を浮動小数点数の値で返している」。
つまり、以下のようなイメージでデータが積まれていく。
# self._historyに積まれているデータのイメージ
[
(1629735916.8669786, 'ON'),
(1629735916.8669786, 'OFF'),
(1629735916.8679776, 'ON'),
(1629735916.8679776, 'OFF'),
(1629735916.8679776, 'ON'),
(1629735916.8679776, 'ON')
]
このタイムスタンプ部分を活用したい、出力して人間の目で理解できるようにしたい、といったこともある。
そこで、人間が理解できる形に変換する方法として「datetime.fromtimestamp()」を使うことができる。
これを踏まえて、例えば
「Switch(Invokerオブジェクト)」に「コマンド履歴を出力する機能を追加する」
としたら、次のような感じに作成できる。
■コマンド履歴を出力する機能を追加したSwitch(Invokerオブジェクト)
from datetime import datetime
import time


####### Invoker関連
class Switch:

   def __init__(self):
       self._commands = {} # 登録するコマンドを積む「dictオブジェクト」
       self._history = [] # 実行コマンドの履歴を積む(時間, コマンド名)のtupleオブジェクトを積んでいく想定

   # コマンド名とコマンドオブジェクト登録
   def register(self, command_name, command_object):
       self._commands[command_name] = command_object


   # 指定のコマンド名に対応するコマンドオブジェクトのメソッドをコールする
   def execute(self, command_name):
       if command_name in self._commands.keys():
           self._commands[command_name].execute()
           self._history.append((time.time(), command_name)) # タイムスタンプと共にコマンド名を履歴保存(tuple型で時間とコマンド保存)
       else:
           print(f"{command_name} not recognised !")


   # 履歴に積んでいるコマンドを出力
   def show_history(self):
       for row in self._history:
           print(
               f"{datetime.fromtimestamp(row[0]).strftime('%H:%M:%S')}"
               f" : {row[1]}"
           )


   # 直近N個のコマンドを再実行
   def replay_last(self, number_of_commands):

       commands = self._history[-number_of_commands:] # 配列要素を逆から取り出す
       for command in commands:
           self._commands[command[1]].execute() # 「添え字1:コマンド名」を取り出して実行
           # この実行をさらに履歴に積むなら
           #self.execute(command[1])
# show_history()を実行したの出力例
01:58:32 : ON
01:58:32 : OFF
01:58:32 : ON
01:58:32 : OFF
01:58:32 : ON
01:58:32 : ON
▲今回は「datetime.fromtimestamp()」で変換した後に、さらに「strftime()」で整形した。「strftime()」については以下参照。
いいなと思ったら応援しよう!

