
[Flutter]introduction_screenでアプリの紹介ページを作る

Flutterの便利なパッケージ、「introduction_screen」を使って、アプリの初回起動時にアプリの説明画面を導入する方法について説明します!
Introduction_screenとは?
アプリの初回起動時に表示するユーザーガイドや、チュートリアルの作成を手助けするパッケージです。
このパッケージを使用することで、アプリの特徴や使い方をスライドショー形式でユーザーに紹介することができます。
また、各スライドにはボタンを設置でき、ユーザーが自由にスライドを切り替えられるようにすることも可能です。
コードの例と使い方
では、具体的な使い方を見ていきましょう。ここでは、IntroductionScreenウィジェットを用いた簡単な例を示します。
コード全文
import 'package:flutter/material.dart';
import 'package:flutter_svg/flutter_svg.dart';
import 'package:introduction_screen/introduction_screen.dart';
import 'package:shared_preferences/shared_preferences.dart';

class IntroPage extends StatefulWidget {
  const IntroPage({Key? key}) : super(key: key);

  @override
  State<IntroPage> createState() => _IntroPageState();
}

class _IntroPageState extends State<IntroPage> {
  List<PageViewModel> getPages() {
    return [
      PageViewModel(
        title: "Title",
        body: "body",
        image: Center(
          child: SvgPicture.asset(
            "assets/test1.svg",
            height: 175.0,
          ),
        ),
        decoration: const PageDecoration(
          titleTextStyle:
              TextStyle(fontSize: 28.0, fontWeight: FontWeight.w700),
          bodyTextStyle: TextStyle(fontSize: 20.0),
          pageColor: Color.fromARGB(108, 146, 193, 209),
        ),
      ),
      PageViewModel(
        title: "Title",
        body: "body",
        image: Center(
          child: SvgPicture.asset(
            "assets/test2.svg",
            height: 175.0,
          ),
        ),
        decoration: const PageDecoration(
          titleTextStyle:
              TextStyle(fontSize: 28.0, fontWeight: FontWeight.w700),
          bodyTextStyle: TextStyle(fontSize: 20.0),
          pageColor: Color.fromARGB(108, 146, 193, 209),
        ),
      ),
    ];
  }

  Future<void> setCompleteIntro(bool value) async {
    final SharedPreferences _prefs = await SharedPreferences.getInstance();
    await _prefs.setBool('hasCompletedIntro', value);
  }

  @override
  Widget build(BuildContext context) {
    return IntroductionScreen(
      pages: getPages(),
      onDone: () async {
        await setCompleteIntro(true);
        Navigator.of(context).pushReplacement(
          MaterialPageRoute(
            builder: (_) => const SignIn(),
          ),
        );
      },
      onSkip: () async {
        await setCompleteIntro(true);
        Navigator.of(context).pushReplacement(
          MaterialPageRoute(
            builder: (_) => const SignIn(),
          ),
        );
      },
      showSkipButton: true,
      skip: const Text('スキップ'),
      next: const Icon(Icons.arrow_forward),
      done: const Text("スタート", style: TextStyle(fontWeight: FontWeight.w600)),
      dotsDecorator: DotsDecorator(
        size: const Size.square(10.0),
        activeSize: const Size(20.0, 10.0),
        activeColor: Theme.of(context).primaryColor,
        color: Colors.black26,
        spacing: const EdgeInsets.symmetric(horizontal: 3.0),
        activeShape: RoundedRectangleBorder(
          borderRadius: BorderRadius.circular(25.0),
        ),
      ),
    );
  }
}
まず、必要なパッケージをインポートします。
注目すべきはintroduction_screenとshared_preferencesパッケージで、前者はイントロダクションスクリーンを作成するため、後者はアプリの設定情報をデバイスに保存するために使います。
import 'package:flutter/material.dart';
import 'package:flutter_svg/flutter_svg.dart';
import 'package:introduction_screen/introduction_screen.dart';
import 'package:shared_preferences/shared_preferences.dart';getPagesメソッドは、表示するページを定義しています。
ここでは2つのPageViewModelをリストとして返しています。それぞれのPageViewModelはタイトル、本文、画像(SVG形式)を持ち、各ページの装飾(テキストスタイル、背景色など)をPageDecorationで定義しています。
SvgPicture.asset()は、assetsディレクトリに保存しておいたtest1.svgという画像ファイルを画面に表示するために使用しています。svg形式のファイルを使用するため、flutter_svgというパッケージを使用しています。
List<PageViewModel> getPages() {
  return [
    PageViewModel(
      title: "Title",
      body: "body",
      image: Center(
        child: SvgPicture.asset(
          "assets/test1.svg",
          height: 175.0,
        ),
      ),
      decoration: const PageDecoration(
        titleTextStyle:
            TextStyle(fontSize: 28.0, fontWeight: FontWeight.w700),
        bodyTextStyle: TextStyle(fontSize: 20.0),
        pageColor: Color.fromARGB(108, 146, 193, 209),
      ),
    ),
    PageViewModel(
        title: "Title",
        body: "body",
        image: Center(
          child: SvgPicture.asset(
            "assets/test2.svg",
            height: 175.0,
          ),
        ),
        decoration: const PageDecoration(
          titleTextStyle:
              TextStyle(fontSize: 28.0, fontWeight: FontWeight.w700),
          bodyTextStyle: TextStyle(fontSize: 20.0),
          pageColor: Color.fromARGB(108, 146, 193, 209),
        ),
      ),
  ];
}setCompleteIntroメソッドは、ユーザーがイントロダクションを完了したかどうかを記録するためのものです。SharedPreferencesを使用して、ユーザーのデバイスにこの情報を保存します。
Future<void> setCompleteIntro(bool value) async {
  final SharedPreferences _prefs = await SharedPreferences.getInstance();
  await _prefs.setBool('hasCompletedIntro', value);
}
最後に、buildメソッドでIntroductionScreenウィジェットを作成します。ここで設定したonDoneとonSkipのコールバックは、それぞれ完了ボタンとスキップボタンが押されたときに実行されます。
これらのコールバックでは、上記のsetCompleteIntroメソッドを呼び出してイントロダクションが完了したことを記録し、MaterialPageRouteでSignInページにリダイレクトしています。
次回のアプリ起動時には、この記録を呼び出すことでイントロダクションが完了したと判断され、イントロダクションページを次回以降表示しないようにできます。(アプリ起動する度に説明画面を出されるのはユーザーにとって嫌なので、それを避ける)
この処理については別の記事で掘り下げます!
@override
  Widget build(BuildContext context) {
    return IntroductionScreen(
      pages: getPages(),
      onDone: () async {
        await setCompleteIntro(true);
        Navigator.of(context).pushReplacement(
          MaterialPageRoute(
            builder: (_) => const SignIn(),
          ),
        );
      },
      onSkip: () async {
        await setCompleteIntro(true);
        Navigator.of(context).pushReplacement(
          MaterialPageRoute(
            builder: (_) => const SignIn(),
          ),
        );
      },
      // ...
    );
  }
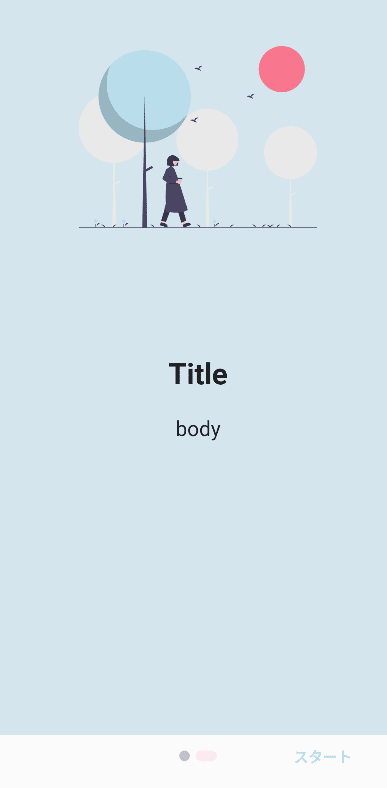
また、IntroductionScreenウィジェットにはスキップボタンが表示され、それぞれのスクリーンの下部にはドットを用いたページインジケータが表示されます。これらの表示はshowSkipButton、skip、next、done、dotsDecorator等のプロパティを設定することで調整できます。
return IntroductionScreen(
    // ...
    showSkipButton: true,
    skip: const Text('スキップ'),
    next: const Icon(Icons.arrow_forward),
    done: const Text("スタート", style: TextStyle(fontWeight: FontWeight.w600)),
    dotsDecorator: DotsDecorator(
      size: const Size.square(10.0),
      activeSize: const Size(20.0, 10.0),
      activeColor: Theme.of(context).primaryColor,
      color: Colors.black26,
      spacing: const EdgeInsets.symmetric(horizontal: 3.0),
      activeShape: RoundedRectangleBorder(
        borderRadius: BorderRadius.circular(25.0),
      ),
    ),
  );
作成した画面はこちら
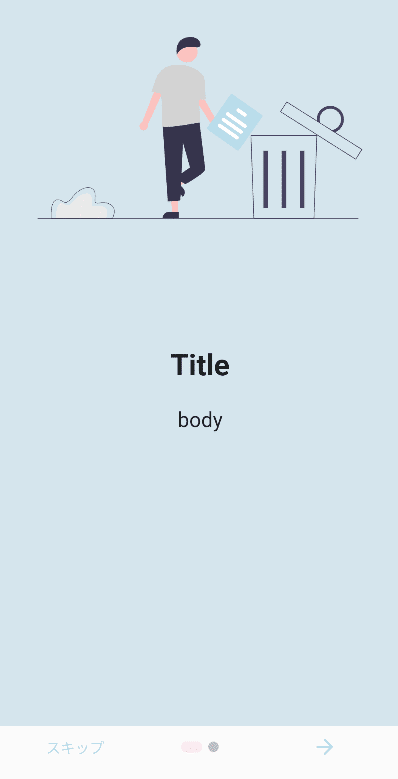
スキップを押すとSignInページに飛び、右下の→は次の画面へ
まとめ
基本的な使い方は非常にシンプルで、必要な情報をPageViewModelに設定し、それらをIntroductionScreenウィジェットに渡すだけです。また、カスタマイズも可能で、ボタンの挙動や表示するスクリーンの数などを自由に変更できます。
以上がFlutterのintroduction_screenパッケージの紹介となります!
この記事が気に入ったらサポートをしてみませんか?