
たまにはPythonとUnityでもちょもちょ

まずはPythonの環境をととのえます。
VSCodeはすでに入っているものとする。
Ctrl+@ でターミナルを開きます。
python -m venv .フォルダと設定ファイルが出来上がります。
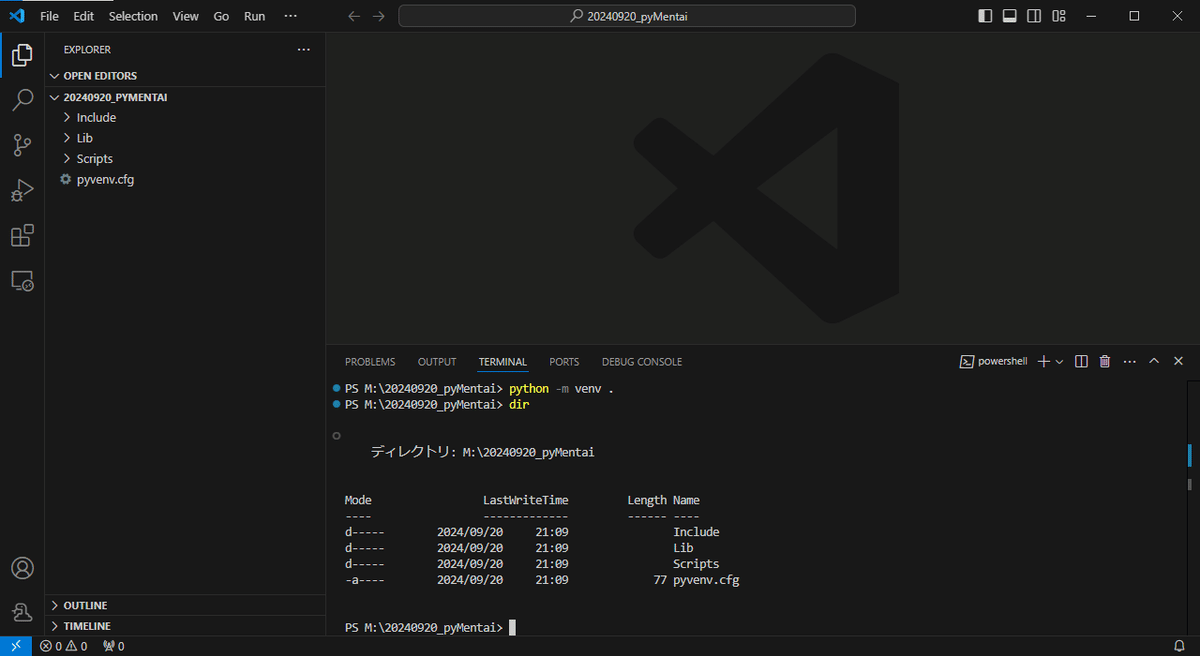
.\Scripts\Activate.ps1仮想環境をアクティベートします。
これわすれると、システムのpythonがわにモジュール入っちゃうので注意。
手順に従ってインストール
pip install pyvirtualcamつぎにソースを作成、お試しなので test1.pyとかでOK
import colorsys
import numpy as np
import pyvirtualcam

with pyvirtualcam.Camera(width=1280, height=720, fps=20) as cam:
    print(f'Using virtual camera: {cam.device}')
    frame = np.zeros((cam.height, cam.width, 3), np.uint8)  # RGB
    while True:
        h, s, v = (cam.frames_sent % 100) / 100, 1.0, 1.0
        r, g, b = colorsys.hsv_to_rgb(h, s, v)
        frame[:] = (r * 255, g * 255, b * 255)
        cam.send(frame)
        cam.sleep_until_next_frame()
保存して、実行
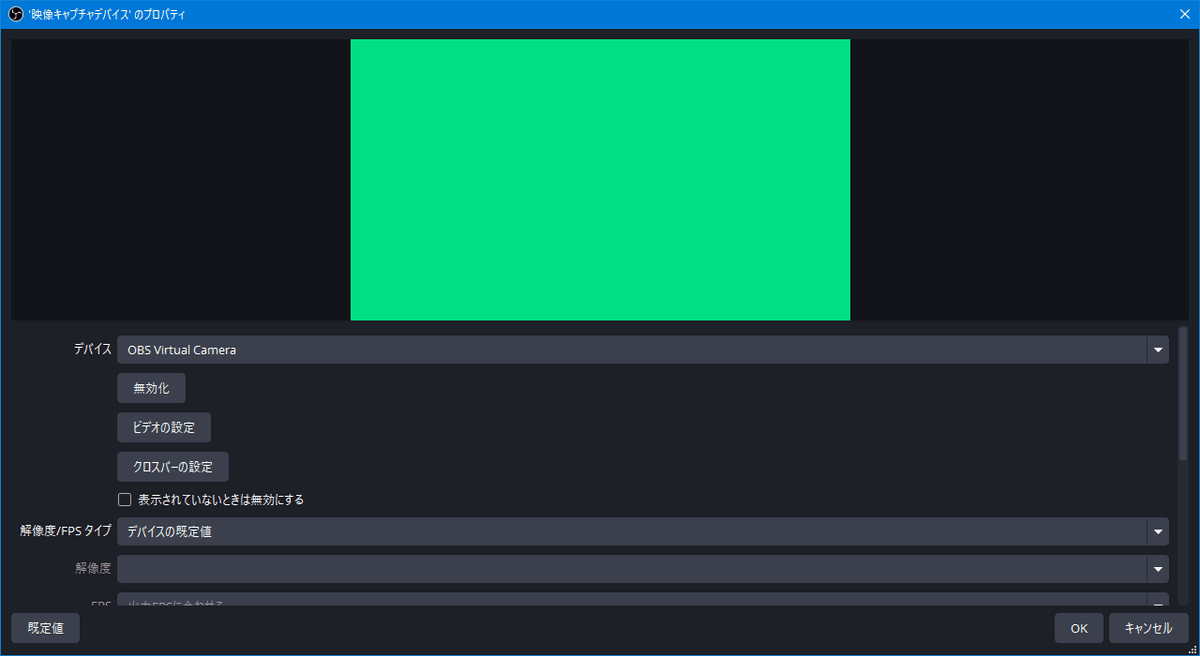
> python.exe .\test1.py
Using virtual camera: OBS Virtual Camera
この状態で止まってるのが正常です。
もしだめならOBSがインストールされてないかも。
OBS起動して、ソースに映像キャプチャデバイス追加して、デバイスにOBS Virtual Camera を指定してなんだかギラギラした映像が出てきたらここまでOKです。OBSは閉じてしまおう。
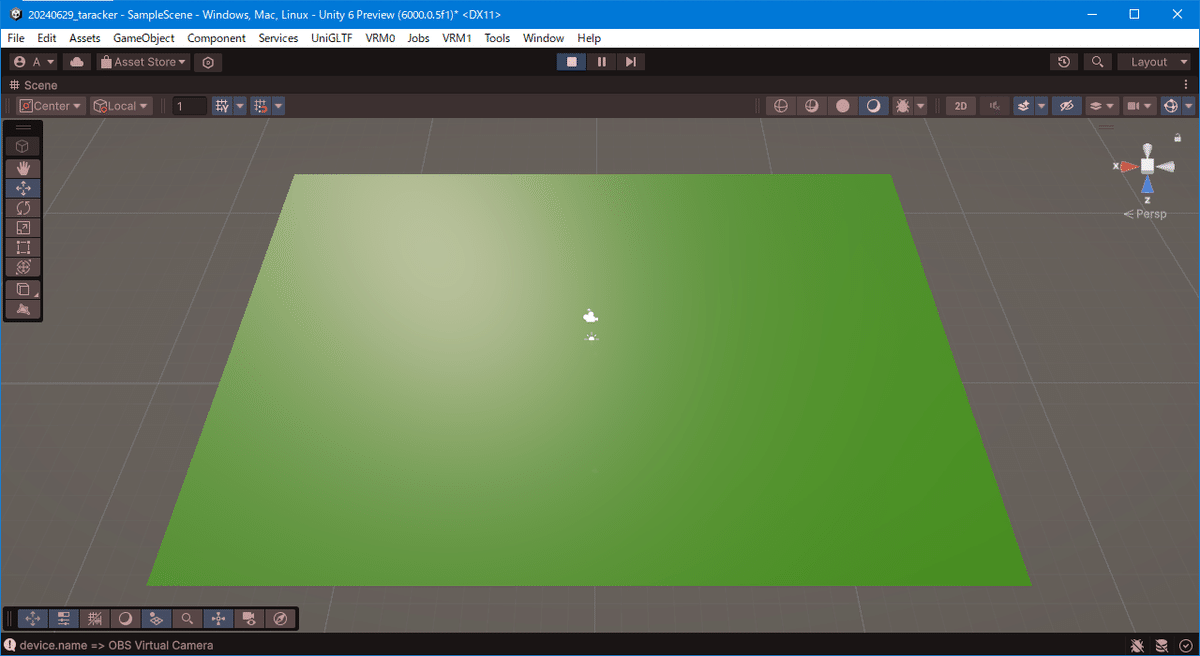
ここからは、Unity側作業です
Planeオブジェクト作って、下のスクリプトを WebCamController.cs で作って、アタッチ。
devices[3].name 3 の部分はカメラの数で変わるので OBS Virtual Camera に対応する番号に変えてね
using System.Collections;
using System.Collections.Generic;
using UnityEngine;
using UnityEngine.UI;

public class WebCamController : MonoBehaviour
{
    int width = 1920;
    int height = 1080;
    int fps = 30;
    WebCamTexture webcamTexture;
    [SerializeField] WebCamDevice[] devices;

    void Start()
    {
        devices = WebCamTexture.devices;
        foreach (WebCamDevice device in devices)
        {
            Debug.Log("device.name => " + device.name);
        }

        webcamTexture = new WebCamTexture(devices[3].name, this.width, this.height, this.fps);
        GetComponent<Renderer>().material.mainTexture = webcamTexture;
        webcamTexture.Play();
    }

    // Update is called once per frame
    void Update()
    {
    }
}
OBSと同じような感じのになるけどマテリアルのせいてテカってます。きになるならunlit系に変える
Pythonでの作業に戻ります。
mjpegを受け取ってフレームに入れてcam.sendです。
おいおい使うのでopencvのライブラリをいれます
pip install opencv-python
pip install opencv-contrib-python
おあそび!画像をギラギラさせる
test2_img.py
import colorsys
import numpy as np
import pyvirtualcam

import cv2

im = cv2.imread('img.jpg')
im_rgb = cv2.cvtColor(im,cv2.COLOR_BGR2RGB)
ang = 0

with pyvirtualcam.Camera(width=1280, height=720, fps=20) as cam:
    print(f'Using virtual camera: {cam.device}')
    frame = np.zeros((cam.height, cam.width, 3), np.uint8)  # RGB
    while True:
        # h, s, v = (cam.frames_sent % 100) / 100, 1.0, 1.0
        # r, g, b = colorsys.hsv_to_rgb(h, s, v)
        # frame[:] = (r * 255, g * 255, b * 255)

        ang = (ang + 10) % 180
        hsv = cv2.cvtColor(im_rgb, cv2.COLOR_RGB2HSV)
        hsv = hsv.astype(np.uint16) # uint8だと255以上で不定になるので型を変更
        hsv[:,:,0] = (hsv[:,:,0]+ang)%180
        hsv = hsv.astype(np.uint8) # 型を戻す
        dst = cv2.cvtColor(hsv, cv2.COLOR_HSV2RGB)

        cam.send(dst)
        cam.sleep_until_next_frame()
本命!mjpegを仮想WEBCAMにしちゃう
test3_mjpeg.py
URLと、解像度は適切に変更
import colorsys
import numpy as np
import pyvirtualcam
import cv2

URL = "http://192.168.100.101"
AWB = True

# Face recognition and opencv setup
cap = cv2.VideoCapture(URL + ":81/stream")

with pyvirtualcam.Camera(width=320, height=240, fps=30) as cam:
    print(f'Using virtual camera: {cam.device}')
    frame = np.zeros((cam.height, cam.width, 3), np.uint8)  # RGB
    while True:
        # h, s, v = (cam.frames_sent % 100) / 100, 1.0, 1.0
        # r, g, b = colorsys.hsv_to_rgb(h, s, v)
        # frame[:] = (r * 255, g * 255, b * 255)
        ret, frame = cap.read()
        cam.send(frame)
        cam.sleep_until_next_frame()
コレも結構面白い!RTSPをWEBCAMに
おまけ。mediapipeをpythonで
必要になる追加のライブラリ
pip install python-osc
pip install mediapipe
face_landmarker.task を別途ダウンロードして同じフォルダに配置
test4_mp_fl.py
ソースはちょっと整理中
# Copyright 2023 The MediaPipe Authors. All Rights Reserved.
#
# Licensed under the Apache License, Version 2.0 (the "License");
# you may not use this file except in compliance with the License.
# You may obtain a copy of the License at
#
#     http://www.apache.org/licenses/LICENSE-2.0
#
# Unless required by applicable law or agreed to in writing, software
# distributed under the License is distributed on an "AS IS" BASIS,
# WITHOUT WARRANTIES OR CONDITIONS OF ANY KIND, either express or implied.
# See the License for the specific language governing permissions and
# limitations under the License.
"""Main scripts to run face landmarker."""

import argparse
import sys
import time

from pythonosc import udp_client

import cv2
import mediapipe as mp

from mediapipe.tasks import python
from mediapipe.tasks.python import vision
from mediapipe.framework.formats import landmark_pb2

mp_face_mesh = mp.solutions.face_mesh
mp_drawing = mp.solutions.drawing_utils
mp_drawing_styles = mp.solutions.drawing_styles

# Global variables to calculate FPS
COUNTER, FPS = 0, 0
START_TIME = time.time()
DETECTION_RESULT = None

def run(model: str, num_faces: int,
        min_face_detection_confidence: float,
        min_face_presence_confidence: float, min_tracking_confidence: float,
        camera_id: int, width: int, height: int) -> None:
    """Continuously run inference on images acquired from the camera.

  Args:
      model: Name of the face landmarker model bundle.
      num_faces: Max number of faces that can be detected by the landmarker.
      min_face_detection_confidence: The minimum confidence score for face
        detection to be considered successful.
      min_face_presence_confidence: The minimum confidence score of face
        presence score in the face landmark detection.
      min_tracking_confidence: The minimum confidence score for the face
        tracking to be considered successful.
      camera_id: The camera id to be passed to OpenCV.
      width: The width of the frame captured from the camera.
      height: The height of the frame captured from the camera.
  """

    # Start capturing video input from the camera
    # cap = cv2.VideoCapture(camera_id)
    # cap.set(cv2.CAP_PROP_FRAME_WIDTH, width)
    # cap.set(cv2.CAP_PROP_FRAME_HEIGHT, height)

    URL = "http://192.168.100.101"
    cap = cv2.VideoCapture(URL + ":81/stream")

    cap.set(cv2.CAP_PROP_FRAME_WIDTH, width)
    cap.set(cv2.CAP_PROP_FRAME_HEIGHT, height)

    # Visualization parameters
    row_size = 50  # pixels
    left_margin = 24  # pixels
    text_color = (0, 0, 0)  # black
    font_size = 1
    font_thickness = 1
    fps_avg_frame_count = 10

    # Label box parameters
    label_background_color = (255, 255, 255)  # White
    label_padding_width = 1500  # pixels

    def save_result(result: vision.FaceLandmarkerResult,
                    unused_output_image: mp.Image, timestamp_ms: int):
        global FPS, COUNTER, START_TIME, DETECTION_RESULT

        # Calculate the FPS
        if COUNTER % fps_avg_frame_count == 0:
            FPS = fps_avg_frame_count / (time.time() - START_TIME)
            START_TIME = time.time()

        DETECTION_RESULT = result
        COUNTER += 1

    # Initialize the face landmarker model
    base_options = python.BaseOptions(model_asset_path=model)
    options = vision.FaceLandmarkerOptions(
        base_options=base_options,
        running_mode=vision.RunningMode.LIVE_STREAM,
        num_faces=num_faces,
        min_face_detection_confidence=min_face_detection_confidence,
        min_face_presence_confidence=min_face_presence_confidence,
        min_tracking_confidence=min_tracking_confidence,
        output_face_blendshapes=True,
        result_callback=save_result)
    detector = vision.FaceLandmarker.create_from_options(options)

    # Continuously capture images from the camera and run inference
    while cap.isOpened():
        success, image = cap.read()
        if not success:
            sys.exit(
                'ERROR: Unable to read from webcam. Please verify your webcam settings.'
            )

        image = cv2.flip(image, 1)

        # Convert the image from BGR to RGB as required by the TFLite model.
        rgb_image = cv2.cvtColor(image, cv2.COLOR_BGR2RGB)
        mp_image = mp.Image(image_format=mp.ImageFormat.SRGB, data=rgb_image)

        # Run face landmarker using the model.
        detector.detect_async(mp_image, time.time_ns() // 1_000_000)

        # Show the FPS
        fps_text = 'FPS = {:.1f}'.format(FPS)
        text_location = (left_margin, row_size)
        current_frame = image
        cv2.putText(current_frame, fps_text, text_location,
                    cv2.FONT_HERSHEY_DUPLEX,
                    font_size, text_color, font_thickness, cv2.LINE_AA)

        if DETECTION_RESULT:
            face_blendshapes = DETECTION_RESULT.face_blendshapes

            if face_blendshapes:
                # print(vars(face_blendshapes[0]))
                for idx, category in enumerate(face_blendshapes[0]):
                    category_name = category.category_name
                    score = round(category.score, 2)

                    if category_name.startswith('cheekPuff') :
                        print(vars(category))

        if DETECTION_RESULT:
            # Draw landmarks.
            for face_landmarks in DETECTION_RESULT.face_landmarks:
                face_landmarks_proto = landmark_pb2.NormalizedLandmarkList()
                face_landmarks_proto.landmark.extend([
                    landmark_pb2.NormalizedLandmark(x=landmark.x,
                                                    y=landmark.y,
                                                    z=landmark.z) for
                    landmark in
                    face_landmarks
                ])
                mp_drawing.draw_landmarks(
                    image=current_frame,
                    landmark_list=face_landmarks_proto,
                    connections=mp_face_mesh.FACEMESH_TESSELATION,
                    landmark_drawing_spec=None,
                    connection_drawing_spec=mp.solutions.drawing_styles
                    .get_default_face_mesh_tesselation_style())
                mp_drawing.draw_landmarks(
                    image=current_frame,
                    landmark_list=face_landmarks_proto,
                    connections=mp_face_mesh.FACEMESH_CONTOURS,
                    landmark_drawing_spec=None,
                    connection_drawing_spec=mp.solutions.drawing_styles
                    .get_default_face_mesh_contours_style())
                mp_drawing.draw_landmarks(
                    image=current_frame,
                    landmark_list=face_landmarks_proto,
                    connections=mp_face_mesh.FACEMESH_IRISES,
                    landmark_drawing_spec=None,
                    connection_drawing_spec=mp.solutions.drawing_styles
                    .get_default_face_mesh_iris_connections_style())

        # Expand the right side frame to show the blendshapes.
        current_frame = cv2.copyMakeBorder(current_frame, 0, 0, 0,
                                           label_padding_width,
                                           cv2.BORDER_CONSTANT, None,
                                           label_background_color)

        if DETECTION_RESULT:
          # Define parameters for the bars and text
          legend_x = current_frame.shape[
                         1] - label_padding_width + 20  # Starting X-coordinate (20 as a margin)
          legend_y = 30  # Starting Y-coordinate
          bar_max_width = label_padding_width - 40  # Max width of the bar with some margin
          bar_height = 8  # Height of the bar
          gap_between_bars = 5  # Gap between two bars
          text_gap = 5  # Gap between the end of the text and the start of the bar

          face_blendshapes = DETECTION_RESULT.face_blendshapes

          if face_blendshapes:
              for idx, category in enumerate(face_blendshapes[0]):
                  category_name = category.category_name
                  score = round(category.score, 2)

                  # Prepare text and get its width
                  text = "{} ({:.2f})".format(category_name, score)
                  (text_width, _), _ = cv2.getTextSize(text,
                                                       cv2.FONT_HERSHEY_SIMPLEX,
                                                       0.4, 1)

                  # Display the blendshape name and score
                  cv2.putText(current_frame, text,
                              (legend_x, legend_y + (bar_height // 2) + 5),
                              # Position adjusted for vertical centering
                              cv2.FONT_HERSHEY_SIMPLEX,
                              0.4,  # Font size
                              (0, 0, 0),  # Black color
                              1,
                              cv2.LINE_AA)  # Thickness

                  # Calculate bar width based on score
                  bar_width = int(bar_max_width * score)

                  # Draw the bar to the right of the text
                  cv2.rectangle(current_frame,
                                (legend_x + text_width + text_gap, legend_y),
                                (legend_x + text_width + text_gap + bar_width,
                                 legend_y + bar_height),
                                (0, 255, 0),  # Green color
                                -1)  # Filled bar

                  # Update the Y-coordinate for the next bar
                  legend_y += (bar_height + gap_between_bars)

        cv2.imshow('face_landmarker', current_frame)

        # Stop the program if the ESC key is pressed.
        if cv2.waitKey(1) == 27:
            break

    detector.close()
    cap.release()
    cv2.destroyAllWindows()


def main():
    parser = argparse.ArgumentParser(
        formatter_class=argparse.ArgumentDefaultsHelpFormatter)
    parser.add_argument(
        '--model',
        help='Name of face landmarker model.',
        required=False,
        default='face_landmarker.task')
    parser.add_argument(
        '--numFaces',
        help='Max number of faces that can be detected by the landmarker.',
        required=False,
        default=1)
    parser.add_argument(
        '--minFaceDetectionConfidence',
        help='The minimum confidence score for face detection to be considered '
             'successful.',
        required=False,
        default=0.5)
    parser.add_argument(
        '--minFacePresenceConfidence',
        help='The minimum confidence score of face presence score in the face '
             'landmark detection.',
        required=False,
        default=0.5)
    parser.add_argument(
        '--minTrackingConfidence',
        help='The minimum confidence score for the face tracking to be '
             'considered successful.',
        required=False,
        default=0.5)
    # Finding the camera ID can be very reliant on platform-dependent methods.
    # One common approach is to use the fact that camera IDs are usually indexed sequentially by the OS, starting from 0.
    # Here, we use OpenCV and create a VideoCapture object for each potential ID with 'cap = cv2.VideoCapture(i)'.
    # If 'cap' is None or not 'cap.isOpened()', it indicates the camera ID is not available.
    parser.add_argument(
        '--cameraId', help='Id of camera.', required=False, default=0)
    parser.add_argument(
        '--frameWidth',
        help='Width of frame to capture from camera.',
        required=False,
        default=1280)
    parser.add_argument(
        '--frameHeight',
        help='Height of frame to capture from camera.',
        required=False,
        default=960)
    args = parser.parse_args()

    run(args.model, int(args.numFaces), args.minFaceDetectionConfidence,
        args.minFacePresenceConfidence, args.minTrackingConfidence,
        int(args.cameraId), args.frameWidth, args.frameHeight)


if __name__ == '__main__':
    main()
以上!