
Dynamics 365 Business Centralの開始残登録 1 Customer(得意先)とVendor(仕入先)の開始残

Dynamics 365 Business CentralのCustomer(得意先)とVendor(仕入先)への開始残高の登録方法の1つとしての参考となれば幸いです。
1)Customer(得意先)の開始残(売掛金残高)登録
こちらの動画を参考にしています。
How to create Opening Entries for the Customers - Dynamics 365 Business Central
General Journalを開き、Customerごとに売掛残を登録します。
Document TypeをInvoiceに設定し、Document No.をCustomerごとに変更します。今回はAR20241231-001~AR20241231-004にしています。
それぞれの売掛残を登録したら、Bal. Account No.(相手勘定科目)に売掛金勘定科目を指定します。これは、Customer Posting Groupで設定している勘定科目です。


相手勘定科目を設定し、必要に応じてDimension Codeなどを設定します。
Postをクリックし、Business Centralに計上します。Postが成功したら、Chart of Account(勘定科目一覧)を確認します。
勘定科目2310と2320のBalanceが0(-)となっているのがわかります。仕訳としては、同じ勘定科目で仕訳をしています。
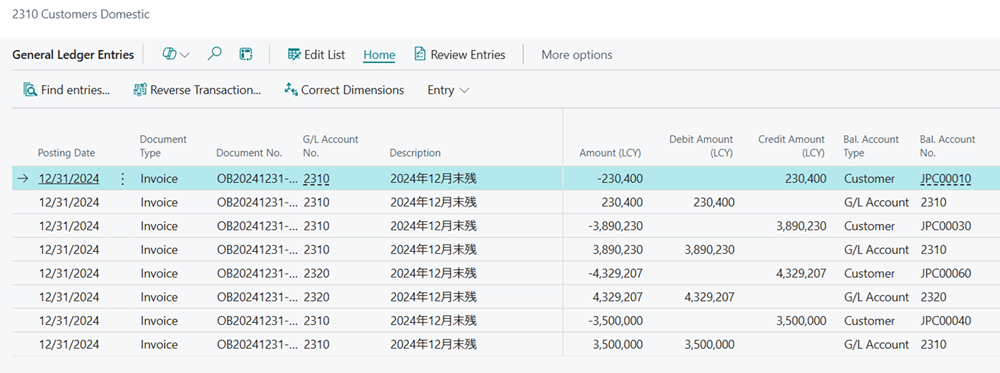
General Ledger Entriesを確認すると、明細ができているのがわかります。
Customer Ledger Entries(顧客元帳/得意先元帳)を確認すると、各Customerに売掛残が登録されているのがわかります。Customerカードで確認も可能です。


2)Vendor(仕入先)の開始残(買掛金残高)登録
こちらも次の動画を参考にしています。
How to create Opening Entries for the Vendors - Dynamics 365 Business Central
General Journalを開き、Vendorごとに買掛残を登録します。
Document TypeをInvoiceに設定し、Document No.をVendorごとに変更します。今回はAP20241231-001~AP20241231-004にしています。
それぞれの買掛残を登録したら、Bal. Account No.(相手勘定科目)に買掛金勘定科目を指定します。これは、Vendor Posting Groupで設定している勘定科目です。相手勘定科目を設定し、必要に応じてDimension Codeなどを設定します。
とこのように先ほどのCustomerの開始残高と同様にVendorに対しても同じ処理を行います。General Journalで異なる点は、Amountがマイナスとなることです。

Postが成功すると、General Ledger Entriesが作成され、Vendor Ledger Entriesに各Vendorごとの開始残高が登録されたことが確認できます。

