note Androidアプリで課金機能をリリースするためにやったこと:ポイントチャージ編
こんにちは、トリです。
食べ物の記事ばかり投稿していますが、普段はnoteでAndroidエンジニアをしています。
さっそくですが、今年2024年の春にnoteアプリで有料記事が買えるようになりました!
今回はポイントチャージ(アプリ内課金)に焦点を当て、どのような実装を行なったのかを、基本的な「実装の流れ」と「TIPS」の構成で説明していこうと思います。
※ この記事はnote株式会社のアプリチーム1weekアドベントカレンダーの2日目の記事です
開発環境
※ 2024年5月に Google Play Billing Library7.0.0 がリリースされましたが、基本的に開発時のバージョンで説明します。
準備
実装の流れ
1. ライブラリ追加
dependencies {
    implementation("com.android.billingclient:billing:6.2.1")
}
2. BillingClientの初期化
private val listener = object : PurchasesUpdatedListener {
    override fun onPurchasesUpdated(result: BillingResult, purchases: MutableList<Purchase>?) {
        // 購入フローの結果を受け取る
        // 購入成功、キャンセル、エラー etc...
    }
}

private val client = BillingClient.newBuilder(context)
    .setListener(listener)
    .build()
課金関連の処理は BillingClient で呼び出します。
購入フロー(後述)の結果を受け取るため、BillingClient 初期化時に PurchasesUpdatedListener をセットする必要があります。
【TIPS】
PurchasesUpdatedListener が重複して呼ばれないように、アクティブな BillingClient は1つだけにする
BillingClient は、多くの一般的な請求処理に役立つコンビニエンス メソッド(同期メソッドと非同期メソッドの両方)を提供します。1 つのイベントに対する複数の PurchasesUpdatedListener コールバックを回避するため、一度に開くアクティブな BillingClient 接続は 1 つにすることを強くおすすめします。
3. GooglePlayに接続する
client.startConnection(object : BillingClientStateListener {
    override fun onBillingSetupFinished(result: BillingResult) {
        if (result.responseCode == BillingClient.BillingResponseCode.OK) {
            // アイテムの取得や決済処理など行う
        }
    }

    override fun onBillingServiceDisconnected() {
        // 接続が切れた時に呼ばれる
        // startConnection()で再接続を試みるなど
    }
})
BillingClient.startConnection() で GooglePlay に接続します。
非同期で実行され、 BillingClientStateListener で結果を受け取ります。
【TIPS】
接続が不要になったら BillingClient.endConnection() で解放する
メモリリークを避けるため、 Activity や Fragment が破棄されるタイミングで実行する
BillingClient.isReady で接続状態を返すので、BillingClientメソッド実行前に使える
4. GooglePlayに登録した課金アイテムの取得
suspend fun fetchProducts(productIds: List<String>): List<ProductDetails>? {
    // 取得したいアイテムを設定する
    val productList = productIds.map {
        QueryProductDetailsParams.Product.newBuilder()
            .setProductId(it) // アプリ内アイテムで登録したアイテムID
            .setProductType(BillingClient.ProductType.INAPP) // 1回限り: INAPP, 定期購入: SUBS
            .build()
    }
    val params = QueryProductDetailsParams.newBuilder()
        .setProductList(productList)
        .build()

    val result = client.queryProductDetails(params)
    return if (result.billingResult.responseCode == BillingClient.BillingResponseCode.OK) {
        result.productDetailsList
    } else {
        // エラー処理
    }
}
アイテムIDとタイプ(1回限り or 定期購入)を QueryProductDetailsParams に設定して、BillingClient.queryProductDetails(params) を実行します。
戻り値の ProductDetails で課金アイテム情報を取得できます。
ProductDetailsで取得できる項目(一部)

- productId: アイテムID
  - 例) example.id

- name: 名前
  - 例) 100ポイント

- description: 説明
  - 例) 記事の購入に使えます

- oneTimePurchaseOfferDetails.formattedPrice: 通貨記号付きの金額
  - 例) ¥140
【TIPS】
setProductId() と setProductType() を指定しないとエラーになる
BillingClient.queryProductDetailsAsync() でもOK
ProductDetailsResponseListener で結果を取得できる
5. 課金アイテムを購入する(購入フローの起動)
val productDetails = listOf(
    BillingFlowParams.ProductDetailsParams.newBuilder()
        .setProductDetails(details)
        .build()
)
val params = BillingFlowParams.newBuilder()
    .setProductDetailsParamsList(productDetails)
    .build()

val billingResult = client.launchBillingFlow(activity, params)
if (billingResult.responseCode != BillingClient.BillingResponseCode.OK) {
    // 失敗した時の処理
}
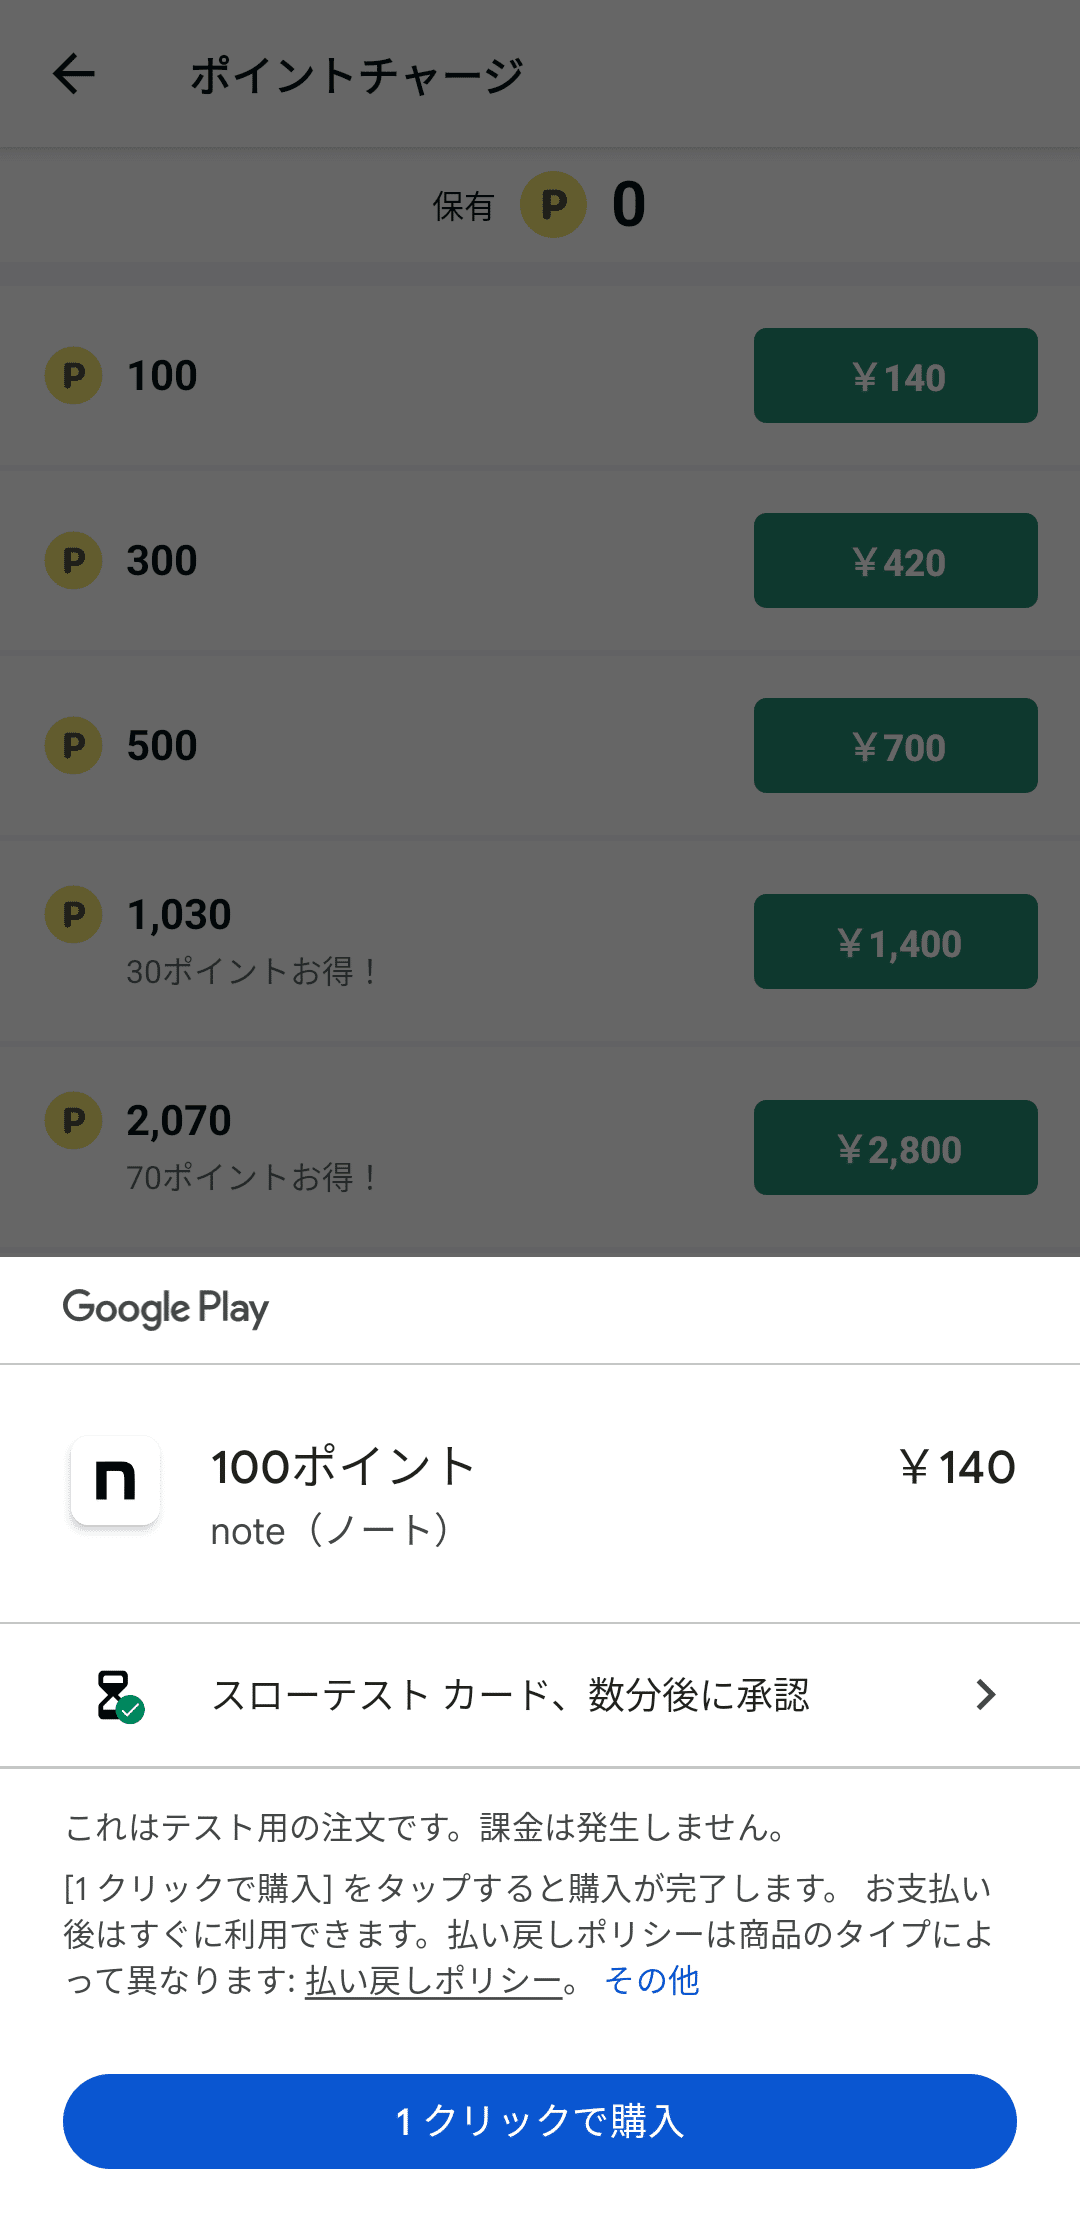
購入したい ProductDetails を ProductDetailsParams に設定して、BillingClient.launchBillingFlow を実行します。
成功すると、下記の画面が表示されます。

6. 購入フローの結果を受け取る
override fun onPurchasesUpdated(result: BillingResult, purchases: MutableList<Purchase>?) {
    when (result.responseCode) {
        BillingClient.BillingResponseCode.OK -> {
            if (purchases != null) {
                for (purchase in purchases) {
                    // 決済処理を行う
                }
            }
        }

        BillingClient.BillingResponseCode.ITEM_ALREADY_OWNED -> {
            // アイテム購入済みエラー
        }

        BillingClient.BillingResponseCode.USER_CANCELED -> {
            // キャンセル操作された
        }

        else -> {
            // その他エラーなど
        }
    }
}
BillingClient の初期化でセットした PurchasesUpdatedListener がコールバックされ、onPurchasesUpdated() を実行します。
BillingResponseCode を確認し、決済・キャンセル・エラーなどを適宜処理します。
note では決済をサーバーで処理しています。
【TIPS】
この時点では支払いが完了していないので、クライアントやサーバーで決済処理を行う
決済には Purchase.purchaseToken が必要
消費型アイテムの消費前に再購入すると BillingResponseCode.ITEM_ALREADY_OWNED エラーになる
7. 購入アイテムを定期的に確認する
override fun onResume() {
    super.onResume()
    queryPurchases()
}

...


fun queryPurchases() {
    val queryPurchasesParams = QueryPurchasesParams.newBuilder()
    .setProductType(BillingClient.ProductType.INAPP)
    .build()

    client.queryPurchasesAsync(queryPurchasesParams) { result, purchaseList ->
        if (result.responseCode != BillingClient.BillingResponseCode.OK) {
            // エラー
            return@queryPurchasesAsync
        }
        // 未決済のアイテムを取得
        val purchase = purchaseList.find {
            it.purchaseState == Purchase.PurchaseState.PURCHASED && !it.isAcknowledged
        }
        // 決済処理を行う
    }
}
PurchasesUpdatedListener だけでは、ユーザーの購入をハンドリングできない場合があります。そのため、onResume() などで定期的に購入状態を確認することが大切です。
BillingClient.queryPurchasesAsync() で未決済のアイテムを取得できます。
【TIPS】
PurchaseState.PURCHASED : 決済を進行できる状態
Purchase.isAcknowledged : 購入の承認フラグ
決済処理には購入の承認が必要なので、フラグが立っていないならば未決済であると判断できる
8. 保留決済に対応する
即時払いではない支払い(コンビニ決済など)にも対応します。
private val client = BillingClient.newBuilder(context)
    .setListener(listener)
    .enablePendingPurchases()
    .build()
BillingClientの初期化で enablePendingPurchases() をセットします。
この設定によって、購入フローでスローテストを選択できるようになります。

override fun onPurchasesUpdated(result: BillingResult, purchases: MutableList<Purchase>?) {
    when (result.responseCode) {
        BillingClient.BillingResponseCode.OK -> {
            if (purchases != null) {
                for (purchase in purchases) {
                    if (purchase.purchaseState == Purchase.PurchaseState.PURCHASED) {
                        // 決済処理を行う
                    } else if (purchase.purchaseState == Purchase.PurchaseState.PENDING) {
                        // 保留中
                        // 購入を完了するとPURCHASEDの状態でonPurchasesUpdatedが呼ばれる
                    }
                }
            }
        }
        // 以下省略 ...
    }
}
PurchasesUpdatedListener で PurchaseState.PENDING のアイテムがないか確認します。
fun queryPurchases() {
    val queryPurchasesParams = QueryPurchasesParams.newBuilder()
    .setProductType(BillingClient.ProductType.INAPP)
    .build()

    client.queryPurchasesAsync(queryPurchasesParams) { result, purchaseList ->
        if (result.responseCode != BillingClient.BillingResponseCode.OK) {
            // エラー
            return@queryPurchasesAsync
        }
        // 保留中のアイテムを取得
        val purchase = purchaseList.find {
            it.purchaseState == Purchase.PurchaseState.PENDING
        }
    }
}
BillingClient.queryPurchasesAsync() でも PurchaseState.PENDING のアイテムがないか確認します。
【TIPS】
PurchaseState.PENDING の場合は、決済処理を進めない
ユーザーがコンビニで支払いなどすると PurchaseState.PURCHASED に切り替わる
まとめ
今回は、note Androidアプリで提供するポイントチャージ機能について、どのような実装をしたのか要点をまとめてみました。
アプリ内課金を検討しているどなたかの参考になれば幸いです。
参考:
- https://developer.android.com/google/play/billing/integrate?hl=ja
- https://github.com/android/play-billing-samples
- https://speakerdeck.com/syarihu/re-zero-starting-uses-of-play-billing-library
note iOSアプリのアプリ内課金の記事もあります。
noteでは、Androidエンジニアを募集しています。
カジュアル面談だけでも可能ですので、お気軽にお問い合わせください。
