
第六話:RAGを活用した業務特化型AIチャットボットのノーコード活用
現在、弊社では業務効率化を目的としたAIツールの導入を検討しており、以下のようなツールについて情報を収集しています。
契約書チェックに特化したAIツール 議事録に特化したAIツール 情報収集に特化したAIツール RAG(Retrieval-Augmented Generation)を活用した業務特化型AIボットをノーコードで作成できるツール これらのツールをセキュリティ上の懸念なく導入する方法について、ご提案いただけますと幸いです。
特に、金融機関での導入実績があるツールを優先的に検討しております。
今回もお寄せいただいたお問い合わせから厳選し、AIでお悩み解決していきます。
社内の大量のデータの中から関連する情報を取り出すのって嫌ですよねぇ。そんな方に向け、本記事を記載いたしましたので、よろしくお願いします。
まずは以下にそれぞれ回答させていただきます。
リーガルオンさんなどの既存サービスがありますので、まずはそちらの比較検討からスタートしてみるのは、いかがでしょうか?
Zoomがないなら議事録取れる君ですが、あるならZoomのAIで個人的には十分な気がします。
ChatGPTやAnthoropicなどが既に情報収集に特化していると思いますが、もう少し具体的な情報をいただけると回答できるかもしれません。
今回の本題です。前回はホテル特化型でしたが、今回は金融機関特化型でAIエージェントの機能を拡張していきたいと思います。それでは、Let’s Go!!
前回は、もっとも類似性の高い回答が1つだけ選択されるサービスでした。今回は、よりサービスレベルを向上させる為、複数回答を組み合わせて行うように修正いたします。
ただ、その前に金融機関のマニュアルをインプットする必要がありますので、まずはそこから行お、回答レベル向上へ繋げます。
金融機関マニュアルのインプット
福島銀行さんの「でんさいネットサービス」を学習します。
https://www.fukushimabank.co.jp/hojin/densai/manual/
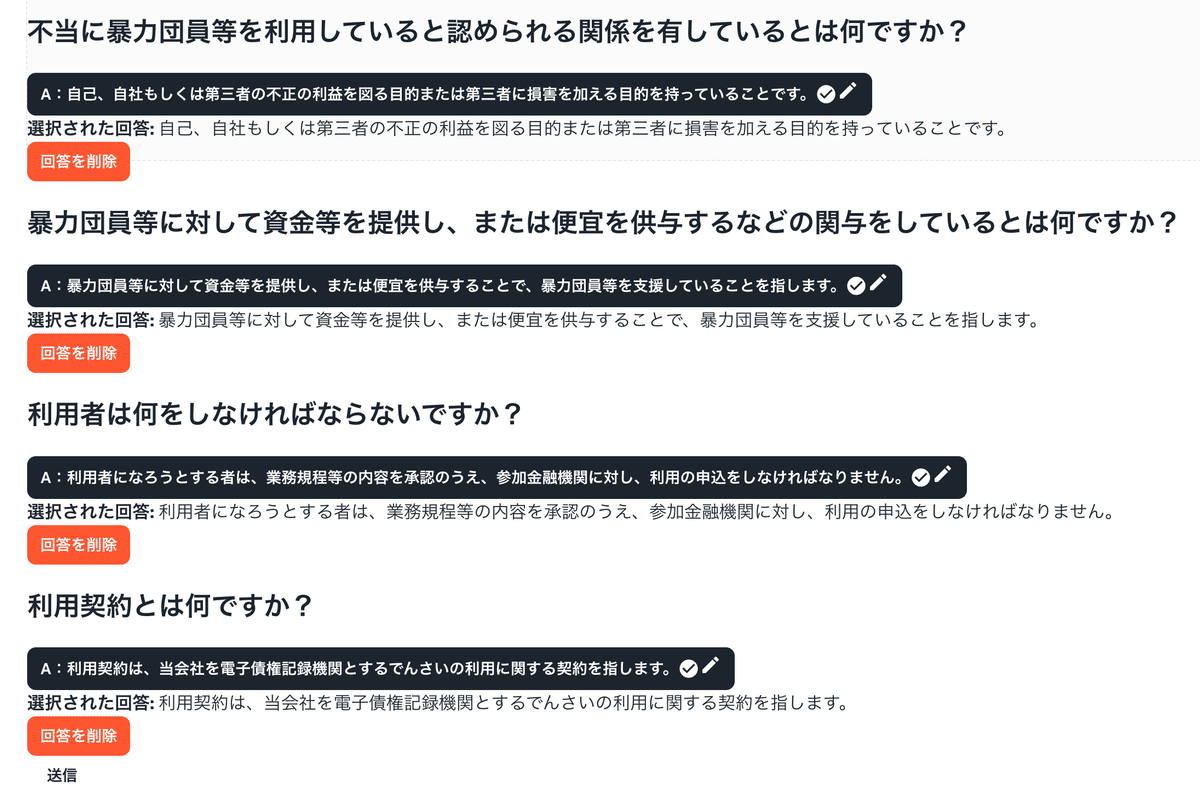
densai_gyoumukitei.pdfは30ページあるのですが、Q&Aが4つしか作成されないのは、非効率です。まずはここの拡張を行います。といっても、src/app/api/qa/route.tsの数量をコントロールするだけです。
    const response = await openai.chat.completions.create({
        model: 'gpt-3.5-turbo',
        temperature: 0,
        messages: [
            {
                role: 'user',
                content: `Based on the document content below, create exactly 4 Q&A pairs in Japanese. Each pair must be on a new line in this exact format:
                Q1: [質問内容] A1: [回答内容]
                Q2: [質問内容] A2: [回答内容]
                Context: ${results.map((r) => r.pageContent).join('\\n\\n')}`,
            },
        ],
    });
ちなみにエンドユーザーには、ノーコードとなるようにしますが、開発物自体には当然コードが必要となりますので、悪しからず。コード不要と思った方は、読み飛ばしてOKです。
“exactly 4 Q&A”とあるのを30に変更します。
しかしながら、10しか作られません。
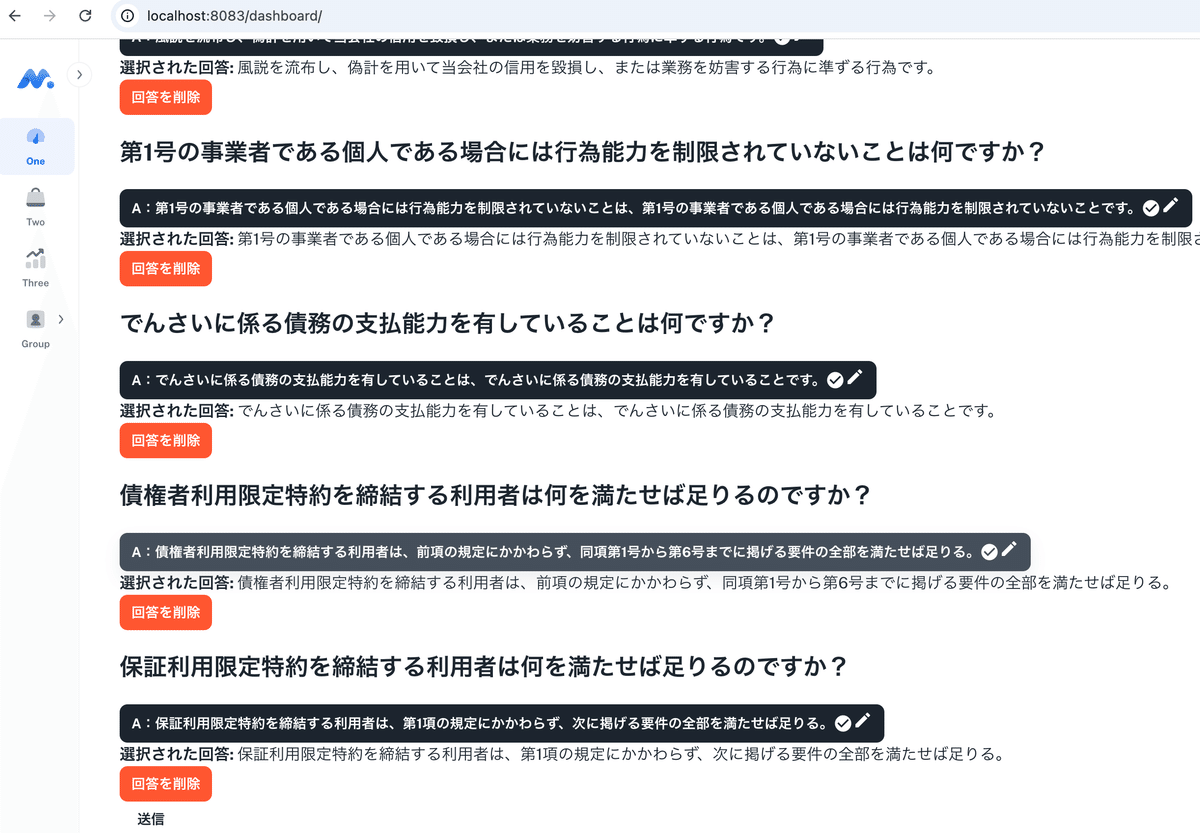
仕方ないので、複数回まわして取得するように変更します。
// src/app/api/qa/route.ts

import 'dotenv/config';
import { NextRequest, NextResponse } from 'next/server';
import { MemoryVectorStore } from 'langchain/vectorstores/memory';
import { OpenAIEmbeddings } from 'langchain/embeddings/openai';
import { CharacterTextSplitter } from 'langchain/text_splitter';
import { PDFLoader } from 'langchain/document_loaders/fs/pdf';
import { openai } from '@/lib/openai';
import { Buffer } from 'buffer';
import { Question, questionSchema } from '@/lib/schemas';

export const createStore = (docs: any[]) =>
    MemoryVectorStore.fromDocuments(docs, new OpenAIEmbeddings());

export const docsFromPDF = (fileBuffer: Buffer) => {
    const blob = new Blob([fileBuffer]);
    const loader = new PDFLoader(blob);

    return loader.loadAndSplit(
        new CharacterTextSplitter({
            separator: '. ',
            chunkSize: 2500,
            chunkOverlap: 200,
        })
    );
};

const loadStore = async (fileBuffer: Buffer) => {
    const pdfDocs = await docsFromPDF(fileBuffer);
    return createStore([...pdfDocs]);
};

const generateQAsFromContext = async (context: string, count: number) => {
    const response = await openai.chat.completions.create({
        model: 'gpt-3.5-turbo',
        temperature: 0,
        messages: [
            {
                role: 'user',
                content: `Based on the document content below, create exactly ${count} Q&A pairs in Japanese. Each pair must be on a new line in this exact format:
                Q1: [質問内容] A1: [回答内容]
                Q2: [質問内容] A2: [回答内容]
                Context: ${context}`,
            },
        ],
    });

    const generatedMessage = response.choices[0].message.content;

    if (!generatedMessage) {
        throw new Error('Empty response from GPT');
    }

    const lines = generatedMessage.split('\\n').filter((line) => line.trim());
    const rawQAs = lines.map((line, idx) => {
        const id = String(idx + 1);
        const parts = line.split(/A\\d+:/);

        if (parts.length < 2) {
            console.warn(`Skipping malformed line: ${line}`);
            return null;
        }

        const question = parts[0].replace(`Q${id}:`, '').trim();
        const answer = parts[1].trim();

        if (!question || !answer) {
            return null;
        }

        return {
            id,
            question,
            option: '',
            answer,
        };
    }).filter((qa): qa is Question => qa !== null);

    return rawQAs;
};

const generateQAsFromFile = async (fileBuffer: Buffer) => {
    const store = await loadStore(fileBuffer);
    const results = await store.similaritySearch('summary', 4);

    const contextChunks = results.map((r) => r.pageContent).slice(0, 2); // コンテキストを短縮
    const totalQAs: Question[] = [];
    const requiredQAs = 30;
    const batchSize = 10;

    for (let i = 0; i < requiredQAs / batchSize; i++) {
        const chunkContext = contextChunks.join('\\n\\n');
        const qas = await generateQAsFromContext(chunkContext, batchSize);
        totalQAs.push(...qas);
    }

    if (totalQAs.length < requiredQAs) {
        throw new Error(`Only ${totalQAs.length} Q&A pairs were generated.`);
    }

    return totalQAs.slice(0, requiredQAs);
};

export async function POST(req: NextRequest) {
    try {
        const formData = await req.formData();
        const file = formData.get('file');

        if (!file || !(file instanceof File)) {
            console.error('No file uploaded or invalid file.');
            return NextResponse.json({
                success: false,
                error: 'No file uploaded or invalid file.',
            });
        }

        const buffer = await file.arrayBuffer();
        const fileBuffer = Buffer.from(buffer);

        const qas = await generateQAsFromFile(fileBuffer);

        return NextResponse.json({
            success: true,
            qas,
        });
    } catch (error) {
        // error を型チェック
        if (error instanceof Error) {
            console.error('Error during file upload or Q&A generation:', error.message);
            return NextResponse.json({
                success: false,
                error: `An error occurred: ${error.message}`,
            });
        } else {
            console.error('Unexpected error:', error);
            return NextResponse.json({
                success: false,
                error: 'An unexpected error occurred.',
            });
        }
    }
}
for文の分割処理で30取得できました。どうやらAPIのレスポンス制限があったようです。
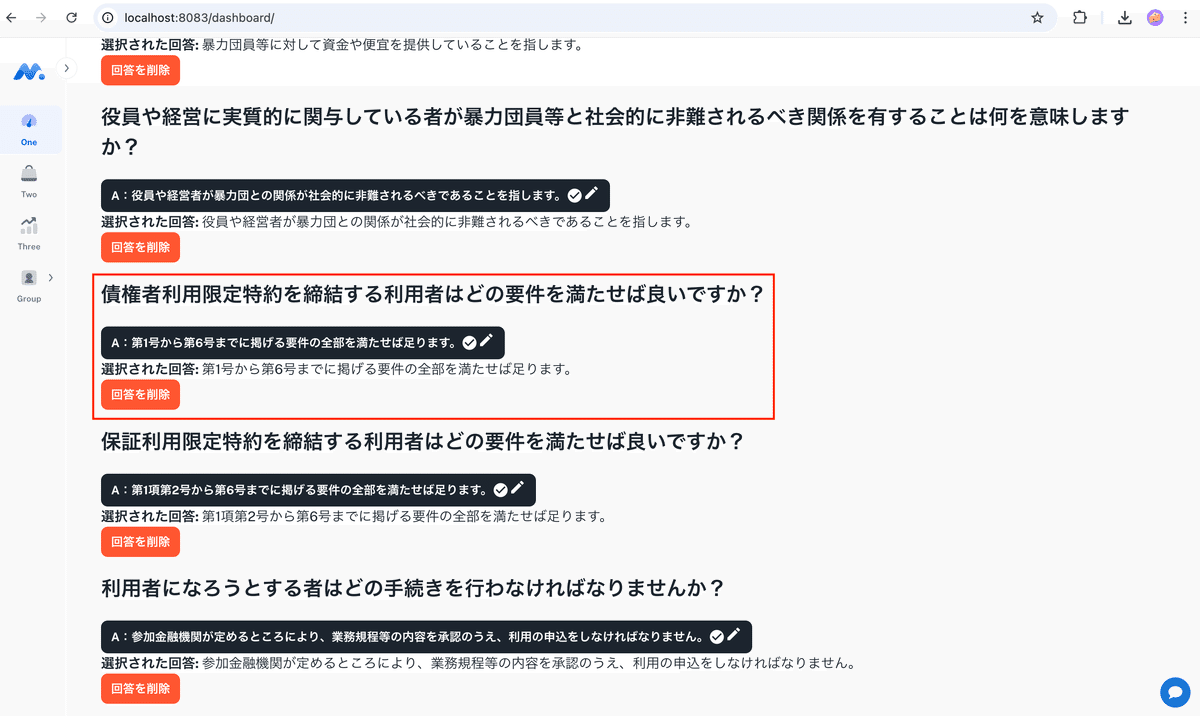
不当に暴力団員等を利用していると認められる関係を有していることは何を意味しますか? 暴力団員等に資金を提供するなどの関与をしていると認められる関係を有することは何を意味しますか? 役員や経営者が暴力団員等と社会的に非難されるべき関係を有することは何を意味しますか? どのような行為が暴力的な要求行為に該当しますか? 風説を流布し、当社の信用を毀損する行為は何を指しますか? 債権者利用限定特約を締結する利用者はどの要件を満たせば良いですか? 保証利用限定特約を締結する利用者はどの要件を満たせば良いですか? 利用者登録をする際に通知される事項は何ですか? 利用契約の効力が生じるのはどの時点ですか? 規程の施行期日はいつですか? 不当に暴力団員等を利用していると認められる関係を有していることは何を意味しますか? 暴力団員等に資金を提供するなどの関与をしていると認められる関係を有することは何を意味しますか? 役員や経営に実質的に関与している者が暴力団員等と社会的に非難されるべき関係を有することは何を意味しますか? 債権者利用限定特約を締結する利用者はどの要件を満たせば良いですか? 保証利用限定特約を締結する利用者はどの要件を満たせば良いですか? 利用者になろうとする者はどの手続きを行わなければなりませんか? 利用契約の効力が生じるのはどの時点ですか? この規程はいつから施行されますか? 規程の改正はいつ行われましたか? 参加金融機関が申込者と利用契約を締結する場合、どの手続きを行う必要がありますか? 不当に暴力団員等を利用していると認められる関係を有していることは何を意味しますか? 暴力団員等に資金を提供するなどの関与をしていると認められる関係を有することは何を意味しますか? 役員や経営者が暴力団員等と社会的に非難されるべき関係を有することは何を意味しますか? 債権者利用限定特約を締結する利用者はどの要件を満たせば良いですか? 保証利用限定特約を締結する利用者はどの要件を満たせば良いですか? 利用者登録をする際に通知される事項は何ですか? 利用契約はいつ効力を生じますか? この規程はいつ施行されますか? 利用者になろうとする者は何をしなければなりませんか? 利用契約を締結する場合、参加金融機関は何を遅滞なく行わなければなりませんか?
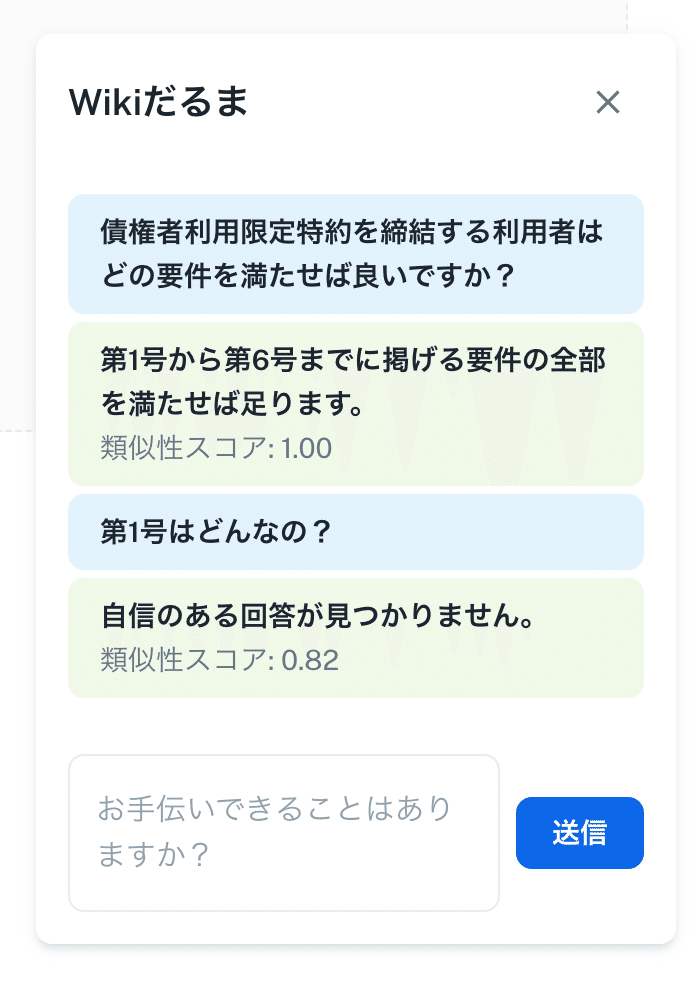
下記のような質問を受けた場合、「第1号とはなんですか?」という次のターンの質問が発生してしまいますので、最初からそのデータも用意しておく必要があります。しかしながら、これらの性質の質問は自動生成されないようでした。また、ここで注意をしなければならないのは、「第一号」という言葉の類似性のみで判断してはいけない点です。コンテクストを渡してあげる必要がありますので、前回の質問も渡すなどの工夫が必要となります。
質問に対するセクションの分割・埋め込みの粒度を細かくする
現在のデータ構造では、全体的な質問と回答のペアがデータベースに格納されています。
これを改善するために、マニュアルやドキュメントを細かいセクション単位に分割し、それぞれをベクトル化していきます。
「第一号って何?」のような質問でも、該当セクションにマッチしやすくなります。
Prismaでベクトルデータを扱う方法
1. カスタムスキーマを使用
第一話で説明したPrismaのスキーマで、カスタムデータ型(例えばvector)を利用できます。ただし、直接サポートされていないため、以下の手順を取ります。
1.1. PostgreSQL側でpgvectorを設定
まず、pgvector拡張機能を有効にします。
psql -h localhost -p 5432 -U prisma -d prisma_db

CREATE EXTENSION vector;
次に、テーブルを作成します。
CREATE TABLE documents (
  id SERIAL PRIMARY KEY,
  content TEXT,
  embedding VECTOR(1536) -- ベクトル次元数を指定
);
ベクトル次元数とは、埋め込みベクトル(embedding vector)の「長さ」を示す値です。具体的には、テキストデータやその他の情報を数値的に表現するために、機械学習モデルが出力するベクトルが持つ要素(値)の数を指します。
例:
VECTOR(1536)という指定がある場合、これはそのベクトルが1536個の数値(次元)を持っていることを意味します。
例えば、ある質問を機械学習モデルに渡すと、その質問は1536次元の数値ベクトルに変換されます。このベクトルの各次元(数値)は、質問の特徴を表現しています。
なぜ次元数が重要なのか?
情報の表現能力:
高い次元数(例えば、1536次元)は、より多くの情報を表現できるため、モデルがより詳細な特徴を捉えることができます。これにより、類似性の比較や検索などが精度高く行えるようになります。
計算負荷:
次元数が多いほど、計算量が増えます。1536次元のベクトルは、例えば300次元のベクトルに比べて計算コストが高くなりますが、その分より精緻なデータの表現が可能になります。
埋め込みベクトルの例
例えば、「債権者利用限定特約を締結する利用者はどの要件を満たせば良いですか?」という質問をベクトル化すると、その結果として得られるベクトルは1536個の要素を持つ数値のリストです。以下のように(実際の数値は異なりますが)数値で表現されます。
[0.12, -0.34, 0.56, ..., 0.02] // 1536個の数値
このベクトルを使って、データベース内の他の質問と比較したり、類似性を計算したりすることができるようになります。
コンピュータは0と1の世界でできていることは広く知られていますが、エンベディングとは概念を数値列に変換したもので、類似性の評価や機械学習の処理に活用されています。
例えば、以下のように言葉を3次元の数値に変換します。
犬→(1,1,9)
猿→(1,2,9)
雉→(1,3,9)
とすると、最初の1が動物ということを指し、次が種類で、最後が桃太郎に出てくることを意図する、みたいな感じです。
そうやって、言葉とベクトルをめっちゃ頑張って集めると、どんな言葉が来ても、システムはその引き出しから、それっぽい回答が導き出せるようになるという、このエンべディングこのがChatGPTの支柱です。
2. Prismaで直接SQLクエリを発行
Prismaはprisma.$queryRawやprisma.$executeRawを使って生SQLクエリを発行できます。これを利用してベクトル検索を実現します。
ベクトルデータの挿入
import { PrismaClient } from '@prisma/client';

const prisma = new PrismaClient();

async function insertDocument() {
  const embedding = Array(1536).fill(0.1); // 仮のベクトルデータ

  await prisma.$executeRaw`
    INSERT INTO documents (content, embedding)
    VALUES ('Example content', ${embedding}::vector)
  `;
}

insertDocument();
類似度検索
async function searchSimilarDocuments(queryEmbedding: number[]) {
  const results = await prisma.$queryRaw`
    SELECT id, content, embedding <-> ${queryEmbedding}::vector AS distance
    FROM documents
    ORDER BY distance ASC
    LIMIT 5
  `;

  console.log(results);
}
3. Prismaクライアントを拡張する
Prismaをそのまま使うのではなく、拡張してベクトル操作を簡略化します。
カスタム関数の作成
class ExtendedPrismaClient extends PrismaClient {
  async insertVectorDocument(content: string, embedding: number[]) {
    await this.$executeRaw`
      INSERT INTO documents (content, embedding)
      VALUES (${content}, ${embedding}::vector)
    `;
  }

  async findSimilarDocuments(queryEmbedding: number[], limit = 5) {
    return this.$queryRaw`
      SELECT id, content, embedding <-> ${queryEmbedding}::vector AS distance
      FROM documents
      ORDER BY distance ASC
      LIMIT ${limit}
    `;
  }
}

const prisma = new ExtendedPrismaClient();

async function example() {
  const queryEmbedding = Array(1536).fill(0.1);
  const similarDocuments = await prisma.findSimilarDocuments(queryEmbedding);
  console.log(similarDocuments);
}

example();
4. ベクトルデータの生成とフロントエンドとの連携
フロントエンドから埋め込み生成
フロントエンド(React/Next.js)では、埋め込み生成を行うライブラリやAPIを活用します(例: OpenAIのtext-embedding-ada-002)。
import axios from 'axios';

async function generateEmbedding(text: string): Promise<number[]> {
  const response = await axios.post('<https://api.openai.com/v1/embeddings>', {
    input: text,
    model: 'text-embedding-ada-002',
  }, {
    headers: { 'Authorization': `Bearer ${process.env.OPENAI_API_KEY}` },
  });

  return response.data.data[0].embedding;
}
サーバー側に送信して保存
async function handleSaveDocument(content: string) {
  const embedding = await generateEmbedding(content);
  await fetch('/api/save-document', {
    method: 'POST',
    headers: { 'Content-Type': 'application/json' },
    body: JSON.stringify({ content, embedding }),
  });
}
API (/api/save-document/route.ts)
typescript
コードをコピーする
import { NextApiRequest, NextApiResponse } from 'next';
import prisma from '../../lib/prisma'; // Prismaのインスタンスをインポート
import { z } from 'zod';

// リクエストのボディのバリデーション用スキーマ(Zodを使用)
const SaveDocumentSchema = z.object({
  content: z.string(),
  embedding: z.string(), // バイナリデータをBase64エンコードして送信
});

type SaveDocumentRequest = z.infer<typeof SaveDocumentSchema>;

export default async function handler(
  req: NextApiRequest,
  res: NextApiResponse
) {
  // POSTメソッドの確認
  if (req.method === 'POST') {
    try {
      // リクエストボディをバリデーション
      const { content, embedding }: SaveDocumentRequest = SaveDocumentSchema.parse(
        req.body
      );

      // Base64エンコードされたembeddingをデコード
      const embeddingBuffer = Buffer.from(embedding, 'base64');

      // データベースに保存
      const document = await prisma.document.create({
        data: {
          content,
          embedding: embeddingBuffer, // バイナリデータをそのまま保存
        },
      });

      // 保存したデータをレスポンスで返す
      return res.status(201).json(document);
    } catch (error) {
      console.error(error);
      return res.status(400).json({ error: 'Invalid request data' });
    }
  } else {
    // POST以外のリクエストには405 Method Not Allowedを返す
    return res.status(405).json({ error: 'Method Not Allowed' });
  }
}
コンテキストを統合する方法
質問とその前の質問に関連するコンテキスト(例:以前の質問や回答、対話履歴)を組み合わせて、検索クエリを作成します。この場合、現在の質問と前回の質問を1つの文字列として結合し、それをベクトル化して検索に利用します。
コンテキスト付きでの検索
具体的には、以下のステップを踏みます:
前回の質問と現在の質問を結合: 例えば、「前回の質問と回答」を含めて、新たな質問として全体を渡します。こうすることで、前回の質問が新たな質問に関連する文脈として検索に利用されます。
ベクトル生成: 前回と現在の質問を組み合わせたテキストを埋め込みモデルでベクトル化します。
類似度検索: ベクトル化されたクエリを使って、データベース内の文書と類似度を計算します。
3. コードの実装例
以下に、前回の質問と現在の質問を結合して、ベクトル検索を行うコード例を示します。
async function searchSimilarDocuments(previousQuestion: string, currentQuery: string) {
  // 前回の質問と現在の質問を結合して1つのクエリとして扱う
  const combinedQuery = `${previousQuestion} ${currentQuery}`;

  // 1つのクエリから埋め込みベクトルを生成
  const queryEmbedding = await generateEmbedding(combinedQuery);  // `generateEmbedding`は埋め込みベクトルを生成する関数

  // 類似度検索の実行
  const results = await prisma.$queryRaw`
    SELECT id, content, embedding <-> ${queryEmbedding}::vector AS distance
    FROM documents
    ORDER BY distance ASC
    LIMIT 5
  `;

  console.log(results);  // 結果を出力

  return results;  // 類似文書を返す
}
ここまで説明してきてお気づきの方はお気づきかと思いますが、埋め込みベクトルの生成以外にopenaiのAPIキーは使用しません。また、Hugging Faceなどのオープンソースでベクトル生成する方法もありますので、オリジナルのシステムを構築する上で、そういったものでコストを抑えていくという選択肢があります。
セクション間のリンクを構築
関連するセクション間にリンクを構築し、ユーザーの質問が特定の項目に関連する場合、リンク先のデータも検索するようにします。
例:
「債権者利用限定特約」などの特定の用語を見つけた場合、それに関連するセクションをデータベース内で事前にリンク付けしておきます。
質問に「債権者利用限定特約」と含まれている場合、そのリンク情報を参照して回答を生成すします。
スキーマ例(Prisma):
model Section {
  id         Int      @id @default(autoincrement())
  title      String
  content    String
  embedding  Bytes    // ベクトルデータ
  relatedIds Int[]    // 関連するセクションのID
}
データ取得の例:
async function getRelatedAnswer(questionEmbedding: number[]) {
  const similarSections = await prisma.$queryRaw`
    SELECT id, title, content, embedding <-> ${questionEmbedding}::vector AS distance
    FROM Section
    ORDER BY distance ASC
    LIMIT 1
  `;

  const relatedSections = similarSections[0]?.relatedIds || [];
  const relatedAnswers = await prisma.section.findMany({
    where: { id: { in: relatedSections } },
  });

  return relatedAnswers.map(s => s.content).join('\\n');
}
下記のように、セクションごとに色を分けてベクトル値を保存しておき、メッセージから関連セクションを探して、関連回答を返却させると、より性能がアップするイメージです。
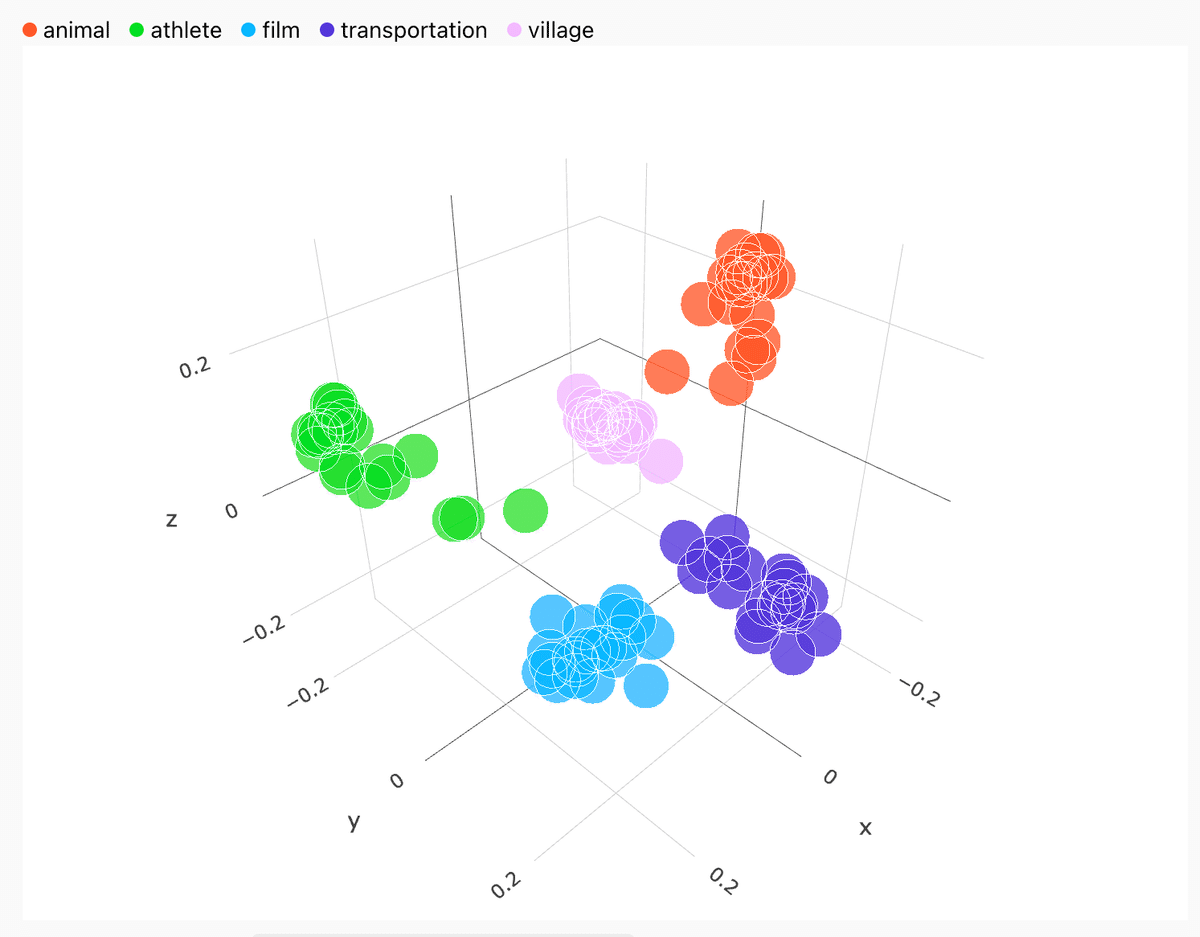
https://openai.com/index/introducing-text-and-code-embeddings/
ただ、一つ大きな問題なのは、シンプルに訓練が面倒くさいというのがあります。
それを解決するアプローチとして、フィードバックループがあります。
フィードバックループを活用する
ユーザーからのフィードバックを収集し、AIが誤った回答をした場合にその情報をデータセットに反映させることで、次回の回答の精度を向上させることができます。例えば、「自信のある回答が見つかりません」といった場合、どの情報が足りなかったのかを分析し、データセットを更新して再学習させることができます。
それでは、「自信のある回答が見つかりません。」と返ってきた時に、答えを教えてあげられるモードにしていきます。
まずはバックエンドから修正します。
// src/app/api/chatbot/route.ts

import { NextRequest, NextResponse } from 'next/server';
import { Document } from 'langchain/document';
import { MemoryVectorStore } from 'langchain/vectorstores/memory';
import { OpenAIEmbeddings } from 'langchain/embeddings/openai';
import prisma from '@/db'; // Prisma instance

const OPENAI_API_KEY = process.env.OPENAI_API_KEY;

if (!OPENAI_API_KEY) {
    throw new Error('OpenAI API key not found. Set OPENAI_API_KEY in your environment.');
}

export async function POST(req: NextRequest) {
    try {
        if (!process.env.OPENAI_API_KEY) {
            return NextResponse.json({ error: 'OpenAI API key not configured' }, { status: 500 });
        }

        const body = await req.json();
        const { inputValue } = body;

        if (!inputValue) {
            return NextResponse.json({ error: 'Missing input' }, { status: 400 });
        }

        const questionAnswers = await prisma.questionAnswer.findMany();
        const questions = questionAnswers.map(qa => qa.question || '');

        const closest = await findClosestQuestionWithOpenAI(inputValue, questions);

        if (!closest) {
            return NextResponse.json({ error: 'No match found' }, { status: 404 });
        }

        const result = {
            closestQuestion: closest.score < 0.9 ? "自信のある回答が見つかりません。" : closest.closestQuestion,
            answer: closest.score >= 0.9 ? questionAnswers[parseInt(closest.metadata.source, 10)].answer : null,
            score: closest.score,
            promptForAnswer: closest.score < 0.9 // Add the flag when the confidence score is low
        };

        return NextResponse.json(result);

    } catch (error) {
        console.error('API error:', error);
        return NextResponse.json({ error: 'Server error' }, { status: 500 });
    }
}

const findClosestQuestionWithOpenAI = async (input: string, questions: string[]) => {
    try {
        const store = await createStore(questions);
        const results = await store.similaritySearchWithScore(input, 1);

        if (results && results.length > 0) {
            const [document, score] = results[0];
            return { closestQuestion: document.pageContent, metadata: document.metadata, score };
        }

        return undefined;

    } catch (error) {
        console.error('Error in similarity search:', error);
        return undefined;
    }
};

const createStore = async (questions: string[]) => {
    try {
        const documents = questions.map((question, index) =>
            new Document({
                pageContent: question,
                metadata: { source: index.toString(), question },
            })
        );

        return await MemoryVectorStore.fromDocuments(
            documents,
            new OpenAIEmbeddings({ openAIApiKey: OPENAI_API_KEY })
        );
    } catch (error) {
        console.error('Error creating MemoryVectorStore or OpenAIEmbeddings:', error);
        throw new Error('Failed to initialize vector store');
    }
};
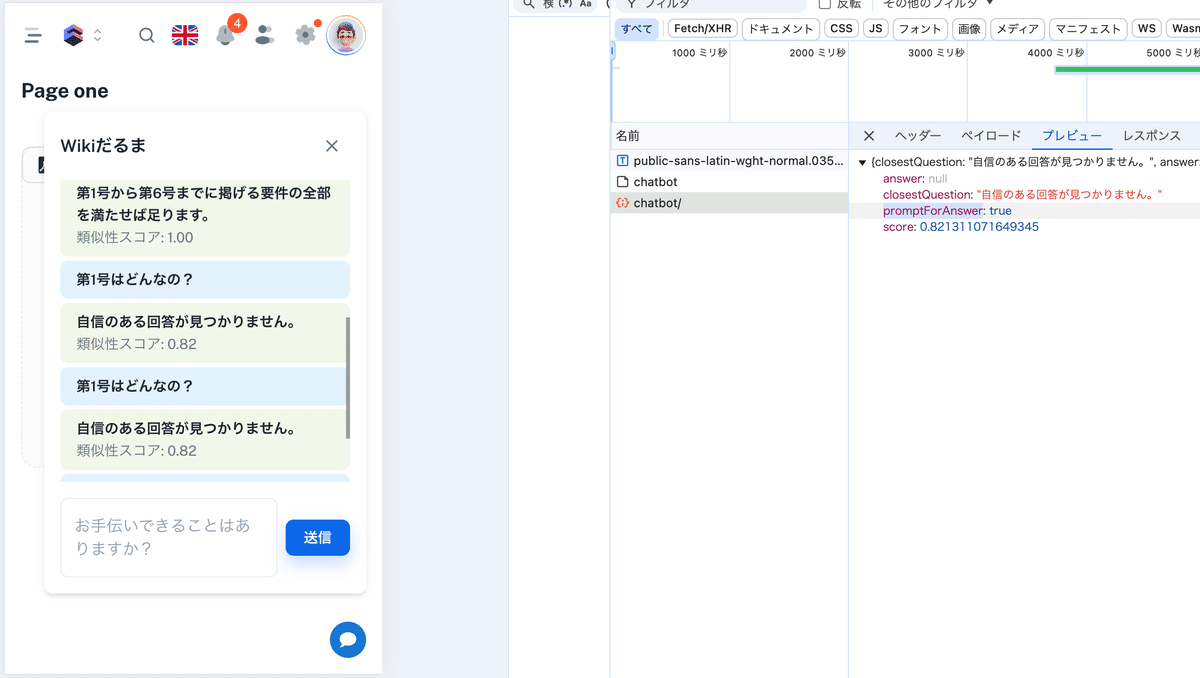
このレスポンスを受けて、フロントで正しい回答を教えることができるモードにします。
// app/components/page-one/chatbot.tsx

import { useState } from 'react';
import { Iconify } from 'src/components/iconify'; // Importing the Iconify component
import {
  Box,
  Button,
  IconButton,
  TextField,
  Typography,
  Paper,
  List,
  ListItem,
  ListItemText,
} from '@mui/material';

const ChatBot = () => {
  const [messages, setMessages] = useState<
    { content: string; type: 'sent' | 'received'; score?: number }[]
  >([]);
  const [isOpen, setIsOpen] = useState(false); // State to toggle the chatbot visibility
  const [inputValue, setInputValue] = useState(''); // State to manage input value
  const [isAnswerMode, setIsAnswerMode] = useState(false); // State to toggle "provide answer" mode
  const [correctAnswer, setCorrectAnswer] = useState(''); // State to store the user's correct answer

  const handleSendMessage = async (message: string) => {
    setMessages((prevMessages) => [...prevMessages, { content: message, type: 'sent' }]);

    try {
      const response = await fetch('/api/chatbot', {
        method: 'POST',
        headers: {
          'Content-Type': 'application/json',
        },
        body: JSON.stringify({ inputValue: message }),
      });

      const data = await response.json();

      if (data.error) {
        setMessages((prevMessages) => [
          ...prevMessages,
          {
            content: '申し訳ありませんが、処理中にエラーが発生しました。',
            type: 'received',
          },
        ]);
      } else {
        if (data.promptForAnswer) {
          // If promptForAnswer is true, switch to the "provide answer" mode
          setIsAnswerMode(true);
          setMessages((prevMessages) => [
            ...prevMessages,
            {
              content: '自信のある回答が見つかりませんでした。正しい答えを教えてください。',
              type: 'received',
            },
          ]);
        } else {
          setMessages((prevMessages) => [
            ...prevMessages,
            {
              content: data.answer || data.closestQuestion || '回答を取得できませんでした。',
              type: 'received',
              score: data.score,
            },
          ]);
        }
      }
    } catch (error) {
      console.error('Error in API request:', error);
      setMessages((prevMessages) => [
        ...prevMessages,
        {
          content: '申し訳ありませんが、エラーが発生しました。',
          type: 'received',
        },
      ]);
    }
  };

  const handleSubmitAnswer = async () => {
    if (correctAnswer.trim()) {
      // Create a combined question string
      const previousQuestion = messages
        .filter((msg) => msg.type === 'sent')
        .map((msg) => msg.content)
        .join(' ');

      const combinedQuestion = `前回の質問: ${previousQuestion} 今回の質問: ${correctAnswer}`;

      // Add a message indicating the correct answer submission
      setMessages((prevMessages) => [
        ...prevMessages,
        {
          content: `回答承認依頼をしました。質問:「${combinedQuestion}」回答:「${correctAnswer}」`,
          type: 'received',
        },
      ]);

      setIsAnswerMode(false); // Exit "provide answer" mode
      setCorrectAnswer(''); // Clear the answer field

      // Send the combined question to the server with approved=false
      const response = await fetch('/api/preserve', {
        method: 'POST',
        headers: {
          'Content-Type': 'application/json',
        },
        body: JSON.stringify({
          questions: [{ question: combinedQuestion, answer: correctAnswer }],
          userAnswers: [correctAnswer],
          pdf_name: 'Sample PDF',
          approved: false, // Set approved to false on the server
        }),
      });

      const result = await response.json();
      if (!response.ok) {
        setMessages((prevMessages) => [
          ...prevMessages,
          {
            content: `回答承認依頼の送信に失敗しました: ${result.error}`,
            type: 'received',
          },
        ]);
      }
    } else {
      setMessages((prevMessages) => [
        ...prevMessages,
        { content: '答えを入力してください。', type: 'received' },
      ]);
    }
  };

  return (
    <>
      {/* Floating Chat Button */}
      <IconButton
        onClick={() => setIsOpen(!isOpen)} // Toggle chatbot visibility on button click
        style={{
          position: 'fixed',
          bottom: 16,
          right: 16,
          backgroundColor: '#1976d2',
          color: 'white',
          zIndex: 1000,
        }}
      >
        <Iconify icon="mdi:chat" fontSize={24} />
      </IconButton>

      {/* ChatBot Modal */}
      {isOpen && (
        <Paper
          elevation={3}
          style={{
            position: 'fixed',
            bottom: 80,
            right: 16,
            width: 320,
            maxWidth: '100%',
            padding: 16,
            zIndex: 1000,
          }}
        >
          {/* Close Button */}
          <Box display="flex" justifyContent="space-between" alignItems="center">
            <Typography variant="h6">Wikiだるま</Typography>
            <IconButton onClick={() => setIsOpen(false)}>
              <Iconify icon="mdi:close" fontSize={24} />
            </IconButton>
          </Box>

          {/* Chat Messages */}
          <Box style={{ maxHeight: 300, overflowY: 'auto', marginTop: 16 }} component={List}>
            {messages.map((msg, index) => (
              <ListItem
                key={index}
                style={{
                  backgroundColor: msg.type === 'sent' ? '#e3f2fd' : '#f1f8e9',
                  margin: '4px 0',
                  borderRadius: 8,
                }}
              >
                <ListItemText
                  primary={msg.content}
                  secondary={
                    msg.score !== undefined ? `類似性スコア: ${msg.score.toFixed(2)}` : null
                  }
                />
              </ListItem>
            ))}
          </Box>

          {/* Input Field and Send Button */}
          <Box display="flex" alignItems="center" marginTop={2}>
            {isAnswerMode ? (
              <>
                <TextField
                  variant="outlined"
                  placeholder="正しい答えを教えてください"
                  value={correctAnswer}
                  onChange={(e) => setCorrectAnswer(e.target.value)}
                  fullWidth
                  sx={{
                    '& .MuiOutlinedInput-root': {
                      fontWeight: 'bold', // Make the text bold
                      '& fieldset': {
                        borderColor: '#1976d2', // Change the border color to blue
                      },
                      '&:hover fieldset': {
                        borderColor: '#1565c0', // Change the border color on hover
                      },
                      '&.Mui-focused fieldset': {
                        borderColor: '#0d47a1', // Change the border color when focused
                      },
                      '& input::placeholder': {
                        color: '#1976d2', // Change the placeholder color to blue
                      },
                    },
                  }}
                />
                <Button
                  variant="contained"
                  color="primary"
                  style={{ marginLeft: 8 }}
                  onClick={handleSubmitAnswer}
                >
                  送信
                </Button>
              </>
            ) : (
              <>
                <TextField
                  variant="outlined"
                  placeholder="お手伝いできることはありますか?"
                  value={inputValue}
                  onChange={(e) => setInputValue(e.target.value)}
                  fullWidth
                  multiline
                  rows={2}
                />
                <Button
                  variant="contained"
                  color="primary"
                  style={{ marginLeft: 8 }}
                  onClick={() => {
                    if (inputValue.trim()) {
                      handleSendMessage(inputValue);
                      setInputValue('');
                    }
                  }}
                >
                  送信
                </Button>
              </>
            )}
          </Box>
        </Paper>
      )}
    </>
  );
};

export default ChatBot;
モード変更に成功しました。
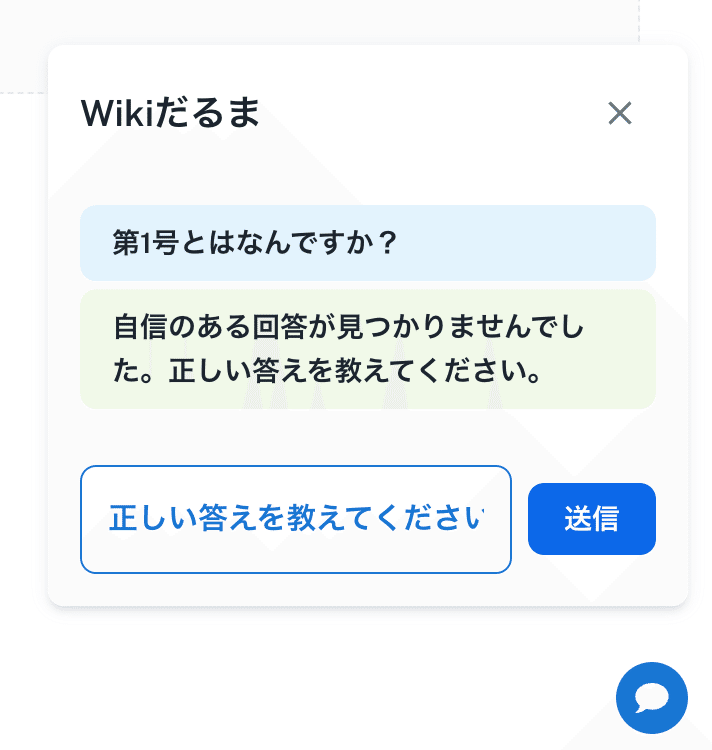
今回は金融機関がテーマでしたので、「教えないよん」と回答されたとしても、即時保存はせずに、このQ&Aの承認を管理者に仰ぐ形にします。
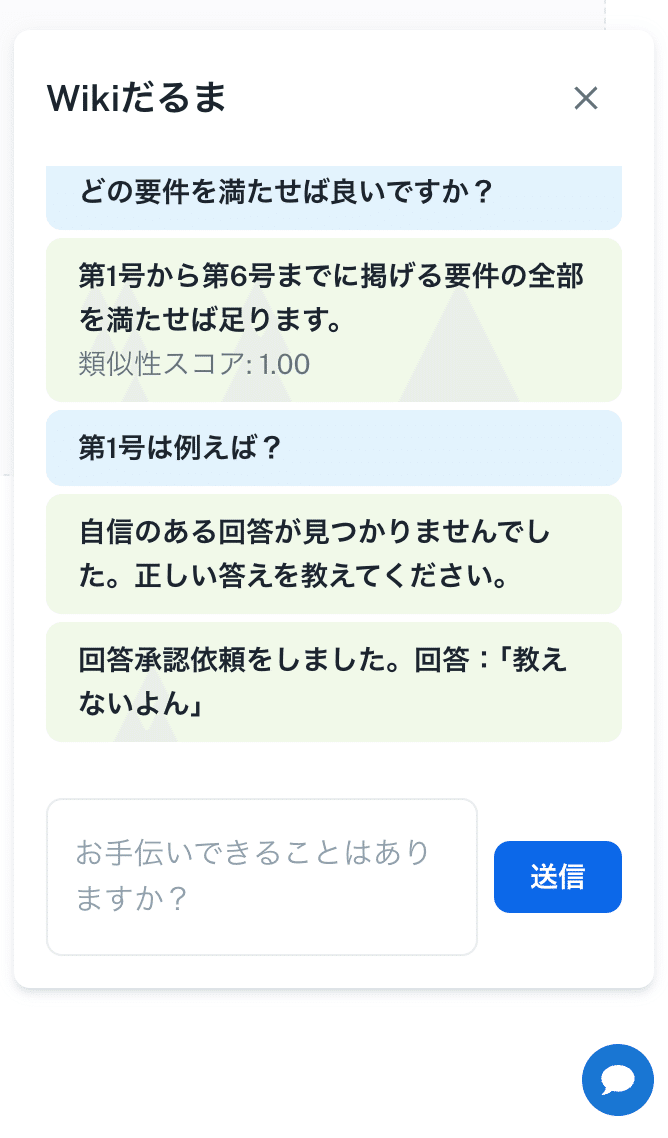
この回答を保存する為に、スキーマの変更・APIの追加・utilsの追加を行います。
// prisma/schema.prisma

generator client {
  provider = "prisma-client-js"
}

datasource db {
  provider = "postgresql"
  url      = env("DATABASE_URL")
}

model QuestionAnswer {
  id         Int      @id @default(autoincrement())
  question   String
  answer     String
  pdf_name   String
  pdf_url    String?
  created_by String
  updated_by String
  embedding  Bytes
  approved   Boolean  @default(false)
  createdAt  DateTime @default(now())
  updatedAt  DateTime @updatedAt
}

// src/app/api/preserve/route.ts

import { NextResponse } from "next/server";
import { PrismaClient } from "@prisma/client";
// 例: OpenAIやその他の埋め込み生成ライブラリ
import { generateEmbedding } from "@/utils/embedding"; // 埋め込み生成関数

const prisma = new PrismaClient();

export async function POST(req: Request) {
    try {
        const body = await req.json(); // リクエストボディを解析
        console.log("Received body:", body);

        const { questions, userAnswers, pdf_name, approved } = body; // pdf_name と questions, userAnswers, embedding を受け取る

        // 必須フィールドのチェック
        if (!questions || !Array.isArray(questions) || questions.length === 0) {
            throw new Error("Missing or invalid 'questions' field");
        }

        if (!pdf_name || pdf_name.trim() === "") {
            throw new Error("Missing 'pdf_name' in the request body");
        }

        // userAnswers の存在と対応チェック
        if (!userAnswers || !Array.isArray(userAnswers) || userAnswers.length !== questions.length) {
            throw new Error("The number of answers must match the number of questions");
        }

        // approvedが渡されていない場合は true を設定
        const isApproved = approved !== undefined ? approved : true;

        // 各質問と回答に対してデータベースに保存
        const savedAnswers = await Promise.all(
            questions.map(async (questionObj, index) => {
                const { question, answer } = questionObj;

                if (!question || !answer) {
                    throw new Error(`Missing required fields for question ${index + 1}`);
                }

                // 埋め込み生成
                const embedding = await generateEmbedding([{ question, answer }]); // 修正: 配列として渡す

                // 直接Uint8Arrayを作成
                const embeddingUint8Array = new Uint8Array(embedding);

                const newData = await prisma.questionAnswer.create({
                    data: {
                        question,
                        answer,
                        pdf_name: pdf_name, // 外部で取得した pdf_name を使用
                        pdf_url: null, // 必要に応じて設定
                        created_by: "system_admin",
                        updated_by: "system_admin",
                        approved: isApproved, // approvedが渡されていない場合はtrue
                        embedding: embeddingUint8Array, // embeddingがない場合は空のUint8Arrayとして保存
                    },
                });

                return newData;
            })
        );

        return NextResponse.json(savedAnswers, { status: 201 });
    } catch (error: any) {
        console.error("Error in POST /api/qa:", error.message);
        return NextResponse.json(
            { error: error.message || "Failed to create data" },
            { status: 500 }
        );
    }
}

// utils/embedding.ts

import { OpenAI } from "openai"; // OpenAIを使う場合

const openai = new OpenAI({
    apiKey: process.env.OPENAI_API_KEY,
});

export async function generateEmbedding(questionAnswerPairs: { question: string; answer: string }[]) {
    // 質問と回答を結合して埋め込みを生成
    const texts = questionAnswerPairs.map(pair => `${pair.question} ${pair.answer}`);

    try {
        // OpenAIの埋め込みAPIを使って埋め込みを生成(例)
        const response = await openai.embeddings.create({
            model: "text-embedding-ada-002", // 適切なモデルを指定
            input: texts,
        });

        // 埋め込みを返す
        return response.data.map((embedding: any) => embedding.embedding);
    } catch (error) {
        console.error("Error generating embedding:", error);
        throw new Error("Failed to generate embeddings");
    }
}
保存に成功しました。binaryでベクトルデータも格納されています。
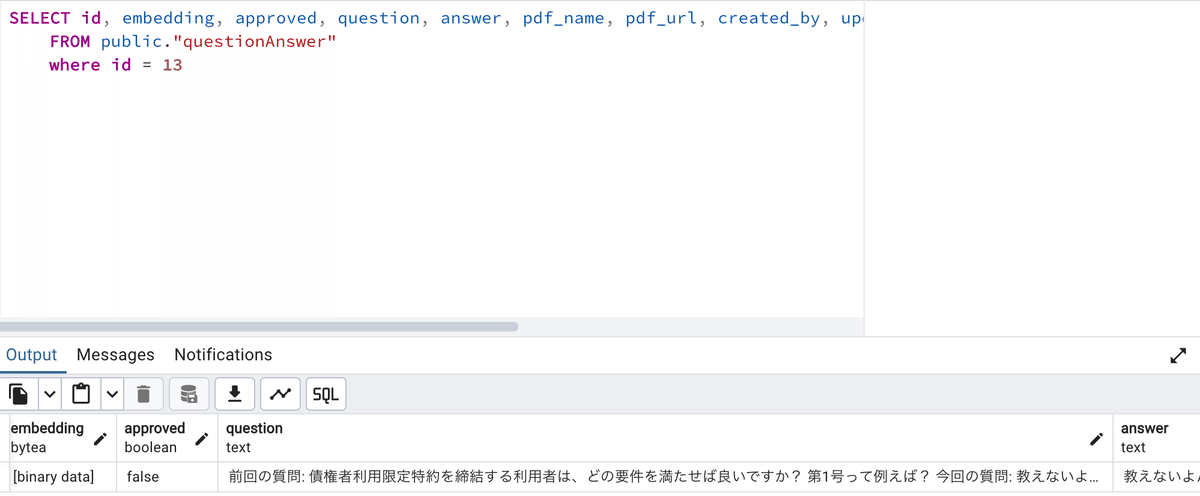
あとは、approved=falseなら、その回答はまだ使わないように除外しておきます。
  const questionAnswers = await prisma.questionAnswer.findMany({
            where: {
                approved: true, // approved が true のみ取得
            },
        });
まとめ
これでユーザーはRAGを活用した業務特化型AIチャットボットをノーコードで活用できるようになりました。あとは、承認フロー用の機能を作ったり、追加したembeddingを利用しながら、さらにステップアップさせていくフェーズになります。
それではまたいつか会う日まで。ごきげんよう🍀
