
JavaScript 変則的な書き方

注意: JavaScriptのMIMEタイプは、
text/javascript
または
application/javascript
認められる識別子
・最初の文字は以下
大文字・小文字アルファベット(A-Z、a-z)
アンダースコア(_)
ドル記号($)
注意: 1文字目を数字にできない
・2文字目以降なら数字も使用できる
アルファベット
数字
アンダースコア
ドル記号
を使用できる
・予約後は使用できない
変数に様々な型を代入できる
同じ変数に数値、文字列、真偽値を入れられる
let dynamicVar = 42;     // 数値として代入
console.log(typeof dynamicVar); // "number"

dynamicVar = "Hello";    // 文字列として再代入
console.log(typeof dynamicVar); // "string"

dynamicVar = true;       // ブール値として再代入
console.log(typeof dynamicVar); // "boolean"
JavaScriptの型はプリミティブ型とオブジェクト型がある
プリミティブ型
数値
文字列
真偽値
null
undefined
シンボル
オブジェクト型
配列
オブジェクト
var arr = [];
var obj = {};
オブジェクトの生成
// 1)
var cat = {name: "Tom"};

// 2)
var cat = {"name": "Tom"};

// 3)
var cat = {};
cat.name = "Tom";


// 下記の書き方は不正
vat cat.name = "Tom";
オブジェクトのプロパティアクセス
var cat = {name: "Tom"};


console.log(cat.name);
console.log(cat["name"]);
オブジェクトに値を代入
・nullを入れても要素数は変わらない
・配列の要素やオブジェクトのプロパティはdeleteで削除すれば、要素数は変わる
var cat = {name: "Tom", type: "black cat"};
cat.age = 1.4;
cat[222] = "猫の日";
cat.type = null

// { '222': '猫の日', name: 'Tom', type: null, age: 1.4 }
console.log(cat);


delete cat.type;
console.log(cat); // { '222': '猫の日', name: 'Tom', age: 1.4 }
プリミティブ型とオブジェクト型の値の格納
プリミティブ型は値渡し(「値」を直接、変数に渡す)
aに格納
bにaを格納
bだけ値を変える
aとbは別の値
var a = 10;
var b = a;

b = 20;

console.log(a); // 10
console.log(b); // 20
オブジェクト型の参照渡し(変数のアドレスを渡す)
aに格納
bにaを格納
bだけ値を変える(しかし、裏でaの値も変わる)
aとbは同じ値
var array1 = ["banana", "apple", "orange"];
var array2 = array1;

array1[2] = "peach";


for(let x in array2) {
    console.log(array2[x]);
}


for(let x of array2) {
    console.log(x);
}
var obj1 = { name: "John", age: 30 };
var obj2 = obj1;
obj1.age = 31;
console.log(obj2.age); // 31
グローバル変数を関数の引数に使った例
下記は関数の引数にグローバル変数を使っている
でも、 ++val を再代入していないから valは100のまま
プリミティブ型は値を渡す。関数の内部でパラメータ val の値を変更しても、valの値は変化しない
var val = 100;

function increment(val) {
    return ++val;
}

console.log(increment(val)); // 101
console.log(val); // 100
プリミティブ型とオブジェクト型の値比較の違い
1) オブジェクト型同士の比較は、falseとなる
オブジェクト型はアドレス値を見る
var num1 = new Number(100); // ラッパーオブジェクトを生成
var num2 = new Number(100); // ラッパーオブジェクトを生成

var str1 = new String("100"); // ラッパーオブジェクトを生成
var str2 = new String("100"); // ラッパーオブジェクトを生成


console.log(num1 == num2); // false
console.log(num1 == str1); // false
console.log(str1 == str2); // false
console.log(num1 == 100); // true
console.log(str1 == 100); // true
オブジェクト型は同じ値に見えてもメモリ内の参照(アドレス)を見るので、異なるものとして扱う(アドレス値が違うため)
var array1 = [1, 2, 3];
var array2 = [1, 2, 3];

console.log(array1 === array2); // false


var obj1 = { key: 'value' };
var obj2 = { key: 'value' };

console.log(obj1 === obj2); // false


var func1 = function() { return true; };
var func2 = function() { return true; };

console.log(func1 === func2); // false
2) オブジェクト型とプリミティブ型の場合は、
== なら true
=== なら false
=== は型も厳格に比較する
オブジェクト型とプリミティブ型は型が違うのでfalse
var num1 = new Number(100); // ラッパーオブジェクトを生成

var str1 = new String("100"); // ラッパーオブジェクトを生成

console.log(num1 == 100); // true
console.log(num1 == "100"); // true
console.log(str1 == "100"); // true
console.log(str1 == 100); // true


console.log(num1 === 100); // false
console.log(num1 === "100"); // false
console.log(str1 === "100"); // false
console.log(str1 === 100); // false
3) プリミティブ型は値を見るので、プリミティブ型同士の比較はtrueとなる
var num1 = 100;
var num2 = 100;

var str1 = "100";
var str2 = "100";


console.log(num1 == num2); // true
console.log(num1 == str1); // true
console.log(str1 == str2); // true
console.log(num1 == 100); // true
console.log(str1 == 100); // true
<!DOCTYPE html>
<html lang="ja">
<head>
<meta charset="UTF-8">
<title>JavaScript Type Characteristics</title>
</head>
<body>
<h1>JavaScriptの型特性デモ</h1>
<p>コンソールを開いて結果を確認してください。</p>
<script>
// プリミティブ型の値渡し
var a = 10;
var b = a;
b = 20;
console.log('a:', a); // 10
console.log('b:', b); // 20
// オブジェクト型の参照渡し
var array1 = ["banana", "apple", "orange"];
var array2 = array1;
array1[2] = "peach"; // 配列の要素を変更
for(let x in array2) {
console.log('in:', array2[x]);
}
for(let x of array2) {
console.log('of:', x);
}
var obj1 = { name: "John", age: 30 };
var obj2 = obj1;
obj1.age = 31;
console.log('obj2 age:', obj2.age); // 31
// オブジェクト型同士の比較
var num1 = new Number(100);
var num2 = new Number(100);
var str1 = new String("100");
var str2 = new String("100");
console.log(num1 == num2); // false
console.log(num1 == str1); // false
console.log(str1 == str2); // false
console.log(num1 == 100); // true
console.log(str1 == 100); // true
console.log(num1 === 100); // false
console.log(num1 === "100"); // false
console.log(str1 === "100"); // false
console.log(str1 === 100); // false
// プリミティブ型同士の比較
var num1 = 100;
var num2 = 100;
var str1 = "100";
var str2 = "100";
console.log(num1 == num2); // true
console.log(num1 == str1); // true
console.log(str1 == str2); // true
console.log(num1 == 100); // true
console.log(str1 == 100); // true
</script>
</body>
</html>
var, let, constの注意点
(それぞれのスコープ、再代入など)
var 注意点
関数内で宣言された変数は関数全体で使える
ブロック内で宣言しても、ブロック外から使える
・再宣言が可能
・再代入が可能
関数スコープ:
ブロック内でvarを宣言しても、その関数内であればどこからでもアクセスできる
if (true) {
  var x = 10;
}
console.log(x); // 10 - ブロック外からもアクセス可能
ただしこのようにスコープ外からはvar変数もアクセスできない
function func() {
    var local = "Local"; // この変数はfunc関数内でのみ有効
}

try {
    console.log(local); // この行はエラーを引き起こします
} catch (error) {
    console.log(error.message); // "local is not defined"というメッセージを出力
}

func(); // 関数を呼び出す
再宣言が可能:
varで宣言した変数は同じスコープ内で再宣言が可能
var y = 5;
var y = 10; // 問題なく再宣言される
console.log(y); // 10
巻き上げ(Hoisting):
varは「巻き上げ(Hoisting)」と呼ばれる動作をする
つまり、変数が宣言される前に使用してもエラーが発生しないが、undefinedが返る
console.log(z); // undefined - 宣言が巻き上げられるが、初期化は巻き上げられない
var z = 15;
let 注意点
宣言したブロック内でのみ有効
・再宣言は出来ない
・再代入は可能
再宣言不可:
同じスコープ内で同じ名前の変数をletで再宣言しようとするとエラーが発生する
let x = 10;
let x = 20; // SyntaxError: Identifier 'x' has already been declared
ブロックスコープ:
letはブロックスコープ({}で囲まれた範囲)を持つ
異なるブロック内では同じ名前で宣言可能
スコープ外からはアクセスできない
if (true) {
  let y = 10;
}
console.log(y); // ReferenceError: y is not defined
巻き上げ出来ない:
宣言する前に使用するとReferenceErrorが発生する
console.log(z); // ReferenceError: Cannot access 'z' before initialization
let z = 5;
const 注意点
・再宣言できない
・再代入できない
・宣言と同時に初期化が必要
つまり、 const 変数 = 値; と書かないとダメ
再代入不可:
constで宣言した変数に再代入しようとすると、TypeErrorが発生する
const x = 10;
x = 20; // TypeError: Assignment to constant variable.
宣言と同時に初期化が必要:
constは宣言と同時に値を代入しなければエラーになる
const y; // SyntaxError: Missing initializer in const declaration
y = 10;
オブジェクトや配列の変更は可能:
constで宣言したオブジェクトや配列は、再代入は不可。
しかし、その内容(プロパティや要素)は変更可能
const obj = { name: "Alice" };
obj.name = "Bob"; // プロパティは変更可能
console.log(obj); // { name: "Bob" }

const arr = [1, 2, 3];
arr.push(4); // 配列の要素も変更可能
console.log(arr); // [1, 2, 3, 4]
var, let, const
複数のスコープ内で同じ変数名で宣言した場合
・var は新しい値が入る
・let は再宣言は出来ないので値はそのまま
・const は再宣言も再代入もできないので値はそのまま
function testScopes() {
  var a = 1; // 関数スコープのローカル変数
  let b = 2; // ブロックスコープのローカル変数
  const c = 3; // ブロックスコープの定数

  if (true) {
    var a = 4; // 同じスコープ内で `var` は再宣言可能、値は変更される
    let b = 5; // 新しいブロック内の `let`。外の `b` とは別物
    const c = 6; // 新しいブロック内の `const`。外の `c` とは別物
    console.log(a, b, c); // 4, 5, 6
  }

  console.log(a, b, c); // 4, 2, 3 - `var` だけが関数スコープ内で影響を受ける
}

testScopes();
var は if文中のvar変数はif外でも使える
// if文中のvar変数はif外でも使える

var score = 95;

if(score >= 70) {
    var message = "Passed";
}

console.log(message);
スコープ内ならどこまでvar変数を使える
スコープ外ならエラーになる
var global = "Global";

function func() {
    var local = "Local";
    console.log(global); // Global
}

func();
console.log(local); // 同じスコープ内ではないのでエラー
関数内でvar変数を再宣言しても、関数スコープ内でのみ置き換わる
var global = "Global";

function func() {
    var global = "Local";
    console.log(global); // この関数スコープ内のみLocalになる
}

func();
console.log(global); // 同じスコープ内ではGlobalなので、Globalが表示される
var value = "Global";

function func1() {
    console.log(value); // Global
}

function func2() {
    var value = "Local"; // この関数スコープ内でのみvalueの値はLocalとなる
    func1();
}

func2(); // GLobal
関数内でvar変数を再代入したら、置き換わる
var global = "Global";

function func() {
    global = "Local";
    console.log(global); // Local
}

func();
console.log(global); // var変数を再代入したので、Local
同じvar変数名の場合、巻き上げに注意
以下は、undefined B A
関数 print() の中で var val = "B"; が巻き上げられ、関数の最初で var val; として宣言され、その後で val に "B" が代入される。
そのため、print() の最初の console.log(val); では undefined が出力される
その後、"B" が出力され、グローバルスコープの val が最後に出力される
var val = "A";

function func() {
    // これは上記のvalではなく、下記の var val = "B"を巻き上げて使う
    // var変数は巻き上げられるけどundefinedとなる
    console.log(val); // undefined

    var val = "B";
    return val;
}

console.log(func()); // B
console.log(val); // A
グローバル変数とローカル変数のスコープ
以下は、コンソールには [Global undefined] と表示される
グローバル変数 global は関数内外でアクセス可能
ローカル変数 local は func 関数内でのみアクセス可能
関数外で ローカル変数 local をログに出力しようとするため、エラーが発生する
var global = "Global";

function func() {
    var local = "Local";
    console.log(global);
}
func();
console.log(local);
スコープチェーンとクロージャー
Inner Global が表示される
var global = "Global"; // グローバルスコープで定義された変数

function outerScope() {
    var local = "Outer"; // outerScope関数のローカル変数

    function innerScope() {
        var local = "Inner"; // innerScope関数のローカル変数
        console.log(local); // 最も近いスコープにある 'local' 変数 "Inner" を表示
        console.log(global); // グローバルスコープにある 'global' 変数 "Global" を表示
    }

    innerScope(); // innerScope関数を実行
}

outerScope(); // outerScope関数を実行
反復処理
forEach
配列の要素に対して繰り返し処理を行いたい場合に使用
配列に特化している
for-in
オブジェクトリストに使用するのに適している 配列にも使えるが、
要素の順序が保証されないので推奨されてない
for-of
配列やString、Map、Setなどの反復可能オブジェクトの要素を反復処理に
適している
for-in → 配列のキー(インデックス)
取り出すインデックスの順序は保証されない
for-of → 値自体
順序は保証される
var numbers = [1, 2, 3];
var numbersCopy = numbers;

numbers[1] = 200;


// for-inループでインデックスを使って反復処理
for (let i in numbersCopy) {
    console.log(numbersCopy[i]); // 1, 200, 3
}


// for-ofループで値を直接反復処理
for (let num of numbersCopy) {
    console.log(num); // 1, 200, 3
}
forEach
配列の各要素に対して指定された関数を実行
戻り値はundefinedで、元の配列を変更しない
const numbers = [1, 2, 3, 4, 5];

numbers.forEach((num, index) => {
  console.log(`Index ${index}: ${num}`);
});

// 出力:
// Index 0: 1
// Index 1: 2
// Index 2: 3
// Index 3: 4
// Index 4: 5
for-in
配列の添え字、オブジェクトのキーを取得
オブジェクトのキーは順序のあるリストとして扱われていない
なので、for-inは順序通りの取得が保証されない
var fruits = ["apple", "banana", "cherry"];
for (var index in fruits) {
    console.log(index);  // "0", "1", "2"
}
for-in でプロパティの順序が保証されない例
const arr = [10, 20, 30];
arr.foo = "bar";  // 非数値プロパティを追加
arr[5] = 50;      // 空白要素を作成

for (const key in arr) {
    console.log(key);
}
// 出力例: "0", "1", "2", "5", "foo"
// 数値型プロパティの順序は保証されるように見えるが、"foo" が最後に混ざる。
const obj = {
    3: "three",
    1: "one",
    2: "two",
    a: "A",
    b: "B"
};

for (const key in obj) {
    console.log(key);
}
// 出力例: "1", "2", "3", "a", "b"
// 数値型プロパティは昇順だが、文字列型プロパティは挿入順序。
Object.prototype.z = "from prototype";

const obj = { a: 1, b: 2, c: 3 };

for (const key in obj) {
    console.log(key);
}
// 出力例: "a", "b", "c", "z"
// プロトタイプチェーンの "z" が最後に追加される。
const arr = [];
arr[3] = "D";
arr[1] = "B";
arr[5] = "E";

for (const key in arr) {
    console.log(key);
}
// 出力例: "1", "3", "5"
// 配列のインデックスは昇順になるが、空白インデックスがあってもすべて列挙される。
const obj = {};
obj.b = 1;
obj.a = 2;
obj[2] = "two";
obj[1] = "one";

for (const key in obj) {
    console.log(key);
}
// 出力例: "1", "2", "b", "a"
// 数値型プロパティ(インデックス)は昇順で、文字列型プロパティは挿入順序。
for-of
配列、文字列、マップ、セットの値を直接取得
注意: オブジェクトは反復可能でないので使えない
var fruits = ["apple", "banana", "cherry"];
for (var fruit of fruits) {
    console.log(fruit);  // "apple", "banana", "cherry"
}
オブジェクトでfor-ofを使うには以下を行う
Object.keys()、Object.values()、Object.entries()
var person = { name: "Alice", age: 25, city: "New York" };
for (var value of Object.values(person)) {
    console.log(value);  // "Alice", 25, "New York"
}
for-ofは取得される順番が保証される
const arr = [];
arr[3] = "D";
arr[1] = "B";
arr[5] = "E";


for (var key of arr) {
    console.log(key);
}


出力結果
undefined
B
undefined
D
undefined
E
やや複雑なwhileでの計算の例
var num = 0;

while (num < 100) {
    if(num > 55) {
        num += 6;
    }
    num += 11;
}

console.log(num); // 100
var num = 0;
while (num < 100) {
if(num >= 50) {
num += 10; // numが50以上の場合、10を加算
}
num += 5; // すべてのループで5を加算
console.log("Current num: " + num); // 現在のnumの値をログに記録
}
console.log("Final num: " + num); // 最終的なnumの値
continueは「処理を抜かせ」、breakは「処理を辞めろ」
for (let i = 0; i < 5; i++) {
  if (i === 2) {
    continue; // iが2のとき、以下の処理をスキップして次のループへ
  }
  console.log(i); // 0, 1, 3, 4
}


for (let i = 0; i < 5; i++) {
  if (i === 2) {
    break; // iが2のとき、ループ自体を終了
  }
  console.log(i); // 0, 1
}
<!DOCTYPE html>
<html lang="ja">
<head>
    <meta charset="UTF-8">
    <title>JavaScriptの反復処理の実演</title>
</head>
<body>
    <h1>JavaScriptの反復処理と制御フロー</h1>
    <p>コンソールを開いて結果を確認してください。</p>
    <script>
        // forEachの使用例
        console.log("forEachの使用例:");
        const numbers = [1, 2, 3, 4, 5];
        numbers.forEach((num, index) => {
            console.log(`Index ${index}: ${num}`);
        });

        // for-inの使用例
        console.log("for-inの使用例:");
        const fruits = ["apple", "banana", "cherry"];
        for (let index in fruits) {
            console.log(`${index}: ${fruits[index]}`);
        }

        // for-ofの使用例
        console.log("for-ofの使用例:");
        for (let fruit of fruits) {
            console.log(fruit);
        }

        // for-inでオブジェクトのプロパティを列挙
        console.log("for-inでオブジェクトのプロパティを列挙:");
        const person = { name: "Alice", age: 25, city: "New York" };
        for (let key in person) {
            console.log(`${key}: ${person[key]}`);
        }

        // for-ofを使ってObject.values()で値を反復処理
        console.log("Object.values()を使ったfor-of:");
        for (let value of Object.values(person)) {
            console.log(value);
        }

        // 複雑なwhileループの例
        console.log("複雑なwhileループの例:");
        var num = 0;
        while (num < 100) {
            if(num >= 50) {
                num += 10; // numが50以上の場合、10を加算
                console.log("Added 10, current num: " + num);
            } else {
                num += 5; // それ以外の場合、5を加算
                console.log("Added 5, current num: " + num);
            }
            if (num >= 95) break; // numが95以上になったらループ終了
        }
        console.log("Final num: " + num);

        // breakとcontinueの使用例
        console.log("breakとcontinueの使用例:");
        for (let i = 0; i < 5; i++) {
            if (i === 2) {
                continue; // iが2のとき、以下の処理をスキップして次のループへ
            }
            if (i === 4) {
                break; // iが4に達したらループ終了
            }
            console.log(i); // 0, 1, 3
        }
    </script>
</body>
</html>
JavaScriptの型 使用上の注意
数値
NaN同士で比較しても等しくなく、falseとなる
isNaNで比較しないといけない
console.log(NaN === NaN); // false
console.log(isNaN(NaN)); // true
文字列
+演算子で数値と文字列を連結しようとすると、型は文字列となる
console.log(5 + "5"); // "55"
真偽値
以下は全てfalseとなる
定義されていない値や0などはfalseとなる
空文字列 ("")
0
null
undefined
NaN
以下はtrueとなる
"0"
空配列 ([])
空オブジェクト({})
1以上の値
負の数
console.log(Boolean(""));
console.log(Boolean(0));
console.log(Boolean(null));
console.log(Boolean(undefined));
console.log(Boolean(NaN));


console.log(Boolean("0"));
console.log(Boolean([]));
console.log(Boolean({}));
console.log(Boolean(5));
console.log(Boolean(-1));
undefined と null
undefined :「値が割り当てられていない」状態
型は、undefined
null :「空または存在しない値」
型は、object
console.log(undefined == null); // true

console.log(undefined === null); // false
console.log(typeof undefined); // "undefined"
console.log(typeof null); // "object"
配列
配列はオブジェクト型であり、要素が連続していなくても動作する
空の配列にいきなり、配列[10] = 値、とやっても値は入る
配列の長さも変わる
let arr = [];

arr[10] = "value"; // インデックス 0-9 は空のまま

console.log(arr.length); // 11
配列[10]以外は空
console.log(arr); // [ <10 empty items>, 'value' ]
空の配列もobject型
console.log(typeof []); // "object"
オブジェクト
存在しないプロパティを使用しようとしたら、undefinedを返す
let obj = { key: "value" };
console.log(obj.nonExistentKey); // undefined
オブジェクトデータのコピーは = を使うと、参照が渡される
let original = { a: 1 };
let copy = original;
copy.a = 2;
console.log(original.a); // 2 - `original` も変更される
なので、オブジェクトのコピーはイコールではなく、
シャローコピーやディープコピーを使う
シャローコピー
let original = { a: 1, b: { c: 2 } };
let shallowCopy = Object.assign({}, original);
shallowCopy.b.c = 42;
console.log(original.b.c); // 42 - ネストされたオブジェクトは参照のまま
let shallowCopy = { ...original };
ディープコピー
let deepCopy = JSON.parse(JSON.stringify(original));
let _ = require('lodash');
let deepCopy = _.cloneDeep(original);
オブジェクトが持つプロパティがオブジェクト自身のものかどうかを確認するために、hasOwnProperty() を使用する
let obj = { key: "value" };
console.log(obj.hasOwnProperty("key")); // true
console.log(obj.hasOwnProperty("toString")); // false - プロトタイプのプロパティ
オブジェクトについて
・ObjectオブジェクトはJavaScriptのすべてのオブジェクトの基底クラス
・他のすべてのオブジェクトはObjectから派生しているので、
他のオブジェクトも、create(), keys() などのメソッドを使える
・Objectをnewして新しいオブジェクトを作成できる
・前述にあるような、
「変数 = {キー: 値}」は、オブジェクトリテラルと言う
これは新しいオブジェクトを直接作成していることを示す。
例1)オブジェクトリテラルを使う
let obj = {
  key1: "value1",
  key2: "value2"
};
例2)new Object() で新しいオブジェクトを作成する
let obj = new Object();
obj.key1 = "value1";
obj.key2 = "value2";
Objectから派生しているオブジェクトの例
1) Globalオブジェクト
・クリプト全体でアクセス可能な最上位のオブジェクト
・様々なビルトインの関数やコンストラクタ、値が含まれている
ブラウザではこれがwindowオブジェクトのこと。
↓ windowオブジェクトについては下記参照
2) windowオブジェクト
・ブラウザ環境におけるグローバルオブジェクト
ブラウザのウィンドウに関連する機能を提供する
・使い方の例
window.alert("Hello World"):
window.document:
ただし、「window.」 は省略できる
windowオブジェクトのメソッドやプロパティはグローバルスコープで直接参照可能なため
グローバルに定義された変数や関数(varで定義した変数や関数)は window オブジェクトのプロパティとしてアクセス可能
varで定義すればwindowオブジェクトに追加される、すなわちグローバルオブジェクトとなる
var globalVar = "test";
console.log(window.globalVar); // "test"
ブラウザのウィンドウやタブを表す
console.log(window.innerWidth); // ウィンドウの幅を取得
console.log(window.innerHeight); // ウィンドウの高さを取得
ウィンドウサイズなどの情報を扱う
window.addEventListener("resize", () => {
  console.log("Window resized");
});
postMessage()でドメイン間通信を行う
const iframe = document.getElementById("iframe");
iframe.contentWindow.postMessage("Hello from parent", "https://example.com");
非同期処理を行える
setTimeout, setInterval を使う
setTimeout(() => console.log("2秒後に実行"), 2000);
ページをリダイレクトする
window.location.href = "https://example.com";
3) Mathオブジェクト
・数学的な演算や定数を提供する静的オブジェクト
・使い方の例
Math.random():
Math.round(4.7):
4) Dateオブジェクト
・日付と時刻を表すオブジェクト
・使い方の例
let now = new Date():
now.getFullYear():
オブジェクトのメンバ演算子の利用方法
オブジェクトのプロパティ、メソッドの操作
プロパティやメソッドは追加、取得、削除、確認できる
const obj = {};

obj.name = "Alice"; // 追加

console.log(obj.name); // 取得

delete obj.name; // 削除

console.log("name" in obj); // 存在確認
オブジェクトのプロパティやメソッドにアクセスする方法
const obj = { name: "Alice" };
console.log(obj.name); // "Alice" - ドット演算子
console.log(obj["name"]); // "Alice" - ブラケット演算子
ドット演算子(.)
オブジェクト.プロパティ名/メソッド名
let obj = { name: "Alice" };
console.log(obj.name); // "Alice"
ブラケット演算子([])
オブジェクト.["プロパティ名/メソッド名"]
let obj = { "first-name": "Alice" };
console.log(obj["first-name"]); // "Alice"
文字列とString型、数値とNumber型
new StringはObject型
var val1 = "hello"; // String
var val2 = new String("hello"); // Object


console.log(typeof val1); // String
console.log(typeof val2); // Object

console.log(val1 instanceof Object);
console.log(val2 instanceof Object);
文字列型とString(オブジェクト)の比較
これは値を見るので、「==」はtrue
型は違うので「===」はfalse
console.log(val1 == val2); // true
console.log(val1 === val2); // false
new NumberはObject型
var val1 = 100 // number
var val2 = new Number(100); // object

console.log(typeof val1); // number
console.log(typeof val2); // object

console.log(val1 instanceof Object); // false
console.log(val2 instanceof Object); // true
数値とnumber型の比較
「==」はtrue
「===」はfalse
console.log(val1 == val2); // true
console.log(val1 === val2); // false
== による型変換の例
== は自動的に型変換して値を比較する
=== は型変換せずに比較する
以下は全てtrueとなる
・0や空文字はfalseに変換される
0 == false はtrue
"" == false はtrue
・nullとundefined は等しいとみなされる
null == undefined は true
・文字列"0"は数値0は型変換される
"0" == 0 は true
・空白は数値 0 に変換される
" " == 0
・true は 数値 1 に変換される
true == 1
console.log(0 == false); // true - 0 は false に変換されて比較される
console.log("" == false); // true - 空文字列は false に変換されて比較される
console.log(null == undefined); // true - null と undefined は等しいとみなされる
console.log("0" == 0); // true - "0" は数値 0 に変換されて比較される
console.log(" " == 0);
console.log(true == 1);
=== は型変換しないので上記を === に変えたら全てfalseとなる
console.log(0 === false);
console.log("" === false);
console.log(null === undefined);
console.log("0" === 0);
console.log(" " === 0);
console.log(true === 1);
// true - 0 は false に型変換される
console.log(0 == false);
// false - 厳密には型が異なるので等しくない
console.log(0 === false);
// true - 等しいとみなされる
console.log(null == undefined);
// false - 厳密には異なる
console.log(null === undefined); JavaScriptでは、ほぼすべてのオブジェクトが Object のプロトタイプから継承されるので、オブジェクトはObject.prototypeのメソッドを含む
なので、in演算子の結果もtrueとなる
var obj = {no: 1, name: "A"};

console.log("no" in obj); // noがobjにあるので、true
console.log("bark" in  obj); // barkはないのでfalse

// 下記はObject.prototypeの既定のメソッド
// 全てtrueとなる
console.log("toString" in obj);
console.log("valueOf" in obj);
console.log("hasOwnProperty" in obj);
console.log("isPrototypeOf" in obj);
console.log("propertyIsEnumerable" in obj);
Objectオブジェクトの使用例
Objectオブジェクトのメソッドを使用すると、オブジェクトのプロパティを取得したり、キーを確認したりできる
const obj = { name: "Alice", age: 25 };
console.log(Object.keys(obj)); // ["name", "age"]
console.log(Object.values(obj)); // ["Alice", 25]
console.log(Object.entries(obj)); // [["name", "Alice"], ["age", 25]]
演算子の優先順位
演算子には優先順位があるので、計算にも影響することになる
グループ化:()(括弧)
メンバアクセス:.、[]
関数呼び出し:()
インクリメント/デクリメント:++、--
論理NOT:!
乗算/除算/剰余:*、/、%
加算/減算:+、-
比較:<、<=、>、>=
等価:==、!=、===、!==
論理AND:&&
論理OR:||
条件(三項)演算子:? :
代入:=、+=、-= など
演算子の優先順位によって計算がどう変わるか?
メモ: () が一番優先される。かっこをつければ計算順序を明確にできる
例 1: 三項演算子、論理演算子、加算の組み合わせ
a < b と b < c は両方true
b + c / a は、b + 15 / 5
13となる
let a = 5;
let b = 10;
let c = 15;
let result = a < b && b < c ? b + c / a : a * b;
例 2: 複雑な三項演算子とビット演算子の組み合わせ
5 > 10 はfalse
x | y ^ z は まず 10^20を計算。ビット演算で30
5 | 30 は 31になる
let x = 5;
let y = 10;
let z = 20;
let result = x > y ? x & z : x | y ^ z;
console.log(result); // 31
strictモード
"use strict";Strictモードの基本ルール
同じ引数名を関数内で使用できない:
同一の関数内で同じ名前の引数を定義することが禁止
function example(x, x) {  // Strictモードではエラー
  return x + x;
}
宣言していない変数を使用できない:
変数をvar、let、constなどで宣言しないと使えない
function example() {
  y = 3;  // Strictモードではエラー
}
オブジェクトに同じ名前のプロパティ、メソッドを定義できない:
オブジェクトリテラル内での重複したプロパティ名は禁止
var obj = {
  p: 1,
  p: 2  // Strictモードではエラー
};
delete演算子で変数や関数を削除できない:
変数、関数、または関数の引数をdelete演算子で削除できない
var x = 1;
delete x;  // Strictモードではエラー
with文を使用できない:
with文はStrictモードでは使用できない
with (obj) {  // Strictモードではエラー
  console.log(p);
}
予約語の使用禁止
将来のキーワードとして予約されている単語を変数名や関数名に使用できない
"use strict";
var public = 1; // SyntaxError: Unexpected strict mode reserved word
thisの扱い
グローバルスコープでのthisはundefinedになる
"use strict";
console.log(this); // undefined
グローバルスコープとローカルスコープの引数名の重複について
Strictモードでは、グローバルスコープと関数内ローカルスコープでの変数名が重複してもいい。
グローバル変数とローカル変数は異なるスコープに存在するため、エラーにならないため。
var x = 1;  // グローバル変数
function example() {
  var x = 2;  // ローカル変数、問題なし
  console.log(x);  // 2
}
example();
console.log(x);  // 1
strictモードを使用したページの例
<!DOCTYPE html>
<html lang="en">
<head>
  <meta charset="UTF-8">
  <meta name="viewport" content="width=device-width, initial-scale=1.0">
  <title>Strict Mode Example</title>
</head>
<body>
  <h1>Strict Mode Example</h1>
  <p>Check the console for errors generated by strict mode violations.</p>
  <script>
    "use strict"; // Strictモードを有効化

    console.log("Strict Mode Enabled!");

    // === 同じ引数名を関数内で使用する(エラー) ===
    try {
      function example(x, x) {
        return x + x; // エラー:同じ引数名
      }
      example(1, 2);
    } catch (e) {
      console.error("Error: Same argument names in a function are not allowed in strict mode.");
      console.error(e);
    }

    // === 宣言していない変数を使用する(エラー) ===
    try {
      function useUndeclaredVariable() {
        y = 3; // エラー:変数を宣言していない
      }
      useUndeclaredVariable();
    } catch (e) {
      console.error("Error: Undeclared variables are not allowed in strict mode.");
      console.error(e);
    }

    // === オブジェクトで同じ名前のプロパティを定義する(エラー) ===
    try {
      var obj = {
        p: 1,
        p: 2 // エラー:重複したプロパティ名
      };
    } catch (e) {
      console.error("Error: Duplicate property names are not allowed in strict mode.");
      console.error(e);
    }

    // === delete 演算子で変数を削除する(エラー) ===
    try {
      var x = 1;
      delete x; // エラー:delete演算子で変数削除は不可
    } catch (e) {
      console.error("Error: Deleting variables is not allowed in strict mode.");
      console.error(e);
    }

    // === with文を使用する(エラー) ===
    try {
      var obj2 = { p: 1 };
      with (obj2) { // エラー:with文は使用不可
        console.log(p);
      }
    } catch (e) {
      console.error("Error: with statements are not allowed in strict mode.");
      console.error(e);
    }

    // === グローバルスコープとローカルスコープの変数名の重複(問題なし) ===
    try {
      var globalVar = 1; // グローバル変数
      function localScopeExample() {
        var globalVar = 2; // ローカル変数
        console.log("Local variable:", globalVar); // 2
      }
      localScopeExample();
      console.log("Global variable:", globalVar); // 1
    } catch (e) {
      console.error("Error: Unexpected behavior in variable scoping.");
      console.error(e);
    }
  </script>
</body>
</html>
NaN(Not a Number) 注意点
数学的に未定義または不正な操作の結果として現れる。typeof は "number" を返す。
自身との比較が常に false。
NaN は「数ではない」という特殊な数値
数学的に不正確または未定義の演算の結果として返さるNaNはNumber型
NaN 同士の比較は常にfalse
(NaN が一意の値であるため)
NaN 同士の比較は常にfalse
console.log(NaN == NaN); // false
console.log(NaN === NaN); // false


var num1 = NaN;
console.log(num1 == num1); // false
NaNを返す計算の例
0 ÷ 0
無限大 ÷ 無限大
無限大 - 無限大
NaN + 数値
0を0で除算する
「0 ÷ 0」 の値は未定義のため
console.log(0 / 0);InfinityをInfinityで除算する
数学的には「無限大 ÷ 無限大」の値は未定義のため
Infinityは特定の数値でない
無限大同士の計算は特定の結果を定められない
console.log(Infinity / Infinity);InfinityからInfinityを減算する
数学的には「無限大 - 無限大」の値も未定義のため
Infinityは特定の数値でない
無限大同士の計算は特定の結果を定められない
console.log(Infinity - Infinity); NaNと数値を足そうとすると、NaN 数値と表示される
let x = NaN;
let y = "5";
console.log(x + y); // NaN5
Infinity 注意点
全ての有限な値より大きい特殊な数値。
演算においては、その大きさの性質に基づいて結果が決まる。
Infinityは全ての値より大きい値を表す
Infinityはnumber型
Inifity同士の計算はInfinityになる
(引き算/割り算以外)
console.log(1 / 0); // Infinity
console.log(Infinity + 1); // Infinity

console.log(Infinity / Infinity); // NaN
console.log(Infinity - Infinity); // NaN
正の数 / 0 → Infinity
数学上では未定義となるが、コンピュータ上では、
正の無限大を返すことで未定義であると言う状態を表す
よって答えはInfinity
console.log(1 / 0); // Infinity負の数 / 0 → -Infinity
負のInfinityとなる
console.log(-1 / 0); // -InfinityInfinity + 正の数 → Infinity
無限大に数を加えるとさらに大きな数となるため
console.log(Infinity + 1); // InfinityInfinity + Infinity → Infinity
無限大に数を加えるとさらに大きな数となるため
console.log(Infinity + Infinity); // InfinityInfinity - 数値 → Infinity
console.log(Infinity - 1); // InfinityInfinity * 数値 → Infinity
無限大に数を掛けるとさらに大きな数となるため
console.log(Infinity * 3); // InfinityInfinity * 負の数 → Infinity
console.log(Infinity * -3); // -InfinityInfinity * Infinity→ Infinity
無限大に数を掛けるとさらに大きな数となるため
console.log(Infinity * Infinity); // InfinityInfinity / 数値 → Infinity
console.log(Infinity / 1); // InfinityInfinity - Infinity
Infinity ÷ Infinity
はNaNとなる
無限大から無限大を引くと、理論的にはどのような数値にもなり得るため(無限大 - 無限大は未定義)答えはNaNとなる
無限大を無限大で割る場合も度の値になるか未定義のためNaNを返す
NaNとInfinityまとめ
// === NaN(Not-a-Number)の注意点 ===

// NaN は "数ではない" という特殊な数値
console.log(typeof NaN); // "number" (NaNはNumber型)

// NaN 同士の比較
console.log(NaN == NaN); // false
console.log(NaN === NaN); // false

// === NaN を返す計算の例 ===

// 0 を 0 で除算する(ゼロ割り算は未定義)
console.log(0 / 0); // NaN

// Infinity を Infinity で除算する(未定義)
console.log(Infinity / Infinity); // NaN

// Infinity から Infinity を減算する(未定義)
console.log(Infinity - Infinity); // NaN

// NaN と数値を足すと結果は NaN
let x = NaN;
let y = 5;
console.log(x + y); // NaN

// === Infinity の注意点 ===

// Infinity は全ての有限の数より大きい数値
console.log(typeof Infinity); // "number" (InfinityもNumber型)

// 無限大 + 正の数 → 無限大
console.log(Infinity + 1); // Infinity

// 無限大 + 無限大 → 無限大
console.log(Infinity + Infinity); // Infinity

// 無限大 - 数値 → 無限大
console.log(Infinity - 1); // Infinity

// 無限大 * 数値 → 無限大
console.log(Infinity * 3); // Infinity

// 無限大 * 負の数 → 負の無限大
console.log(Infinity * -3); // -Infinity

// 無限大 * 無限大 → 無限大
console.log(Infinity * Infinity); // Infinity

// 正の数 / 0 → 無限大
console.log(1 / 0); // Infinity

// 負の数 / 0 → 負の無限大
console.log(-1 / 0); // -Infinity

// 無限大 / 数値 → 無限大
console.log(Infinity / 1); // Infinity

// === NaN と Infinity の組み合わせ ===

// Infinity 同士の除算または引き算は NaN
console.log(Infinity / Infinity); // NaN
console.log(Infinity - Infinity); // NaN
undefined 注意点
値を代入してない変数を使用する
定義されていないプロパティにアクセスした
関数に戻り値が指定されてない
メモ: undefinedを使用してもガーベージコレクションの対象にならない
値を代入していない変数を使用するとundefined
var msg; // 変数宣言

console.log(msg); // undefined
定義されていないプロパティにアクセスするとundefined
var obj = {name: 'cat'};

console.log(obj.name); // cat

console.log(obj.bark); // undefined
関数に戻り値が指定されていないとundefined
例) 以下は戻り値を指定していないので、Hello undefinedと表示される
JavaScriptは関数の戻り値を指定しないと、デフォルトでundefinedを返す。-→ 関数の実行結果をconsole.logで出力すると、関数内のconsole.logの出力とは別に、関数自体の戻り値(この場合はundefined)が出力される。
・hello() 関数が呼ばれ、"Hello"という文字列がコンソールに出力される
・hello() 関数自体の戻り値は指定されていないため、undefinedを返す
・外側のconsole.logは、hello()から返されたundefinedを受け取り、それをコンソールに出力。
結果として、"Hello"の後に"undefined"が続けて出力される
function hello() {
    console.log("Hello");
}

console.log(hello()); // Hello undefined
単に関数を呼ぶだけならエラーにならず表示される
関数を単に呼び出すだけの場合は、その関数がコンソールに出力する内容(あれば)が表示されるだけで、返り値はどこにも使用されない
→以下のように関数を呼び出すとエラーにはならず、指定された出力のみがコンソールに表示される
function hello() {
    console.log("Hello");
}

hello(); // コンソールには "Hello" だけが表示される
undefinedになるアンチコードパターン
値を代入していない変数を使用する:
宣言だけして値を代入していない変数の値はデフォルトで undefined。
定義されていないプロパティにアクセスする:
オブジェクトに存在しないプロパティを参照しようとすると undefined が返される。
関数に戻り値が指定されていない:
JavaScript では、関数が明示的に値を返さない場合、デフォルトで undefined を返す。
引数が渡されなかった場合:
関数の引数が渡されなかった場合、その引数はデフォルトで undefined になる。
配列の範囲外にアクセス:
存在しないインデックスを参照すると undefined。
// === 値を代入していない変数を使用する ===
let uninitializedVar; // 初期化していない変数
console.log(uninitializedVar); // undefined
// 値を代入していない変数にアクセスすると `undefined`

// === 定義されていないプロパティにアクセスする ===
const obj = { key: "value" };
console.log(obj.nonExistentKey); // undefined
// 存在しないプロパティにアクセスすると `undefined`

// === 関数に戻り値が指定されていない ===
function noReturnValue() {
    const a = 10; // 何か処理をしているが戻り値を指定していない
}
const result = noReturnValue();
console.log(result); // undefined
// 戻り値がない関数を呼び出すと `undefined` が返される

// === その他のアンチパターン ===

// 関数の引数が渡されなかった場合
function greet(name) {
    console.log("Hello, " + name); // name が undefined の場合
}
greet(); // "Hello, undefined"

// 配列の範囲外にアクセス
const arr = [1, 2, 3];
console.log(arr[5]); // undefined
// 存在しない配列の要素にアクセスすると `undefined`

// 明示的に `undefined` を代入してしまう(推奨されない)
let explicitlyUndefined = undefined;
console.log(explicitlyUndefined); // undefined
// これはコードの意図を不明瞭にするので避けるべき
undefinedにならないために以下を行う
// 初期化する:
let initializedVar = null; // 意図的に未設定状態を表現


// 存在確認:
console.log(obj.nonExistentKey || "default value");


// 戻り値を明示:
function withReturnValue() {
    return "some value";
}


// 引数にデフォルト値を設定:
function greet(name = "Guest") {
    console.log("Hello, " + name);
}
greet(); // "Hello, Guest"
数値と文字列で「+」、「-」を使う
数値-文字列は計算する
文字列-数値の計算は、自動的に文字列を数値に変換し計算している
let num = "123";         // 文字列
let convertedNum = num * 1; // 自動的に数値に変換される(乗算による暗黙の型変換)
console.log(typeof convertedNum); // "number"
console.log(convertedNum);        // 123
let str = "10";
let sum = str - 3; // 自動的に文字列 "10" が数値に変換され、計算される。
console.log(sum); // 7数値+文字列は連結する
下記は、数値と文字列を結合している
自動的に型変換しているので、「数値 + 文字列」の型はStringとなる
let result = 5 + "5"; // 数値と文字列の連結。自動的に文字列結合が行われる。
console.log(result);  // "55"
console.log(typeof result); // "string"
nullと数値の演算の場合、nullは0に変換して計算
let calc = null + 5; // nullは数値として0に変換される。
console.log(calc);   // 5
console.log(typeof calc); // "number"
文字列*数値は、NaN(Not a Number)
let strange = "abc" * 2; // 文字列に数値を掛けるとNaN(Not a Number)になる。
console.log(strange);    // NaN
console.log(typeof strange); // "number"
ページの例(変数に様々な型を代入する例~=== による厳密な比較)
変数に様々な型を代入する例
数値と文字列で「+」、「-」を使う例
null と数値の演算
文字列と数値の掛け算が NaN になる例
== による型変換の例
=== による厳密な比較
<!DOCTYPE html>
<html lang="en">
<head>
  <meta charset="UTF-8">
  <meta name="viewport" content="width=device-width, initial-scale=1.0">
  <title>JavaScript 特性例</title>
</head>
<body>
  <h1>JavaScript の特性例</h1>
  <p>ブラウザのコンソールを開いて(F12キーを押して)、出力を確認してください。</p>
  <script>
    console.log("=== 1. 変数に様々な型を代入する例 ===");

    let dynamicVar = 42; // 数値
    console.log(dynamicVar); // 42
    console.log(typeof dynamicVar); // "number"

    dynamicVar = "Hello"; // 文字列
    console.log(dynamicVar); // "Hello"
    console.log(typeof dynamicVar); // "string"

    dynamicVar = true; // 真偽値
    console.log(dynamicVar); // true
    console.log(typeof dynamicVar); // "boolean"

    console.log("=== 2. 数値と文字列で「+」、「-」を使う例 ===");

    let num = "123"; // 文字列
    let convertedNum = num * 1; // 自動で数値に変換
    console.log(convertedNum); // 123
    console.log(typeof convertedNum); // "number"

    let str = "10";
    let sum = str - 3; // 数値計算
    console.log(sum); // 7

    let result = 5 + "5"; // 数値と文字列の連結
    console.log(result); // "55"
    console.log(typeof result); // "string"

    console.log("=== 3. null と数値の演算 ===");

    let calc = null + 5; // null は 0 に変換
    console.log(calc); // 5
    console.log(typeof calc); // "number"

    console.log("=== 4. 文字列 * 数値は NaN ===");

    let strange = "abc" * 2; // NaN
    console.log(strange); // NaN
    console.log(typeof strange); // "number"

    console.log("=== 5. == による型変換の例 ===");

    console.log(0 == false); // true
    console.log("" == false); // true
    console.log(null == undefined); // true
    console.log("0" == 0); // true
    console.log(" " == 0); // true
    console.log(true == 1); // true

    console.log("=== 6. === による厳密な比較 ===");

    console.log(0 === false); // false
    console.log("" === false); // false
    console.log(null === undefined); // false
    console.log("0" === 0); // false
    console.log(" " === 0); // false
    console.log(true === 1); // false
  </script>
</body>
</html>
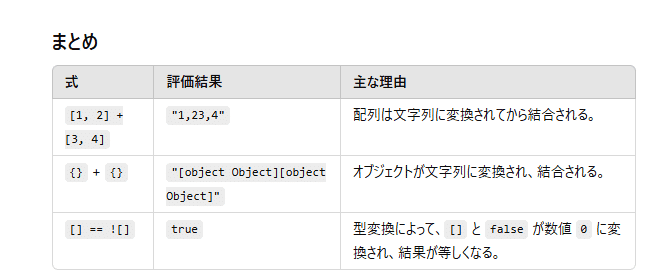
配列と文字列を結合すると、配列の要素はカンマ区切りの文字列となる
let arr = [1, 2, 3];
console.log(arr + ""); // "1,2,3" - 配列が文字列として結合される


// String
console.log(typeof (arr + ""));
// 空の配列同士を加算すると空文字列になる
console.log([] + []); // ""
// 空の配列と空のオブジェクトを加算するとオブジェクトの文字列表現になる
console.log([] + {}); // "[object Object]"
// 空のオブジェクトの前に加算演算子があると、数値として扱われる
console.log({} + []); // 0 Null はobject型、NaN は number型
Null はobject
NaN は number(NaN は "Not a Number" であるが型は数値)
console.log(typeof null); // "object" - JavaScriptの初期からあるバグ
console.log(typeof NaN); // "number" - NaN は "Not a Number" であるが型は数値
文字列と数値の不等式
と文字列同士の不等式は、数値に変換される
文字列と数値の不等式
文字列同士の不等式
-> 数値に変換される
配列[1] -> 数値1 に変換される
null -> 0 に変換される
console.log("5" < 10); // true - "5" は数値 5 に変換されて比較される
console.log("12" > "5"); // false - 文字列として比較され、"1" < "5" のように判定される
console.log([1] > null); // true - 配列 [1] は数値 1 に変換され、null は数値 0 に変換される
数値と文字列の演算、結合の例
+演算子は計算以外に文字列の結合もするためこうなる
基本的には左から実行されるので、
・文字列が左なら、それを結合後に計算
1 + "2" + 3
"1" + "2" + 3
・文字列が右なら、左の計算後先に結合
1 + 2 + "3"
最終的には計算はせず結合する(文字列なので)
// "123" - 左から順に評価され、1 + "2" は "12" となり、"12" + 3 で "123"
console.log(1 + "2" + 3);


// "33" - 1 + 2 は 3 で、その後 3 + "3" で "33"
console.log(1 + 2 + "3");


// 9 - 文字列 "10" は数値 10 に変換されて引き算される
console.log("10" - 1);


// "101" - 文字列 "10" に数値 1 が連結される
console.log("10" + 1);
+以外の演算子(-, *, / など)は数値演算を行うため、文字列があれば数値に変換される
下記のように + 演算子は文字列として結合、 -, * / は計算を行う
+演算子

console.log(1 + "2" + 3); // 123
console.log("1" + "2" + 3); // 123
console.log(1 + 2 + "3");  // 33


- 演算子

console.log("10" - 1); // 9
console.log(10 - "5"); // 5
console.log("10" - "5"); // 5


* 演算子

console.log("2" * 5);
console.log(2 * "5");
console.log("2" * "5");


/ 演算子

console.log("10" / 2); // 5
console.log(10 / "2"); // 5
console.log("10" / "2"); // 5
ページの例(配列と文字列の結合、数値と文字列の演算、結合)
配列と文字列の結合
null と NaN の型
文字列と数値の不等式
数値と文字列の演算、結合
<!DOCTYPE html>
<html lang="en">
<head>
  <meta charset="UTF-8">
  <meta name="viewport" content="width=device-width, initial-scale=1.0">
  <title>JavaScript 特性例</title>
</head>
<body>
  <h1>JavaScript の特性例</h1>
  <p>ブラウザのコンソールを開いて(F12キーを押して)、出力を確認してください。</p>
  <script>
    console.log("=== 配列と文字列の結合 ===");

    let arr = [1, 2, 3];
    console.log(arr + ""); // "1,2,3"
    console.log(typeof (arr + "")); // "string"

    console.log([] + []); // ""
    console.log([] + {}); // "[object Object]"
    console.log({} + []); // 0

    console.log("=== Null と NaN の型 ===");

    console.log(typeof null); // "object"
    console.log(typeof NaN); // "number"

    console.log("=== 文字列と数値の不等式、文字列同士の不等式 ===");

    console.log("5" < 10); // true
    console.log("12" > "5"); // false
    console.log([1] > null); // true

    console.log("=== 数値と文字列の演算と結合 ===");

    console.log(1 + "2" + 3); // "123"
    console.log(1 + 2 + "3"); // "33"
    console.log("10" - 1); // 9
    console.log("10" + 1); // "101"

    console.log("=== + 以外の演算子 ===");

    console.log(1 + "2" + 3); // "123"
    console.log("1" + "2" + 3); // "123"
    console.log(1 + 2 + "3"); // "33"

    console.log("- 演算子");
    console.log("10" - 1); // 9
    console.log(10 - "5"); // 5
    console.log("10" - "5"); // 5

    console.log("* 演算子");
    console.log("2" * 5); // 10
    console.log(2 * "5"); // 10
    console.log("2" * "5"); // 10

    console.log("/ 演算子");
    console.log("10" / 2); // 5
    console.log(10 / "2"); // 5
    console.log("10" / "2"); // 5
  </script>
</body>
</html>
Booleanに様々な値を入れた例
trueになる例
空白文字列、空配列、空オブジェクト
// true - 空白が含まれている文字列は true
console.log(Boolean(" "));

// true - 空の配列は true
console.log(Boolean([]));

// true - 空のオブジェクトも true
console.log(Boolean({}));
falseになる例
0、空文字列、undefined、null、NaN
// false - 0 は false
console.log(Boolean(0));

// false - 空文字列は false
console.log(Boolean(""));

// false - undefined は false
console.log(Boolean(undefined));

// false - null も false
console.log(Boolean(null));

// false - NaN は false
console.log(Boolean(NaN));
数値 + true数値、
数値 + false/null、
数値 + undefined
の計算
・数値 + true
-> trueは数値1に変換される
・数値 + false/null
-> false/null は数値0に変換される
・数値 + undefined
答えは、NaN
// true は数値 1 に変換される
console.log(4 + true); // 5

// falseやnull は数値 0 に変換される
console.log(4 + false); // 4
console.log(4 + null); // 4

// undefined は数値変換できないため NaN になる
console.log(4 + undefined); // NaN

// "5" は数値に変換されて掛け算が行われる
console.log(4 * "5"); // 20
配列同士を+で連結した場合
配列 [1, 2] は文字列 "1,2" に変換され、
配列 [3, 4] は文字列 "3,4" に変換されるため
console.log([1, 2] + [3, 4]); // "1,23,4"
空のオブジェクト同士を連結した場合
オブジェクトに + 演算子を使うと、JavaScript は暗黙の型変換を行い、オブジェクトを文字列に変換する
オブジェクト {} はデフォルトで "[object Object]" に変換される
その後、+ 演算子が文字列同士を結合するので "[object Object][object Object]" となる
console.log({} + {}); // "[object Object][object Object]"
[] == ![]
空配列はtrueとして扱う
![]はfalseとなる
==は自動的に型を変換し比較する
falseが比較されるとき、falseは数値0に変換される
空配列はNumber([])となるので、0になる
0 == 0 はtrue、よって結果はtrue
console.log([] == ![]); // true
NaNの特殊な例
NaNはNot a Numberの意味だけで型は数値型
console.log(NaN == NaN); // false - NaN は自分自身と等しくない
console.log(isNaN(NaN)); // true - isNaN で確認できる
console.log(typeof NaN); // "number" - 数値型として認識される
nullとundefinedの違い
console.log(null == undefined); // true - 等しいとみなされる
console.log(null === undefined); // false - 厳密には異なる型

console.log(typeof null); // "object" - バグで「オブジェクト」と認識される
console.log(typeof undefined); // "undefined" - そのまま「undefined」と認識される
予測不能な比較
文字列同士の不等式は直感通りでない場合がある
// true - 文字列比較では最初の文字を見て "2" > "1" で true
console.log("2" > "12");

// false - 同じ理由で false
console.log("2" < "12");

// 8 - 自動的に数値に変換される
console.log("10" - "2");

// "102" - 文字列の連結
console.log("10" + "2");
数値に変換される奇妙な例
// 10 - 数字部分のみを変換する
console.log(parseInt("10px"));

// 16 - 0x は16進数として解釈される
console.log(parseInt("0x10"));

// 12.34 - 最初の数値だけが変換される
console.log(parseFloat("12.34.56"));

// 42 - 空白は無視される
console.log(parseInt("   42   "));
++数値、数値++の加算のシステム
数値++
処理 -> 数値を足す
処理後に数値を足す
let a = 0;

console.log(a++); // この時点ではまだ代入されてない
console.log(a++); // 上記の処理後に足される
++数値
数値を足す -> 処理
数値を足してから処理
let a = 0;

console.log(++a); // この時点で足される
try - catch - finally の書き方
catch, finally は1つしか書けない
複数書けない
try {
    // 処理
} catch (err) {
    console.log(err);
} finally {
    console.log("最後に必ずここの処理を実行");
}
1つのcatchで全てのエラーを受け取るのでこういう書き方になる
try {
    // エラーを発生させる可能性のあるコード
    throw new Error("何かエラーが発生しました");
} catch (error) {
    if (error instanceof TypeError) {
        console.log("TypeErrorが発生しました:", error.message);
    } else if (error instanceof ReferenceError) {
        console.log("ReferenceErrorが発生しました:", error.message);
    } else {
        console.log("予期せぬエラー:", error.message);
    }
}
Errorオブジェクトのプロパティを使う例
// Errorオブジェクトを生成
const error = new Error("何か問題が発生しました");

// messageプロパティ: エラーメッセージを取得
console.log("Error message:", error.message);  // "何か問題が発生しました"

// nameプロパティ: エラーの名前(タイプ)を取得
console.log("Error name:", error.name);  // "Error"

// stackプロパティ: スタックトレースを取得
console.log("Stack trace:", error.stack);

// Error.stackTraceLimitの設定(この行はスタックトレースの深さを制限します)
Error.stackTraceLimit = 10;

// 新しいエラーを生成してスタックトレースを表示(stackTraceLimitに従う)
try {
    throw new Error("新しいエラー");
} catch (e) {
    console.log(e.stack);
}
throw で例外を投げる
// Errorオブジェクトを生成
const error = new Error("何か問題が発生しました");

// throwを使ってエラーを発生させる
try {
    // カスタムエラーメッセージを持つエラーを投げる
    throw error;
} catch (e) {
    // messageプロパティ: エラーメッセージを取得
    console.log("Error message:", e.message);  // "何か問題が発生しました"

    // nameプロパティ: エラーの名前(タイプ)を取得
    console.log("Error name:", e.name);  // "Error"

    // stackプロパティ: スタックトレースを取得
    console.log("Stack trace:", e.stack);
}
特殊演算子の利用法
console.log(typeof "Hello"); // "string"
console.log([] instanceof Array); // true
const obj = { name: "Alice" };
delete obj.name;
console.log(obj.name); // undefined
typeof
変数や値の型を返す。
console.log(typeof 123); // "number"
console.log(typeof "hello"); // "string"
instanceof
オブジェクトが特定のコンストラクタのインスタンスかどうかを判定します。
let arr = [];
console.log(arr instanceof Array); // true
in
オブジェクトに特定のプロパティが存在するかを判定します。
let obj = { name: "Alice" };
console.log("name" in obj); // true
yieldの使用例
ジェネレータ関数内で使われ、呼び出しごとに処理を一時停止し、次の呼び出し時に再開する
function* generateNumbers() {
  yield 1;
  yield 2;
  yield 3;
}

const gen = generateNumbers();
console.log(gen.next().value); // 1
console.log(gen.next().value); // 2
delete 演算子
- 削除できる
配列の要素
オブジェクトのプロパティ
- 削除できない
変数
関数
オブジェクト自体
削除できる
・配列の要素
・オブジェクトのプロパティ
メモ: 配列の値をdeleteしても要素数は変わらない
var emp = {no: 1, name: "A"};

delete emp.no; // emp オブジェクトから "no" プロパティを削除

console.log(emp.no); // undefined
配列の値をdeleteしても要素数は変わらない
var array = ["A", "B", "C"];
console.log("delete前: " + array.length); // delete前: 3


delete array[0];

console.log(array[0]); // undefined
console.log("delete後: " + array.length); // delete後: 3
削除できない
・変数
・関数
・オブジェクト自体
var emp = {no: 1, name: "A"};
var empNo = emp.no;

delete emp.no;  // emp オブジェクトから "no" プロパティを削除
delete empNo;   // 何も起こらない(empNo はプリミティブ値であり、削除できない)

console.log(emp.no); // undefined, "no" プロパティは削除されたため
console.log(empNo);  // 1, delete はプリミティブ値に影響を与えないため変わらず
withの使用例と注意点
withはオブジェクト内のプロパティを直接操作する際に使用される、
しかし曖昧なスコープを引き起こすため非推奨
const obj = { x: 10, y: 20 };
with (obj) {
  console.log(x + y); // 30
}
プロトタイプチェーン
オブジェクトが他のオブジェクトのプロパティやメソッドを継承できる仕組み
JavaScriptでは、すべてのオブジェクトは「プロトタイプ」という別のオブジェクトへの参照を持つ
オブジェクトのプロパティやメソッドをアクセスする際、JavaScriptはまずそのオブジェクト内を検索し、見つからなければプロトタイプチェーンをたどって検索を続ける。
最終的に Object.prototype にたどり着き、それ以上のプロトタイプがないと null で終わる
`alice` オブジェクトには `greet` プロパティがないので、`Person.prototype` をたどって `greet` メソッドを探す。
function Person(name) {
  this.name = name;
}

Person.prototype.greet = function() {
  console.log("Hello, my name is " + this.name);
};

let alice = new Person("Alice");
alice.greet(); // "Hello, my name is Alice"
クラスとプロトタイプ
両方ともオブジェクトのメソッドやプロパティを共有するための仕組み
ES6以降、class構文が導入された。オブジェクト指向プログラミングを更にシンプルに書けることが目的。prototypeを使った仕組みの上で構築されている
classを使うことでオブジェクト指向が直感的に分かりやすくなる
・継承の簡易さ
・コンストラクタの明確化
・静的メソッド/プロパティの明確化
・オーバーライドのsuper()
・newキーワードの使用
プロトタイプの継承
function Animal(name) {
  this.name = name;
}

Animal.prototype.speak = function() {
  console.log(this.name + " makes a sound.");
};

let dog = new Animal("Dog");
dog.speak(); // "Dog makes a sound"
function Animal(name) {
  this.name = name;
}

Animal.prototype.speak = function() {
  console.log(this.name + " makes a sound.");
};

function Dog(name) {
  Animal.call(this, name); // `Animal` のコンストラクタを呼び出し
}

Dog.prototype = Object.create(Animal.prototype);
Dog.prototype.constructor = Dog;

Dog.prototype.speak = function() {
  console.log(this.name + " barks.");
};

let dog = new Dog("Dog");
dog.speak(); // "Dog barks"
クラスの継承
class Animal {
  constructor(name) {
    this.name = name;
  }

  speak() {
    console.log(this.name + " makes a sound.");
  }
}

let dog = new Animal("Dog");
dog.speak(); // "Dog makes a sound"
class Animal {
  constructor(name) {
    this.name = name;
  }

  speak() {
    console.log(this.name + " makes a sound.");
  }
}

class Dog extends Animal {
  speak() {
    console.log(this.name + " barks.");
  }
}

let dog = new Dog("Dog");
dog.speak(); // "Dog barks"
コンストラクタの例
function Cat(name, type) {
    this.name = name;
    this.type = type
}
関数の3つの作成方法 注意点
関数宣言(関数名を付けて宣言):
巻き上げされる。
定義前に呼び出し可能。
thisの扱いに違いはない関数式(無名関数として宣言):
巻き上げされない。
定義前の呼び出しでエラーが出る。アロー関数:
外側のthisを継承するため、thisを使用する際に注意が必要。
巻き上げされない。即時実行関数
巻き上げられない
// 関数宣言
function greet() {
  console.log("Hello!");
}


// 関数式
// 変数に関数を格納
const greet = function() {
  console.log("Hello!");
};


// アロー関数
const greet = () => {
  console.log("Hello!");
};


(function() {
    console.log("この関数は定義された直後に実行されます。");
})();
巻き上げ
・変数宣言よりも前でも変数を使用できる
ただし、varのみ
letやconstではエラーとなる
・「巻き上げられる」のは宣言部分のみ
・初期化や代入は巻き上げられない
・関数の巻き上げは、
function 関数名()
巻き上げられる
変数名 = function ()
アロー関数
は巻き上げられない
varで巻き上げ
宣言のみ巻き上げられるので、
console.log(x) 時点は undefined
console.log(x); // undefined
var x = 10;
しかし、その後、値は入る
console.log(x);
var x = 10;
console.log(x); // 10上記の実際の動作イメージ:
var x;          // 変数の宣言だけが巻き上げられる
console.log(x); // undefined

x = 10;         // 初期化はその場で実行される
console.log(x); // 10
function 関数名() での関数宣言の巻き上げは以下となる
ただし、
変数名 = function 関数名
アロー関数での宣言
は巻き上げられず、undefinedとなる
greet(); // "Hello!"
function greet() {
  console.log("Hello!");
}
let/constで巻き上げは出来ない
letやconstでの変数宣言前に変数を使用できない
エラーが出る
console.log(x); // ReferenceError: Cannot access 'x' before initialization
let x = 10;

const y = 20;
console.log(y); // ReferenceError: Cannot access 'y' before initialization
関数宣言 function 関数名() {}
function greet() {
  console.log("Hello!");
}
巻き上げられる
関数宣言よりも前で関数を使用可能
greet(); // 実行可能
function greet() {
  console.log("Hello!");
}
関数式 変数名 = 関数名() {}
const greet = function() {
  console.log("Hello!");
};
巻き上げられない
関数宣言よりも前で、関数を宣言できない
greet(); // TypeError: greet is not a function
const greet = function() {
  console.log("Hello!");
};
アロー関数 関数名 = () => {}
const greet = () => {
  console.log("Hello!");
};
巻き上げられない
関数宣言よりも前で、関数を宣言できない
greet(); // TypeError: greet is not a function

const greet = () => {
  console.log("Hello!");
};
thisの扱い
person内の `this.name`はpersonではなくグローバルを指す
personのnameではない
const person = {
  name: "Alice",
  greet: () => {
    console.log(`Hello, ${this.name}`); // `this`はpersonではなくグローバルを指す
  }
};
person.greet(); // "Hello, undefined"
this
グローバルコンテキスト
ブラウザ環境下ではthisはwindow, つまりグローバルオブジェクトを指す
console.log(this === window); // true
// windowオブジェクトに新しいプロパティを設定
window.myValue = "Hello, world!";

// グローバルコンテキストでthisがwindowオブジェクトと等しいか確認
console.log(this === window); // true

// 設定したプロパティを表示
console.log(this.myValue); // "Hello, world!"
関数コンテキスト
通常の関数内では、thisはデフォルトでグローバルオブジェクト(window)を指す
function test() {
    console.log(this === window); // true
}
test();
strictモードのメソッド呼び出し
strictモードの場合、通常の関数呼び出しでthisはundefinedとなる
function testStrict() {
    'use strict';
    console.log(this === window); // false, thisはundefined
}
testStrict();
オブジェクト内のメソッドとしての関数
このthisはオブジェクト自身を指す
なので this === window はfalseとなる
const obj = {
    method: function() {
        console.log(this === window); // false, thisはobjを指す
    }
};
obj.method();
const obj = {
    name: "Tom",
    method: function() {
        console.log(this); // { name: 'Tom', method: [Function: method] }
    }
};
obj.method();
アロー関数
このthisは外側のスコープのthisを継承する
グローバルスコープで呼び出された場合、this === window はtrue
const arrowFunc = () => {
    console.log(this === window); // true if called in the global scope
};
arrowFunc();
ガーベージコレクションの基本
JavaScriptでは不要になったオブジェクトはガーベージコレクション(GC)によって解放される
・使用中(参照されている)のオブジェクトは保持
・参照されなくなったオブジェクトはメモリから解放
ガーベージコレクションの例)
オブジェクトが不要になった
let obj = { name: "Alice" };
// objが不要になったら
obj = null; // GCの対象になる
ガーベージコレクションの対象になる/ならない場合
オブジェクト型にundefinedを代入した場合、対象になる
オブジェクトへの参照をundefinedに変更すると、そのオブジェクトへの参照が削除される。
他にそのオブジェクトを参照している変数やプロパティがない限り、オブジェクトはGCの対象となる
この場合、objが最初に参照していたオブジェクトは、他に参照がなければガーベージコレクションの対象になる
var obj = { name: "Example" }; // オブジェクトへの参照を作成
obj = undefined; // 参照をundefinedに変更

// この時点で、最初に作成したオブジェクト { name: "Example" } への参照は存在しない
プリミティブ型にundefinedを代入した場合、対象にならない:
プリミティブ値(数値、文字列、ブール値など)は、
他の変数やオブジェクトのプロパティとして再代入されることなく独立して存在する。
undefinedを代入してもガーベージコレクションの対象にはならない。
let primitiveValue = 42; // プリミティブ値(数値)
primitiveValue = undefined; // プリミティブ値に undefined を代入

// プリミティブ値(42)は独立した値であり、GC の対象にはならない。
console.log(primitiveValue); // undefined
ローカルスコープの変数は関数の実行が終了しても、すぐに対象にならない
関数の実行が終了しても参照されてないとは限らないため
delete演算子で削除されたプロパティも、すぐに対象にならない
削除されたプロパティの値が他に参照されていない -> 対象になる
削除後も他の場所で値が引き続き参照されている -> 対象にならない
クロージャの使用例と注意点
直接外部からアクセスされたくない変数があっても扱うことが出来る
1) 関数内で変数を定義する
2) その変数をreturnする内部関数を作成
3) 関数内の変数が外部でも使用できる
秘匿したい変数の例)
・カウンターの値
・設定情報
・APIキーなど認証情報
function createCounter() {
  let count = 0;
  return function() {
    return ++count;
  };
}

const counter = createCounter();
console.log(counter()); // 1
console.log(counter()); // 2
function createCounter() {
    let count = 0;
    return function() {
        count++;
        return count;
    };
}

const counter = createCounter();
console.log(counter()); // 出力: 1
console.log(counter()); // 出力: 2
console.log(counter()); // 出力: 3
function myCatName() {
    var catName = "Lum";
    function closure() {
        return catName;
    }

    return closure; // catNameを返す
}

var test = myCatName();

console.log(test()); // Lum
グローバルオブジェクトとCallオブジェクトの使用例
グローバルオブジェクト:window(ブラウザ)やglobal(Node.js)
Callオブジェクト:関数のthisコンテキストを指定する際にcallやapplyで使用
function sayHello() {
  console.log(this.message);
}

const obj = { message: "Hello" };
sayHello.call(obj); // "Hello"
グローバルオブジェクトの使用例と注意点
グローバルオブジェクト(windowやglobal)はどこからでもアクセスできるため、設定やメソッドを保持する用途で使われる
window.globalVar = "I am global"; // ブラウザでの例
console.log(window.globalVar); // "I am global"
注意点: グローバル変数が増えると、名前の衝突や予期しないエラーが発生するリスクが高まるため、使用は最小限に抑えることが推奨される
ビルトインオブジェクト
Mathオブジェクト
すべてのメソッドは静的メソッドで、インスタンスを生成する必要はない
// 定数の使用例
console.log(Math.PI); // 3.141592653589793

// 四捨五入
console.log(Math.round(4.5)); // 5

// 切り上げ
console.log(Math.ceil(4.1)); // 5

// 切り捨て
console.log(Math.floor(4.9)); // 4

// 絶対値
console.log(Math.abs(-10)); // 10

// 乱数生成(0以上1未満のランダムな数)
console.log(Math.random()); // 例: 0.345678

// 最大・最小値を取得
console.log(Math.max(1, 5, 10, 20)); // 20
console.log(Math.min(1, 5, 10, 20)); // 1

// 数値の累乗
console.log(Math.pow(2, 3)); // 8(2の3乗)
console.log(2 ** 3); // ES6以降、`**`演算子でも可能
Dateオブジェクト
// 現在の日付と時刻を取得
const now = new Date();
console.log(now); // 例: 2024-11-10T10:23:00.000Z

// 特定の日付を指定して作成
const specificDate = new Date(2024, 10, 10, 15, 30); // 年, 月(0基準), 日, 時, 分
console.log(specificDate); // 例: 2024-11-10T06:30:00.000Z(時差による)

// Unixタイムスタンプから日付を作成
const timestampDate = new Date(1609459200000); // 例: 2021年1月1日
console.log(timestampDate);

// 各種情報の取得
console.log(now.getFullYear()); // 年を取得(例: 2024)
console.log(now.getMonth()); // 月を取得(0基準: 0=1月, 10=11月)
console.log(now.getDate()); // 日を取得
console.log(now.getDay()); // 曜日を取得(0=日曜日, 1=月曜日)

// ミリ秒の取得
console.log(now.getTime()); // Unixエポック(1970年1月1日)からの経過ミリ秒

// 日付の比較
const date1 = new Date(2024, 0, 1);
const date2 = new Date(2024, 11, 31);
console.log(date1 < date2); // true
windowオブジェクト
・JavaScriptのグローバルオブジェクト
・ブラウザのウィンドウやタブを表す
・ウィンドウサイズなどの情報を扱う
・postMessage()はドメイン間通信を行う
ウィンドウオブジェクトでできること・主な機能
HTML要素の操作
documentオブジェクトを介して、HTML要素の操作が可能
window.document.title ページのタイトル取得
window.document.body.style.xxxxxxxx
console.log(window.document.title); // 現在のページタイトルを取得
window.document.body.style.backgroundColor = "lightblue"; // 背景色を変更
アラートやプロンプトを表示
window.alert
window.prompt
window.alert("これはアラートダイアログです"); // アラート表示
let userInput = window.prompt("名前を入力してください"); // 入力を求めるダイアログ
console.log(userInput);
非同期処理
setTimeout, setIntervalを使う
window.setTimeout(() => {
  console.log("2秒後に実行されます");
}, 2000);

let intervalId = window.setInterval(() => {
  console.log("1秒ごとに実行されます");
}, 1000);

window.clearInterval(intervalId); // タイマーを停止
新しいウィンドウやタブの操作、ウィンドウサイズの取得
ページを開く
window.open("ページのURL")
ウィンドウの幅と高さを取得
window.innerWidth
window.innerHeight
ページを閉じる
let newWindow = window.open("ページのURL")
newWindow.close()
let newWindow = window.open("https://example.com", "_blank", "width=600,height=400"); // 新しいタブを開く
console.log(window.innerWidth); // ウィンドウの幅を取得
console.log(window.innerHeight); // ウィンドウの高さを取得
newWindow.close(); // 開いたウィンドウを閉じる
ローカルストレージとセッションストレージ
window.localStorage.setItem("username", "Alice"); // データを保存
console.log(window.localStorage.getItem("username")); // データを取得
イベントリスナーを設定しイベントを追加
window.addEventListner("xx", () => {
})
window.addEventListener("resize", () => {
  console.log("ウィンドウのサイズが変更されました");
});

window.addEventListener("scroll", () => {
  console.log("ページがスクロールされました");
});
ナビゲーションとリダイレクト
現在のURLを取得したり、新しいURLに移動する
console.log(window.location.href); // 現在のURLを取得
window.location.href = "https://example.com"; // ページをリダイレクト
ブラウザ履歴の操作
Historyオブジェクトを使う
window.history.back(); // 前のページに戻る
window.history.forward(); // 次のページに進む
JavaScriptコードを実行
window.eval("console.log('スクリプト実行')"); // 実行されるが注意
フルスクリーンモードに切り替える
document.documentElement.requestFullscreen(); // フルスクリーンに切り替え
document.exitFullscreen(); // フルスクリーンを終了
Selectors API
Selectors API自体はdocumentオブジェクトの一部として提供される
JavaScriptを使用してDOM要素やブラウザの履歴、URL情報を操作する
DOM要素を選択するために、CSSセレクターと同じ構文を使用する
querySelector
最初に一致した要素のみを取得。
window.document.querySelectorquerySelectorAll
すべて一致した要素をNodeListとして取得。
window.document.querySelectorAll
// Selectors APIはdocumentオブジェクトから利用される
const element = window.document.querySelector(".example");
console.log(element);
// 最初のdiv要素を取得
const firstDiv = document.querySelector("div");
console.log(firstDiv);

// class="example" のすべての要素を取得
const allExamples = document.querySelectorAll(".example");
allExamples.forEach(element => console.log(element));

// id="main" の要素を取得
const main = document.querySelector("#main");
console.log(main);
History API
History APIは、window.historyとして提供される
前後のページに移動したり、現在の履歴スタックを変更する
history.back(): 前のページに戻る。
history.forward(): 次のページに進む。
history.go(n): 履歴スタック内を相対的に移動。
history.pushState(): 現在の履歴スタックに新しいエントリを追加。
history.replaceState(): 現在の履歴エントリを置き換える。
// History APIはwindow.historyを通じて利用可能
window.history.pushState({ page: 1 }, "Page 1", "/page1");
console.log(window.history.state); // { page: 1 }
// 前のページに戻る
history.back();

// 次のページに進む
history.forward();

// 2つ前のページに移動
history.go(-2);

// 新しい状態を追加
history.pushState({ page: 1 }, "Page 1", "/page1");
console.log(history.state); // { page: 1 }

// 現在の状態を置き換える
history.replaceState({ page: 2 }, "Page 2", "/page2");
console.log(history.state); // { page: 2 }
Location API
Location APIは、window.locationとして提供される
現在のページのURL情報にアクセスしたり、ページをリダイレクトする
location.href
現在のページの完全なURL
location.protocol
URLのプロトコル(例: http:)
location.host
ホスト名とポート番号(例: example.com:80)
location.hostname
ホスト名(例: example.com)
location.port
ポート番号
location.pathname
パス名(例: /path/to/page)
location.search
クエリ文字列(例: ?id=123)
location.hash
ハッシュ部分(例: #section )
// Location APIはwindow.locationを通じて利用可能
console.log(window.location.href); // 現在のURL
window.location.href = "https://example.com"; // ページをリダイレクト
// URL情報を取得
console.log(location.href); // 現在のページのURL
console.log(location.pathname); // パス名
console.log(location.search); // クエリ文字列

// ページをリダイレクト
location.href = "https://example.com";

// ページを再読み込み
location.reload();

// 特定のURLにジャンプ
location.assign("https://example.com");

// 現在のURLを置き換える(履歴は変更されない)
location.replace("https://example.com");
Arrayオブジェクト
push(), pop() 以外にもこういうのがある
concat()
var array1 = ['a', 'b', 'c'];
var array2 = ['d', 'e', 'f'];
var array3 = array1.concat(array2);

console.log(array3); // ["a", "b", "c", "d", "e", "f"]
concat()はaddAll()とは違う
元の配列は変更せず、新しい配列を戻り値として返すので、長さは変わらない
var array1 = ['a', 'b', 'c'];
array1.concat(['d', 'e']);

console.log(array1.length);
sort()
var months = ['March', 'Jan', 'Feb', 'Dec'];
months.sort();
console.log(months); // ["Dec", "Feb", "Jan", "March"]
forEach()
var array = ['a', 'b', 'c'];

array.forEach(function(element, index) {
  console.log(index, element);
});
// 出力:
// 0 'a'
// 1 'b'
// 2 'c'
DateオブジェクトのgetMonth(), getDate(), getDay()の注意点
getDate() のみ 1から数える
getMonth(), getDay() は0から始まる
getMonth()
0, 1, 2, 3….
getDate()
1, 2, 3, 4……..
getDay()
0, 1, 2, 3….
getMonth()
0から始まる数値で返す
1月は0、2月は1、...、12月は11
var date = new Date(2023, 8, 1); // 2023年9月1日
console.log(date.getMonth()); // 8 (0から数えるため、8は9月を表す)
getDate()
1から数える
var date = new Date(2023, 8, 1); // 2023年9月1日
console.log(date.getDate()); // 1
getDay()
日曜日を0とする
土曜日を6とする
0  1  2  3  4  5  6
日 月 火 水  木 金  土
var date = new Date(2023, 8, 1); // 2023年9月1日、金曜日
console.log(date.getDay()); // 5 (日曜日が0、金曜日は5)
RegExpオブジェクト
注意: match()とreplace()はない
(Stringオブジェクトにはある)
test()
文字列が正規表現にマッチするか真偽値を返す
var regex = /hello/;
console.log(regex.test("hello world")); // true
exec()
一致した結果を返す
var regex = /ab*/g;
var result = regex.exec("abc abd ab abm");
console.log(result[0]); // "ab"
Mathオブジェクト
Math.PI 円周率
数学定数π(パイ)の値
値: 約3.14159
Math.E 自然対数
自然対数の底e の値
値: 約2.71828
Math.ceil() 切り上げ
数値を切り上げる
Math.ceil(4.2) は 5 を返す
// 切り上げ
console.log(Math.ceil(4.1));
Math.floor() 切り捨て
数値を切り捨てる
Math.floor(4.8) は 4 を返す
// 切り下げ
console.log(Math.floor(4.9));
Math.round() 四捨五入
四捨五入する
Math.round(4.5) は 5、Math.round(4.4) は 4を返す
// 四捨五入
console.log(Math.round(4.5));
console.log(Math.round(4.4));
イベントハンドラとイベントリスナ
イベントハンドラやイベントリスナで設定する
・イベントハンドラは1つのイベントしか設定できない
・イベントリスナは2つ以上のイベントを設定できる
・設定済のイベントハンドラ/イベントリスナを削除できる
イベントハンドラ
var button = document.getElementById("btn");
button.onclick = function() {
    alert("Hello");
};
イベントハンドラを削除する
nullを代入する
var button = document.getElementById("btn");
button.onclick = function() {
    alert("Hello");
};

button.onclick = null;
イベントリスナ
var button = document.getElementById("btn");
function btnClick() {
    alert("Hello");
}

button.addEventListener("click", btnClick, true);
イベントリスナは複数設定できる
var button = document.getElementById("btn");

function btnClick() {
    alert("Hello");
}

function logMessage() {
    console.log("Button was clicked!");
}

// Add multiple event listeners to the same button
button.addEventListener("click", btnClick, true);
button.addEventListener("click", logMessage, true);
イベントリスナを削除する
removeEventListenerを使う
var button = document.getElementById("btn");
function btnClick() {
alert("Hello");
}
button.addEventListener("click", btnClick, true);
button.removeEventListener("click", btnClick, true);正しいイベントリスナの書き方
addEventListener("イベント名", 関数名, true/false)
なので、
onclickではなくclick
foo() ではなくfoo
xxxx.addEventListener("click", foo, true);間違いの例
xxxx.addEventListener("onclick", foo(), true);
間違い:
"onclick" はイベントハンドラ名
foo() は関数が呼び出される。イベントリスナとして関数そのものを渡す必要があるので、fooと書く
正しい書き方:xxxx.addEventListener("click", foo, true);
xxxx.addEventListener("onclick", foo, true);
間違い:
"onclick" はイベントハンドラ名
正しい書き方:xxxx.addEventListener("click", foo, true);
xxxx.addEventListener("click", foo(), true);
間違い:
foo()ではなくfooと書く
正しい書き方:xxxx.addEventListener("click", foo, true);
イベントリスナはバブリングを設定できる
イベントリスナの第3引数で設定する
指定がない場合はデフォルトでfalseとなる
・親要素をクリックしたら親要素のイベントだけ発生する
・子要素をクリックしたら親要素のイベントも発生する
・第3引数にtrue, falseを設定し、
親要素と子要素のイベントの発生順を変えられる
キャプチャフェーズ(true)
addEventListener の第三引数に true を設定する
親要素から子要素への方向でイベントが伝播する
つまり、
1) 最上位の親要素(例えば document オブジェクト)
2) イベントのターゲット(イベントが発生した要素)
に向かってイベントが起動する
INNERをクリックした場合:
"OUTER"
"INNER"
OUTERをクリックした場合:
"OUTER"
<div id="outer">
OUTER
<p id="inner">
INNER
</p>
</div>
var outer = document.getElementById("outer");
outer.addEventListener("click", function() {
console.log("OUTER");
}, true);
var inner = document.getElementById("inner");
inner.addEventListener("click", function() {
console.log("INNER");
}, true);バブリングフェーズ(false)
addEventListener の第三引数に false を設定する
(または何も指定しないとデフォルトでfalse)
子要素から親要素への方向でイベントが伝播する
1) ターゲット要素で発生
2) 最終的にはドキュメントのルート(document)
に向かってイベントが起動する
INNERをクリックした場合:
"INNER"
"OUTER"
OUTERをクリックした場合:
"OUTER"
<div id="outer">
OUTER
<p id="inner">
INNER
</p>
</div>
var outer = document.getElementById("outer");
outer.addEventListener("click", function() {
console.log("OUTER");
}, false);
var inner = document.getElementById("inner");
inner.addEventListener("click", function() {
console.log("INNER");
}, false);JavaScriptイベント
フォームに関するイベント
focus: 入力フィールドがフォーカスされたとき。
blur: 入力フィールドからフォーカスが外れたとき。
input: ユーザーが入力フィールドに文字を入力したとき。
change: 選択フィールドの選択肢が変更されたとき。
contextmenu: 入力フィールド上で右クリックメニューが開かれたとき。
invalid: 不正な値を入れた場合
例えばrequiredを付けたフォームが空のまま
select: 入力フィールド内のテキストが選択されたとき。
submit: フォームが送信されたとき。
<!DOCTYPE html>
<html lang="en">
<head>
<meta charset="UTF-8">
<title>Form Events Example</title>
<script>
document.addEventListener('DOMContentLoaded', function () {
const form = document.getElementById('form');
const input = document.getElementById('input');
const select = document.getElementById('select');
// Focus event
input.addEventListener('focus', function () {
console.log('Input field is focused');
});
// Blur event
input.addEventListener('blur', function () {
console.log('Input field has lost focus');
});
// Input event
input.addEventListener('input', function () {
console.log('User typed in the input field: ' + input.value);
});
// Change event
select.addEventListener('change', function () {
console.log('Selection changed to: ' + select.value);
});
// Context menu event
input.addEventListener('contextmenu', function (event) {
console.log('Context menu opened on input field');
event.preventDefault(); // Prevent the context menu from opening
});
// Invalid event
input.addEventListener('invalid', function () {
console.log('Invalid input detected');
});
// Select event
input.addEventListener('select', function () {
console.log('Text selected in input field');
});
// Submit event
form.addEventListener('submit', function (event) {
event.preventDefault(); // Prevent actual form submission
console.log('Form submitted');
});
});
</script>
</head>
<body>
<form id="form">
<label for="input">Enter text:</label>
<input type="text" id="input" required>
<label for="select">Choose option:</label>
<select id="select">
<option value="option1">Option 1</option>
<option value="option2">Option 2</option>
<option value="option3">Option 3</option>
</select>
<button type="submit">Submit</button>
</form>
</body>
</html>
キーボードに関するイベント
keydown: キーを押したとき。
keyup: キーから手を離したとき。
keypress: キーを押している間
<!DOCTYPE html>
<html lang="en">
<head>
<meta charset="UTF-8">
<title>Keyboard Event Example</title>
<script>
document.addEventListener('DOMContentLoaded', function () {
const input = document.getElementById('input');
// Keydown event
input.addEventListener('keydown', function (event) {
console.log('Key down: ' + event.key);
});
// Keypress event
input.addEventListener('keypress', function (event) {
console.log('Key press: ' + event.key);
});
// Keyup event
input.addEventListener('keyup', function (event) {
console.log('Key up: ' + event.key);
});
});
</script>
</head>
<body>
<label for="input">Type here:</label>
<input type="text" id="input">
</body>
</html>
キーボードイベントの入力情報
KeyboardEventのプロパティ
code キーコードを取得
key キーの値を取得
<div>押されたキーの「code」: <span id="keyCode"></span></div>
<div>押されたキーの「key」: <span id="keyValue"></span></div>
document.addEventListener('keydown', function(event) {
// キーイベントのデータを取得
const keyCode = event.code; // キーのコード(位置)
const keyValue = event.key; // キーの値(文字)
// HTMLに表示
document.getElementById('keyCode').textContent = keyCode;
document.getElementById('keyValue').textContent = keyValue;
// ブラウザでのデフォルトのキーアクションを防ぐ(例:スペースでのページスクロール防止)
event.preventDefault();
});フォームを送信/リセットするメソッド
submit(), reset()
<button type="button" id="submitBtn">Submit Form</button>
<button type="button" id="resetBtn">Reset Form</button>
// エレメントを取得
var form = document.getElementById('myForm');
var submitBtn = document.getElementById('submitBtn');
var resetBtn = document.getElementById('resetBtn');
// submitボタンのクリックイベントハンドラ
submitBtn.addEventListener('click', function() {
form.submit(); // フォームを送信
});
// resetボタンのクリックイベントハンドラ
resetBtn.addEventListener('click', function() {
form.reset(); // フォームをリセット
});e.preventDefault() を使用してフォーム送信を制御する
デフォルトのイベントの処理を発生させないようにする
<form id="myForm">
<label for="username">ユーザー名:</label>
<input type="text" id="username" name="username" required>
<button type="submit">送信</button>
</form>
<div id="result"></div>
document.getElementById('myForm').addEventListener('submit', function(event) {
event.preventDefault(); // フォームのデフォルトの送信動作を防ぐ
const username = document.getElementById('username').value;
// 結果を表示するための領域を取得
const resultDiv = document.getElementById('result');
// 入力されたユーザー名を表示(ここではサーバーへの送信は行わない)
resultDiv.textContent = '送信されたユーザー名: ' + username;
// 実際のアプリケーションではここで AJAX リクエストを使ってサーバーにデータを送信することができる
});
マウス操作に関するイベント
click: 単一のマウスボタンが押されて放されたとき
dblclick: 同一の要素上で二回連続してクリックが行われた時
mousedown: 要素の上でマウスボタンが押さた時
mouseup: 要素上でマウスボタンが放された時
mousemove: 要素上でマウスが動かされた時
mouseover: マウスポインタが要素のエリアに入った時
mouseout: マウスポインタが要素のエリアを離れた時
mousewheel: マウスのホイールが回転した時
scroll: 要素がスクロールされた時
drag: 要素やテキスト選択がドラッグされるとき
dragstart: ユーザーが要素またはテキスト選択のドラッグを開始した時
dragend: ドラッグ操作が終了した時
dragenter: ドラッグされた要素が有効なドロップ対象に入った時
dragover: ドラッグされた要素が有効なドロップ対象上を移動した時
dragleave: ドラッグされた要素が有効なドロップ対象を離れた時
drop: 要素が有効なドロップ対象上にドロップされた時
<!DOCTYPE html>
<html lang="en">
<head>
<meta charset="UTF-8">
<title>Mouse and Drag Event Description Example</title>
<style>
#eventArea {
width: 300px;
height: 300px;
border: 2px dashed #ccc;
margin: 20px;
position: relative;
overflow: auto;
padding: 10px;
}
#dragArea {
width: 100%;
height: 100px;
background-color: #f0f0f0;
border: 1px solid #000;
color: #333;
line-height: 100px;
text-align: center;
margin-top: 20px;
}
</style>
</head>
<body>
<div id="eventArea">
<p>Interact with mouse or drag files here.</p>
<div id="dragArea">Drag files over this area!</div>
</div>
<script>
const eventArea = document.getElementById('eventArea');
const dragArea = document.getElementById('dragArea');
const logEvent = (event) => {
console.log(event.type + ' event detected at (' + event.clientX + ', ' + event.clientY + ')');
};
// Mouse events
eventArea.addEventListener('click', () => logEvent('Click: Single mouse button press and release'));
eventArea.addEventListener('dblclick', () => logEvent('DoubleClick: Two clicks in quick succession on the same element'));
eventArea.addEventListener('mousedown', () => logEvent('MouseDown: Mouse button is pressed on an element'));
eventArea.addEventListener('mouseup', () => logEvent('MouseUp: Mouse button is released over an element'));
eventArea.addEventListener('mousemove', () => logEvent('MouseMove: Mouse is moved over an element'));
eventArea.addEventListener('mouseover', () => logEvent('MouseOver: Mouse pointer enters the element area'));
eventArea.addEventListener('mouseout', () => logEvent('MouseOut: Mouse pointer leaves the element area'));
eventArea.addEventListener('mousewheel', () => logEvent('MouseWheel: Wheel or similar device is rotated'));
eventArea.addEventListener('scroll', () => logEvent('Scroll: Element is scrolled'), true); // Use capture for scrolling
// Drag events
dragArea.addEventListener('drag', () => logEvent('Drag: Element or text selection is being dragged'));
dragArea.addEventListener('dragstart', () => logEvent('DragStart: The user starts dragging an element or text selection'));
dragArea.addEventListener('dragend', () => logEvent('DragEnd: A drag operation is being ended (by releasing a mouse button or hitting the escape key)'));
dragArea.addEventListener('dragenter', () => logEvent('DragEnter: Dragged element enters a valid drop target'));
dragArea.addEventListener('dragover', (event) => {
event.preventDefault(); // Necessary for enabling drop
logEvent('DragOver: An element or text selection is being dragged over a valid drop target');
});
dragArea.addEventListener('dragleave', () => logEvent('DragLeave: Dragged element leaves a valid drop target'));
dragArea.addEventListener('drop', (event) => {
event.preventDefault();
logEvent('Drop: An element is dropped on a valid drop target');
});
// Allow drop
dragArea.addEventListener('dragover', (event) => {
event.preventDefault(); // Allow drop
});
</script>
</body>
</html>
タッチ操作に関するイベント
touchstart: ユーザーが指一本以上でタッチスクリーンに触れた時
touchmove: ユーザーがタッチスクリーン上で指を動かしている間
touchend: ユーザーがタッチスクリーンから指を離した時
<!DOCTYPE html>
<html lang="en">
<head>
<meta charset="UTF-8">
<meta name="viewport" content="width=device-width, initial-scale=1.0">
<title>Touch Events Example</title>
<style>
#touchArea {
width: 300px;
height: 300px;
background-color: #f4f4f4;
border: 2px solid #ccc;
margin: 20px;
display: flex;
align-items: center;
justify-content: center;
text-align: center;
}
</style>
</head>
<body>
<div id="touchArea">
Touch here
</div>
<script>
const touchArea = document.getElementById('touchArea');
touchArea.addEventListener('touchstart', function(event) {
console.log('Touch started at position (' + event.touches[0].pageX + ', ' + event.touches[0].pageY + ')');
});
touchArea.addEventListener('touchmove', function(event) {
// Prevent the window from scrolling
event.preventDefault();
console.log('Touch moved to position (' + event.touches[0].pageX + ', ' + event.touches[0].pageY + ')');
}, { passive: false });
touchArea.addEventListener('touchend', function(event) {
console.log('Touch ended');
});
</script>
</body>
</html>
document.formsプロパティ
1)
document.forms[インデックス]
2)
document.forms.フォーム名
3)
document.forms["フォーム名"]
<form name="loginForm">
<input type="text" name="username">
<input type="password" name="password">
<input type="submit" value="Login">
</form>
// document.forms[インデックス]
document.forms[0]
// document.forms.フォーム名
document.forms.loginForm;
// document.forms["フォーム名"]
document.forms["loginForm"];form内のinputのアクセス
document.forms.loginForm.username
document.forms.loginForm.password要素.onload
window.onload
DOMContentLoaded の読み込み
起動が早い順:
1) DOMContentLoaded
HTMLドキュメントが完全に読み込まれて解析された時点で起動する
(画像やスタイルシートは読み込まれなくても起動する)
2) 要素.onload
指定された単一の要素がロードされた後に起動
3) window.onload
ページ全体(すべての依存リソースを含む)がロードされた後に起動
document.addEventListener('DOMContentLoaded', function() {
console.log('DOMが完全に読み込まれました。');
});
var image = document.getElementById('myImage');
image.onload = function() {
console.log('画像が読み込まれました。');
};
window.onload = function() {
console.log('すべてのリソースが読み込まれました。');
};
イベントの非同期処理を実現する方法
複数の処理を一時停止せずに進行し、別の処理が完了するのを待たずに後続の処理を実行する
非同期処理を使う方法:
・コールバック関数
・Promise
・async / await
・setTimeout
・Ajax通信
コールバック関数
function fetchData(callback) {
setTimeout(() => {
callback('データが取得されました');
}, 1000); // 1秒後にコールバックを実行
}
fetchData((data) => {
console.log(data); // データが取得されました
});
Promise
.then()、.catch()、および .finally() メソッドを使う
function fetchData() {
return new Promise((resolve, reject) => {
setTimeout(() => {
resolve('データが取得されました');
}, 1000);
});
}
fetchData()
.then(data => console.log(data)) // データが取得されました
.catch(error => console.error(error))
.finally(() => console.log('非同期処理が完了しました'));
async / await
async function fetchData() {
return new Promise((resolve, reject) => {
setTimeout(() => {
resolve('データが取得されました');
}, 1000);
});
}
async function run() {
try {
const data = await fetchData();
console.log(data); // データが取得されました
} catch (error) {
console.error(error);
} finally {
console.log('非同期処理が完了しました');
}
}
run();
setTimeout
指定した時間が経過した後に関数を一度だけ実行するための関数
指定された遅延時間(ミリ秒)後に、関数が非同期的に実行される
1000ミリ秒 = 1秒
setTimeout(() => {
console.log("This will be logged after 2 seconds");
}, 2000);
Ajax通信
ページ全体を再読み込みせずに、非同期でデータをサーバーとやり取りする技術
下記を使って実現する
XMLHttpRequest
fetch API
jQuery Ajax
fetch APIを使った例
fetch("https://jsonplaceholder.typicode.com/posts")
.then(response => {
if (!response.ok) {
throw new Error("Network response was not ok");
}
return response.json();
})
.then(data => console.log(data))
.catch(error => console.error("Fetch error:", error));
innerHTMLは += で連結できる
= を使うと上書きされる
<div id="example">Hello</div>
const div = document.getElementById("example");
div.innerHTML = "Goodbye"; // これにより "Hello" は "Goodbye" に置き換わる
<div id="example">Hello</div>
const div = document.getElementById("example");
div.innerHTML += ", World!"; // "Hello" に ", World!" を追加し、"Hello, World!" document.createAttributeとdocument.setAttributeの違いは
setAttribute は属性を設定
createAttributeは新しい要素を作成する
<div id="example">Hello, world!</div>
var div = document.getElementById("example");
// document.createAttribute (非推奨)
var newAttr = document.createAttribute("data-info");
newAttr.value = "some info";
div.setAttributeNode(newAttr);
// element.setAttribute (推奨)
div.setAttribute("data-role", "page");
console.log(div.getAttribute("data-info")); // some info
console.log(div.getAttribute("data-role")); // pageCanvas
これらは画像ファイルを読み込まなくても画像を作成、表示できること、
ブラウザにデータを保存できることが利点となる。
Canvas
画像ファイルを事前に用意しなくても動的に画像やグラフィックを
生成し、表示するためのツール
ゲームやインタラクティブなアプリケーションのグラフィック処理に
適している
LocalStorage / SessionStorage
ブラウザ内にデータを保存できる仕組み
アプリの状態やユーザー設定などのデータ保存に役立つ
保存容量の制限とセキュリティ面での配慮が必要
HTML5で導入されたグラフィックス要素
JavaScriptを使って動的に画像や図形を描画できる機能
利点:
動的な画像生成と表示:
画像ファイルを事前に用意しなくても、JavaScriptで描画することで画像やグラフィックを生成・表示できる。
図形の描画、テキストの配置、エフェクトの追加などが可能インタラクティブな操作:
ユーザーのマウス操作やタッチ入力と連動してリアルタイムに描画が可能リアルタイムな画像処理:
画像を直接編集・加工できる
リアルタイムでフィルタやエフェクトを適用できる
CanvasとSVGの違い
HTMLでは画像ファイルが無くてもブラウザ上に画像ファイルを表示できる CanvasとSVGがその機能
Canvasはアニメーションやゲームなど動的なグラフィック
SVGはアイコンやロゴなど解像度の影響を受けないグラフィック
にそれぞれ適する
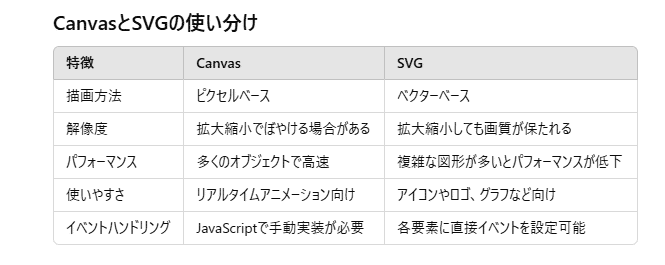
Canvasは、HTML5で導入された2Dグラフィックスの描画用の要素
JavaScriptを使ってピクセル単位で画像や図形を描画する
・ピクセル単位で描画する
-> 画像やグラフィックスを細かく制御できる
高精細なグラフィックやアニメーションに向いている
・JavaScriptでリアルタイムに描画できる
-> ゲーム、アニメーションに適している
・Canvasはアニメーションを描画する機能はなく、
更新がない限り静止画のまま
-> リアルタイムに描画内容を更新するのでアニメーションとなる
<canvas id="myCanvas" width="200" height="200"></canvas>
<script>
const canvas = document.getElementById("myCanvas");
const ctx = canvas.getContext("2d");
// 円を描画
ctx.beginPath();
ctx.arc(100, 100, 50, 0, 2 * Math.PI);
ctx.fillStyle = "blue";
ctx.fill();
</script>
SVGは、XMLベースのベクターグラフィックス形式
HTMLドキュメントに直接記述する
JavaScriptを使わなくても画像や図形を表示できる
・SVGは数式で描画する
-> 拡大、縮小しても画質が劣化しない
・SVG内の図形やパスは独立した要素として扱われる
CSSやJavaScriptでそれぞれにスタイルやアニメーションを適用できる
・SVG内の個々の要素に対して、イベントを設定できる(クリックなど)
<svg width="200" height="200">
<circle cx="100" cy="100" r="50" fill="blue" />
</svg>
localstorage/sessionstorage
利点:
ブラウザ内にデータを保存:
サーバーを使わずにブラウザ内にデータを保存できる
ユーザーの設定やアプリの状態などを保存して再利用が可能LocalStorage
データを永続的に保存
ブラウザを閉じたりPCを再起動してもデータが維持される。SessionStorage
データをページのセッション(タブやウィンドウ)が終了するまで保存
タブやブラウザを閉じると削除される
データの読み書きが簡単:
キーと値のペアでデータを保存する画像データの保存:
画像データをBase64形式に変換すれば、LocalStorageやSessionStorageにも保存可能
ただし、保存できるデータ量には上限がある